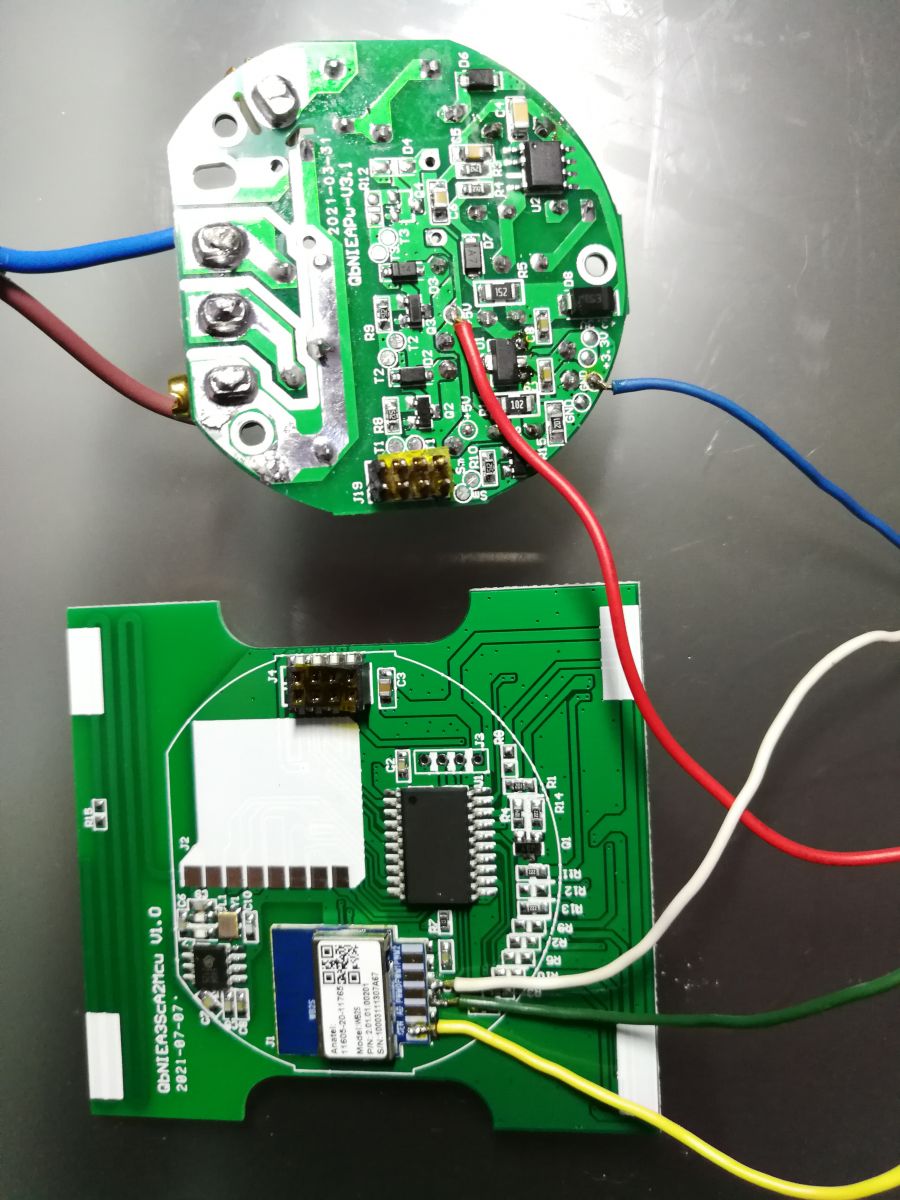
What hardware sits inside the MOES 2-Gang wall switch?
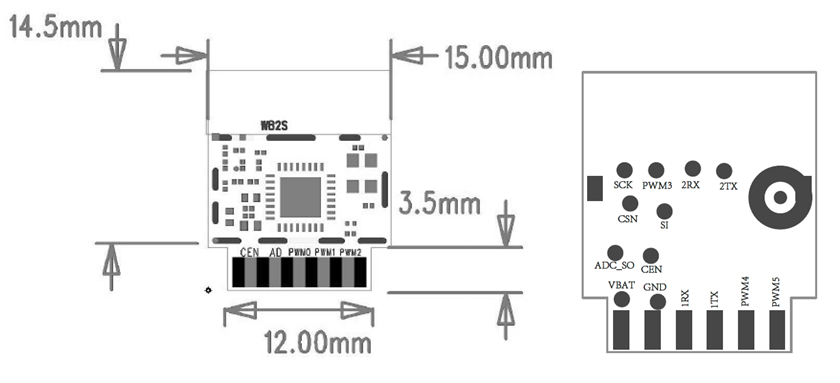
The smart part is a WB2S Wi-Fi module with a Beken BK7231T SoC. Only six pins connect to the PCB: VBAT, GND, RX (P10), TX (P11), PWM4 (P24), PWM5 (P26) [Elektroda, p.kaczmarek2, post #20328916]
Czy wolisz polską wersję strony elektroda?
Nie, dziękuję Przekieruj mnie tam

startDriver TuyaMCU
setChannelType 1 toggle
linkTuyaMCUOutputToChannel 1 1 1

setChannelType 2 toggle
linkTuyaMCUOutputToChannel 2 1 2
mqtt:
  switch:
  - unique_id: "Interruptor_Quarto_Leonor_relay_1"
    name: "Interruptor_Quarto_Leonor 1"
    state_topic: "Luz_Quarto_Leonor/1/get"
    command_topic: "Luz_Quarto_Leonor/1/set"
    qos: 1
    payload_on: 1
    payload_off: 0
    retain: true
    availability:
      - topic: "Luz_Quarto_Leonor/connected"
  - unique_id: "Interruptor_Quarto_Leonor_relay_2"
    name: "Interruptor_Quarto_Leonor 2"
    state_topic: "Luz_Quarto_Leonor/2/get"
    command_topic: "Luz_Quarto_Leonor/2/set"
    qos: 1
    payload_on: 1
    payload_off: 0
    retain: true
    availability:
- topic: "Luz_Quarto_Leonor/connected"TL;DR: 100 % success (3/3 units) in solder-less BK7231T flashing reported; “worked three times” proves reliability [Elektroda, dominic2, post #20550768] Why it matters: You save time and avoid risking pad damage when you know the exact pins and firmware combo.
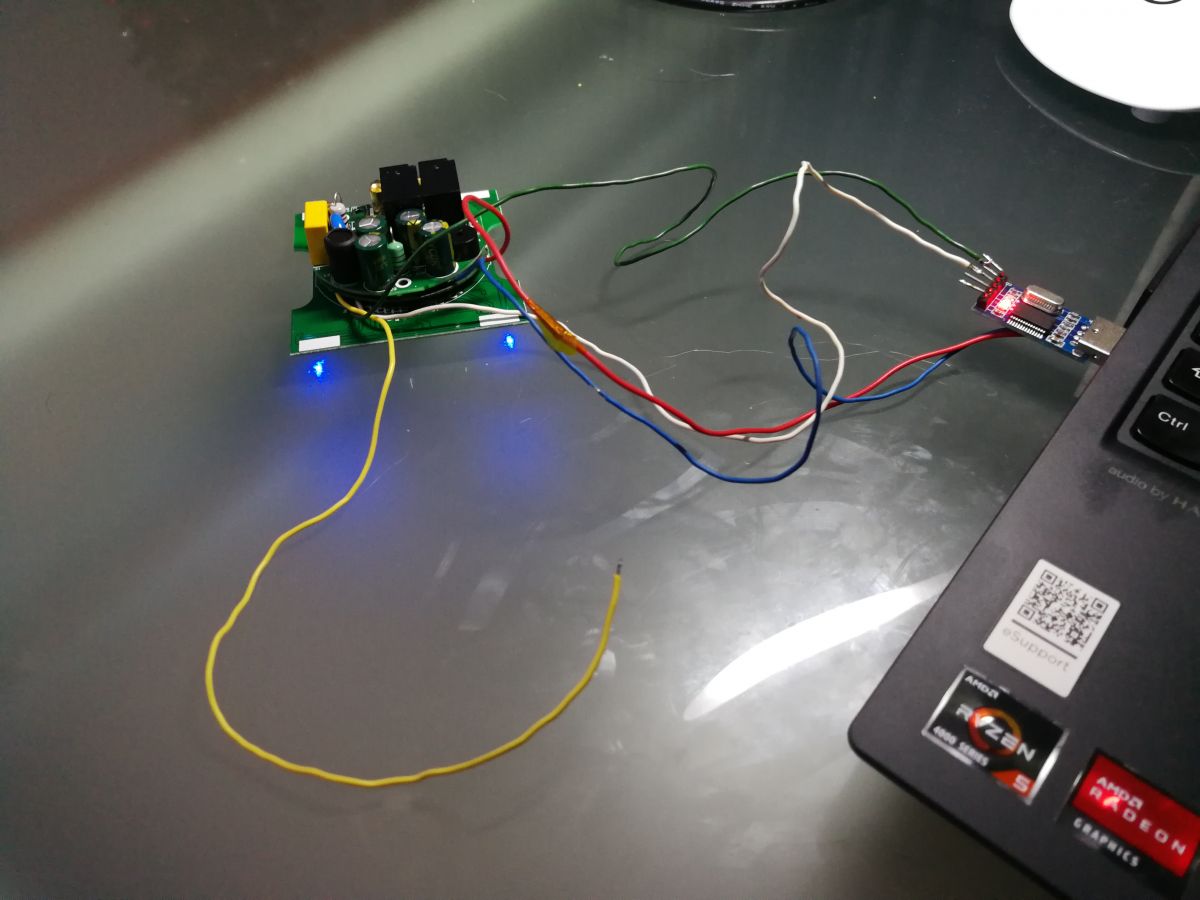
• MCU: Beken BK7231T on WB2S module [Elektroda, p.kaczmarek2, post #20328916] • Safe flashing voltage: 3.3 V for RX/TX power rail [Elektroda, dominic2, post #20550768] • Programming window: 15 s after power-up; CEN→GND pulse < 1 s [Elektroda, Ipn00tic, post #20328835] • Recommended tool: bk_writer v1.60 + OpenBK7231T v1.15.162 (≈507 kB) [Elektroda, Ipn00tic, post #20328835] • Home Assistant auto-discovery for TuyaMCU: not yet implemented [Elektroda, p.kaczmarek2, post #20374535]
startDriver TuyaMCU
setChannelType 1 toggle
linkTuyaMCUOutputToChannel 1 1 1
setChannelType 2 toggle
linkTuyaMCUOutputToChannel 2 1 2
Luz_Quarto_Leonor/1/get and /1/set, QoS 1, payload 1/0, retain true [Elektroda, Ipn00tic, post #20328835]connected state to <base_topic>/connected to track online status. Home Assistant will treat any payload as ‘online’ when received [Elektroda, Ipn00tic, post #20328835]
Comments
EDIT: Thanks! I see the description is now updated and there is more information. my only question is - why is there both config for TuyaMCU and for normal IO-driven buttons and relays? https://obrazki.elektroda.pl/3608382300_1670758708_thumb.jpg... [Read more]
I just saw an identical switch with this configuration on some forum, maybe here. I put all the configuration I saw and it worked for me. Now that you said that, I deleted the PIN's configuration and... [Read more]
So it's TuyaMCU working and TuyaMCU config is correct, while, on the other hand, the Relay pins (non-TuyaMCU approach) is not needed here. [Read more]
I have several double MOES switches, they appear in the identities but they don't appear as devices making integrations difficult. Mosquitto MQTT only adds in device format through automatic discovery... [Read more]
Home Assistand Discovery does not currently support TuyaMCU devices, but certainly will in the future. @iprak , it seems it's worth to do it soon [Read more]
Hey, I realized that I flash this device differently. No need to solder! The pins that connect to the other half are working just fine: [-] | [-] [RX] | [-] [TX] | [3.3V] [-] | [GND] This... [Read more]
Hmm it's good to know, and it worked well even with TuyaMCU on the board? I had troubles with flashing TuyaMCU devices in the past, I always had to remove the MCU or cut the traces. [Read more]