Elektroda.com
Elektroda.com
X
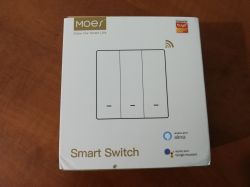
  • Moes 2 GAND Wall Switch - Aliexpress https://pt.aliexpress.com/item/10050036040138..._main.136.24a4caa4WAcIDy&gatewayAdapt=glo2bra
    2 Gang MOES WB2S BK7231T - Aliexpress 2 Gang MOES WB2S BK7231T - Aliexpress
    2 Gang MOES WB2S BK7231T - Aliexpress 2 Gang MOES WB2S BK7231T - Aliexpress 2 Gang MOES WB2S BK7231T - Aliexpress
    2 Gang MOES WB2S BK7231T - Aliexpress

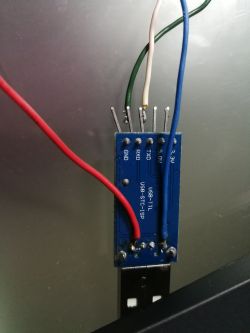
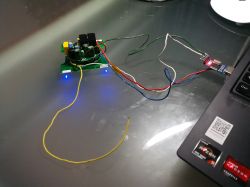
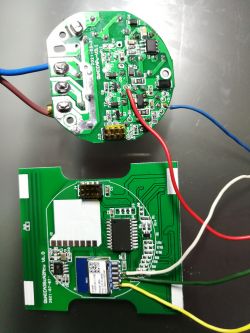
    Connect the programmer's direct 5v USB output to the power supply module to the pin labeled "+5v" and the negative to GND (red and blue wire).

    Connect RX and TX (green and white wires)

    Yellow wire is CEN to activate writing mode.

    Program to use is: bk_writer1.60 : https://github.com/openshwprojects/OpenBK7231...a220b19018c2e0a80c130df1c38/bk_writer1.60.zip

    Firmware File: OpenBK7231T_UA_1.15.162.bin https://github.com/openshwprojects/OpenBK7231T_App/releases/tag/1.15.162

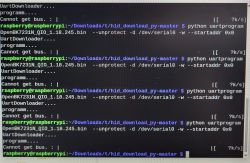
    load the firmware in the software and click on programm, you have 15 seconds to put it in programming mode, taking the yellow wire ( CEN ) and finding it on the GND wire. this connection has to be very fast, less than a second.
    if it goes well the program starts to program the new firmware.


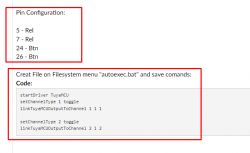
    Creat File on Filesystem menu "autoexec.bat" and save comands:
    
    startDriver TuyaMCU
    setChannelType 1 toggle
    linkTuyaMCUOutputToChannel 1 1 1
    
    setChannelType 2 toggle
    linkTuyaMCUOutputToChannel 2 1 2


    Home Assistant Discovery configure:


    mqtt:
      switch:
      - unique_id: "Interruptor_Quarto_Leonor_relay_1"
        name: "Interruptor_Quarto_Leonor 1"
        state_topic: "Luz_Quarto_Leonor/1/get"
        command_topic: "Luz_Quarto_Leonor/1/set"
        qos: 1
        payload_on: 1
        payload_off: 0
        retain: true
        availability:
          - topic: "Luz_Quarto_Leonor/connected"
      - unique_id: "Interruptor_Quarto_Leonor_relay_2"
        name: "Interruptor_Quarto_Leonor 2"
        state_topic: "Luz_Quarto_Leonor/2/get"
        command_topic: "Luz_Quarto_Leonor/2/set"
        qos: 1
        payload_on: 1
        payload_off: 0
        retain: true
        availability:
          - topic: "Luz_Quarto_Leonor/connected"

    Cool? Ranking DIY
    About Author
    Ipn00tic
    Level 7  
    Offline 
    Ipn00tic wrote 17 posts with rating 5. Been with us since 2020 year.
  • #2
    p.kaczmarek2
    Moderator Smart Home
    EDIT: Thanks! I see the description is now updated and there is more information.

    my only question is - why is there both config for TuyaMCU and for normal IO-driven buttons and relays?
    2 Gang MOES WB2S BK7231T - Aliexpress
    You usually just need to send on of them.
    Are relays connected physically to pin 5 and 7 of BK? Are Buttons connected physically to pins 24 and 26 of BK?

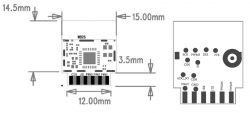
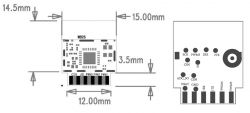
    When you look at the WB2S IOs:
    2 Gang MOES WB2S BK7231T - Aliexpress
    Pin No.SymbolI/O typeFunction
    1VBATPPower supply pin (3.3 V), which is connected to the VBAT pin on the internal IC
    2PWM2I/OCommon GPIO, which is connected to the P8 pin on the internal IC
    3GNDPPower supply reference ground pin
    4PWM1I/OCommon GPIO, which is connected to the P7 pin on the internal IC
    51RXI/OUART1_RXD, which is used as a user-side serial interface pin and is connected to the P10 pin on the internal IC
    6PWM0I/OCommon GPIO, which is connected to the P6 pin on the internal IC
    71TXI/OUART1_TXD, which is used as a user-side serial interface pin and is connected to the P11 pin on the internal IC
    8ADAIADC pin, which is connected to the P23 pin on the internal IC
    9PWM4I/OCommon GPIO, which is connected to the P24 pin on the internal IC
    10CENILow-level reset, high-level active (internally pulled high) Docking IC-CEN
    11PWM5I/OCommon GPIO, which is connected to the P26 pin on the internal IC

    Only the following pins connects to the PCB:
    - VDD (VBAT)
    - GND
    - 1RX (P10)
    - 1TX (P11)
    - PWM4 (P24)
    - PWM5 (P26)
    So I'd say that at least P5 and P7 does nothing here as it's not connected.
  • #3
    Ipn00tic
    Level 7  
    I just saw an identical switch with this configuration on some forum, maybe here.
    I put all the configuration I saw and it worked for me.

    Now that you said that, I deleted the PIN's configuration and it continues to work the same.
  • #4
    p.kaczmarek2
    Moderator Smart Home
    So it's TuyaMCU working and TuyaMCU config is correct, while, on the other hand, the Relay pins (non-TuyaMCU approach) is not needed here.
  • #5
    Ipn00tic
    Level 7  
    I have several double MOES switches, they appear in the identities but they don't appear as devices making integrations difficult.
    Mosquitto MQTT only adds in device format through automatic discovery but in my case I cannot activate automatic discovery in openbeken firmware because none has been configured: "No relay, PWM, binary sensor or power driver running.MQTT discovery queued."

    Switch configuration is done only by TuyaMCU driver and not by PINs configuration:
    "
    startDriver TuyaMCU
    setChannelType 1 toggle
    linkTuyaMCUOutputToChannel 1 1 1

    setChannelType 2 toggle
    linkTuyaMCUOutputToChannel 2 1 2
    "

    In this way, openbeken does not automatically disover to the home assistant.

    I think it's just necessary to adjust the firmware?
  • #6
    p.kaczmarek2
    Moderator Smart Home
    Home Assistand Discovery does not currently support TuyaMCU devices, but certainly will in the future.

    @iprak , it seems it's worth to do it soon
  • #7
    dominic2
    Level 1  
    Hey,

    I realized that I flash this device differently.
    No need to solder! The pins that connect to the other half are working just fine:

    [-] | [-]
    [RX] | [-]
    [TX] | [3.3V]
    [-] | [GND]

    This makes it super easy and chill to actually flash it. Did it three times, worked three times. Just need to connect CEN to GND for a split second and be done.
  • #8
    p.kaczmarek2
    Moderator Smart Home
    Hmm it's good to know, and it worked well even with TuyaMCU on the board? I had troubles with flashing TuyaMCU devices in the past, I always had to remove the MCU or cut the traces.