


logo elektroda
logo elektroda
X
logo elektroda

[BK7231N - CBU] Tuya Night Light with WiFi: Pin Configuration, PWM, dInput, ADC, PIR Sensitivity

Andy41  6 3096 Cool? (0)
Listen:

TL;DR LABEL_AI_GENERATED

  • A Tuya WiFi night light built around a BK7231N CBU module exposes all needed pins and can be flashed without removing the module.
  • Mapped pins include P26/P24/P6/P8/P7 for RGB and white PWM, P14 for PIR input, P20 for the inverted button, P23 for ambient brightness ADC, and P9 for PIR sensitivity.
  • P23 reads brightness from 0 for bright to 4096 for dark, while P14 carries the PIR signal with about a 5-second switch-off delay.
  • P9 matches the BS-612 PIR SENS pin, with 0 V giving highest sensitivity and 3 V giving low sensitivity.
  • No other signal pins were found, and it remains unclear whether P9 should be driven by PWM or a standard digital output.
AI summary based on the discussion. May contain errors.
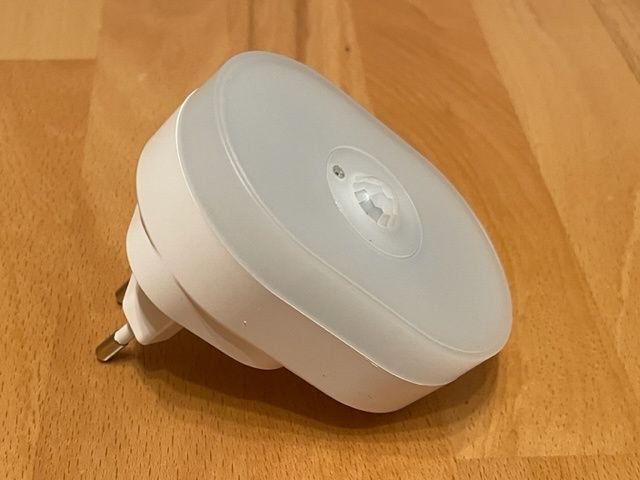
Tuya night light with WIFI


Source: https://de.aliexpress.com/item/1005004997029225.html

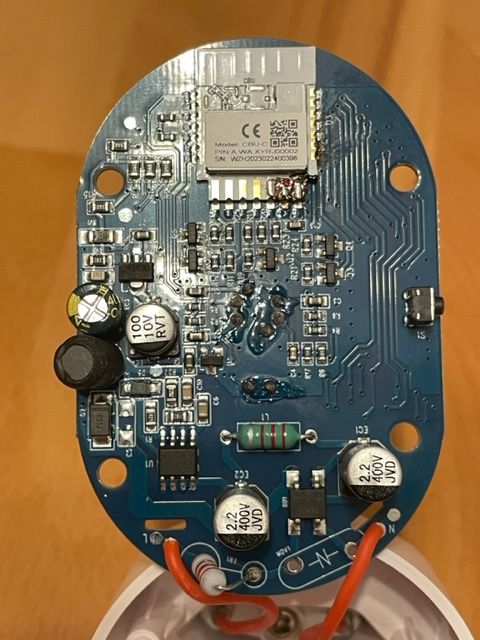
The night light is made by Tuya-module CBU.

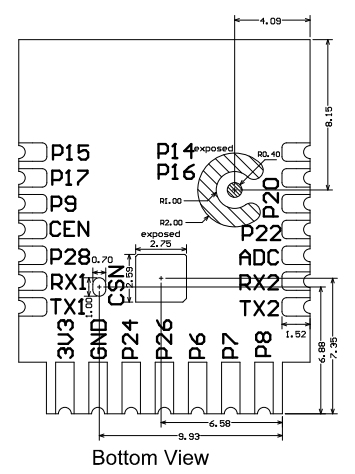
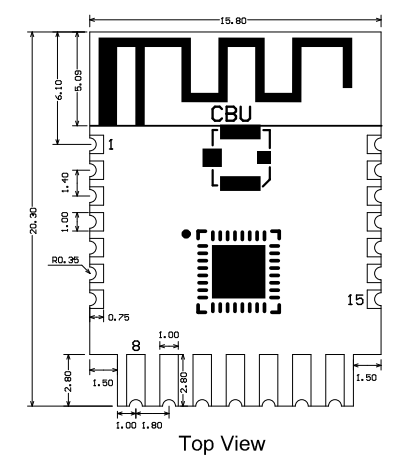
All needed pin are accessable. You can flash it without dismount the module


Pin definition for the module as cbu.txt

These pins are used:
P26 - PWM1 - red
P24 - PWM2 - green
P6 - PWM3 - blue
P8 - PWM4 - cool white
P7 - PWM5 - warmwhite
P14 - dInput - PIR-signal
P20 - dInput_n - button
P23 - ADC - brightness (0 = bright; 4096 = dark)
P9 - PWM - sensitivity of PIR, 0-max, 255-min

I do not use HA but IP-Symcon. That is why I can not say something to HA-integration.

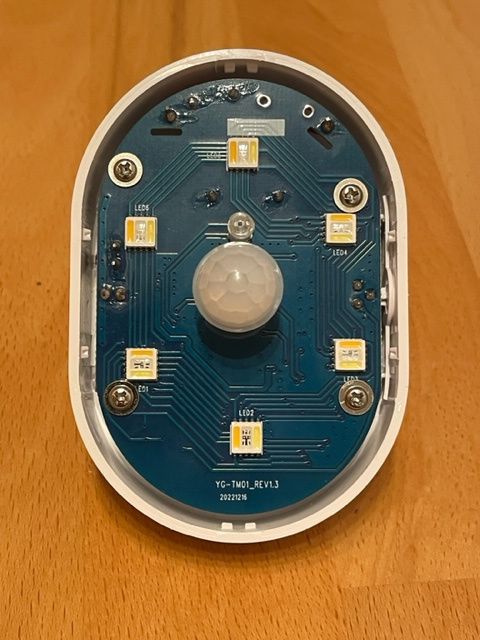
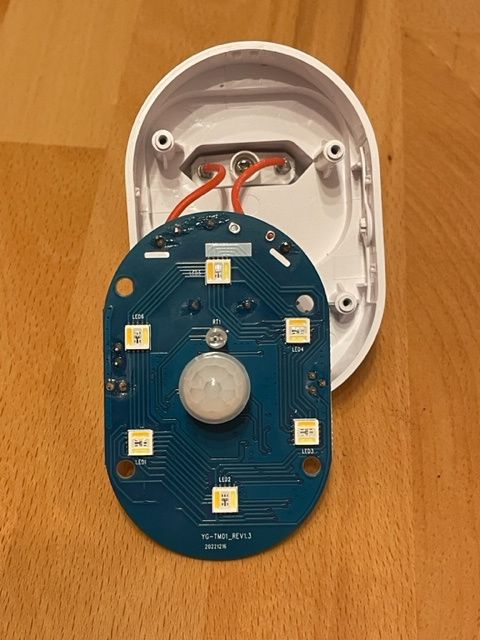
Some inner pictures:


I use the device as a simple status signal. In my case for the count of open windows in the case of exit the apartment.

pins explained:
P26; P24; P6; P8; P7
standard PWM output for R,G,B,CW,WW

P20
buttom at the right side of the device
negated

P23
analog brightness signal
0 - sun light
200-400 approx. room light in the evening
4096 - no lights

P14
PIR signal with approx. 5sec switch-off delay

P9
output corresponds with pin SENS of the PIR-module BS-612
there is a small capacitor between signal and ground (no value known).
0 Volt - highest sensitivity
3 Volt - low sensitivity
I do not know if you can output this as PWM or you have to set it as a standard digital output.

Other signal pin were not found.
Attachments:
  • obkFFEC7DB2_4.6.2023_19-45-34.zip (514 Bytes) You must be logged in to download this attachment.
  • C17724.pdf (1.31 MB) You must be logged in to download this attachment.
  • BK7231N_TuyaConfig.zip (1.42 KB) You must be logged in to download this attachment.
  • cbu.txt (2.04 KB) You must be logged in to download this attachment.

About Author
Andy41 wrote 10 posts with rating 1 , helped 1 times. Been with us since 2023 year.

Comments

p.kaczmarek2 04 Jun 2023 08:52

Thank you for a very detailed review. I wasn't aware about the PIR setting. Can you provide us two more things for analysis? First, a Tuya Config partition file, extracted like on the tutorial: https://www.youtube.com/watch?v=WunlqIMAdgw&ab_channel=Elektrodacom And... [Read more]

Andy41 04 Jun 2023 19:42

Hi, now, I have made some changes. - translated to english - added some more necessary files - PWM-pins changed from 0-4 to 1-5 - pins explained - Tuya-config added here are only the PWMs... [Read more]

p.kaczmarek2 04 Jun 2023 21:27

The Pin9 is present in the JSON, it was just not converted to text (not listed on human-readable interpretation) "pirin_pin":"14", "pirsense_pin":"9", ... [Read more]

Andy41 04 Jun 2023 21:40

Hi, thank you for your answer. Pin 9 is found - Ok. But can you give me the information, how "tuya" this pin uses. PWM or 0/1 ? Andreas [Read more]

p.kaczmarek2 04 Jun 2023 21:47

I have no idea how is this pin used. This is totally new to me. As I said, your device is a new thing for me and I will later improve my flasher to extract GPIO specified in your Tuya partition. You... [Read more]

divadiow 15 Nov 2024 18:23

https://github.com/OpenBekenIOT/webapp/commit/475cfcdfbcdd7e214667e612cbc7ab977c7db97a [Read more]

FAQ LABEL_AI_GENERATED

TL;DR: This FAQ gives BK7231N CBU night-light modders 9 mapped GPIOs and the expert warning “check yourself” for PIR sensitivity testing. It solves flashing, PWM RGBWW mapping, ADC brightness, button, PIR input, and OpenBeken test setup without desoldering the Tuya CBU module. [#20604874]

Why it matters: Correct GPIO mapping prevents broken PIR behavior, inverted buttons, missing ADC readings, and unusable RGBWW channels after flashing.

Option Best use Known limitation
Original Tuya firmware Observe factory PIR sensitivity behavior P9 PWM versus 0/1 behavior was not confirmed
OpenBeken Test GPIO roles, PWM channels, and automation Tuya Config conversion initially missed some human-readable fields
IP-Symcon Status signaling, such as open-window count Thread gives no Home Assistant validation
Home Assistant Possible smart-home integration path Author did not test HA integration

Key insight: The CBU module exposes all needed pins for flashing in place, but P9 needs bench testing. Tuya Config showed pirin_pin 14 and pirsense_pin 9, while only PWM 1–5 appeared in the first readable extract. [#20605949]

Quick Facts

  • RGBWW uses 5 PWM outputs: P26 red, P24 green, P6 blue, P8 cool white, and P7 warm white, giving separate control for color and two white channels. [#20604874]
  • The brightness ADC on P23 reads 0 in sunlight, about 200–400 in evening room light, and 4096 with no light. [#20604874]
  • PIR sensing uses P14 with an approx. 5 sec switch-off delay, while the side button uses negated input P20. [#20604874]
  • PIR sensitivity connects to P9 and the BS-612 SENS pin: 0 V means highest sensitivity, while 3 V means low sensitivity. [#20604874]
  • The extracted JSON contained pirin_pin 14 and pirsense_pin 9, but the initial human-readable interpretation listed only PWM channels 1–5. [#20605949]

How do I flash a Tuya night light with a BK7231N CBU module without desoldering the module?

Flash it through the accessible CBU pins on the PCB, without removing the module. The device exposes all needed pins for in-place flashing. Use the CBU pinout image from the teardown, then connect the flashing interface to the module pads. Keep power stable during the write.
  1. Open the night light and locate the CBU module pads.
  2. Connect the required serial flashing pins without desoldering CBU.
  3. Flash OpenBeken, then assign GPIO roles from the mapped pin list. [#20604874]

What is the pin configuration for the Tuya WiFi night light using the CBU BK7231N module?

The working CBU mapping uses 9 GPIO functions: 5 PWM LEDs, 2 digital inputs, 1 ADC, and 1 PIR sensitivity output. P26, P24, P6, P8, and P7 drive RGBCW/WW. P14 reads PIR, P20 reads the negated button, P23 reads brightness ADC, and P9 connects to PIR sensitivity. Other signal pins were not found during testing. [#20604874]

How are the RGB, cool white, and warm white LEDs mapped to PWM pins on the Tuya CBU night light?

The RGBWW LEDs map to PWM1–PWM5 on five separate CBU pins. P26 is PWM1 red. P24 is PWM2 green. P6 is PWM3 blue. P8 is PWM4 cool white. P7 is PWM5 warm white. The author changed the PWM channel numbering from 0–4 to 1–5 during the thread update. [#20605792]

What is the purpose of P14, P20, P23, and P9 on the Tuya BK7231N night light PCB?

P14 reads motion, P20 reads the side button, P23 reads ambient brightness, and P9 controls PIR sensitivity. P14 is the PIR signal and has an approx. 5 sec switch-off delay. P20 is a negated digital input for the right-side button. P23 is an ADC where 0 means bright and 4096 means dark. P9 connects to the BS-612 SENS input. [#20604874]

How does the brightness ADC reading on P23 work, and what do values like 0, 400, and 4096 mean?

P23 reports analog ambient brightness, where lower ADC values mean more light. A reading of 0 means sunlight or very bright light. A reading around 200–400 means typical room light in the evening. A reading of 4096 means no lights or maximum darkness. This inverted scale matters when building dusk-only PIR automation. [#20604874]

How does Tuya use the PIR sensitivity pin P9 on this night light, as PWM output or as a digital 0/1 signal?

The thread does not confirm whether Tuya drives P9 as PWM or as a digital 0/1 signal. The maintainer stated, “I have no idea how is this pin used,” because this device type was new to him. The proposed fix was direct testing with OpenBeken PWM values or probing original Tuya firmware using a simple scope. [#20605976]

What is the BS-612 PIR module, and how does its SENS pin control motion detection sensitivity?

BS-612 is a PIR motion-sensor module that exposes a SENS input for sensitivity control, using voltage level to change detection sensitivity. In this night light, P9 connects to SENS through a small capacitor to ground. 0 V gives highest sensitivity. 3 V gives low sensitivity. The capacitor value was not identified. [#20604874]

How can I test whether the PIR sensitivity control pin is PWM or digital using OpenBeken?

Test P9 by assigning it a PWM role in OpenBeken, then change an unused channel value from the console. The suggested method uses GPIO role PWM and SetChannel <index> <value>. If sensitivity changes smoothly, PWM is plausible. If only two states work, digital control may fit better. A scope on original Tuya firmware gives the clearest answer. [#20605949]

What OpenBeken console commands can set a PWM channel value for testing PIR sensitivity on GPIO P9?

Use SetChannel <index> <value> after assigning GPIO P9 to a PWM role and an unused channel. The thread gives the command format, not a fixed channel number. Choose one channel not already used by PWM1–PWM5 for RGBWW LEDs. Then test values across the available range and observe PIR response or measure P9 with a scope. [#20605949]

Why does the Tuya Config partition show only PWM pins 1–5 even though other pins like PIR, button, ADC, and sensitivity are present?

The first human-readable conversion did not list every JSON field from this new device type. The raw JSON still included pirin_pin 14 and pirsense_pin 9. The maintainer explained that he had not seen this kind of Tuya Config JSON before. He planned to improve the flasher to extract these GPIO fields. [#20605949]

How do I extract the Tuya Config partition from a BK7231N device for OpenBeken analysis?

Extract the Tuya Config partition using the OpenBeken-related tutorial method referenced in the thread, then share the config file and JSON template. The maintainer requested two analysis files: the Tuya Config partition and the Web App JSON template. One edge case is Linux-only workflow. The author found extraction difficult on Arch Linux because the available tool path assumed Windows. [#20605020]

What is a Tuya Config partition, and why is it useful when reverse engineering BK7231N smart devices?

Tuya Config partition is a firmware configuration area that stores Tuya device GPIO assignments, letting reverse engineers recover roles such as PWM, PIR input, and sensitivity pins. It helped confirm pirin_pin 14 and pirsense_pin 9 on this night light. That matters when the visual PCB trace and automatic text conversion disagree. [#20605949]

What is OpenBeken, and how is it used with Tuya BK7231N devices like WiFi night lights?

OpenBeken is an open firmware and web-app ecosystem used to configure BK7231N Tuya devices after flashing, including GPIO roles, PWM channels, and console commands. In this night light, it can map PWM1–PWM5 for RGBWW and test P9 as a possible PWM output. The thread also references a later OpenBeken webapp commit from 2024. [#21304540]

OpenBeken vs original Tuya firmware — which is better for controlling a BK7231N night light with PIR and RGBWW LEDs?

OpenBeken is better for documented local control, while original Tuya firmware is better for observing factory P9 behavior. OpenBeken lets you assign PWM roles and use SetChannel <index> <value> for experiments. Original Tuya firmware can be probed with a scope to reveal whether P9 is PWM or digital. Use Tuya first only when you need factory signal evidence. [#20605976]

How can I integrate a flashed Tuya BK7231N night light with IP-Symcon or Home Assistant for status signaling?

Use the flashed night light as a local RGBWW status indicator, then drive its channels from your automation platform. The author used IP-Symcon, not Home Assistant, and used the device to signal the count of open windows when leaving the apartment. The thread gives no Home Assistant integration result, so treat HA support as unverified for this device. [#20604874]
AI summary based on the discussion. May contain errors.
%}