Another ELIVCO LSPA9: BSD342-2110 PCB with [LN882H] and [BL0937]
This plug was already mentioned here
and here is the very useful page about the LN882H.
The inside is exactly the same PCB as mentioned here with another socket case and a different relay.
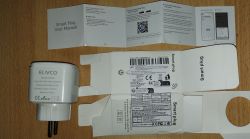
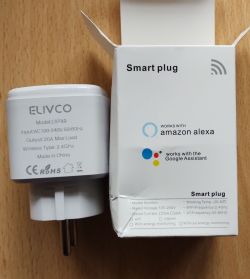
So, why another post? I think I might give some useful information here, so I hope it's o.k.
(If there should not be a new post, for the same device, please move it into one of the other posts)
First about opening the device:
The upper and lower part are lightly glued together and the pressure on the sides should break it open.
I opened the case with help of a vice, so you can apply pressure on the whole sides.
Just use some thick paper or cardboard to avoid marks on the case.
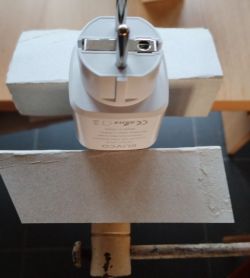
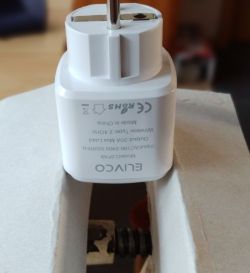
Turn the plug to put pressure on both sides. You will hear a light crack when glue is broken; you might also support the pressure by some light bending of the socket.
(If you hear a loud crack, you probably applied to much pressure but I already opened five devices and never broke one...)
Just keep pressing and turning the sides until the device pops open.
The inside is a BSD342-2110 PCB with "WL2S" labeled LN882H module and BL0937 energy metering chip. The relay shows 16A and 20A, so it's your choice, what to believe :
:
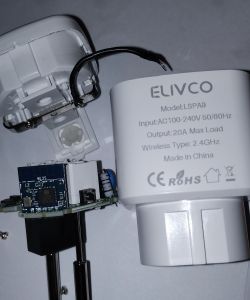
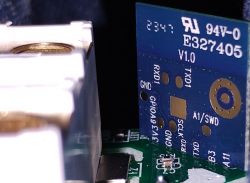
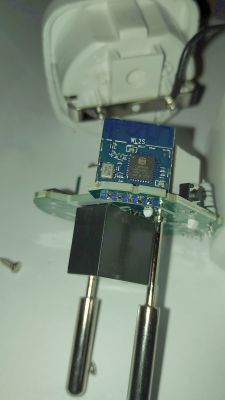
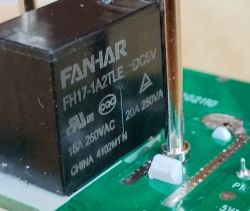
The bootlog for the shipped firmware is visible on Tx1 (UART1 is on the back side of the WL2S module), but flashing is done via Rx0/Tx0 (soldered to main PCB).
Now to some new findings (I hope): As I am a lazy guy, let me tell you, that in fact you only need to solder three wires
VCC (3.3 V)
RX
TX
You can use the plugs power pin opposite to the LN882H module as GND - no need to solder here!
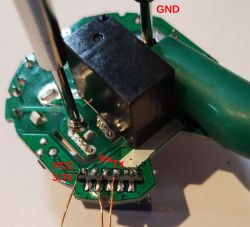
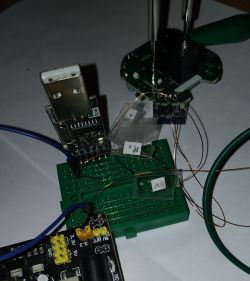 .
.
If there was any doubt, now you know for sure that you should never try to use the free GPIOs outside the plugs case: For at least GND will be connected to the high voltage live wires!
Regarding flashing you need to short pin A9 to GND - but this was not necessary for the whole flashing process:
I shortened A9 for some seconds after powering the device up - you will see if you missed the point, if the device starts flashing its LED.
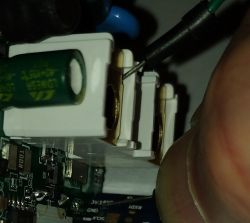
It works o.k. with the shown wires from a breadboard, for other plugs I used a testing pin from a multi-meter, this won't bend so easy.
It didn't work every time, I had to give it some tries, but was successful with all plugs in the end.
Remember, since we used the power pin for GND, we have it present on the upper outlet socket, as you can see on the picture.
For you might need to retry several times: If your PCs keyboard is not reachable from the plug while shortening the pin, I had a small batch file running to retry every five seconds.
Just to show off, I pimped my simple batch a bit
Then flashing with the speed of 115200 (I didn't manage to use 200000, that might be, because of too long wires, the PCB not desoldered but still in the plugs PCB, or some other reason).
Thanks again to all the brave people working on the Openbeken port for this chip!
Here is my template for the device:
Please also see the posts by @divadiow Link and by @sithyoda Link.
The flashing tool is present e.g. in the LN882H flashing guide by @p.kaczmarek2
or can be downloaded here:
https://gitee.com/lightningsemi/ln882h-docume...%BB%A4%E8%A1%8C%E5%B7%A5%E5%85%B7_V1.0.16.zip (use "save as" on the shown download link, for at least for me it would otherwise only show the raw binary - missing mime type I suspect)
Have fun!
and here is the very useful page about the LN882H.
The inside is exactly the same PCB as mentioned here with another socket case and a different relay.


So, why another post? I think I might give some useful information here, so I hope it's o.k.
(If there should not be a new post, for the same device, please move it into one of the other posts)
First about opening the device:
The upper and lower part are lightly glued together and the pressure on the sides should break it open.
I opened the case with help of a vice, so you can apply pressure on the whole sides.
Just use some thick paper or cardboard to avoid marks on the case.


Turn the plug to put pressure on both sides. You will hear a light crack when glue is broken; you might also support the pressure by some light bending of the socket.
(If you hear a loud crack, you probably applied to much pressure
Just keep pressing and turning the sides until the device pops open.
The inside is a BSD342-2110 PCB with "WL2S" labeled LN882H module and BL0937 energy metering chip. The relay shows 16A and 20A, so it's your choice, what to believe


The bootlog for the shipped firmware is visible on Tx1 (UART1 is on the back side of the WL2S module), but flashing is done via Rx0/Tx0 (soldered to main PCB).
Now to some new findings (I hope): As I am a lazy guy, let me tell you, that in fact you only need to solder three wires
VCC (3.3 V)
RX
TX
You can use the plugs power pin opposite to the LN882H module as GND - no need to solder here!

 .
.
If there was any doubt, now you know for sure that you should never try to use the free GPIOs outside the plugs case: For at least GND will be connected to the high voltage live wires!
Regarding flashing you need to short pin A9 to GND - but this was not necessary for the whole flashing process:
I shortened A9 for some seconds after powering the device up - you will see if you missed the point, if the device starts flashing its LED.

It works o.k. with the shown wires from a breadboard, for other plugs I used a testing pin from a multi-meter, this won't bend so easy.
It didn't work every time, I had to give it some tries, but was successful with all plugs in the end.
Remember, since we used the power pin for GND, we have it present on the upper outlet socket, as you can see on the picture.
For you might need to retry several times: If your PCs keyboard is not reachable from the plug while shortening the pin, I had a small batch file running to retry every five seconds.
Just to show off, I pimped my simple batch a bit
@echo off
echo List of serial ports (with some text about status):
echo.
echo and all .bin files
dir *.bin  | findstr .bin
echo.
echo.
mode | findstr COM
echo.
echo.

:pset
set p=-10
set /p p="Enter COM-Port number: "
if +%p% NEQ %p%   (
	@echo please only provide numbers
	goto pset
)
(mode | findstr COM%p%: >Nul || (
	@echo COM%p% not found
	goto pset
))

:fset
set /p f="Enter filename: "
if NOT exist %f% (
	@echo Can't find file %f%. Please chek and try again.
	goto fset
)

:loop
 LN882H_CMD_Tool.exe COM%p% download flash 115200 0x0 %f%
 timeout /t 5
goto loop
Then flashing with the speed of 115200 (I didn't manage to use 200000, that might be, because of too long wires, the PCB not desoldered but still in the plugs PCB, or some other reason).
Thanks again to all the brave people working on the Openbeken port for this chip!
Here is my template for the device:
Quote:{
"vendor": "Elvico",
"bDetailed": "0",
"name": "Elvico LSPA9",
"model": "LSPA9",
"chip": "LN882H",
"board": "BSD342-2110",
"flags": "1024",
"keywords": [
"BSD342-2110",
"LN882H",
"BL0937"
],
"pins": {
"0": "LED_n;0",
"3": "Btn;0",
"7": "BL0937CF1;0",
"10": "WifiLED_n;1",
"11": "Rel;0",
"12": "BL0937CF;0",
"19": "BL0937SEL;0"
},
"command": "",
"image": "https://obrazki.elektroda.pl/5522980200_1708165078.jpg",
"wiki": "https://www.elektroda.com/rtvforum/topic4036567.html"
}
Please also see the posts by @divadiow Link and by @sithyoda Link.
The flashing tool is present e.g. in the LN882H flashing guide by @p.kaczmarek2
or can be downloaded here:
https://gitee.com/lightningsemi/ln882h-docume...%BB%A4%E8%A1%8C%E5%B7%A5%E5%85%B7_V1.0.16.zip (use "save as" on the shown download link, for at least for me it would otherwise only show the raw binary - missing mime type I suspect)
Have fun!


Comments
Which AliExpress shop this was bought? I would like ln882h lspa9 form socket for my collection 😂 [Read more]
It was bought at Digitaling Store , and this is the Link to the plug. But, since this was some weeks ago, you can never be sure, you will get the same device, if you order it now ;-) [Read more]
I bought the same plug as OP. I can see on the order details that it is even the same item number on AliExpress. Here is my plug and package: https://obrazki.elektroda.pl/8437186600_1710450158_thumb.jpg... [Read more]
The device seems to be very unstable. Longest uptime was around 48h. It just disappears from the network after a certain amount of time. Also all firmwares from 1.17.513 and later are not really booting... [Read more]
Hi @ all, for me its working fine with latest version (OpenLN882H_1.17.521.bin) Web GUI and Web App are working smooth. Once I got kicked out of networkaccess after doing some settings with reboot. Only... [Read more]
This setting should control the button 😀! It defines pin 3 (A3) as control input for channel 0. If it doesn't work as expected, maybe you defined your relay to another channel (see the number after... [Read more]
thanks! I have the BSD34-202110 bord like @raufaser . Yours is BSD342-2110 if this is correct? Channel is the same. Seems like button needs another pin setting then. ---------- solved! The push-button... [Read more]
Just when I made it to try - yes it works, regardless if there is power loss or it's restarted via GUI ;-) [Read more]
kkk... thanks anyway Next will hopefully be a working "powersave" on the LN882. Tomorrow I try to find some time to mesure power consumption of the hole unit from the AC side. I think it is too much... [Read more]
Today I was playing arround with my multimeter to mesure the powerconsumption of the LSPA9. First I had to realise that powermesuring needs to be done with a osciloscope to get reliable results, because... [Read more]
Yo dawg, I heard you like power measurements. So i put a Beken in line with your Beken, so you can measure the power consumption of measuring the power consumption. 🤣 But seriously, how did you measure... [Read more]
I do have a good quality DMM from Brymen to measure inline and a good and payable clamp meter (UNI-T UT211B). They show +/- the same. With an oscilloscope I think you do it with a shunt resistance and... [Read more]
--update and observations-- PowerSave 1 still needs to be set manually after the device has booted. But my LSPA9 is stable since more than three days without any interrupts or hanging in the GUI. (OpenLN882H_1.17.530_OTA.bin) DHT... [Read more]
Good to hear that yours is running stable. I can report mine is running stable too. For almost a week now. It is in use 24/7 measuring the consumption of my "always on" Tiny-PCs 👍 https://obrazki.... [Read more]
Is it possible to add the device to the device list? The Elvico LSPA9, that are in the list have different pin settings. [Read more]
Has probably nothing to do with Hardware or Flashing, but might depend on the used Tasmota Firmware: How to switch this device from IObroker? I can read the device via MQTT and also can see a state "mqtt.0.<MQTT_Client_Topic>.0.get"... [Read more]
With the help from some guys on ioBroker-Forum, I managed to get basic switching functionality in ioBroker: You have to create a manual entry in the mqtt.0 device-tree (using Expert Mode): mqtt.0.cmnd.<Client... [Read more]
Sorry, I never used the plug like that, so I can't help here [Read more]
Alright. Do you mean, you never switch the plug using the hardware button on the plug? Btw: Is there a data point for your plug that reflects the state of this button, meaning: indicating, if it is pushed?... [Read more]