logo elektroda
logo elektroda
X
logo elektroda

BK7231T Feit Smart Wifi Dimmer: TuyaMCU, Programming & 3-Way Mode Tips (Amazon Purchase)

bleeblak8 8487 59
ADVERTISEMENT
  • #1 20385261
    bleeblak8
    Level 4  
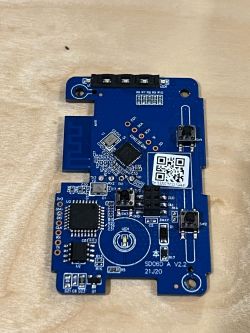
    Purchased dimmer from Amazon as my local Menards said they had some in stock but I couldn't locate them. I was struggling to get this to program until I came across another post about the TuyaMCU that is on these boards. Once I was able to ground the MCU, it took the programming. Hope this helps anyone else that might grab these dimmers. The only thing that isn't working is the 3 way mode to turn it off. I'm guessing the MCU handles that but I haven't looked into it yet. If anyone has any pointers, please let me know.
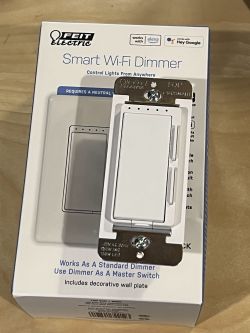
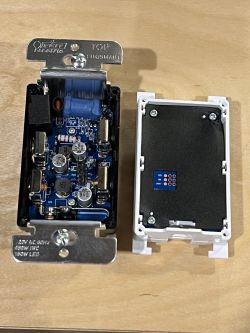
    BK7231T Feit Smart Wifi Dimmer: TuyaMCU, Programming & 3-Way Mode Tips (Amazon Purchase)
    BK7231T Feit Smart Wifi Dimmer: TuyaMCU, Programming & 3-Way Mode Tips (Amazon Purchase)
    BK7231T Feit Smart Wifi Dimmer: TuyaMCU, Programming & 3-Way Mode Tips (Amazon Purchase)
    BK7231T Feit Smart Wifi Dimmer: TuyaMCU, Programming & 3-Way Mode Tips (Amazon Purchase)

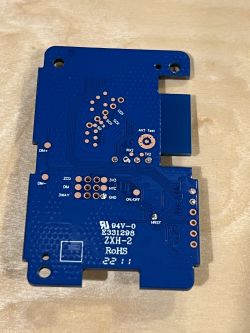
    To program, I grounded the NRST pad on the back. Then attached wires to RX1, TX1, 3.3 and GND. Ran the program and it was able to flash the file.

    Once I had it flashed and on my wifi. I then added an autoexec.bat file for the TuyaMCU. Below is the code I have in it. In my testing, I wasn't able to use the dimmer buttons until I added the other OutputChannel 3. I'm not sure if that is correct, but it worked for me.
    I am still very new to the TuyaMCU devices, and if this isn't correct, please let me know.

    startDriver TuyaMCU
    setChannelType 1 toggle
    setChannelType 2 dimmer
    tuyaMcu_setDimmerRange 0 1000
    linkTuyaMCUOutputToChannel 1 bool 1
    linkTuyaMCUOutputToChannel 2 val 2
    linkTuyaMCUOutputToChannel 3 val 3
  • ADVERTISEMENT
  • #2 20385294
    p.kaczmarek2
    Moderator Smart Home
    Very interesting device. Good job with figuring the third TuyaMCU dpID, although I''d like to see what kind of values are stored there?
    I haven't experienced anything like that yet.
    Maybe it's some kind of a countdown value?

    Regarding stairs configuration... I am not 100% sure, but wouldn't our Tasmota Device Groups system work like that? But as far as I remember DGRs are not yet integrated with TuyaMCU... I would need to check that.
    Helpful post? Buy me a coffee.
  • #4 20393335
    p.kaczmarek2
    Moderator Smart Home
    Adding a FCC ID along with the teardown photos is always a good practice. I wish more devices had a FFC documentation available.
    Thanks.
    Helpful post? Buy me a coffee.
  • Helpful post
    #5 20417046
    guppy
    Level 2  
    I picked a couple of these up as they seemed pretty interesting and I am glad I did.

    The 3 way switching works for me, but the LED indicator being on all the time was frustrating. I dug into it a bit and found out how to control it. It can be off, on dimly, or on brightly.

    This autoexec.bat should let you control the LED indicator. Note it does need the latest revision (1.15.405) with the added channel type to work.

    
    startDriver TuyaMCU
    setChannelType 1 toggle
    setChannelType 2 dimmer
    setChannelType 4 OffDimBright
    tuyaMcu_setDimmerRange 0 1000
    linkTuyaMCUOutputToChannel 1 bool 1
    linkTuyaMCUOutputToChannel 2 val 2
    linkTuyaMCUOutputToChannel 3 val 3
    linkTuyaMCUOutputToChannel 101 enum 4
    
  • ADVERTISEMENT
  • #6 20417071
    bleeblak8
    Level 4  
    guppy wrote:
    I picked a couple of these up as they seemed pretty interesting and I am glad I did.

    The 3 way switching works for me, but the LED indicator being on all the time was frustrating. I dug into it a bit and found out how to control it. It can be off, on dimly, or on brightly.

    This autoexec.bat should let you control the LED indicator. Note it does need the latest revision (1.15.405) with the added channel type to work.

    
    startDriver TuyaMCU
    setChannelType 1 toggle
    setChannelType 2 dimmer
    setChannelType 4 OffDimBright
    tuyaMcu_setDimmerRange 0 1000
    linkTuyaMCUOutputToChannel 1 bool 1
    linkTuyaMCUOutputToChannel 2 val 2
    linkTuyaMCUOutputToChannel 3 val 3
    linkTuyaMCUOutputToChannel 101 enum 4


    I will have to try that out. Thank you for updating us.
  • Helpful post
    #7 20417099
    p.kaczmarek2
    Moderator Smart Home
    @guppy was that your pull request with OffDimBright? Very good job, little but useful code snipper. Now it's integrated to the main code tree and also released. Thanks
    Helpful post? Buy me a coffee.
  • ADVERTISEMENT
  • #8 20417125
    guppy
    Level 2  
    @p.kaczmarek2 yep, that was me! I saw the notification that the change was approved, and a new release was published. I figured I should document the config here before I forgot to.
  • #9 20426950
    tryingbe
    Level 2  
    I have the same switch and I used 3.3V ground, TX1, RX1, and NRST with a FTDI USB to TTL chip.
    I use NRST to restart the chip but it won't connect. I even try to swap the TX1 and RX1 cables, no change.
    I flashed plenty of Tasmota devices with my FTDI cable so this is not the first time I'm trying to flash a firmware.

    Any pointer?
  • #10 20426968
    bleeblak8
    Level 4  
    tryingbe wrote:
    I have the same switch and I used 3.3,v ground, TX1, RX1, and NRST with a FTDI USB to TTL chip.
    I use NRST to restart the chip but it won't connect. I even try to swap the TX1 and RX1 cables, no change.
    I flashed plenty of tasmota devices with my FTDI cable so this is not the first time I'm trying to flash a firmware.

    Any pointer?


    You’ll need to keep the nrst point grounded the entire time. This basically bypasses the Tuyamcu chip. Then you can flash like before. Hope that helps.
  • Helpful post
    #11 20426991
    guppy
    Level 2  
    Just to add to what @bleeblak8 said. I didn't realize at first you need to have the timing just right with bkwriter and power up. Try connecting TX1, RX1, GND, and ground NRST. Hit program on bkwriter and during the 15 sec timeout connect 3.3V. bkwriter should start flashing it. I use a separate power supply with a switch to make it a little easier.
  • #12 20428837
    tryingbe
    Level 2  
    guppy wrote:
    Just to add to what @bleeblak8 said. I didn't realize at first you need to have the timing just right with bkwriter and power up. Try connecting TX1, RX1, GND, and ground NRST. Hit program on bkwriter and during the 15sec timeout connect 3.3V. bkwriter should start flashing it. I use a separate power supply with a switch to make it a little easier.


    I did as you said, but as soon as I touch the 3.3V on the light switch, the computer makes a disconnect sound and the program would crash and no flash.

    Are you using FTDI chip usb to ttl or something else?

    Thanks.
  • #13 20428873
    bleeblak8
    Level 4  
    tryingbe wrote:
    guppy wrote:
    Just to add to what @bleeblak8 said. I didn't realize at first you need to have the timing just right with bkwriter and power up. Try connecting TX1, RX1, GND, and ground NRST. Hit program on bkwriter and during the 15sec timeout connect 3.3V. bkwriter should start flashing it. I use a separate power supply with a switch to make it a little easier.


    I did as you said, but as soon as I touch the 3.3V on the light switch, the computer makes a disconnect sound and the program would crash and no flash.

    Are you using FTDI chip usb to ttl or something else?

    Thanks.


    Can you provide a picture of how you have things hooked up?
    Thanks
  • #14 20429228
    p.kaczmarek2
    Moderator Smart Home
    Please post a picture of your setup. I will also add that I often flash without using CEN/RST/etc, just GND, VDD, RX and TX and then I reboot with reconnecting power from an external reliable 3.3V supply.
    Helpful post? Buy me a coffee.
  • ADVERTISEMENT
  • #15 20430641
    tryingbe
    Level 2  
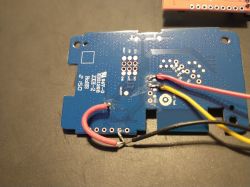
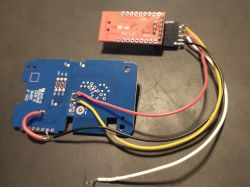
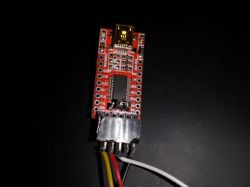
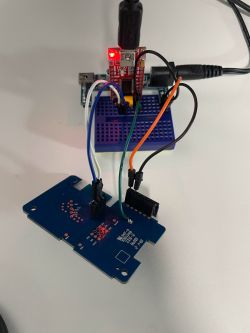
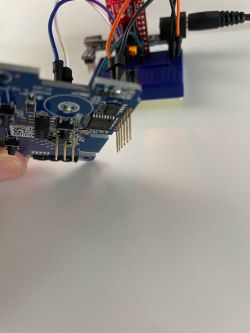
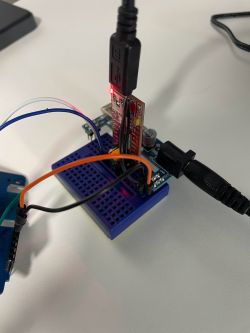
    Here you go. I haven't tried an external 3.3v. Guess I will be trying that next.

    BK7231T Feit Smart Wifi Dimmer: TuyaMCU, Programming & 3-Way Mode Tips (Amazon Purchase) BK7231T Feit Smart Wifi Dimmer: TuyaMCU, Programming & 3-Way Mode Tips (Amazon Purchase) BK7231T Feit Smart Wifi Dimmer: TuyaMCU, Programming & 3-Way Mode Tips (Amazon Purchase)
  • #16 20430717
    p.kaczmarek2
    Moderator Smart Home
    You're getting 3.3V from that small USB to UART dongle? It won't work, you need to have a reliable 3.3V power supply.
    Helpful post? Buy me a coffee.
  • #17 20430805
    bleeblak8
    Level 4  
    tryingbe wrote:
    Here you go. I haven't tried an external 3.3v. Guess I will be trying that next.

    BK7231T Feit Smart Wifi Dimmer: TuyaMCU, Programming & 3-Way Mode Tips (Amazon Purchase) BK7231T Feit Smart Wifi Dimmer: TuyaMCU, Programming & 3-Way Mode Tips (Amazon Purchase) BK7231T Feit Smart Wifi Dimmer: TuyaMCU, Programming & 3-Way Mode Tips (Amazon Purchase)


    If you've got some dupont jumpers, that would be easier to hook up ground and 3.3v. You can put the 3.3 and ground right in the middle of the 6 pin receiving area. Then you can pull the 3.3 once you start the flasher and it should start to work.
  • #18 20433488
    tryingbe
    Level 2  
    Success!

    I used an Arduino with a wall plug and USB cable to supply 3.3V and ground to the light switch and I was able to flash the light switch!

    Thanks for the help!
  • #19 20433588
    p.kaczmarek2
    Moderator Smart Home
    Good job!
    Arduino 3.3V has good current capability and is a way to go. Getting 3.3V directly from USB to TTL is not going to work and it never worked for me.
    Helpful post? Buy me a coffee.
  • #20 20435034
    nectur
    Level 2  
    Great guide! I just got a couple of these from Costco and successfully flashed them. I have manual on device control working properly in a 3-way configuration, with proper dimming and the power LED is properly working in 'dim' mode. Having issues getting them integrated into Home Assistant though. I have configured MQTT and it shows up in MQTT Explorer, but only with the 'connected' value. Are there Module config settings to set along with the autoexec.bat? When I attempt to do the Home Assistant Discovery I get an error saying "No relay, PWM, sensor or power driver running. MQTT discovery queued." which is telling me that I need to configure the module more, but I am at a loss of what to set.

    Keep up the great work! Looking forward to getting more devices off of Tuya's cloud!
  • #21 20435099
    p.kaczmarek2
    Moderator Smart Home
    I am sorry @nectur , but we don't have HA discovery for TuyaMCU devices yet. You will have to do YAML manually. I can try to look into supporting that faster or ask @iprak to do it in the free time.

    by Yaml I mean, in configuration.yaml for Home Assistant

    see:
    OpenBeken and TuyaMCU dimmer - configuration guide/tutorial
    Helpful post? Buy me a coffee.
  • #22 20435696
    nectur
    Level 2  
    Perfect, thanks! I just hadn't found that one yet. Probably too limited of search terms on my part.
  • #23 20441187
    mattj
    Level 9  
    Just wanted to say thanks to all here! :D I had struggled with this device for a bit, and put it away. The instructions here worked great! (Not sure if it was my use of the built-in 3.3v adapter or not properly grounding the NRST, but it works now.)

    Side note: using some old header pins makes it so a single solder point on the NRST pad is the only thing required. I am tempted to whip up a 3D printed jig to make this easily repeatable (I've got a handful of these to flash).

    BK7231T Feit Smart Wifi Dimmer: TuyaMCU, Programming & 3-Way Mode Tips (Amazon Purchase) BK7231T Feit Smart Wifi Dimmer: TuyaMCU, Programming & 3-Way Mode Tips (Amazon Purchase) BK7231T Feit Smart Wifi Dimmer: TuyaMCU, Programming & 3-Way Mode Tips (Amazon Purchase)
  • #24 20441193
    p.kaczmarek2
    Moderator Smart Home
    I've been thinking of doing 3d printed jigs for various Beken modules and boards, especially since there is already a TYWE3S one so that could be a good start, but I've never gotten around to it, I always just prefer to solder.

    Still, it's a great idea! Please post it here if you make one, @Matt_J
    Helpful post? Buy me a coffee.
  • #25 20444044
    mattj
    Level 9  
    On the topic of repeatable processes... Is there an easy way to save and restore settings? E.g., WiFi and MQTT settings most likely remain the same across devices. I know some Tasmota flashing programs have the ability to set those details at the time of flashing.

    I did notice it would be possible to read and restore fsblock - my understanding is that this would work for the autoexec.bat?

    Thanks!
  • #26 20480422
    wesduda
    Level 5  
    Thanks for all the work...
    Before I was flashing older FEIT dimmers from Costco with Tasmota, recently I bought some more of it
    with a new chip, ($15 for two, hard to resist)
    After reading this post, I was able to flash and get new firmware in, connect to Home Assistant, get MQTT...
    but can not control the switch, like the mapping of the ports is wrong or something....

    ...did I choose wrong .bin file? (OpenBK7231T_UA_1.15.574.bin)

    I'm sort of lost...
  • #27 20481113
    mattj
    Level 9  
    Did you create the Autoexec.bat script?

    With the Tuya MCU devices you have to enable the driver (and you'll then have to manually write the YAML for Home Assistant - the auto discovery doesn't work)

    Just guessing that might be your issue. Was a little counterintuitive.
  • #28 20481126
    p.kaczmarek2
    Moderator Smart Home
    @wesduda it should be very easy to control them. Is your OpenBeken web panel running?

    Keep in mind that flashing T version build on N chip (BK7231N) will not work, you always have to choose correct build for your platform.
    Helpful post? Buy me a coffee.
  • #29 20481978
    wesduda
    Level 5  
    Thank you guys for quick reply.
    It comes sort of easy to flush the firmware, but I do not know where to start with writing Autoexec.bat script, or other configuration settings?


    OK I found where to make the Autoexec.bat.....and it works hurraaa!!!

    now to MQTT broker......I will work on it now......YAML code....hymmm

    Prior to this chip, I have played a little with ESP 8622 and Tasmota, I flushed and installed like 10 devices around my house, and I got hooked with Home-Automation.

    Now the new chip (BK7231N) brings new challenges for me.

    The version I flushed it with is version 1.15.575, I did not write any YAML code, (do not know how) but my Home Assistant or MQTT broker (Mosquitto) connects pretty much instantly.
    I will include some screenshots.

    Can you direct me where to begin?
    ...how to write and where to place Autoexec.bat script, or other configuration settings?


    Thanks for any advice,

    I feel much better working with my hands than with the programming
    …but with your help I will learn quick.
  • #30 20481992
    p.kaczmarek2
    Moderator Smart Home
    autoexec can be created in Web Appliation, LittleFS tab.

    Here you can get some generic ideas about our firmware:
    https://github.com/openshwprojects/OpenBK7231T_App/blob/main/docs/README.md
    Those are our md docs, they are not finished, and we will soon export them to other formats (the sources are in JSON).

    For example, here is a list of autoexec examples and topics:
    https://github.com/openshwprojects/OpenBK7231T_App/blob/main/docs/autoexecExamples.md
    Helpful post? Buy me a coffee.

Topic summary

The discussion revolves around the BK7231T Feit Smart WiFi Dimmer, focusing on programming challenges and solutions related to the TuyaMCU. Users shared experiences with flashing the device using various methods, including grounding the NRST pad and using FTDI USB to TTL chips. Several users reported success in configuring the dimmer for 3-way switching and controlling the LED indicator. Issues with Home Assistant integration and MQTT configuration were also addressed, with suggestions for writing the autoexec.bat script and YAML configurations. The conversation highlighted the importance of using reliable power supplies and provided insights into troubleshooting common problems encountered during setup.
Summary generated by the language model.
ADVERTISEMENT