Elektroda.com
Elektroda.com
X

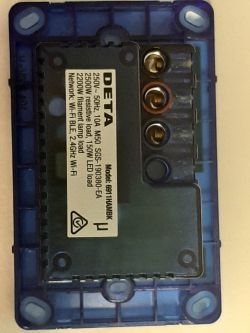
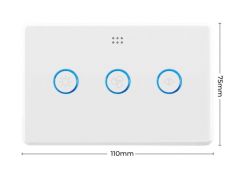
Deta Grid Connect Smart Fan Speed Controller with Touch Light Switch - 6914HA - Teardown

wolfieeewolf 1353 39
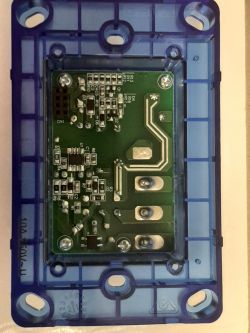
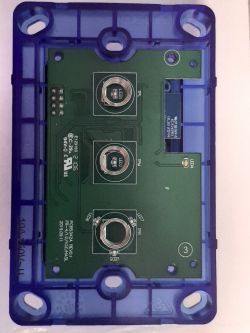
  • Device Name: Deta Grid Connect Smart Fan Speed Controller with Touch Light Switch - 6914HA
    Device Type: Fan and Light switch
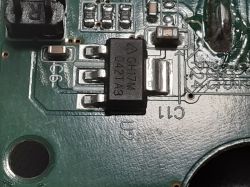
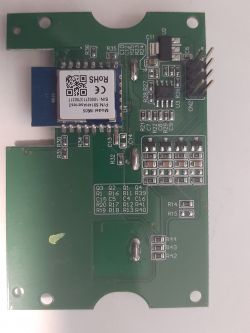
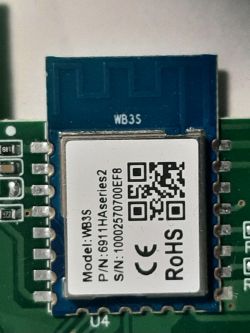
    Device Chip: WB3S - BK7231T
    Device Purchased: Bunnings Warehouse - $59.36AUD
    Deta Grid Connect Smart Fan Speed Controller with Touch Light Switch - 6914HA - Teardown Deta Grid Connect Smart Fan Speed Controller with Touch Light Switch - 6914HA - Teardown Deta Grid Connect Smart Fan Speed Controller with Touch Light Switch - 6914HA - Teardown Deta Grid Connect Smart Fan Speed Controller with Touch Light Switch - 6914HA - Teardown Deta Grid Connect Smart Fan Speed Controller with Touch Light Switch - 6914HA - Teardown Deta Grid Connect Smart Fan Speed Controller with Touch Light Switch - 6914HA - Teardown Deta Grid Connect Smart Fan Speed Controller with Touch Light Switch - 6914HA - Teardown Deta Grid Connect Smart Fan Speed Controller with Touch Light Switch - 6914HA - Teardown Deta Grid Connect Smart Fan Speed Controller with Touch Light Switch - 6914HA - Teardown


    Flashing of Main Chip

    Manually flashed the chip with BK7231 GUI Flash Tool.

    WB3S Module Datasheet


    Configuration of Module


    PinChTypeDescription
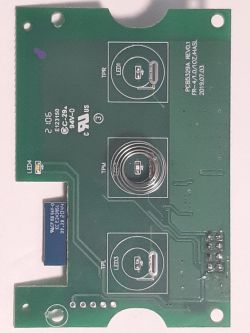
    P1Ch4Btn_ScriptOnlyFan Button (Middle)
    P6Ch2RelFan MIN speed, turns on 1 of 3 LEDs around the Arrow Button (right led).
    Pin active on all fan speeds. Turns on fan button LED
    P7Ch3RelFan MIN speed, turns on 1 of 3 LEDs around the Arrow Button (top led)
    P8Ch10Btn_ScriptOnlyArrow Button (Right)
    P9Ch4RelFan MAX speed, turns on 1 of 3 LEDs around the Arrow Button (bottom led)
    P10Ch0WifiLED_nWifiLED_n - White LED on when Wifi is connected or WifiLED - White LED on when Wifi is disconnected
    P14Ch1Btn_ScriptOnlyLight Button (Left)
    P26Ch1RelLight Relay. Turns on light button LED


    Launch Web Application
    Go to Filesystem tab
    Create file called autoexec.bat (should be default)
    Paste follow script
    Save and reboot the device.
    Test all functions to make sure they are working.

    A huge thank you to Drkarl and p.kaczmarek2 for working out the final coding.

    
    // Display the labels for each channel on the GUI
    setChannelLabel 1 "Light Relay"
    setChannelLabel 2 "Min Fan 1 Relay"
    setChannelLabel 3 "Mid Fan 2 Relay"
    setChannelLabel 4 "Max Fan Relay"
    setChannelType 5 Toggle
    setChannelLabel 5 "Fan ON/OFF"
    setChannelType 10 OffLowMidHigh
    
    // Hide the raw relay channel buttons from the GUI
    setChannelVisible 1 0
    setChannelVisible 2 0
    setChannelVisible 3 0
    setChannelVisible 4 0
    setChannelVisible 5 0
    
    // Start the HTTP button driver
    startDriver httpButtons
    
    // Set up the Light button on the GUI
    setButtonLabel 1 "Light ON/OFF"
    setButtonCommand 1 Do_Light_Press
    setButtonEnabled 1 1
    setButtonColor 1 red
    addChangeHandler Channel1 == 0 setButtonColor 1 red
    addChangeHandler Channel1 != 0 setButtonColor 1 green
    addEventHandler OnClick 14 Do_Light_Press
    alias Do_Light_Press toggleChannel 1
    
    // Set up the Fan ON/OFF button on the GUI
    setButtonLabel 2 "Fan ON/OFF"
    setButtonCommand 2 Do_Power_Press
    setButtonEnabled 2 1
    setButtonColor 2 red
    addChangeHandler Channel2 == 0 setButtonColor 2 red
    addChangeHandler Channel2 != 0 setButtonColor 2 green
    addEventHandler OnClick 1 Do_Power_Press
    alias Do_Power_Press toggleChannel 5
    
    // Set up the Fan speed cycle button on the GUI
    setButtonLabel 10 "Next Fan Speed"
    setButtonCommand 10 Do_Cycle_Press_Ext
    setButtonEnabled 10 1
    addEventHandler OnClick 8 Do_Cycle_Press_Ext
    alias Do_Cycle_Press addChannel 10 -1 1 3 1 
    alias Do_Cycle_Press_Ext if $CH10!=0 then Do_Cycle_Press 
    
    
    // Set up change handlers for the fan speed options
    addChangeHandler Channel10 == 0 backlog SetChannel 2 0; SetChannel 3 0; SetChannel 4 0; SetChannel 5 0
    addChangeHandler Channel10 == 1 backlog SetChannel 2 1; SetChannel 3 0; SetChannel 4 0; SetChannel 5 1
    addChangeHandler Channel10 == 2 backlog SetChannel 2 1; SetChannel 3 1; SetChannel 4 0; SetChannel 5 1
    addChangeHandler Channel10 == 3 backlog SetChannel 2 1; SetChannel 3 1; SetChannel 4 1; SetChannel 5 1
    addChangeHandler Channel5 == 0 backlog SetChannel 10 0
    addChangeHandler Channel5 == 1 backlog SetChannel 10 3


    So far all the relays/buttons are working the same as the original firmware and I'm able to set all the fan speeds.

    To set up the MQTT script in home assistant use the following

    
    mqtt: 
    ################################################################################
      light:
      ### Bedroom Light #####################
        - unique_id: bedswitch_relay_1
          name: "Bedroom Light"
          state_topic: "bedswitch/1/get"
          command_topic: "bedswitch/1/set"
          qos: 1
          payload_on: 1
          payload_off: 0
          retain: true
          availability:
          - topic: "bedswitch/connected"
    ################################################################################
      fan:
      ### Bedroom Fan ##########################
        - unique_id: "bedswitch_Channel_10"
          name: "Bedroom Fan"
          state_topic: "bedswitch/5/get"
          command_topic: "bedswitch/5/set"
          percentage_state_topic: "bedswitch/10/get"
          percentage_command_topic: "bedswitch/10/set"
          qos: 1
          payload_on: 1
          payload_off: 0
          speed_range_min: 1
          speed_range_max: 3
          retain: true
          availability:
            - topic: "bedswitch/connected"
    

    Cool? Ranking DIY
    About Author
    wolfieeewolf
    Level 9  
    Offline 
    wolfieeewolf wrote 43 posts with rating 10, helped 5 times. Been with us since 2023 year.
  • Helpful post
    #2
    p.kaczmarek2
    Moderator Smart Home
    Hello, the first thing to do would be to check if it's really TuyaMCU or not. I doesn't look like TuyaMCU.

    1. Does removing the config from autoexec.bat for you changes anything?
    2. With TuyaMCU config, in Launch Web Application -> Logs, do you have any TuyaMCU packets received?
    3. Is WB3S TXD1/RXD1 port connected somewhere on the board (check with multimeter or just look at the PCB), and if so, where?

    The configuration of the module looks like almost the module is doing everything, so there might be no TuyaMCU.

    Futhermore, when you consider the GPIOs of WB3S:
    15RXD1I/OUART1_RXD, which is used as a user-side serial interface pin and is connected to the P10 pin on the internal IC
    16TXD1I/OUART1_TXD, which is used as a user-side serial interface pin and is connected to the P11 pin on the internal IC

    RXD1 is P10, and you already listed P10 as LED control, so it's not possible that it's TuyaMCU.

    I will say that it currently looks like a non-TuyaMCU device. So TuyaMCU config won't help.

    The thing that you could do (and I can write a script for you for that) is script the fan things manually.

    We have multiple automatic tests on our Windows port for that functionality. They are mostly for developers, but they can give you (or readers) basic idea how it would be done in scripts:
    https://github.com/openshwprojects/OpenBK7231T_App/blob/main/src/selftest/selftest_demo_fanCyclingRelays.c
    https://github.com/openshwprojects/OpenBK7231T_App/blob/main/src/selftest/selftest_demo_mapFanSpeedToRelays.c
    https://github.com/openshwprojects/OpenBK7231T_App/blob/main/src/selftest/selftest_demo_exclusiveRelays.c

    I am not sure how well they match your device, but we can try to figure out something
  • #3
    wolfieeewolf
    Level 9  
    I think I agree with you that there is no TuyaMCU on board.

    1. Does removing the config from autoexec.bat for you changes anything?

    I added the code to the autoexec.bat to see what it would do and it crashed the device on reboot. Had to ClearConfig to reset.

    2. With TuyaMCU config, in Launch Web Application -> Logs, do you have any TuyaMCU packets received?

    I tried sending a few commands and gives little not nothing back in the log.

    3. Is WB3S TXD1/RXD1 port connected somewhere on the board (check with multimeter or just look at the PCB), and if so, where?

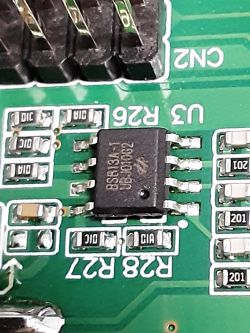
    I did some continuity testing with a multimeter and the TXD1 and RXD1 seem to run to the CH17M then to the BSB13A-1 then terminate on the top two CN2 header pins on the right. From some web searching it appears the chips are not TuyaMCU chips. Not that there was much info out there for them.

    I'm pretty now confident in saying that this device does not have a TuyaMCU.

    I have tried to get the scripts to work but I'm not overly confident in this stuff and couldn't get them to do anything. From what I understand I need add the script to autoexec.bat. So far it just keeps crashing or nothing happens. I'm guessing because some of the code is not compatible.

    I guess I have to write my own script from what you have giving me. I think I understand what the script is trying to do and I just need to modify it to work with my device. Will keep trying. I'm sure I'll work it out.
  • #4
    p.kaczmarek2
    Moderator Smart Home
    Remember that you can use Btn_ScriptOnly role for a button that is fully scriptable and has no automatic channel interactions.

    I must admit that this part of your description is not clear to me:
    Quote:

    Relay 2 should turn on Relay 3 and 4 - This sets fan to max speed
    Relay 2 should turn off Relay 3 and 4 - This turns off fan
    Relay 3 should always decrease speed one at a time 3 -> 2 -> 1 -> 3

    How can relay turn other relay? And how can Relay 2 at the same time turn off and on relays?

    I can write you a script, but I'd need a more clear description.
  • #5
    wolfieeewolf
    Level 9  
    Hope this helps. Have done some testing with changing pin channels and I feel that what i have below is 99.9% correct.

    I have been trying to do this via scripting, but I just have no idea where to start.


    Breakdown of what script should do

    Button 1 - Toggle light on/off

    Button 2 - Turn fan on/off - Set to Max when on

    Buttons 3 - Cycle Fan Speed - Max/Mid/Low - Needs to loop.

    What I know so far

    Relays

    Pin 26 - Light Relay - Channel 1

    Pin 6 - ? Main Fan Switch - This sets fan speed to lowest speed and turns on 1 of 3 smaller LEDs around the Arrow Button (right led).
    This pin needs to be active in all fan speeds. This pin also turns on the fan button LED - Channel 2

    Pin 7 - Turns fan to lowest speed and turns on 1 of 3 smaller LEDs around the Arrow Button (top led) - Channel 3

    Pin 9 - Turns fan to Highest setting and turns on 1 of 3 smaller LEDs around the Arrow Button (bottom led)- Channel 4

    When Fan Button is pressed it should turn on P6, P7 and P9 and when pressed again should turn off P6, P7 and P9

    The fan relays can be confusing but all 3 can be on at once. When P6 and P7 are both on at the same time it must supply a higher voltage which then increases the speed of the fan. You can turn P9 on by itself and it will go straight to max speed. However, when P9 is activated with P6 and P7 some kind of magic must be happening somewhere because it sets the speed to max and disregards whatever P6 and P7 are doing. It doesn't however turn on P6 and P7's LEDs.

    When Arrow Button is pressed it should turn on relays in this cycle

    High - P6, P7, P9 - Ch2, 3, 4
    Mid - P6, P7 - Ch2, 3
    Low - P6 - Ch2

    Button and Channels

    P8 - Light Button (Left) - Channel 1
    P14 - Fan Button (Middle) - Channel 2
    P24 - Arrow Button (Right) - Channel 3

    I do have P1 set as a button for P9 but there is no physical button. This was for the web interface so I could toggle P9. It does not need to be added to script.

    If you have a look at the Tasmota script it might give you a better idea of how it should work.

    https://templates.blakadder.com/deta_6914HA.html
  • Helpful post
    #6
    p.kaczmarek2
    Moderator Smart Home
    Well, we can do this step by step.

    Quote:

    Buttons 3 - Cycle Fan Speed - Max/Mid/Low - Needs to loop.

    This can be done according to this example:
    https://github.com/openshwprojects/OpenBK7231T_App/commit/dccb987ff5214e744155d54f30594632e010bb45#diff-d7f6b8d5f1fc099c6e03c7f7fbfecbaff70e911a0e3d059c6aa64c92ff9e0358
    Basically, you need to choose one channel that will be fan speed.
    1. Let's say that channel 10 is fan speed. In Web App set role "Low Mid High" to get a control on GUI
    2. Choose button that will scroll speeds. Set role to Btn_ScriptOnly
    3. Add following script:
    
    // cycle press will cycle values 0, 1, 2 and 3 for channel 10
    // AddChannel [ChannelIndex][ValueToAdd][ClampMin][ClampMax][bWrapInsteadOfClamp]
    alias Do_Cycle_Press addChannel 10 1 0 3 1
    // clicking button on pin 24 toggles cycles
    addEventHandler OnPress 24 Do_Cycle_Press
    

    Please try following script and tell me if the button works.


    Then, you can go further.

    For example, if you want to do:
    Quote:

    High - P6, P7, P9 - Ch2, 3, 4
    Mid - P6, P7 - Ch2, 3
    Low - P6 - Ch2

    And P6, P7, P9 already has assigned channels, you can do:

    
    // translate fan state (0-4) to relay states
    // This will check for channel 10 change and map it to channels for relays.
    // Fan off - all channels off
    addChangeHandler Channel10 == 0 backlog SetChannel 2 0; SetChannel 3 0; SetChannel 4 0
    // Fan on Low - Ch2 on
    addChangeHandler Channel10 == 1 backlog SetChannel 2 1; SetChannel 3 0; SetChannel 4 0
    // Fan on Medium - Ch2, Ch3 on
    addChangeHandler Channel10 == 2 backlog SetChannel 2 1; SetChannel 3 1; SetChannel 4 0
    // Fan on High - Ch2, 3, 4 on
    addChangeHandler Channel10 == 3 backlog SetChannel 2 1; SetChannel 3 1; SetChannel 4 1


    This is not complete, but should be a good start. Please consider the following code and start with testing only the first snippet, and if it works, proceed to second. Make sure that pin and channel indexes are matching the ones you have.
  • #7
    wolfieeewolf
    Level 9  
    I have been working on a script over the last couple of days. The script runs if I use the web GUI but it is all messed up on the device.

    I'm getting confused about when I should use the PIN or the CHANNEL number. I think that is why the buttons on the device are messed up.

    my setup is this so far
     "pins": {
        "1": "Btn;4",
        "6": "Rel;2",
        "7": "Rel;3",
        "8": "Btn;1",
        "9": "Rel;4",
        "10": "WifiLED_n;0",
        "14": "Btn_ScriptOnly;2",
        "24": "Btn_ScriptOnly;10",
        "26": "Rel;1"


    and my code is as follows - I have quoted the issues I'm having in the code itself for reference.

    // display on gui
    // LowMidHigh on GUI displaying wrong - just cycles when next fan speed is clicked
    // Clicking LowMidHigh radio buttons not correct.  Low=nothing Mid=Low and High=Mid
    setChannelType 10 LowMidHigh
    setChannelLabel 1 "Light Relay"
    setChannelLabel 2 "Min Fan 1 Relay"
    setChannelLabel 3 "Min Fan 2 Relay"
    setChannelLabel 4 "Max Fan Relay"
    
    // hide raw relay channel buttons from GUI
    // setChannelVisible 1 0
    // setChannelVisible 2 0
    // setChannelVisible 3 0
    // setChannelVisible 4 0
    
    startDriver httpButtons
    setButtonLabel 2 "Fan ON/OFF"
    setButtonLabel 10 "Next Fan Speed"
    setButtonEnabled 2 1
    setButtonEnabled 10 1
    
    // button colour
    addChangeHandler Channel2 == 0 setButtonColor 2 red
    addChangeHandler Channel2 != 0 setButtonColor 2 green
    addChangeHandler Channel3 == 0 setButtonColor 2 red
    addChangeHandler Channel3 != 0 setButtonColor 2 green
    addChangeHandler Channel4 == 0 setButtonColor 2 red
    addChangeHandler Channel4 != 0 setButtonColor 2 green
    
    // off by default
    setButtonColor 2 red
    
    // fan cycle setup
    
    setButtonCommand 10 Do_Cycle_Press
    
    // translate fan state (0-4) to relay states
    // This will check for channel 10 change and map it to channels for relays.
    
    // Fan off - all channels off
    addChangeHandler Channel10 == 0 backlog SetChannel 2 0; SetChannel 3 0; SetChannel 4 0
    
    // Fan on Low - Ch2 on
    addChangeHandler Channel10 == 1 backlog SetChannel 2 1; SetChannel 3 0; SetChannel 4 0
    
    // Fan on Medium - Ch2, Ch3 on
    addChangeHandler Channel10 == 2 backlog SetChannel 2 1; SetChannel 3 1; SetChannel 4 0
    
    // Fan on High - Ch2, 3, 4 on
    addChangeHandler Channel10 == 3 backlog SetChannel 2 1; SetChannel 3 1; SetChannel 4 1
    
    addEventHandler OnPress 24 Do_Cycle_Press
    
    // cycle press will cycle values 0, 1, 2 and 3 for channel 10
    // needs to reset to low on Do_Power_Press ??? not sure how to do this
    // AddChannel [ChannelIndex][ValueToAdd][ClampMin][ClampMax][bWrapInsteadOfClamp]
    alias Do_Cycle_Press addChannel 10 1 0 3 1
    
    // fan on/off setup
    
    setButtonCommand 2 Do_Power_Press
    
    addEventHandler OnPress 14 Do_Power_Press
    
    // power press will toggle channel 2,3 and 4 - so if non zero it goes to 0, if zero, then goes to 1
    // So far only toggles Channel 4. have tried ; and , to make multiple toggleChannels but not being recognised
    alias Do_Power_Press toggleChannel 4
  • #8
    p.kaczmarek2
    Moderator Smart Home
    Do you want to have a "LowMidHigh" (3 options radio button) on GUI or a 4 options one ("OffLowMidHigh") ?
  • #9
    wolfieeewolf
    Level 9  
    I run everything through Home Assistant and while a nice-looking gui is good, I don't really use it. I only have it that way for testing purposes to make sure the physical buttons are doing what they need to do. I could probably just get rid of the LowMidHigh as I can see the relays activating in the right order with the toggle buttons.

    My issue is that the cycling works fine when I click on the "Next Fan Speed" button on the gui but when it press the button on the physical device, it does something completely different.

    The "Fan ON/OFF" button on the gui will also only turn on/off Channel 4. It needs to turn on/off Ch2, 3 and 4.

    I think I have my Channels and Pins mixed up somewhere and I'm a little confused as to when I should be using the Pin number to activate something or the Channel number.

    I'm assuming the statements that say Channel like "addChangeHandler Channel10" and "setChannelLabel" are referring to the number I can set in the "channel field" and the statements like "addEventHandler OnPress 14" and "addEventHandler OnPress 24" are referring to the Pins

    It's when I have statements like "setButtonCommand 2 Do_Power_Press" and "setButtonCommand 10 Do_Cycle_Press" that I get stuck. Is it Pin or Channel?? The documentation doesn't tell me this and looking at the script from the links you sent me makes it more confusing as there is no Pin or channel reference to go off.

    I'm pretty much guessing at this point and hoping for the best which is not good as I've managed to reset the device a few times just by pressing the buttons on the device.

    I understand what the script is doing. I have been looking at and using scripting for many years and they are all pretty much the same but most of the scripting I used was just copied and pasted with maybe some little changes here and there. This script I just can't work out without more info about Pin settings and channel fields.

    I have attached a video of how it should work. hopefully, it will make a bit more sense.


  • Helpful post
    #10
    p.kaczmarek2
    Moderator Smart Home
    wolfieeewolf wrote:

    I'm assuming the statements that say Channel like "addChangeHandler Channel10" and "setChannelLabel" are referring to the number I can set in the "channel field"

    Yes, those are for channels
    wolfieeewolf wrote:

    and the statements like "addEventHandler OnPress 14" and "addEventHandler OnPress 24" are referring to the Pins

    Yes, this is OnPress (you can also use OnClick) event for pin index, where pin should also have button role.

    wolfieeewolf wrote:

    It's when I have statements like "setButtonCommand 2 Do_Power_Press" and "setButtonCommand 10 Do_Cycle_Press" that I get stuck. Is it Pin or Channel??

    I will try to update docs to be more clear, but all setButton* commands are for making custom, HTML-only (virtual, on WWW page) buttons, and the index of HTML button is just index of custom HTML button slot.
    This has nothing to do with pins and channels and this WWW page only.

    Here is a random example of custom buttons script:
    
    
    startDriver httpButtons
    setButtonEnabled 0 1
    setButtonLabel 0 "Turn off after 10 seconds"
    setButtonCommand 0 "addRepeatingEvent 10 1 Power Off"
    //setButtonColor 0 "#FF0000"
    
    setButtonEnabled 1 1
    setButtonLabel 1 "Set Red 50% brightness"
    setButtonCommand 1 "backlog led_basecolor_rgb FF0000; led_dimmer 50; led_enableAll 1"
    //setButtonColor 1 "blue"
    

    Again, as you can see, those are HTML-only buttons, not a physical ones. They just run a command when clicked.


    If you can to script physical buttons on device, use:
    
    addEventHandler OnPress 24 setChannel 1 0
    

    where 24 is pin index, P24, and it also needs to have Button (or Btn, or Btn_ScriptOnly) role set.

    wolfieeewolf wrote:

    I understand what the script is doing. I have been looking at and using scripting for many years and they are all pretty much the same but most of the scripting I used was just copied and pasted with maybe some little changes here and there. This script I just can't work out without more info about Pin settings and channel fields.

    Is there any more info that I can provide?

    Try it now with the information I added, and if there is a problem, I can try to write something more for you later today or tomorrow. I will try to help.
  • #11
    wolfieeewolf
    Level 9  
    Finally worked it out!!!

    After all that effort it ends up that I had some Buttons allocated wrong in the Pin settings. I also was calling the wrong channels and buttons in the script.

    Still a few minor issues with Fan ON/OFF button. The scripting is not triggering all the relays and I'm not sure how to fix that. The "toggleChannel" statement only accepts one channel and not multiple as far as I can tell.

    I'd also like the switch to act like the original firmware. That is, you need to press the Fan ON/OFF button to use the fan and then use the Arrow button to cycle speeds. The Arrow button is essentially locked until the Fan ON/OFF button is pressed. Like in the video. Not sure how one would do this though.

    Would also like to transfer this script to Home Assistant and get it working the same and have a nice GUI. I'm thinking that is more of a HA setup issue than an OpenBK one.

    I have updated the original post and it should allow anyone with the device to use it almost how the original firmware functioned. Will keep tinkering away at this one until I get it right. Might take a break for a few days though to clear my mind. This was hard on my poor brain.

    Thanks for all your help so far.
  • #12
    p.kaczmarek2
    Moderator Smart Home
    Can you please post current version of the script?

    If you want to toggle multiple channels, do:
    
    backlog toggleChannel 10; toggleChannel 12; toggleChannel 14


    Quote:

    I'd also like the switch to act like the original firmware. That is, you need to press the Fan ON/OFF button to use the fan and then use the Arrow button to cycle speeds. The Arrow button is essentially locked until the Fan ON/OFF button is pressed. Like in the video. Not sure how one would do this though.

    Let's say you want to do something only if channel10 is non-zero. Then you can do:
    
    addEventHandler OnPress 24 if $CH10 then Do_Cycle_Press
    

    The generic syntax is:
    
    if CONDITION_SINGLE_WORD then COMMAND_SINGLE_WORD
    

    Remember that you can use "alias" to shorten long command strings into short statements

    Added after 1 [minutes]:

    The conditional:

    can also take quoted string and they are evaluated as command, see:
    https://github.com/openshwprojects/OpenBK7231T_App/blob/main/src/selftest/selftest_if.c
  • #13
    wolfieeewolf
    Level 9  
    The current script is below.

    Haven't added your latest reply changes yet. It's about 1:30 AM here so heading to bed. Will have a crack at it tomorrow.

    // display on gui
    setChannelType 10 OffLowMidHigh
    setChannelLabel 1 "Light Relay"
    setChannelLabel 2 "Min Fan 1 Relay"
    setChannelLabel 3 "Min Fan 2 Relay"
    setChannelLabel 4 "Max Fan Relay"
    
    // hide raw relay channel buttons from GUI
    // setChannelVisible 1 0
    // setChannelVisible 2 0
    // setChannelVisible 3 0
    // setChannelVisible 4 0
    
    //startDriver httpButtons
    setButtonEnabled 1 1
    setButtonEnabled 2 1
    setButtonEnabled 10 1
    
    // button colour
    addChangeHandler Channel1 == 0 setButtonColor 1 red
    addChangeHandler Channel1 != 0 setButtonColor 1 green
    addChangeHandler Channel2 == 0 setButtonColor 2 red
    addChangeHandler Channel2 != 0 setButtonColor 2 green
    addChangeHandler Channel3 == 0 setButtonColor 2 red
    addChangeHandler Channel3 != 0 setButtonColor 2 green
    addChangeHandler Channel4 == 0 setButtonColor 2 red
    addChangeHandler Channel4 != 0 setButtonColor 2 green
    
    // off by default
    setButtonColor 1 red
    setButtonColor 2 red
    
    //enables Light button on GUI - not working unsure why
    setButtonLabel 1 "Light ON/OFF"
    
    // fan on/off setup
    // power press will toggle channel 2,3 and 4 - so if non zero it goes to 0, if zero, then goes to 1
    // So far only toggles channel 4. have tried ; and , to make multiple toggleChannels but not being recognised
    
    setButtonLabel 2 "Fan ON/OFF"
    setButtonCommand 2 Do_Power_Press
    addEventHandler OnClick 1 Do_Power_Press
    alias Do_Power_Press toggleChannel 4
    
    
    // fan cycle setup
    // cycle press will cycle values 0, 1, 2 and 3 for channel 10
    // needs to reset to 1 on Do_Power_Press ??? not sure how to do this
    // AddChannel [ChannelIndex][ValueToAdd][ClampMin][ClampMax][bWrapInsteadOfClamp]
    
    setButtonLabel 10 "Next Fan Speed"
    setButtonCommand 10 Do_Cycle_Press
    addEventHandler OnClick 8 Do_Cycle_Press
    alias Do_Cycle_Press addChannel 10 1 0 3 1
    
    // translate fan state (0-4) to relay states
    // This will check for channel 10 change and map it to channels for relays.
    
    // Fan off - all channels off
    addChangeHandler Channel10 == 0 backlog SetChannel 2 0; SetChannel 3 0; SetChannel 4 0
    
    // Fan on Low - Ch2 on
    addChangeHandler Channel10 == 1 backlog SetChannel 2 1; SetChannel 3 0; SetChannel 4 0
    
    // Fan on Medium - Ch2, Ch3 on
    addChangeHandler Channel10 == 2 backlog SetChannel 2 1; SetChannel 3 1; SetChannel 4 0
    
    // Fan on High - Ch2, 3, 4 on
    addChangeHandler Channel10 == 3 backlog SetChannel 2 1; SetChannel 3 1; SetChannel 4 1
    
    
  • #14
    p.kaczmarek2
    Moderator Smart Home
    Maybe replace:
    
    alias Do_Cycle_Press addChannel 10 1 0 3 1
    

    with
    
    alias Really_Do_Cycle_Press addChannel 10 1 0 3 1
    alias Do_Cycle_Press if $CH4 then Really_Do_Cycle_Press
    

    because it seems that your $CH4 is POWER variable.
  • #15
    wolfieeewolf
    Level 9  
    I did try the changes you suggested while they did work they didn't work as I hoped.


    The Fan button now turns on/off relay channels 2,3 and 4

    The Fan cycle button cycles for high, mid, low and off.

    When you combine the two sections that's where I run into issues.

    Press Fan Button - Ch 2,3 and 4 turn on
    Then press Fan Cycle Button - Ch2,3 on, 4 off
    press Fan Cycle Button again - Ch2 on, 3 and 4 off
    Press Fan Button - Ch 2 off, 3 and 4 on.

    Fan Button just toggles Ch2, 3 and 4 on/off depending on their status. I tried to combat this by writing an If this then that type statement but I ended up having to do this for every combination possible and it just made for a messy hard to follow script that in the end didn't work.

    I did manage to get the Fan Cycle Button to only work when the Fan Button is on but with the above issue I left this out of the script because it just caused more problems then it was worth.

    I edited the script to make it a bit more understandable for me during the testing of the above. Looks messy and I know is not how things should be done but it works and I'm afraid if I mess with it again I'll just break it so I left it as is. I have updated the original post with the new script.

    New scripting below for post continuity

    /// Display the labels for each channel on the GUI
    setChannelType 10 OffLowMidHigh
    setChannelLabel 1 "Light Relay"
    setChannelLabel 2 "Min Fan 1 Relay"
    setChannelLabel 3 "Min Fan 2 Relay"
    setChannelLabel 4 "Max Fan Relay"
    
    // Hide the raw relay channel buttons from the GUI
    setChannelVisible 1 0
    setChannelVisible 2 0
    setChannelVisible 3 0
    setChannelVisible 4 0
    
    // Start the HTTP button driver
    startDriver httpButtons
    
    // Set up the Light button on the GUI
    setButtonLabel 1 "Light ON/OFF"
    setButtonCommand 1 Do_Light_Press
    setButtonEnabled 1 1
    setButtonColor 1 red
    addChangeHandler Channel1 == 0 setButtonColor 1 red
    addChangeHandler Channel1 != 0 setButtonColor 1 green
    addEventHandler OnClick 14 Do_Light_Press
    alias Do_Light_Press toggleChannel 1
    
    // Set up the Fan ON/OFF button on the GUI
    setButtonLabel 2 "Fan ON/OFF"
    setButtonCommand 2 Do_Power_Press
    setButtonEnabled 2 1
    setButtonColor 2 red
    addChangeHandler Channel2 == 0 setButtonColor 2 red
    addChangeHandler Channel2 != 0 setButtonColor 2 green
    addChangeHandler Channel3 == 0 setButtonColor 2 red
    addChangeHandler Channel3 != 0 setButtonColor 2 green
    addChangeHandler Channel4 == 0 setButtonColor 2 red
    addChangeHandler Channel4 != 0 setButtonColor 2 green
    addEventHandler OnClick 1 Do_Power_Press
    alias Do_Power_Press backlog toggleChannel 2; toggleChannel 3; toggleChannel 4
    
    // Set up the Fan speed cycle button on the GUI
    setButtonLabel 10 "Next Fan Speed"
    setButtonCommand 10 Do_Cycle_Press
    setButtonEnabled 10 1
    addEventHandler OnClick 8 Do_Cycle_Press
    alias Do_Cycle_Press addChannel 10 1 0 3 1
    
    // Set up change handlers for the fan speed options
    addChangeHandler Channel10 == 0 backlog SetChannel 2 0; SetChannel 3 0; SetChannel 4 0
    addChangeHandler Channel10 == 1 backlog SetChannel 2 1; SetChannel 3 1; SetChannel 4 1
    addChangeHandler Channel10 == 2 backlog SetChannel 2 1; SetChannel 3 1; SetChannel 4 0
    addChangeHandler Channel10 == 3 backlog SetChannel 2 1; SetChannel 3 0; SetChannel 4 0
    
  • #16
    wolfieeewolf
    Level 9  
    Still trying to sort out this fan-speed drama. I tried to use some Tasmota-type scripting but I don't think OpenBK likes it very much.

    It needs to follow the logic on this page

    // Display the labels for each channel on the GUI
    setChannelType 10 OffLowMidHigh
    setChannelLabel 1 "Light Relay"
    setChannelLabel 2 "Min Fan 1 Relay"
    setChannelLabel 3 "Min Fan 2 Relay"
    setChannelLabel 4 "Max Fan Relay"
    
    // Hide the raw relay channel buttons from the GUI
    setChannelVisible 1 0
    setChannelVisible 2 0
    setChannelVisible 3 0
    setChannelVisible 4 0
    
    // Start the HTTP button driver
    startDriver httpButtons
    
    // Set up the Light button on the GUI
    setButtonLabel 1 "Light ON/OFF"
    setButtonCommand 1 Do_Light_Press
    setButtonEnabled 1 1
    setButtonColor 1 red
    addChangeHandler Channel1 == 0 setButtonColor 1 red
    addChangeHandler Channel1 != 0 setButtonColor 1 green
    addEventHandler OnClick 14 Do_Light_Press
    alias Do_Light_Press power1 toggle
    
    // Set up the Fan ON/OFF button on the GUI
    setButtonLabel 2 "Fan ON/OFF"
    setButtonCommand 2 Do_Power_Press
    setButtonEnabled 2 1
    setButtonColor 2 red
    addChangeHandler Channel2 == 0 setButtonColor 2 red
    addChangeHandler Channel2 != 0 setButtonColor 2 green
    addChangeHandler Channel3 == 0 setButtonColor 2 red
    addChangeHandler Channel3 != 0 setButtonColor 2 green
    addChangeHandler Channel4 == 0 setButtonColor 2 red
    addChangeHandler Channel4 != 0 setButtonColor 2 green
    addEventHandler OnClick 1 Do_Power_Press
    alias Do_Power_Press power2 toggle; power3 toggle; power4 toggle
    
    // Set up the Fan speed cycle button on the GUI
    setButtonLabel 10 "Next Fan Speed"
    setButtonCommand 10 Do_Cycle_Press
    setButtonEnabled 10 1
    addEventHandler OnClick 8 Do_Cycle_Press
    alias Do_Cycle_Press event p=%var1%
    
    // Set up change handlers for the fan speed options
    ON EVENT#p=0 DO power2 OFF ENDON
    ON EVENT#p=0 DO power3 OFF ENDON
    ON EVENT#p=0 DO power4 OFF ENDON
    ON EVENT#p=1 DO power2 ON ENDON
    ON EVENT#p=1 DO power3 ON ENDON
    ON EVENT#p=1 DO power4 ON ENDON
    ON EVENT#p=2 DO power2 ON ENDON
    ON EVENT#p=2 DO power3 ON ENDON
    ON EVENT#p=2 DO power4 OFF ENDON
    ON EVENT#p=3 DO power2 ON ENDON
    ON EVENT#p=3 DO power3 OFF ENDON
    ON EVENT#p=3 DO power4 OFF ENDON


    I'm guessing I need to change it to some kind of toggleChannel command to get it to work. Will keep trying.
  • #17
    drkarl
    Level 4  
    Where you able to get this to function properly?
  • #18
    p.kaczmarek2
    Moderator Smart Home
    Hello, I haven't seen last post in this topic.
    This line:
    
    ON EVENT#p=0 DO power2 OFF ENDON
    
    will not work in OBK yet.
    To toggle channel, you can do:
    
    POWER Toggle
    

    or
    
    toggleChannel 3
    

    where 3 is a channel index.
    See more examples at:
    https://github.com/openshwprojects/OpenBK7231T_App/blob/main/docs/autoexecExamples.md

    Let me know if the problem still persists. I could try to help more, but as said above, it's slightly problematic without having the same device at hand.
  • #19
    drkarl
    Level 4  
    Updated scripting - seems to work as the device is out of the box with 1 exception, see below.

    Quote:
    // Display the labels for each channel on the GUI
    setChannelLabel 1 "Light Relay"
    setChannelLabel 2 "Min Fan 1 Relay"
    setChannelLabel 3 "Mid Fan 2 Relay"
    setChannelLabel 4 "Max Fan Relay"
    setChannelType 5 Toggle
    setChannelLabel 5 "Fan ON/OFF"
    setChannelType 10 OffLowMidHigh

    // Hide the raw relay channel buttons from the GUI
    setChannelVisible 1 0
    setChannelVisible 2 0
    setChannelVisible 3 0
    setChannelVisible 4 0
    setChannelVisible 5 0

    // Start the HTTP button driver
    startDriver httpButtons

    // Set up the Light button on the GUI
    setButtonLabel 1 "Light ON/OFF"
    setButtonCommand 1 Do_Light_Press
    setButtonEnabled 1 1
    setButtonColor 1 red
    addChangeHandler Channel1 == 0 setButtonColor 1 red
    addChangeHandler Channel1 != 0 setButtonColor 1 green
    addEventHandler OnClick 14 Do_Light_Press
    alias Do_Light_Press toggleChannel 1

    // Set up the Fan ON/OFF button on the GUI
    setButtonLabel 2 "Fan ON/OFF"
    setButtonCommand 2 Do_Power_Press
    setButtonEnabled 2 1
    setButtonColor 2 red
    addChangeHandler Channel2 == 0 setButtonColor 2 red
    addChangeHandler Channel2 != 0 setButtonColor 2 green
    addEventHandler OnClick 1 Do_Power_Press
    alias Do_Power_Press toggleChannel 5

    // Set up the Fan speed cycle button on the GUI
    setButtonLabel 10 "Next Fan Speed"
    setButtonCommand 10 Do_Cycle_Press
    setButtonEnabled 10 1
    addEventHandler OnClick 8 Do_Cycle_Press
    alias Do_Cycle_Press addChannel 10 -1 1 3 1

    // Set up change handlers for the fan speed options
    addChangeHandler Channel10 == 0 backlog SetChannel 2 0; SetChannel 3 0; SetChannel 4 0; SetChannel 5 0
    addChangeHandler Channel10 == 1 backlog SetChannel 2 1; SetChannel 3 0; SetChannel 4 0; SetChannel 5 1
    addChangeHandler Channel10 == 2 backlog SetChannel 2 1; SetChannel 3 1; SetChannel 4 0; SetChannel 5 1
    addChangeHandler Channel10 == 3 backlog SetChannel 2 1; SetChannel 3 1; SetChannel 4 1; SetChannel 5 1
    addChangeHandler Channel5 == 0 backlog SetChannel 10 0
    addChangeHandler Channel5 == 1 backlog SetChannel 10 3


    Code: yaml
    Log in, to see the code


    Non Factory Behaviour - Fan Speed Toggle Button
    Issue:
    Fan Speed Cycle button also turns fan ON
    Expected behaviour:
    Button only functions and cycles fan speeds IF fan is turned on ie Channel10 != 0
    Maybe an IF THEN ELSE statement
    if 'Channel10 != 0' then 'alias Do_Cycle_Press addChannel 10 -1 1 3 1 ' else 'setChannel 10 0'
  • #20
    p.kaczmarek2
    Moderator Smart Home
    I can add a channel type "MaxMedMin" or something, if you want other speeds order.

    Your if syntax is not correct.
    You want something like:
    
    alias Do_Cycle_Press_Ext if $CH10!=0 then Do_Cycle_Press 
    
  • #21
    drkarl
    Level 4  
    Quote:
    I can add a channel type "MaxMedMin" or something, if you want other speeds order.

    No I don't think this is necessary. It may actually create an issue for speed selection in Home Assistant.
    Channel10 =1 would be Max in web app but show Min in Home assistant
    Channel10 =3 would be Min in web app but show Max in Home assistant

    Quote:
    Your if syntax is not correct.
    You want something like:
    alias Do_Cycle_Press_Ext if $CH10!=0 then Do_Cycle_Press

    Failed, Sorry I don't seem to understand the syntax properly, I have tried the following

    Failed
    /
    Quote:
    / Set up the Fan speed cycle button on the GUI
    setButtonLabel 10 "Next Fan Speed"
    setButtonCommand 10 Do_Cycle_Press
    setButtonEnabled 10 1
    addEventHandler OnClick 8 Do_Cycle_Press
    alias Do_Cycle_Press if $CH10!=0 then Do_Cycle_Press addChannel 10 -1 1 3 1


    Failed
    /
    Quote:
    / Set up the Fan speed cycle button on the GUI
    setButtonLabel 10 "Next Fan Speed"
    setButtonCommand 10 Do_Cycle_Press
    setButtonEnabled 10 1
    addEventHandler OnClick 8 Do_Cycle_Press
    alias Do_Cycle_Press addChannel 10 -1 1 3 1
    alias Do_Cycle_Press_Ext if $CH10!=0 then Do_Cycle_Press
  • #22
    p.kaczmarek2
    Moderator Smart Home
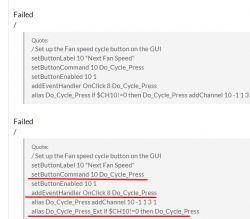
    Hey, you are creating a new aliased command but you are not using it! You are still using an old alias without the condition. Please see screenshot:
    Deta Grid Connect Smart Fan Speed Controller with Touch Light Switch - 6914HA - Teardown
  • #23
    drkarl
    Level 4  
    VICTORY! Thank you for your guidance, all appears to be working as OEM delivered. I will continue testing over the next few days.
    If you can see any obvious script cleanup or improvements please advise.

    Light button - toggles Light ON/OFF
    Fan button - Toggles Fan ON at speed MAX and OFF
    Speed buttons - ONLY works when fan is ON and cycles fan in order of MAX -> Med -> Min ->Max

    SCRIPT
    // Display the labels for each channel on the GUI
    setChannelLabel 1 "Light Relay"
    setChannelLabel 2 "Min Fan 1 Relay"
    setChannelLabel 3 "Mid Fan 2 Relay"
    setChannelLabel 4 "Max Fan Relay"
    setChannelType 5 Toggle
    setChannelLabel 5 "Fan ON/OFF"
    setChannelType 10 OffLowMidHigh
    
    // Hide the raw relay channel buttons from the GUI
    setChannelVisible 1 0
    setChannelVisible 2 0
    setChannelVisible 3 0
    setChannelVisible 4 0
    setChannelVisible 5 0
    
    // Start the HTTP button driver
    startDriver httpButtons
    
    // Set up the Light button on the GUI
    setButtonLabel 1 "Light ON/OFF"
    setButtonCommand 1 Do_Light_Press
    setButtonEnabled 1 1
    setButtonColor 1 red
    addChangeHandler Channel1 == 0 setButtonColor 1 red
    addChangeHandler Channel1 != 0 setButtonColor 1 green
    addEventHandler OnClick 14 Do_Light_Press
    alias Do_Light_Press toggleChannel 1
    
    // Set up the Fan ON/OFF button on the GUI
    setButtonLabel 2 "Fan ON/OFF"
    setButtonCommand 2 Do_Power_Press
    setButtonEnabled 2 1
    setButtonColor 2 red
    addChangeHandler Channel2 == 0 setButtonColor 2 red
    addChangeHandler Channel2 != 0 setButtonColor 2 green
    addEventHandler OnClick 1 Do_Power_Press
    alias Do_Power_Press toggleChannel 5
    
    // Set up the Fan speed cycle button on the GUI
    setButtonLabel 10 "Next Fan Speed"
    setButtonCommand 10 Do_Cycle_Press_Ext
    setButtonEnabled 10 1
    addEventHandler OnClick 8 Do_Cycle_Press_Ext
    alias Do_Cycle_Press addChannel 10 -1 1 3 1 
    alias Do_Cycle_Press_Ext if $CH10!=0 then Do_Cycle_Press 
    
    
    // Set up change handlers for the fan speed options
    addChangeHandler Channel10 == 0 backlog SetChannel 2 0; SetChannel 3 0; SetChannel 4 0; SetChannel 5 0
    addChangeHandler Channel10 == 1 backlog SetChannel 2 1; SetChannel 3 0; SetChannel 4 0; SetChannel 5 1
    addChangeHandler Channel10 == 2 backlog SetChannel 2 1; SetChannel 3 1; SetChannel 4 0; SetChannel 5 1
    addChangeHandler Channel10 == 3 backlog SetChannel 2 1; SetChannel 3 1; SetChannel 4 1; SetChannel 5 1
    addChangeHandler Channel5 == 0 backlog SetChannel 10 0
    addChangeHandler Channel5 == 1 backlog SetChannel 10 3


    Home assistant MQTT intergration works as per OEM button configuration above
    Light - Toggles Light
    Fan - Toggles Fan ON at speed Max and OFF
    Speed Selection - Cycles Fan Speed Decreasing From MAX -> Med -> Min -> MAX. If fan is off, any speed selected turns Fan ON at MAX (to reduce startup time and current draw) then cycles as above.

    Code: yaml
    Log in, to see the code
  • #24
    wolfieeewolf
    Level 9  
    I have tested this script on all 5 of my devices and it is working as planned.

    Would be interested to see if there was a way to get the firmware to send a custom MQTT script. Not sure how this could be done. perhaps give the option to send the default script or a custom one perhaps. This would solve the issue of having 4 extra switches showing up in home assistant.

    As you can write button scripts for this firmware it would be interesting to see if I could control a smart led globe from the light power button. This would stop my wife and kids from killing the power to the globe which I'm sure we have all experienced. It would be great to be able to have the power button turn off the globe or dim the globe by holding the button down. Could even set up scenes with double/triple clicks.

    I'm sure this is already possible just need to do a bit more searching to find it.

    As the autoexec script and MQTT script work as planned, I'll update the original post so anyone new to this device doesn't have to dig through the post to find this information.

    Thank you for everyones hard work on this. I had all but given up on trying to get it to work.
  • #25
    p.kaczmarek2
    Moderator Smart Home
    I am very happy to see that we have finally managed to together sort it out. Let me know if anything else is needed.

    wolfieeewolf wrote:

    Would be interested to see if there was a way to get the firmware to send a custom MQTT script. Not sure how this could be done. perhaps give the option to send the default script or a custom one perhaps. This would solve the issue of having 4 extra switches showing up in home assistant.

    Do you mean custom Home Assistant Discovery yaml? This is planned to be possible via web app.


    wolfieeewolf wrote:

    As you can write button scripts for this firmware it would be interesting to see if I could control a smart led globe from the light power button. This would stop my wife and kids from killing the power to the globe which I'm sure we have all experienced. It would be great to be able to have the power button turn off the globe or dim the globe by holding the button down. Could even set up scenes with double/triple clicks.

    So you have one device with button and you want to toggle second device from that?
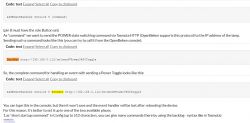
    You can use SendGet for that, see this topic:
    https://www.elektroda.com/rtvforum/viewtopic.php?p=20012428#20012428
    Deta Grid Connect Smart Fan Speed Controller with Touch Light Switch - 6914HA - Teardown
    For click events see:
    https://www.elektroda.com/rtvforum/find.php?q=on3click

    However, it is important to note that button events do not work with TuyaMCU because of TuyaMCU limitations. It's just an UART protocol. It does not notify OBK about the individual button click events. The On3Click, etc, events are available in OBK devices that are using Btn role for buttons (and similar roles), not the TuyaMCU ones.
  • #26
    wolfieeewolf
    Level 9  
    p.kaczmarek2 wrote:
    Do you mean custom Home Assistant Discovery yaml? This is planned to be possible via web app.


    Correct. Would be great to be able to chose to send the auto-generated yaml or a custom one. This would solve a lot of my issues with the doubling up of switches in home assistant.

    p.kaczmarek2 wrote:
    So you have one device with button and you want to toggle second device from that?
    You can use SendGet for that, see this topic:
    https://www.elektroda.com/rtvforum/viewtopic.php?p=20012428#20012428

    For click events see:
    https://www.elektroda.com/rtvforum/find.php?q=on3click

    However, it is important to note that button events do not work with TuyaMCU because of TuyaMCU limitations. It's just an UART protocol. It does not notify OBK about the individual button click events. The On3Click, etc, events are available in OBK devices that are using Btn role for buttons (and similar roles), not the TuyaMCU ones.


    I went searching and found the SendGet command not long after I wrote the post. Just have to work out how to send HTTP commands to Zigbee devices now. I could use some webhooks but they are not the safest way to do it over the internet. I have found a lots of stuff on the home assistant forums about doing this so if I can get it to work I'll update it here.

    Again, thanks for your help on getting this device working how it should.
  • #27
    p.kaczmarek2
    Moderator Smart Home
    I don't know currently how to send HTTP commands to Zigbee devices, so if you figure it out, please let me know. You can also consider posting it as a separate post in our tutorials section. I am trying to make a lot of tutorials with the help of my contributors, but I think we still could use some help from other users.

    Can you provide more details on what you mean by "doubling switches"? Are you trying to use both manual YAML and Hass Discovery at the same time?
  • #28
    wolfieeewolf
    Level 9  
    p.kaczmarek2 wrote:
    I don't know currently how to send HTTP commands to Zigbee devices, so if you figure it out, please let me know. You can also consider posting it as a separate post in our tutorials section. I am trying to make a lot of tutorials with the help of my contributors, but I think we still could use some help from other users


    i think I have to use curl to get zigbee to work. still testing but it looks like the way to do it for now. Also yes i'll make another post if i work it out.

    curl -X POST -H "Content-Type: application/json" -H "x-ha-access: YOUR_API_PASSWORD" -d '{"entity_id": "light.your_light_entity_id", "state": "on"}' http://localhost:8123/api/services/light/turn_on


    p.kaczmarek2 wrote:
    Can you provide more details on what you mean by "doubling switches"? Are you trying to use both manual YAML and Hass Discovery at the same time?


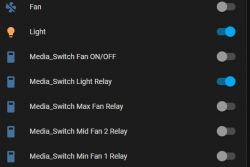
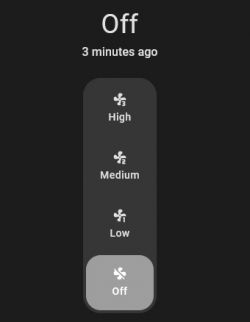
    You can see that I have multiple entries for fans and lights that automatically show up on the overview dashboard in home assistant. The first two switches "Fan" and "Light" have been manually set up using the config.yaml. The rest is automatically discovered via the MQTT broker. Would be nice to be able to isolate what MQTT data gets sent to home assistant or better yet allow us to send custom data from the web UI and disregard the auto-generated data. Hope that makes sense.

    Deta Grid Connect Smart Fan Speed Controller with Touch Light Switch - 6914HA - Teardown Deta Grid Connect Smart Fan Speed Controller with Touch Light Switch - 6914HA - Teardown

    You stated a few posts ago that you were working on something like this. Is there a post here that we can move this to so we are not flooding this thread with an off topic post?
  • #29
    p.kaczmarek2
    Moderator Smart Home
    I think you can open a new topic with the exact feature request/idea, there is currently no topic for that.

    But I will say here, that in general, I didn't intend people to use both HASS discovery and yaml config at the same time. If you are using yaml config, the current approach to fix this problem would be to just add all datapoints to yaml manually and don't use HA discovery.
  • #30
    drkarl
    Level 4  
    +1 for using just manual mqtt config only, you have ultimate control over what is then exposed to home assistant. Why not then just use an automation within home assistant to control the ZigBee device?