logo elektroda
logo elektroda
X
logo elektroda

Flashing and Configuring Laser and Motor on Nebula Star Projector CBU-BK7231N

soubhikkhan 1590 14
ADVERTISEMENT
  • #1 20716874
    soubhikkhan
    Level 3  
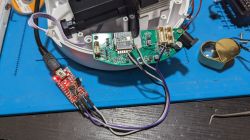
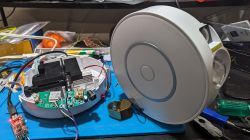
    Electronic circuit with connected USB programmer. Open casing of an electronic device with visible components, cables, and motherboard.

    I have flashed this guy and able to control the RGB LEDs. However need to help with the config for Laser and Motor properly.
    The other thread in this forum with BK7231T was helpful, but I need to understand what pin 23 is doing and what value to set.

    The tool generated this
    Code: JSON
    Log in, to see the code


    Device configuration, as extracted from Tuya:
    - LED Blue (Channel 3) on P8
    - LED Red (Channel 1) on P6
    - LED Green (Channel 2) on P7
    Device seems to be using CBU module, which is using BK7231N.
    And the Tuya section starts, as usual, at 2023424

    Attached the backup bin file as well.
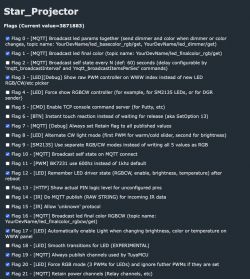
    I have configured the LEDs, Laster and motor as PWM and i'm able to set individual brightness and colors. I followed the general flags from the other star light thread. However not seeing separate toggle buttons for Laser and motor! idk what to add in autoexec.bat script!
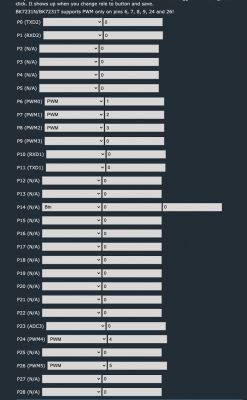
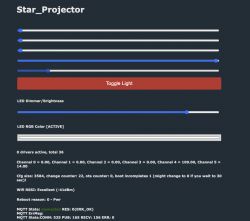
    Screenshot of BK7231N pin configuration with various settings for PWM and buttons. User interface of Star_Projector with control sliders for LED and laser. Configuration options list for a star projector with various setting flags.


    Kindly help me with configuring the Laser and the motor correctly and pin23.
  • ADVERTISEMENT
  • #2 20717053
    p.kaczmarek2
    Moderator Smart Home
    Hello, it looks like that P23 is mentioned in the JSON:
    
    "micpin":"23",


    Does your device have a microphone?

    soubhikkhan wrote:
    However not seeing separate toggle buttons for Laser and motor! idk what to add in autoexec.bat script!
    It's normal. You haven't added script yet. Go to the Web App, LittleFS tab, press Create new file, and create autoexec.bat with the script from the thread you mentioned:
    Genio Galaxy Smart Lamp - BK7231T - Teardown + Guide
    Then save and reboot.
    Helpful post? Buy me a coffee.
  • ADVERTISEMENT
  • #3 20717839
    soubhikkhan
    Level 3  

    p.kaczmarek2 wrote:
    Hello, it looks like that P23 is mentioned in the JSON:
    
    "micpin":"23",


    Does your device have a microphone?

    Not that I'm aware of! That raises the suspicion in my mind if there was one hidden to spy on users ;)
    I will open up again and check the hardware!

    p.kaczmarek2 wrote:

    It's normal. You haven't added the script yet. Go to the Web App, LittleFS tab, press Create new file, and create autoexec.bat with the script from the thread you mentioned:
    Genio Galaxy Smart Lamp - BK7231T - Teardown + Guide
    Then save and reboot.


    I added this, saved and rebooted, but still do not see the laser and motor toggle buttons!
    
    startDriver PWMToggler
    toggler_channel0 4
    toggler_name0 Laser
    toggler_channel1 5
    toggler_name1 Motor
    addEventHandler LEDState 1 backlog toggler_enable0 1; toggler_enable1 1; 
    

  • #4 20717856
    p.kaczmarek2
    Moderator Smart Home
    If you still don't see the buttons from PWM toggler, please post a screenshot of your main WWW OBK page so I can check whether the PWMToggler driver is running.

    Please check is there a mic connected to P23, namely, the ADC input.
    Helpful post? Buy me a coffee.
  • ADVERTISEMENT
  • #5 20717903
    soubhikkhan
    Level 3  

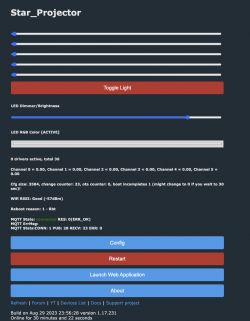
    Here is the screenshot

    Screenshot of the LittleFS file management interface with a script editor. Screenshot of the Star_Projector user interface with sliders for light adjustment.

    Added after 8 [minutes]:

    Looks like 0 drivers active
  • ADVERTISEMENT
  • #6 20717939
    p.kaczmarek2
    Moderator Smart Home
    That's strange, are you sure that you've restarted the device?
    Helpful post? Buy me a coffee.
  • #7 20717951
    soubhikkhan
    Level 3  

    Yes, a couple of times.. again I recreated the file with the script and restarted.
  • #8 20717991
    p.kaczmarek2
    Moderator Smart Home
    This is very strange. Are you sure that your browser didn't add any special chars to the file text, thus making whitespace non-standard?

    Please do a little test - go to Config, then Execute custom command (NOT short startup command), then execute:
    
    startDriver PWMToggler
    

    and show me again the www panel... so we can check is the PWMToggler running
    Helpful post? Buy me a coffee.
  • #9 20718018
    soubhikkhan
    Level 3  

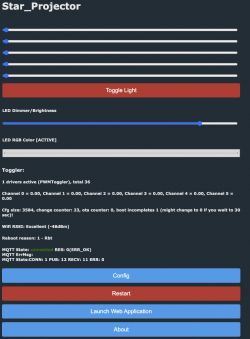
    OK, so after running it from the "Execute custom Command", it showed "OK". Then I went back to the file editor and checked every line, saved, and rebooted. Now on the WWW page, it shows 1 driver active but the toggle button is not yet visible. I tried with and without this line too.
    addEventHandler LEDState 1 backlog toggler_enable0 1; toggler_enable1 1; 


    User interface of the Star_Projector control panel with buttons and sliders for adjusting LED settings.
  • #10 20718097
    p.kaczmarek2
    Moderator Smart Home
    If it's working from command line, but not from autoexec, it may mean one of the following:
    - you haven't restarted your device so autoexec.bat wasn't run
    - autoexec.bat name has a typo or a whitespace
    - your browser has corrupted the autoexec.bat text whitespaces (when copy-pasting from forum) and you need to retype autoexec.bat manually, or at least manually fix whitespace
    Your issue is that, for some reason, autoexec.bat does not execute properly and we need to fix that.
    Helpful post? Buy me a coffee.
  • #11 20718165
    soubhikkhan
    Level 3  
    It worked! I moved from chrome to safari and typed everything manually! waisted hours unnecessarily!

    Now there are 2 things need to fix.
    1. the physical button connected to P14, toggles only the RGB LEDs. I would like to make it work in this way

    single press: toggle LED
    Double press: Toggle Laser and Motor


    2 Home assistant MQTT.
    My current config is this
    mqtt:
      light:
      - unique_id: "Star_Projector_light"
        name: 0
        rgb_command_template: "{{ '#%02x%02x%02x0000' | format(red, green, blue)}}"
        rgb_value_template: "{{ value[0:2]|int(base=16) }},{{ value[2:4]|int(base=16) }},{{ value[4:6]|int(base=16) }}"
        rgb_state_topic: "star_projector/led_basecolor_rgb/get"
        rgb_command_topic: "cmnd/star_projector/led_basecolor_rgb"
        command_topic: "cmnd/star_projector/led_enableAll"
        state_topic: "star_projector/led_enableAll/get"
        availability_topic: "star_projector/connected"
        payload_on: 1
        payload_off: 0
        brightness_command_topic: "cmnd/star_projector/led_dimmer"
        brightness_state_topic: "star_projector/led_dimmer/get"
        brightness_scale: 100
        color_temp_command_topic: "cmnd/star_projector/led_temperature"
        color_temp_state_topic: "star_projector/led_temperature/get"
    

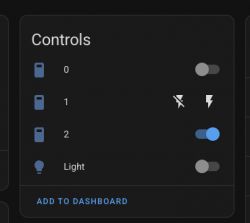
    and it shows in HA like this
    Device control panel in Home Assistant with buttons for toggling various functions.

    Based on the instructions on the other thread, I created this and pasted in the discovery tab and clicked the start button, but the laster and motor doesn't show up on HA. Also when I go to out of the discovery tab and come back, it goes back to the default setting!

    
    mqtt:
      light:
        - unique_id: "Star_Projector_light"
          name: “ProjectorRGB"
          rgb_command_template: "{{ '%02x%02x%02x' | format(red, green, blue)}}"
          rgb_state_topic: "star_projector/led_basecolor_rgb/get"
          rgb_command_topic: "cmnd/star_projector/led_basecolor_rgb"
          rgb_value_template: "{{ value[0:2]|int(base=16) }},{{ value[2:4]|int(base=16) }},{{ value[4:6]|int(base=16) }}"
          #rgb_value_template: "{{ '%02x%02x%02x'| format(red, green, blue) }}"
          command_topic: "cmnd/star_projector/led_enableAll"
          state_topic: "star_projector/led_enableAll/get"
          availability_topic: "star_projector/connected"
          payload_on: 1
          payload_off: 0
          brightness_command_topic: "cmnd/star_projector/led_dimmer"
          brightness_scale: 100
          brightness_state_topic: "star_projector/led_dimmer/get"
          brightness_value_template: "{{value}}"
    
        - unique_id: "Star_Projector_laser"
          name: "ProjectorLaser"
          command_topic: "cmnd/star_projector/toggler_enable0"
          state_topic: "star_projector/toggler_enable0/get"
          payload_on: 1
          payload_off: 0
          brightness_command_topic: "cmnd/star_projector/toggler_set0"
          brightness_scale: 100
          brightness_state_topic: "star_projector/toggler_set0/get"
          brightness_value_template: "{{value}}"
          retain: true
          qos: 1
    
        - unique_id: "Star_Projector_motor"
          name: "ProjectorMotor"
          command_topic: "cmnd/star_projector/toggler_enable1"
          state_topic: "star_projector/toggler_enable1/get"
          payload_on: 1
          payload_off: 0
          brightness_command_topic: "cmnd/star_projector/toggler_set1"
          brightness_scale: 100
          brightness_state_topic: "star_projector/toggler_set1/get"
          brightness_value_template: "{{value}}"
          retain: true
          qos: 1
    
  • Helpful post
    #12 20718295
    p.kaczmarek2
    Moderator Smart Home
    I am glad to hear that we have a progress.
    soubhikkhan wrote:
    It worked! I moved from chrome to safari and typed everything manually! waisted hours unnecessarily!

    Can you provide us more information on the issue, namely the chrome version and all extra details that may have affected the process? So basically, copying config from forum didn't work but typing it worked?

    soubhikkhan wrote:

    Based on the instructions on the other thread, I created this and pasted in the discovery tab and clicked the start button, but the laster and motor doesn't show up on HA.

    You are using the Discovery Page incorrectly. You are supposed to paste the YAML to configuration.yaml of Home Assistant. The text field on OBK with config is for copying from, not for pasting to.
    Helpful post? Buy me a coffee.
  • #13 20719366
    soubhikkhan
    Level 3  

    p.kaczmarek2 wrote:
    Can you provide us more information on the issue, namely the Chrome version and all extra details that may have affected the process? So basically, copying config from the forum didn't work but typing it worked?

    My Chrome v 116.0.5845.110
    So this makes me believe that most probably when I copied and pasted from the forum, it may have changed some characters which was causing the driver not to load! After using Safari and typing manually, it loaded instantly.

    p.kaczmarek2 wrote:

    You are using the Discovery Page incorrectly. You are supposed to paste the YAML to configuration.yaml of Home Assistant. The text field on OBK with config is for copying from, not for pasting to.

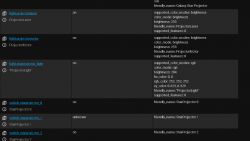
    Thanks for clarifying it! So I did this but still, the buttons were not showing in the auto-discovered device! However, when I checked from the developer tab, I could see the entities. I can call them through service. It works. Hence I added manual buttons on my dashboard to control them and deleted the discovered device. What I understood is, the discovered device is coming from the OBK portal since the number of entities and the names matches with the HA discovered device. I wish if there was a way to edit and save the text field on OBK side.
    Screenshot of a user interface showing a list of light and switch devices with status and parameters. Device control panel with three widgets.

    Added after 5 [minutes]:

    Also is there a way to write a script to customize the case physical button press? single press and double press?
  • #14 20719374
    p.kaczmarek2
    Moderator Smart Home
    I am glad to hear that it works better now. I will check this chrome issue, but can you tell me what kind of localization settings are you using? If I may ask, what kind of language version of OS do you have?

    soubhikkhan wrote:
    . I wish if there was a way to edit and save the text field in OBK side.

    This is planned, I remember that @mnm11 requested it few days ago as well. I will take that into account.

    soubhikkhan wrote:

    Also is there a way to write a script to customize the case physical button press? single press and double press?

    Here are autoexec examples:
    https://github.com/openshwprojects/OpenBK7231T_App/blob/main/docs/autoexecExamples.md
    Search them for OnDblClick . You can also search on our forum:
    https://www.elektroda.com/rtvforum/find.php?q=OnDblClick
    Helpful post? Buy me a coffee.
  • #15 20726496
    soubhikkhan
    Level 3  
    Double click worked! thank you @p.kaczmarek2

Topic summary

The discussion revolves around flashing and configuring the Nebula Star Projector model CBU-BK7231N, specifically focusing on the control of the laser and motor functions. The user successfully flashed the device and managed to control RGB LEDs but encountered issues with the configuration for the laser and motor. Key points include the identification of pin 23 as a microphone input, troubleshooting the visibility of toggle buttons for the laser and motor, and resolving issues related to the autoexec.bat script not executing properly due to browser-related text corruption. The user ultimately resolved the issue by manually typing the script in a different browser. Additionally, they sought assistance in configuring a physical button for toggling functions and integrating the device with Home Assistant via MQTT.
Summary generated by the language model.
ADVERTISEMENT