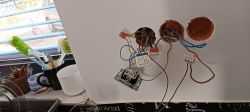
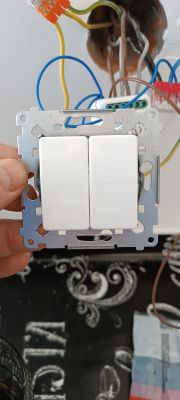
The controller is a NoName SCS86-03AJAI Smart Curtain Switch (as labelled on the back) and fits into a standard single wall box.
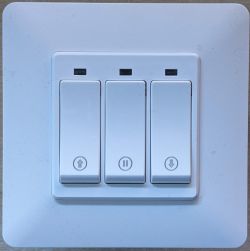
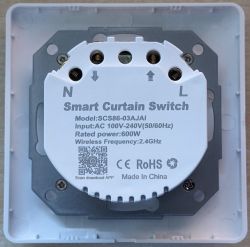
It is one of the few curtain/shade controllers with mechanical keys. It's rather cheap while mechanical build looks quite okay with reasonable electrical separation and proper capacitors. However, the original Tuya firmware has a severe flaw, causing this device to crash at random intervals between a few hours and multiple weeks. It then disconnects from the network; the green WLAN LED is lit permanently, and it can only be restored by a full power cycle. So, flashing it with a proper firmware is mandatory.
It originally was sold with an ESP32 inside that could be flashed with Tasmota (described here https://templates.blakadder.com/SCS86-03AJAI.html) but since 2021 there's a different version using a WB3S module that's hard to distinguish from the outside. The only obvious difference is the load specification (800W on the old device with ESP32, 600W on the current one with WB3S), but this may not be a safe distinction.
The board now has a WB3S with the BK7231T processor, three mechanical buttons for Open, Stop and Close. Blue backlighting can be enabled for the three button LEDs. On activation, each button lights up red. A green LED behind the right button shows WLAN state (off when connected). The terminal block has live and neutral in and live/open and live/close outputs.
Teardown
Opening the case is straightforward: Just carefully pry the 4 clips holding the back cover to the metal frame and detach it with the boards from the front plate. A single Philips screw then needs to be removed from the power board through an opening in the processor board. Make sure the screws on the terminals are either removed or fully screwed in so the boards can be removed from the cover. Here's a view of both sides of the two boards:
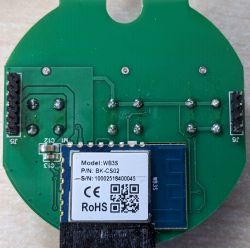
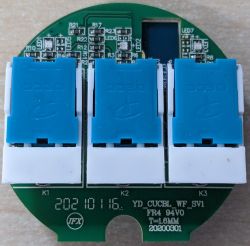
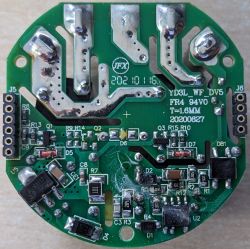
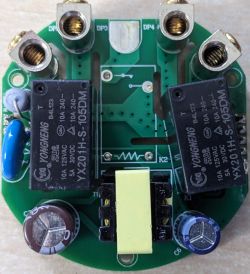
As can be seen, the power board offers space for a third relay and terminal, so there might be a version around that operates as a simple 3-gang power switch, but I haven't come across such a variant anywhere.
Flashing
I soldered wires onto the TXD1, RXD1, GND and VCC pads of the WB3S and connected it up my USB/UART converter set to 3V3, downloaded BK7231Flasher.exe and got the appropriate file to flash it with by this method (OpenBK7231T_UA_1.17.243.bin). The TXD/RXD pins do not interfere with the circuitry, but the trick was to put the device into flash mode: Powering it down did not work as the module draws too much power from the USB converter during powerup, causing an USB disconnect. Momentarily connecting the reset pin to ground however worked fine. Depending on your USB to serial converter, you might have to use a separate 3.3V power source for the WB3S module. Here's my flashing set-up:
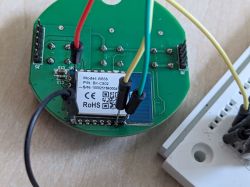
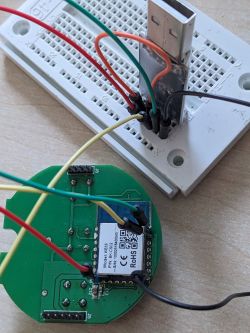
Instead of soldering power to the WB3S module, pin 4 (VCC) and pin 6 (GND) on J5 could have been used as well.
Connecting
Ater removing the temporary wires and reassembling, power up the device, but do not connect the controlled curtain or shutter motor yet. Use e.g., your phone to find and connect to its WiFi - the SSID is pretty obvious. Having done that, open a browser and go to 192.168.4.1, this should get you into the GUI where you should now enter your own WiFi's credentials. Reboot the device and try and find it through your own router. On my router when I looked at WiFi devices it was actually named including the MAC, so it was pretty obvious and unique. You will want to set a reserved IP in many cases.
Configuration
The Tuya controller has 3 buttons, 3 LEDs which illuminate the buttons and 2 relays plus the backlight (I kept the backlight function on channel 4). I set it up like this:
This sets up the correct pinout, but the device will not work as a shutter/curtain controller yet, so don't connect the actuator at this point!
Referring to the great post from richardsg307 on another controller (https://www.elektroda.com/rtvforum/topic3972935.html - also giving nice instructions for integration with MQTT and HA), I adapted his autoexec.bat file to make the device operate properly (e.g., pressing the open button would turn everything off then turn on the open relay and LED for 30 seconds. It would then turn all off before turning the stop LED on for just 1 second. Different from the original fimware, the backlight can now be toggled by a double click of the middle butten (instead of holding it for 10 seconds) if you add channel 4 behind button 2 for P10 on the cfg_pins page, which is not part of below config. Here's my autoexec.bat file which can be uploaded via the "Filesystem" Web Application menu.
Note that this also includes NTP and ClockEvent settings to close shutters at dawn (I'm yet still thinking about an autonomous dynamic setting) and to open them an 8:00 a.m. on weekdays and 9:00 a.m. on the weekend. Note that currently there's a bug in the firmware not allowing leading zeroes in a time setting. Also, events can only be numbered with integer flags to individually delete them later.
The code is not perfect, especially upon manual activation, there's a bit of delay and short key presses won't be recognised. Would be happy to hear about any suggestions for improvement!


It is one of the few curtain/shade controllers with mechanical keys. It's rather cheap while mechanical build looks quite okay with reasonable electrical separation and proper capacitors. However, the original Tuya firmware has a severe flaw, causing this device to crash at random intervals between a few hours and multiple weeks. It then disconnects from the network; the green WLAN LED is lit permanently, and it can only be restored by a full power cycle. So, flashing it with a proper firmware is mandatory.
It originally was sold with an ESP32 inside that could be flashed with Tasmota (described here https://templates.blakadder.com/SCS86-03AJAI.html) but since 2021 there's a different version using a WB3S module that's hard to distinguish from the outside. The only obvious difference is the load specification (800W on the old device with ESP32, 600W on the current one with WB3S), but this may not be a safe distinction.
The board now has a WB3S with the BK7231T processor, three mechanical buttons for Open, Stop and Close. Blue backlighting can be enabled for the three button LEDs. On activation, each button lights up red. A green LED behind the right button shows WLAN state (off when connected). The terminal block has live and neutral in and live/open and live/close outputs.
Teardown
Opening the case is straightforward: Just carefully pry the 4 clips holding the back cover to the metal frame and detach it with the boards from the front plate. A single Philips screw then needs to be removed from the power board through an opening in the processor board. Make sure the screws on the terminals are either removed or fully screwed in so the boards can be removed from the cover. Here's a view of both sides of the two boards:


As can be seen, the power board offers space for a third relay and terminal, so there might be a version around that operates as a simple 3-gang power switch, but I haven't come across such a variant anywhere.
Flashing
I soldered wires onto the TXD1, RXD1, GND and VCC pads of the WB3S and connected it up my USB/UART converter set to 3V3, downloaded BK7231Flasher.exe and got the appropriate file to flash it with by this method (OpenBK7231T_UA_1.17.243.bin). The TXD/RXD pins do not interfere with the circuitry, but the trick was to put the device into flash mode: Powering it down did not work as the module draws too much power from the USB converter during powerup, causing an USB disconnect. Momentarily connecting the reset pin to ground however worked fine. Depending on your USB to serial converter, you might have to use a separate 3.3V power source for the WB3S module. Here's my flashing set-up:


Instead of soldering power to the WB3S module, pin 4 (VCC) and pin 6 (GND) on J5 could have been used as well.
Connecting
Ater removing the temporary wires and reassembling, power up the device, but do not connect the controlled curtain or shutter motor yet. Use e.g., your phone to find and connect to its WiFi - the SSID is pretty obvious. Having done that, open a browser and go to 192.168.4.1, this should get you into the GUI where you should now enter your own WiFi's credentials. Reboot the device and try and find it through your own router. On my router when I looked at WiFi devices it was actually named including the MAC, so it was pretty obvious and unique. You will want to set a reserved IP in many cases.
Configuration
The Tuya controller has 3 buttons, 3 LEDs which illuminate the buttons and 2 relays plus the backlight (I kept the backlight function on channel 4). I set it up like this:
{
  "vendor": "NoName",
  "bDetailed": "1",
  "name": "SCS86-03AJAI Smart Curtain Switch",
  "model": "SCS86-03AJAI",
  "chip": "BK7231T",
  "board": "WB3S",
  "flags": "1024",
  "keywords": [
    "https://www.aliexpress.com/item/1005001698604457.html",
    "https://www.ebay.de/itm/285467516282",
    "https://www.ebay.de/itm/355006643266"
  ],
  "pins": {
    "0": "Rel;3",
    "1": "WifiLED_n;0",
    "6": "Rel;1",
    "7": "Rel;3",
    "8": "Btn;3",
    "10": "Btn;2",
    "11": "LED;4",
    "14": "LED;1",
    "24": "Btn;1",
    "26": "LED;2"
  },
  "command": "",
  "image": "https://obrazki.elektroda.pl/7035845600_1694622383.jpg",
  "wiki": "TBA"
}
This sets up the correct pinout, but the device will not work as a shutter/curtain controller yet, so don't connect the actuator at this point!
Referring to the great post from richardsg307 on another controller (https://www.elektroda.com/rtvforum/topic3972935.html - also giving nice instructions for integration with MQTT and HA), I adapted his autoexec.bat file to make the device operate properly (e.g., pressing the open button would turn everything off then turn on the open relay and LED for 30 seconds. It would then turn all off before turning the stop LED on for just 1 second. Different from the original fimware, the backlight can now be toggled by a double click of the middle butten (instead of holding it for 10 seconds) if you add channel 4 behind button 2 for P10 on the cfg_pins page, which is not part of below config. Here's my autoexec.bat file which can be uploaded via the "Filesystem" Web Application menu.
// Set up Aliases
alias Set_Stop backlog setChannel 3 0; setChannel 2 0; setChannel 1 0; setButtonColor 3 blue; setButtonColor 2 blue; setButtonColor 1 blue
alias Set_Open backlog setChannel 1 1; setButtonColor 1 green
alias Set_Close backlog setChannel 3 1; setButtonColor 3 green
alias Set_Finish backlog setChannel 2 1; setButtonColor 2 red
alias Start_Opening backlog stopAllScripts; startScript autoexec.bat openShutter
alias Start_Closing backlog stopAllScripts; startScript autoexec.bat closeShutter
alias Stop_All backlog stopAllScripts; startScript autoexec.bat stopShutter

// Channel 60 is seconds for power to be applied
setChannel 60 30

// create GUI buttons for HTTP panel
startDriver httpButtons
startDriver NTP

setButtonEnabled 1 1
setButtonLabel 1 "Open"
setButtonCommand 1 Start_Opening
setButtonColor 1 blue

setButtonEnabled 3 1
setButtonLabel 3 "Close"
setButtonCommand 3 Start_Closing
setButtonColor 3 blue

setButtonEnabled 2 1
setButtonLabel 2 "Stop"
setButtonCommand 2 Stop_All
setButtonColor 2 blue

// Hide the default GUI buttons
setChannelVisible 1 0
setChannelVisible 2 0
setChannelVisible 3 0

// Loading Event Handlers
addEventHandler OnClick 8 Start_Closing
addEventHandler OnClick 24 Start_Opening
addEventHandler OnClick 10 Stop_All

// Setting Timed Handlers
ntp_timeZoneOfs 02:00
addClockEvent 20:30 0xff 0 Start_Closing
addClockEvent 8:00 0x3f 1 Start_Opening
addClockEvent 9:00 0x41 2 Start_Opening

// do not proceed
return

openShutter:
Set_Stop
delay_s 0.1
Set_Open
delay_s $CH60
Set_Stop
Set_Finish
delay_s 1
Set_Stop
return

closeShutter:
Set_Stop
delay_s 0.1
Set_Close
delay_s $CH60
Set_Stop
Set_Finish
delay_s 1
Set_Stop
return

stopShutter:
Set_Stop
Set_Finish
delay_s 1
Set_Stop
return
Note that this also includes NTP and ClockEvent settings to close shutters at dawn (I'm yet still thinking about an autonomous dynamic setting) and to open them an 8:00 a.m. on weekdays and 9:00 a.m. on the weekend. Note that currently there's a bug in the firmware not allowing leading zeroes in a time setting. Also, events can only be numbered with integer flags to individually delete them later.
The code is not perfect, especially upon manual activation, there's a bit of delay and short key presses won't be recognised. Would be happy to hear about any suggestions for improvement!


