logo elektroda
logo elektroda
X
logo elektroda

[BK7231N] (DIY) Mini Smart Switch UNSH SS8839-16A-W

riskorja 15024 50
ADVERTISEMENT
  • This is a short teardown of the DIY Mini Smart Switch 2-way from UNSH model SS8839-16A-W based on BK7231N.
    It uses custom PCB, so no Tuya module to replace, already bought one :-)

    Basic Information


    Brand: UNSH - Tuya
    Model: DIY Smart Switch SS8839-16A-W
    Chip: BK7231N on board
    Seller: AliExpress 16A Tuya WiFi Smart Switch 2-way

    Photos


    The switch is very easy to open so i wont go into details, but remember, this device it's using high voltage, so make sure it's not connected to the mains.

    [BK7231N] (DIY) Mini Smart Switch UNSH SS8839-16A-W
    [BK7231N] (DIY) Mini Smart Switch UNSH SS8839-16A-W [BK7231N] (DIY) Mini Smart Switch UNSH SS8839-16A-W [BK7231N] (DIY) Mini Smart Switch UNSH SS8839-16A-W

    Flashing-Uploading OpenBeken firmware


    Used tuya-cloudcutter to flash OpenBK (had to setup in SmartLife/Tuya app - after first flash device did not connect to cloudcutterflash AP)
    Followed this instructions tuya-cloudcutter INSTRUCTIONS.md
    and video Flash OTA using tuya-cloudcutter
    > By firmware version and name
    > ~ Mini Smart Switch
    > 1.2.1 - BK7231N / oem_bk7231n_control_switch
    OpenBK7231N_UG_1.15.648.bin (CCtr flash)

    Requirements:

    RPi to install GitHub tuya-cloudcutter
    Firmware OpenBK7231N_UG_1.15.648.bin
    Router/AccesPoint for temporary local cloudcutterfalsh AP
    some patience and persistence :-)

    Device could not connect to cloudcutterflash AP after reboot,
    so I needed to create a "second" cloudcutterflash AP on spare Router with internet connection as stated in Note: of INSTRUCTIONS.md.
    Had to disable WiFi on RPi - tuya-cloudcutter
    After that it was possible to enter WiFi credentials thru Tuya app.
    Turned off "second AP", enabled tuya-cloudcutter and the process of flashing OpenBeken continued.

    Pin settings for this device.

    TglChanOnTgl - 6 - PWM0 - ch0
    Rel - 8 - PWM1 - ch0
    Btn - 23 - ADC3 - ch0
    LED - 26 - PWM5 - ch0

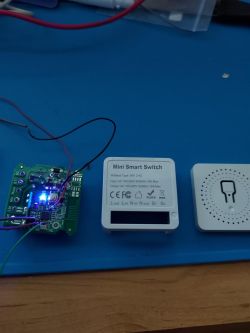
    Simple test environment
    [BK7231N] (DIY) Mini Smart Switch UNSH SS8839-16A-W

    ! This smart switch connects power line N-out and S1 together that makes it unsafe for use other than with the classic wall switch !


    I would like to thank everyone who enabled this to work
    Elektroda and OpenBeken Team
    tuya-cloudcutter Team
    and all of enthusiast who are posting and filming their work


    Payed 3,63 € For UNSH Tuya 16A Tuya WiFi Smart Switch 2-way and 2,18 € form ESP-02S module witch I could not use.
    with alternatives
    ~12 € is the price for Athom 3 Way Relay for ESPHome if buying 3 pieces with shipping
    or
    9~13€ Sonoff MiniR2 from local store

    It was worth for the experience, tinkering, flashing, rebooting

    Cool? Ranking DIY
    About Author
    riskorja
    Level 7  
    Offline 
    riskorja wrote 5 posts with rating 5, helped 3 times. Been with us since 2023 year.
  • ADVERTISEMENT
  • #2 20525130
    p.kaczmarek2
    Moderator Smart Home
    Thank you for submitting the teardown.
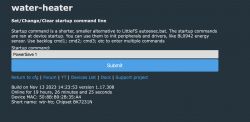
    As usually with this kind of the device, I would like you to enable the BK-specific power save function: PowerSave 1 in startup command (use backlog for multiple commands).
    Otherwise you'll have to do that repair soon:
    https://www.elektroda.pl/rtvforum/topic3898805.html
    Helpful post? Buy me a coffee.
  • Helpful post
    #3 20537640
    riskorja
    Level 7  
    >>20524167

    This is a short teardown of the same seller and the same order and the same package
    DIY Mini Smart Switch 2-way from UNSH model SS8839-16A-W based on BK7231N.

    Basic Information


    Brand: UNSH - Tuya
    Model: DIY Smart Switch SS8839-16A-W
    Chip: BK7231N on board
    Seller: AliExpress 16A Tuya WiFi Smart Switch 2-way

    Photos


    [BK7231N] (DIY) Mini Smart Switch UNSH SS8839-16A-W [BK7231N] (DIY) Mini Smart Switch UNSH SS8839-16A-W [BK7231N] (DIY) Mini Smart Switch UNSH SS8839-16A-W

    but different pins

    Pin settings for this device.

    TglChanOnTgl - 6 - PWM0 - ch0
    Rel - 7 - PWM1 - ch0
    Btn - 23 - ADC3 - ch0
    LED - 26 - PWM5 - ch0

    [BK7231N] (DIY) Mini Smart Switch UNSH SS8839-16A-W

    Flashing-Uploading OpenBeken firmware


    Used tuya-cloudcutter to flash OpenBK (had to repeat)
    Followed this instructions tuya-cloudcutter INSTRUCTIONS.md
    and video Flash OTA using tuya-cloudcutter
    OpenBK7231N_UG_1.15.673.bin (CCtr flash)
    > By firmware version and name
    > 1.2.1 - BK7231N / oem_bk7231n_control_switch
    > Tuya generic
    > Mini Smart Switch

    Requirements:

    Acer E3-111 netbook with Debian 11 on external disk (disabled SmartBoot to enable Linux to boot )
    with docker on debian
    to install GitHub tuya-cloudcutter
    Firmware latest ...UG...

    Had to repeat procedure after that the AP of mini switch was recognized and upgraded.

    ! This smart switch connects power line N-out and S1 together that makes it unsafe for use other than with the classic wall switch !


    I would like to thank everyone who enabled this to work
    Elektroda and OpenBeken Team
    tuya-cloudcutter Team
    and all of enthusiast who are posting and filming their work
  • Helpful post
    #4 20538893
    riskorja
    Level 7  
    >>20524167

    This is a short teardown of the same seller and the same order and the different package
    Smart Mini Switch 2-way from UNSH model EZB-WBZS1H16N-A V1.0 based on BK7231N.

    Basic Information


    Brand: UNSH - Tuya
    Model: EZB-WBZS1H16N-A V1.0
    Chip: BK7231N on board
    Seller: AliExpress 16A Tuya WiFi Smart Switch 2-way

    Photos


    [BK7231N] (DIY) Mini Smart Switch UNSH SS8839-16A-W
    [BK7231N] (DIY) Mini Smart Switch UNSH SS8839-16A-W
    [BK7231N] (DIY) Mini Smart Switch UNSH SS8839-16A-W

    but different board layout and pins
    Relay has marking but should be 16A
    and soldering space for 433 MHz chip and antenna

    Pin settings for this device.

    LED_n - 6 - PWM0 - ch0
    Btn - 8 - PWM2 - ch0
    TglChanOnTgl - 14 - - ch0
    Rel - 15 - - ch0

    [BK7231N] (DIY) Mini Smart Switch UNSH SS8839-16A-W

    Flashing-Uploading OpenBeken firmware


    Used tuya-cloudcutter to flash OpenBK
    Followed this instructions tuya-cloudcutter INSTRUCTIONS.md
    and video Flash OTA using tuya-cloudcutter
    OpenBK7231N_UG_1.15.673.bin (CCtr flash)
    > By firmware version and name
    > 1.2.1 - BK7231N / oem_bk7231n_control_switch
    > Tuya generic
    > Mini Smart Switch

    Requirements:

    Acer E3-111 netbook with Debian 11 on external disk (disabled SmartBoot to enable Linux to boot )
    with docker on debian
    to install GitHub tuya-cloudcutter
    Firmware latest ...UG...

    ! This smart switch connects power line N-out and S1 together that makes it unsafe for use other than with the classic wall switch !


    I would like to thank everyone who enabled this to work
    Elektroda and OpenBeken Team
    tuya-cloudcutter Team
    and all of enthusiast who are posting and filming their work
  • ADVERTISEMENT
  • #5 20737342
    fot201113
    Level 2  
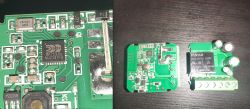
    Close-up of a Mini Smart Switch circuit board with visible components and chip.
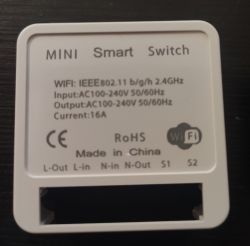
    Back view of a Mini Smart Switch with specification and connection information.
    I opened 2 new Mini Smart Switches and they seem to be this version here. Can anyone help me locate the flashing pins?
  • ADVERTISEMENT
  • #6 20737346
    p.kaczmarek2
    Moderator Smart Home
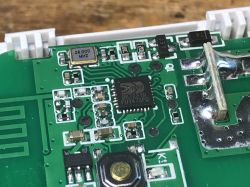
    So you have the same board as me?
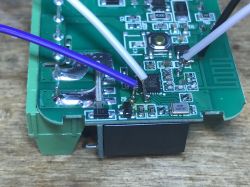
    Close-up of a circuit board with electronic components and 26.000 MHz text.
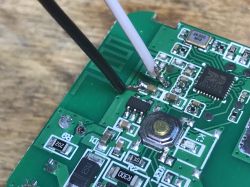
    Here is GND (black) and 3.3V (white):
    Close-up of a circuit board with connected GND (black) and 3.3V (white) wires.
    Here is RX and TX:
    Close-up of a circuit board with connected wires.
    It's a small world.
    Helpful post? Buy me a coffee.
  • #7 20737347
    fot201113
    Level 2  
    hahah that was blazing fast!!
    thanks a lot!!!
  • #8 20797138
    elbuit
    Level 6  
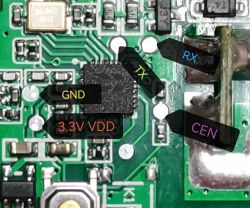
    Same device with same pins but it came with tuya V1.3.10 firmware, so I couldn't use tuya cloudcutter.
    But It worked with serial port:
    Close-up of a circuit board with pin labels: GND, 3.3V VDD, TX, RX, CEN.
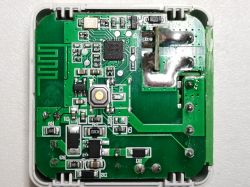
    Circuit board of a device with electronics and components.

    Thanks.
  • ADVERTISEMENT
  • #9 20797170
    p.kaczmarek2
    Moderator Smart Home
    Those devices are so easily openable that for me the "soldering" method is actually easier than the cloudcutter. Of course, in case of devices like light bulbs, cloudcutter may be preferrable, but for simple cases I really prefer just wires.
    Helpful post? Buy me a coffee.
  • #10 20842297
    cyrax4
    Level 3  
    Very similar device, but different pads. Flashed with CP2102 USB UART. Ground soldering is easier at the switch however P1 pad also working (I used the switch).

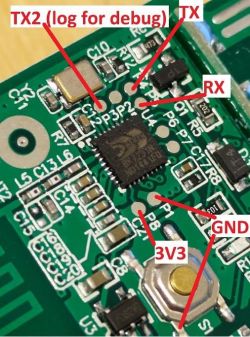
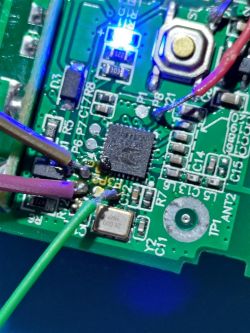
    Important: CP2102 don't provide enough juice to power it up so had to solder TX2 for debugging. Anyhow it is not necessary if UART debug not needed.

    Model: EZB-WBZS1H16N-A V1.0
    Chip: BK7231N
    Device: https://www.aliexpress.com/item/1005005021644441.html
    ROM: OpenBK7231N_QIO_1.17.308.bin (latest at the time of flashing)

    GPIO pinout:
    P6 - WifiLed_n - ch0
    P8 - Btn_Tgl_All - ch0
    P14 - TglChanOnTgl - ch1
    P15 - Rel - ch1

    JSON:

    Code: JSON
    Log in, to see the code


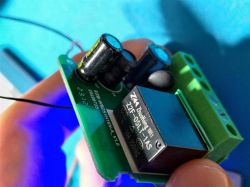
    Printed circuit board and casing of a mini smart switch on a blue workspace mat.Close-up of a circuit board with connectors and a relay on a blue background.Close-up of a circuit board with labels TX2, TX, RX, GND, and 3V3.Close-up of a circuit board with electronic components, including wires and chips.
  • #11 20842308
    p.kaczmarek2
    Moderator Smart Home
    Thanks, can you include JSON template from the OBK Web App?
    Helpful post? Buy me a coffee.
  • #12 20842347
    cyrax4
    Level 3  
    If you asked me then I edited my comment :)

    As I can see you are the main developer - thank your for your efforts!
  • #13 20842524
    p.kaczmarek2
    Moderator Smart Home
    To be precise, the thing you attached is a Tuya JSON format, not OBK JSON format, but luckily I can easily convert it with our tool: https://openbekeniot.github.io/webapp/templateImporter.html

    Code: JSON
    Log in, to see the code
    Helpful post? Buy me a coffee.
  • #14 20889653
    ChrizZz
    Level 5  
    cyrax4 wrote:
    Very similar device, but different pads. Flashed with CP2102 USB UART. Ground soldering is easier at the switch however P1 pad also working (I used the switch).

    Important: CP2102 don't provide enough juice to power it up so had to solder TX2 for debugging. Anyhow it is not necessary if UART debug not needed.

    Model: EZB-WBZS1H16N-A V1.0
    Chip: BK7231N
    Device: https://www.aliexpress.com/item/1005005021644441.html
    ROM: OpenBK7231N_QIO_1.17.308.bin (latest at the time of flashing)

    Close-up of a circuit board with labels TX2, TX, RX, GND, and 3V3.Close-up of a circuit board with electronic components, including wires and chips.


    Did you also find the CEN pad?
  • #15 20889669
    p.kaczmarek2
    Moderator Smart Home
    @ChrizZz to the best of my knowledge no CEN is required. I flashed hundreds of devices via wires so far and I am not using CEN for that.
    Helpful post? Buy me a coffee.
  • #16 20889698
    ChrizZz
    Level 5  
    @p.kaczmarek2 that's strange, I couldn't get a connection - do you have a how to which I should use? Just to start again with another source?
  • #17 20889702
    p.kaczmarek2
    Moderator Smart Home
    Here are our guides:
    https://www.youtube.com/@elektrodacom
    See this playlist:
    https://www.youtube.com/watch?v=L6d42IMGhHw&list=PLzbXEc2ebpH0CZDbczAXT94BuSGrd_GoM

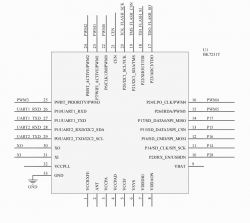
    If you really need CEN, then here is BK pinout:
    Pinout diagram of the BK7231T chip.
    You can try to use it as reference to find where CEN might be on your board.
    Helpful post? Buy me a coffee.
  • #18 20906362
    mrAtini
    Level 3  
    Hi,
    I bought a few pieces of those devices on AliExpress "Choice" (less than 2€)
    I found that there is 2 different PCBs ( for the moment :-) )
    Here's the pinout i have:

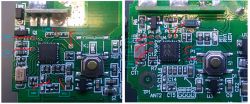
    Two images showing circuit boards with labeled programming points and an integrated circuit.
  • #19 20906558
    p.kaczmarek2
    Moderator Smart Home
    Is there any way to tell which is which from the outside? I don't know, maybe one is 10A version and second 16A?
    Helpful post? Buy me a coffee.
  • #20 20906629
    mrAtini
    Level 3  
    Unfortunately no. From the outside they are exactly the same (and 16A for both)
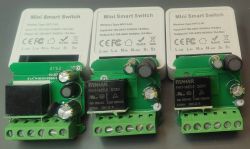
    Three mini smart switches with visible circuit boards and electrical components on a table.
  • #21 20906683
    p.kaczmarek2
    Moderator Smart Home
    Wait, the new one has a varistor but it's missing fusible resistor?
    Helpful post? Buy me a coffee.
  • #22 20906820
    mrAtini
    Level 3  
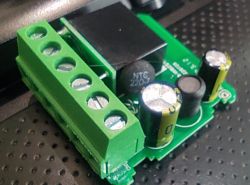
    It's a 22ohms NTC replacing the 10ohms resistor (not fusilble) .
    I do not understand yet why they chose an NTC (R goes down when t° increases)
    Close-up of a PCB with electronic components, including a 22-ohm NTC and capacitors.
  • #23 20991422
    pkkrusty
    Level 2  
    I have this type, but found that the relay is on GPIO 7, rather than GPIO 8. I bought the power meter variety, is there a template for making that work?

    I'm just getting started with OpenBeken, and was able to flash via the pads successfully, but then had trouble getting the unit to stay alive while i configured the pins. It would crash after 30 seconds. But once the pins were defined correctly, it seems more stable.

    Also the unit seems quite warm, even with no load attached. Is that normal? I have put PowerSave 1 in the startup commands.
  • #24 20992272
    p.kaczmarek2
    Moderator Smart Home
    Power metering is supported. Which metering chip is inside, BL0942 or BL0937?
    Please try to extract the config:
    https://www.youtube.com/watch?v=WunlqIMAdgw

    How did the pins affect the device, what config made it crash? It's the first time I've hear about something like that.

    How did you put PowerSave 1 in startup commands? Maybe it's not run?
    Helpful post? Buy me a coffee.
  • #25 20992948
    pkkrusty
    Level 2  
    Configuration interface with startup command PowerSave 1 for a water-heater device.

    My config is as follows:
    ```
    {
    "vendor": "Tuya",
    "bDetailed": "0",
    "name": "Full Device Name Here",
    "model": "enter short model name here",
    "chip": "BK7231N",
    "board": "TODO",
    "flags": "0",
    "keywords": [
    "TODO",
    "TODO",
    "TODO"
    ],
    "pins": {
    "6": "TglChanOnTgl;0",
    "7": "Rel;0",
    "23": "Btn;0",
    "26": "LED;0"
    },
    "command": "PowerSave 1",
    "image": "https://obrazki.elektroda.pl/YOUR_IMAGE.jpg",
    "wiki": "https://www.elektroda.com/rtvforum/topic_YOUR_TOPIC.html"
    }
    ```

    Power monitor chip is BL0942. I entered "startDriver BL0942" and now I can see measurements on main page. Amazing!
  • #26 21040987
    Tilator
    Level 10  
    mrAtini wrote:
    Hi,
    I bought a few pieces of those devices on AliExpress "Choice" (less than 2€)
    I found that there is 2 different PCBs ( for the moment :-) )
    Here's the pinout i have:

    Two images showing circuit boards with labeled programming points and an integrated circuit.


    There seems to be a "flash" pad it the second picture. Do I need it somehow to flash this device?
  • #27 21041271
    p.kaczmarek2
    Moderator Smart Home
    I don't know what this person means. You need only RX, TX and optionally CEN.
    See our BK7231 flasher:
    https://github.com/openshwprojects/BK7231GUIFlashTool
    You can also check out BK7231N and BK7231T video guides here:
    https://www.youtube.com/playlist?list=PLzbXEc2ebpH0CZDbczAXT94BuSGrd_GoM
    Helpful post? Buy me a coffee.
  • #28 21045001
    Tilator
    Level 10  
    I bough four of them two have BK7231N and the other two T34. I have not managed to flash a single one yet. Whatever I do.

    I'm now waiting for a new TTL adapter. My gear is quite old. I suppose I already ruind one of those T34 devices by getting a partial flash making only a corrupt boot loader.
  • #29 21066589
    tonyb62
    Level 8  
    Hi all,
    I've come across another variation of this "Mini Smart Switch" from AliExpress.
    All major components are on the top of the board, was able to flash it with my needle probe jig.
    Doesn't have power monitoring as far as i can see, T34 BK7231N chip.
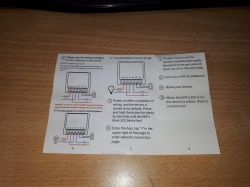
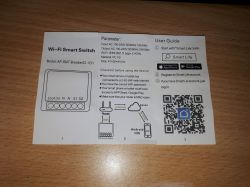
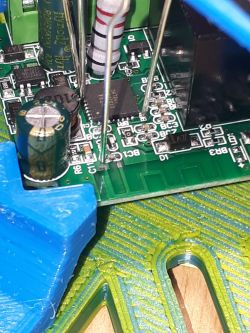
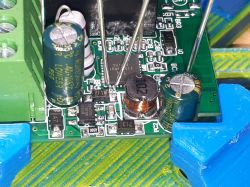
    Instruction manual for Mini Smart Switch with connection diagrams. User manual for Mini Smart Switch from AliExpress. Close-up of a circuit board with visible electronic components and a needle probe. Close-up of a Mini Smart Switch circuit board with visible electronic components. Mini Smart Switch PCB with components on top, placed in a specialized holder. Home setup with an electronics board and clamps on a desk.

    Working Config
    {
    "vendor": "Tuya",
    "bDetailed": "0",
    "name": "AP-SMT-Breaker02-CH1",
    "model": "enter short model name here",
    "chip": "BK7231N",
    "board": "TODO",
    "flags": "1024",
    "keywords": [
    "TODO",
    "TODO",
    "TODO"
    ],
    "pins": {
    "6": "WifiLED_n;1",
    "14": "TglChanOnTgl;1",
    "15": "Rel;1",
    "24": "Btn;1"
    },
    "command": "backlog PowerSave 1",
  • #30 21066615
    Tilator
    Level 10  
    tonyb62 wrote:
    Hi all,
    I've come across another variation of this "Mini Smart Switch" from AliExpress.


    I have two of those too. TX is connected to component BR4.

    You can also try Btn_Tgl_All as P14.

Topic summary

The discussion revolves around the DIY Mini Smart Switch model SS8839-16A-W from UNSH, which utilizes the BK7231N chip. Users share experiences related to flashing the device with OpenBeken firmware using tuya-cloudcutter and discuss various pin configurations for different versions of the switch. Several users report on the ease of opening the device and the necessity of ensuring proper power management settings to avoid overheating. There are mentions of different models, including EZB-WBZS1H16N-A V1.0, and variations in PCB layouts. Users also exchange information on troubleshooting, including issues with deep sleep functionality and the use of serial connections for flashing. The community provides resources, guides, and configurations for successful firmware uploads and device management.
Summary generated by the language model.
ADVERTISEMENT