I just bought a bunch of LED stripes from our local supermarket and flashed them with OpenBK. My goal was to be able to control the device via MQTT in my iobroker instance as well as an Alexa Integration.
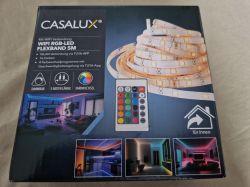
If you're from germany, you can get the stripe at "Aldi Süd" for 7,99€ this week, and as you see in the following, you can also use it with OpenBK.
The stripe itself is pretty cheap but it's not that bad. It comes with a small power adapter, a remote control and some stuff to mount the stripe. Also some cables to go around corners are included. The stripe itself is secured with IP20, so it has this type of glue on the top.
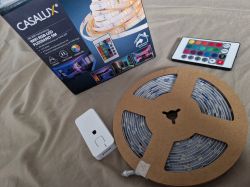
So first of all after buying the stripe I had to take a deeper look to the chipset used in the controller. A screwdriver is a helpful friend to open the case.
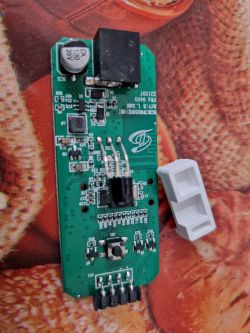
After removing the mainboard, i had to remove the white plasic part under the ir-sensor to see the chipset
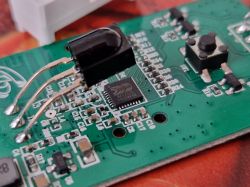
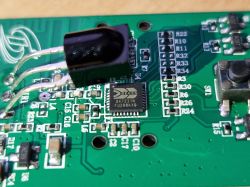
So there it is, the BK7231N.
The next step is to connect the controller to your pc with using your UART USB Converter.
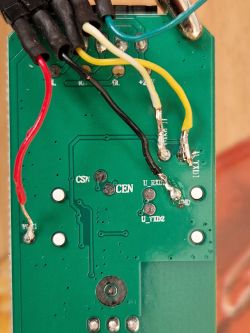
To do so, connect as following:
- VCC from Controller to VCC of Converter
- GND from Controller to GND of Converter
- RX1 from Controller to TX of Converter
- TX1 from Controller to RX of Converter
Make sure to use 3.3V on your Converter and attach the usb cable of your converter to your pc.
Then download the FlashTool under the following URL:
After starting the tool, i've chosen my com port "COM5", which my converter is using, chosen "BK7231N" as chip type and downloaded the newest version with the button next to the drop down where to select the firmware.
Also i had to choose 115200 as baud rate, as i got errors with the suggested default rate.
Then click in "Do backup and flash new" to start the firmware update.
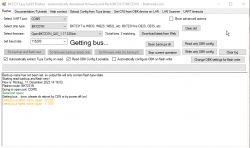
Now you'll see the yellow lines that indicates that the device needs to be rebooted.
In my case powering off the device did not help. Instead i just hold a cable from the GND pin to the CEN pin for a very short time and the flashing process continued ...
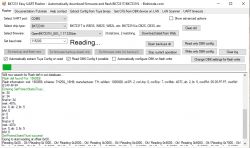
The tool will create a backup of the firmware first. After that, the firmware is written to your device.
When this is done, you will see the tuya config, which is helpful afterwards as it contains informations about which channel is located on which pin of the controller. So it's a good idea to save that information for later use.
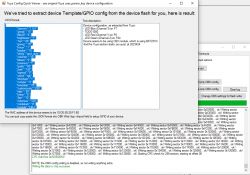
My Tuya Configuration:
Then i disconnect the USB cable and disconnect the Converter from the controller.
Connect the controller with the power adapter to start the controller.
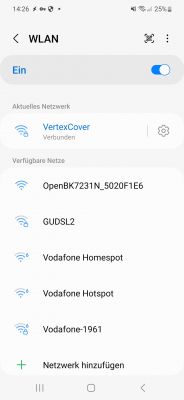
On my smartphone i've then searched for the wifi called "OpenBK..." of the controller and connected to it.
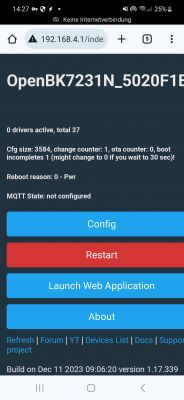
Open the browser on your smartphone and enter the following uri to access the OpenBK firmware of your device.
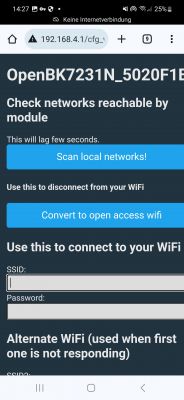
First of all, you should go to "config - Configure WiFi" and configure the access to your local wifi here.
After that you can lookup the newly assigned ip adress on your local router and connect to this ip adress to continue the configuration.
Go to "config - Configure Module". Here you'll need the information of the tuya config mentioned above and set the module as following:
- P6 (PWM0) : PWM : 1
- P7 (PWM1) : PWM : 3
- P24 (PWM4) : PWM : 2
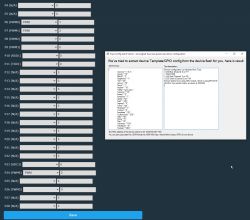
Go back to the main screen. When you attach the stripe to your controller, you should now be able to control the device and change the colors.
For access with iobroker, goto "config - Configure MQTT" and enter the ip adress where your iobroker is running and the authentication details of the running sonoff adapter.

Under "config - Configure General/Flags" i also had to enable the following flag to get data into my iobroker instance:
For Alexa Integration, goto "config - Change startup command text" and enter the following:
This leads to starting up the Wemo driver at every reboot of the controller.
After clicking on reboot on the main page, you can search for new devices on your Alexa and your controller should be found. It will only be found as a switch, so changing colors within alexa is not yet possible as the hue driver is not yet ready to use within OpenBK.
Afterall the stripe is working fine with Alexa and also in my iobroker instance.
Template:

If you're from germany, you can get the stripe at "Aldi Süd" for 7,99€ this week, and as you see in the following, you can also use it with OpenBK.
The stripe itself is pretty cheap but it's not that bad. It comes with a small power adapter, a remote control and some stuff to mount the stripe. Also some cables to go around corners are included. The stripe itself is secured with IP20, so it has this type of glue on the top.

So first of all after buying the stripe I had to take a deeper look to the chipset used in the controller. A screwdriver is a helpful friend to open the case.

After removing the mainboard, i had to remove the white plasic part under the ir-sensor to see the chipset


So there it is, the BK7231N.
The next step is to connect the controller to your pc with using your UART USB Converter.
To do so, connect as following:
- VCC from Controller to VCC of Converter
- GND from Controller to GND of Converter
- RX1 from Controller to TX of Converter
- TX1 from Controller to RX of Converter
Make sure to use 3.3V on your Converter and attach the usb cable of your converter to your pc.

Then download the FlashTool under the following URL:
https://github.com/openshwprojects/BK7231GUIFlashTool/releases/tag/v1.1.5After starting the tool, i've chosen my com port "COM5", which my converter is using, chosen "BK7231N" as chip type and downloaded the newest version with the button next to the drop down where to select the firmware.
Also i had to choose 115200 as baud rate, as i got errors with the suggested default rate.
Then click in "Do backup and flash new" to start the firmware update.

Now you'll see the yellow lines that indicates that the device needs to be rebooted.
In my case powering off the device did not help. Instead i just hold a cable from the GND pin to the CEN pin for a very short time and the flashing process continued ...

The tool will create a backup of the firmware first. After that, the firmware is written to your device.
When this is done, you will see the tuya config, which is helpful afterwards as it contains informations about which channel is located on which pin of the controller. So it's a good idea to save that information for later use.

My Tuya Configuration:
Device configuration, as extracted from Tuya:
- LED Blue (Channel 3) on P7
- TODO1000
- LED Red (Channel 1) on P6
- LED Green (Channel 2) on P24
Device seems to be using CBU module, which is using BK7231N.
And the Tuya section starts, as usual, at 2023424
Then i disconnect the USB cable and disconnect the Converter from the controller.
Connect the controller with the power adapter to start the controller.
On my smartphone i've then searched for the wifi called "OpenBK..." of the controller and connected to it.

Open the browser on your smartphone and enter the following uri to access the OpenBK firmware of your device.
http://192.168.4.1
First of all, you should go to "config - Configure WiFi" and configure the access to your local wifi here.

After that you can lookup the newly assigned ip adress on your local router and connect to this ip adress to continue the configuration.
Go to "config - Configure Module". Here you'll need the information of the tuya config mentioned above and set the module as following:
- P6 (PWM0) : PWM : 1
- P7 (PWM1) : PWM : 3
- P24 (PWM4) : PWM : 2

Go back to the main screen. When you attach the stripe to your controller, you should now be able to control the device and change the colors.
For access with iobroker, goto "config - Configure MQTT" and enter the ip adress where your iobroker is running and the authentication details of the running sonoff adapter.

Under "config - Configure General/Flags" i also had to enable the following flag to get data into my iobroker instance:
Flag 30 - [MQTT] Enable Tasmota TELE etc publishes (for ioBroker etc)For Alexa Integration, goto "config - Change startup command text" and enter the following:
backlog startDriver SSDP; startDriver WemoThis leads to starting up the Wemo driver at every reboot of the controller.
After clicking on reboot on the main page, you can search for new devices on your Alexa and your controller should be found. It will only be found as a switch, so changing colors within alexa is not yet possible as the hue driver is not yet ready to use within OpenBK.
Afterall the stripe is working fine with Alexa and also in my iobroker instance.
Template:
{
  "vendor": "Tuya",
  "bDetailed": "0",
  "name": "Casalux LED-RGB WiFi Flexband",
  "model": "56279",
  "chip": "BK7231N",
  "board": "TODO",
  "flags": "1074004992",
  "keywords": [
    "TODO",
    "TODO",
    "TODO"
  ],
  "pins": {
    "6": "PWM;1",
    "7": "PWM;3",
    "24": "PWM;2"
  },
  "command": "backlog startDriver SSDP; startDriver Wemo",
  "image": "https://obrazki.elektroda.pl/4560293800_1702338662.jpg",
  "wiki": "https://www.elektroda.com/rtvforum/topic4020803.html"
}
Cool? Ranking DIY


