logo elektroda
logo elektroda
X
logo elektroda

[BK7231N] OpenBeken install on Minoston MT10W timer switch with TuyaMCU

grunthos503 1674 10
ADVERTISEMENT
  • Helpful post
    #1 20873071
    grunthos503
    Level 5  
    I have successfully installed OpenBeken on Minoston MT10W in-wall timer switch (US version). Here is the process I did.

    It has a BK7231N and all functions use TuyaMCU. No GPIO pins are used.

    I made all firmware changes OTA. No UART flashing was required. (Which is good, because the beken chip is not easy to get at. The device has two boards soldered together by header pins, and the beken chip is hidden in the middle.)

    First, I used Tuya-Cloudcutter to install kickstart-bk7231n, and then installed ESPHome. However, I found ESPHome was unstable on it. The device would hang and reboot, for no obvious reason. My guess is that LibreTiny is still a little unstable on this device.

    So I switched to OpenBeken. I used the ESPHome web interface on the device to OTA flash OpenBeken from https://github.com/BenJamesAndo/OpenBeken_uf2_firmware

    Because this device is all TuyaMCU controls, I had to define all channels myself. Fortunately, I got a complete list of the TuyaMCI device IDs from LibreTiny's ltchiptool, and translated that into an autoexec.bat for OBK.

    
    startDriver TuyaMCU
    
    SetChannelLabel 1 Switch_1
    setChannelType 1 toggle
    linkTuyaMCUOutputToChannel 1 bool 1
    
    SetChannelLabel 2 Countdown_1
    setChannelType 2 TextField
    linkTuyaMCUOutputToChannel 7 val 2
    
    SetChannelLabel 3 Button_1_(5_min)
    setChannelType 3 TimerSeconds
    linkTuyaMCUOutputToChannel 101 val 3
    
    SetChannelLabel 4 Button_2_(10_min)
    setChannelType 4 TimerSeconds
    linkTuyaMCUOutputToChannel 102 val 4
    
    SetChannelLabel 5 Button_3_(30_min)
    setChannelType 5 TimerSeconds
    linkTuyaMCUOutputToChannel 103 val 5
    
    SetChannelLabel 6 Button_4_(60_min)
    setChannelType 6 TimerSeconds
    linkTuyaMCUOutputToChannel 104 val 6
    
    SetChannelLabel 7 Button_5_(2_hour)
    setChannelType 7 TimerSeconds
    linkTuyaMCUOutputToChannel 105 val 7
    
    SetChannelLabel 8 Button_6_(4_hour)
    setChannelType 8 TimerSeconds
    linkTuyaMCUOutputToChannel 106 val 8
    
    tuyaMcu_setDimmerRange 0 100
    SetChannelLabel 9 Led_Brightness
    setChannelType 9 dimmer
    linkTuyaMCUOutputToChannel 107 val 9
    
    SetChannelLabel 10 Active_Key
    setChannelType 10 TextField
    linkTuyaMCUOutputToChannel 108 val 10
    ClampChannel 10 0 6
    
    SetChannelLabel 11 Power_Status
    setChannelType 11 TextField
    linkTuyaMCUOutputToChannel 109 enum 11
    ClampChannel 11 0 1
    
    SetChannelLabel 12 Countdown_Status
    setChannelType 12 TextField
    linkTuyaMCUOutputToChannel 110 enum 12
    ClampChannel 12 0 1
    
    SetChannelLabel 13 Always_On
    setChannelType 13 toggle
    linkTuyaMCUOutputToChannel 111 bool 13


    This is working correctly to control all features of the timer from the device's web interface.

    Is there a repository of configurations or sample autoexec.bat files where I can submit this, so the next person who tries this device can use it?

    I wasn't really sure how to configure the enum devices. I put in ClampChannel to indicate the proper range, but I don't know if that's really correct or helpful. The "Power Status" dpId 109 and "Countdown Status" dpId 110 are LED controls where 0 = solid on and 1 = flicker. I didn't make them "toggle" because they aren't really off/on, but I suppose toggle_inv could sort of work. The "Active Key" dpId 108 uses a number from 1 to 6, showing which button was last pressed, or letting you turn on the timer using one of the 6 preset times.

    OBK has been stable, and I have not had any unexpected hangs or reboots, like I had with ESPHome.

    My final goal is to get it working properly in Home Assistant. The autodiscovery mades a few good guesses, but didn't quite get it correct.

    The device has one main power relay, and it also has a dimmer for the LED indicator light. Unfortunately, HA autodiscovery combined these together to make a single light device, which is wrong. Here is the autodiscovery MQTT entry, where you can see it combined Channel 1, the relay, with Channel 9, the LED brightness:

    homeassistant/light/Timer_Switch_light_1/config

    
    {
      "dev": {
        "ids": [
          "Timer Switch"
        ],
        "name": "timerswitch_18CAB9",
        "sw": "1.17.366",
        "mf": "Beken Corporation",
        "mdl": "BK7231N",
        "cu": "http://x.x.x.x/index"
      },
      "name": "Switch_1",
      "~": "timerswitch_18CAB9",
      "avty_t": "~/connected",
      "pl_on": "1",
      "pl_off": "0",
      "uniq_id": "Timer_Switch_light_1",
      "qos": 1,
      "stat_t": "~/1/get",
      "cmd_t": "~/1/set",
      "bri_stat_t": "~/9/get",
      "bri_cmd_t": "~/9/set",
      "bri_scl": 100
    }


    Is there a way I can define my OBK channels to keep those separate, with the relay as a switch on one entity, and a separate entity for the LED brightness?

    There is also a countdown number that tells how many seconds are left on the timer. It would be nice to expose this in HA as a sensor, because you can use it to turn on the switch for a certain amount of time. Is there a way that I can define the channel that would generate a sensor in HA autodiscovery?

    Is there a channel setting for the other number fields that would just provide simple number sensors in HA?

    Thanks
  • ADVERTISEMENT
  • #2 20873267
    p.kaczmarek2
    Moderator Smart Home
    Hello, good job with flashing the device.
    grunthos503 wrote:

    So I switched to OpenBeken. I used the ESPHome web interface on the device to OTA flash OpenBeken from https://github.com/BenJamesAndo/OpenBeken_uf2_firmware

    It's a shame they need a third party format to just do OTA update, Very complicated, good to hear you've figured it out.

    grunthos503 wrote:

    
    startDriver TuyaMCU


    You may also need to use tuyaMcu_defWiFiState 4, some TuyaMCU devices require it otherwise they don't work good without MQTT connected (OBK assumes wifi state internally when MQTT is connected)

    grunthos503 wrote:

    Is there a repository of configurations or sample autoexec.bat files where I can submit this, so the next person who tries this device can use it?

    There are two places - first, we post teardowns here, on forum, maybe with discussion, just like you did, later they got featured there:
    https://openbekeniot.github.io/webapp/devicesList.html
    The source of above page is here:
    https://github.com/OpenBekenIOT/webapp/blob/gh-pages/devices.json
    You can add entry there yourself via pull request or I will do it manually later.

    Secondly, we have that docs page:
    https://github.com/openshwprojects/OpenBK7231T_App/blob/main/docs/autoexecExamples.md
    Here are sources:
    https://github.com/openshwprojects/OpenBK7231T_App/tree/main/docs
    You add the bat file, and add entry in JSON, and then use node to regenerate docs (MD files)


    grunthos503 wrote:

    I wasn't really sure how to configure the enum devices. I put in ClampChannel to indicate the proper range, but I don't know if that's really correct or helpful. The "Power Status" dpId 109 and "Countdown Status" dpId 110 are LED controls where 0 = solid on and 1 = flicker. I didn't make them "toggle" because they aren't really off/on, but I suppose toggle_inv could sort of work. The "Active Key" dpId 108 uses a number from 1 to 6, showing which button was last pressed, or letting you turn on the timer using one of the 6 preset times.

    Active Key can be scripted with change events. Many things can be done with our scripts.
    We can also add a channel type per request, what do you have in mind? Something like Toggle but read only?
    You can just make your own page altogether and ignore channel types:
    https://www.elektroda.com/rtvforum/topic3971355.html

    grunthos503 wrote:

    OBK has been stable, and I have not had any unexpected hangs or reboots, like I had with ESPHome.

    Thank you, we're making our firmware from scratch to try to suit your needs.

    grunthos503 wrote:

    My final goal is to get it working properly in Home Assistant. The autodiscovery mades a few good guesses, but didn't quite get it correct.

    Well, to be honest, Autodiscovery is supposed for simpler devices, and for more advanced ones you can always write YAML by hand, but let's try to do it automatic way...

    grunthos503 wrote:

    Is there a way I can define my OBK channels to keep those separate, with the relay as a switch on one entity, and a separate entity for the LED brightness?

    You are the first one to need it, but very well, I've added it for you. Can you check if it's working (first remove old discovered device)?
    https://github.com/openshwprojects/OpenBK7231...mmit/b27c3a9cfc0a468857884f058e8b28ad7bea1b6a

    grunthos503 wrote:

    There is also a countdown number that tells how many seconds are left on the timer. It would be nice to expose this in HA as a sensor, because you can use it to turn on the switch for a certain amount of time. Is there a way that I can define the channel that would generate a sensor in HA autodiscovery?

    We have a TimerSeconds channel type but it's not linked to HA discovery yet. I will try to add it as well, but in a meantime, I can see that ReadOnly is discovered, have you tried that?[/code]
    Helpful post? Buy me a coffee.
  • ADVERTISEMENT
  • #3 20875279
    grunthos503
    Level 5  
    p.kaczmarek2 wrote:
    You may also need to use tuyaMcu_defWiFiState 4

    Good to know, I will add that.

    p.kaczmarek2 wrote:
    https://github.com/OpenBekenIOT/webapp/blob/gh-pages/devices.json
    You can add entry there yourself via pull request or I will do it manually later.


    Great! I will send a pull request.

    p.kaczmarek2 wrote:
    Secondly, we have that docs page:
    https://github.com/openshwprojects/OpenBK7231T_App/blob/main/docs/autoexecExamples.md
    Here are sources:
    https://github.com/openshwprojects/OpenBK7231T_App/tree/main/docs
    You add the bat file, and add entry in JSON, and then use node to regenerate docs (MD files)


    OK, I will try to update that and make a pull request for it also.


    p.kaczmarek2 wrote:
    grunthos503 wrote:
    I wasn't really sure how to configure the enum devices. I put in ClampChannel to indicate the proper range, but I don't know if that's really correct or helpful. The "Power Status" dpId 109 and "Countdown Status" dpId 110 are LED controls where 0 = solid on and 1 = flicker. I didn't make them "toggle" because they aren't really off/on, but I suppose toggle_inv could sort of work. The "Active Key" dpId 108 uses a number from 1 to 6, showing which button was last pressed, or letting you turn on the timer using one of the 6 preset times.


    We can also add a channel type per request, what do you have in mind? Something like Toggle but read only?

    I was thinking that for an enum dpId, I think it would be enough to have a simple number field that enforces min and max, and publishes to HA as a "number" sensor. But I haven't actually tried that yet. I need to try some variations in manual HA setup before I have a good recommendation.

    Right now, I set up the Active Key channel as a TextField with ClampChannel. The device web interface does not stop me from entering a number that is larger than the max ClampChannel value. I'm not certain if ClampChannel is still to stop that from being sent to the TuyaMCU. I will have to study the logs. If ClampChannel did work, it did not update the web UI to show the "fixed" clamped value, but I'm not sure if it was supposed to.

    p.kaczmarek2 wrote:
    You can just make your own page altogether and ignore channel types:
    https://www.elektroda.com/rtvforum/topic3971355.html


    Nice to know; I will investigate that.

    p.kaczmarek2 wrote:
    Well, to be honest, Autodiscovery is supposed for simpler devices, and for more advanced ones you can always write YAML by hand


    Yes, that makes sense. This device is a little different from the usual switch or light. I assume that I probably will need to do that.

    p.kaczmarek2 wrote:
    grunthos503 wrote:
    Is there a way I can define my OBK channels to keep those separate, with the relay as a switch on one entity, and a separate entity for the LED brightness?

    You are the first one to need it, but very well, I've added it for you. Can you check if it's working (first remove old discovered device)?
    https://github.com/openshwprojects/OpenBK7231...mmit/b27c3a9cfc0a468857884f058e8b28ad7bea1b6a

    Thanks! I tried it out with the new flag 45. That successfully makes the switch just a switch again.

    Now I have that flag on, and LED indicator dpId 9 is still defined as a dimmer, but it doesn't show up at all in HA autodiscovery. Perhaps it doesn't make sense to call it a dimmer, since it doesn't apply to the main function of the device, but just a minor setting for the LED indicator, without its own on/off toggle. So I can try changing it to a TextField instead of dimmer, if that is the best way.

    p.kaczmarek2 wrote:
    grunthos503 wrote:
    There is also a countdown number that tells how many seconds are left on the timer.

    We have a TimerSeconds channel type but it's not linked to HA discovery yet. I will try to add it as well, but in a meantime, I can see that ReadOnly is discovered, have you tried that?


    I have not tried ReadOnly yet, so I will try it.

    For this device, ReadOnly doesn't sound quite right for this countdown timer. In operation, it is writeable as the way to turn on the timer for a custom amount of time (different from the 6 predefince buttons). However, in my case, I'm not really going to be changing it from the web UI (I'm mainly using the web UI just for initial testing) and in real use, all changes will come through HA.

    One more question: is there a recommendation on channel numbering? I made them sequential from 1 to 13, but I wonder if it might make more sense to match them to the dpId numbers.

    I have some good ideas to go try. Thank you for the help with this!

    Added after 2 [hours] 56 [minutes]:

    grunthos503 wrote:
    One more question: is there a recommendation on channel numbering? I made them sequential from 1 to 13, but I wonder if it might make more sense to match them to the dpId numbers.

    I just realized that channel numbers go from 0 to 31, so that won't work for dpId's that are over 31.
  • ADVERTISEMENT
  • #4 20875347
    p.kaczmarek2
    Moderator Smart Home
    grunthos503 wrote:

    Right now, I set up the Active Key channel as a TextField with ClampChannel. The device web interface does not stop me from entering a number that is larger than the max ClampChannel value. I'm not certain if ClampChannel is still to stop that from being sent to the TuyaMCU. I will have to study the logs. If ClampChannel did work, it did not update the web UI to show the "fixed" clamped value, but I'm not sure if it was supposed to.

    I think you're making a mistake here. The ClampChannel command clamps the channel at the execution time. It allows for various types of wrapping, like ping-pong, wrap around or just clamp to min/max. It does not fire automatically later.

    If you want to impose a hard, automatic limits on channel value, for either generic channel or TuyaMCU, then we might need to add a separate mechanism for that. Maybe some command to set per channels limits, etc.
    Helpful post? Buy me a coffee.
  • #5 20876395
    grunthos503
    Level 5  

    Ah, yes, I did misunderstand what ClampChannel is supposed to do. Thank you for explaining.
  • ADVERTISEMENT
  • #6 20877361
    grunthos503
    Level 5  
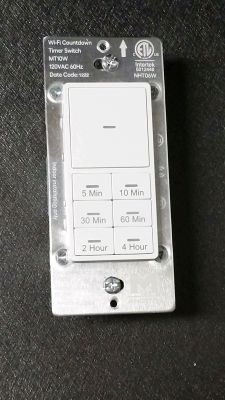
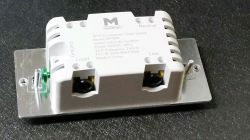
    Photos of the device
    Wi-Fi timer switch with buttons to set time from 5 minutes to 4 hours. Minoston MT10W Wi-Fi timer switch.

    Added after 5 [hours] 18 [minutes]:

    This device is complicated/different enough that it definitely needs an autoexec.bat and a YAML file for Home Assistant. I have them available at https://github.com/grunthos503/OpenBeken/tree/main/Minoston-MT10W-timer-switch

    p.kaczmarek2 wrote:
    Secondly, we have that docs page:
    https://github.com/openshwprojects/OpenBK7231T_App/blob/main/docs/autoexecExamples.mdHere are sources:
    https://github.com/openshwprojects/OpenBK7231T_App/tree/main/docsYou add the bat file, and add entry in JSON, and then use node to regenerate docs (MD files)


    I can see there is an "autoexecs" directory there, where I can put the autoexec.bat file for this device. However, it does need the manual YAML file for the required entities. Where is a good place to put that? As a YAML file in the autoexecs directory? Or is there a better place? Thanks
  • #7 20877627
    p.kaczmarek2
    Moderator Smart Home
    I would just put yaml here, on forum, with full description, later I can link to that from both autoexec.bat list on Github and from devices list: https://openbekeniot.github.io/webapp/devicesList.html
    Helpful post? Buy me a coffee.
  • Helpful post
    #8 20880909
    grunthos503
    Level 5  
    autoexec.bat

    
    // Autoexec.bat for Minoston MT10W countdown timer switch
    
    // All controls are through TuyaMCU
    startDriver TuyaMCU
    tuyaMcu_defWiFiState 4 
    
    // Main power relay
    SetChannelLabel 1 Switch
    setChannelType 1 toggle
    linkTuyaMCUOutputToChannel 1 bool 1
    
    // Countdown timer -- read/writea
    SetChannelLabel 2 Countdown
    setChannelType 2 TextField
    linkTuyaMCUOutputToChannel 7 val 2
    
    
    // 6 physicial buttons.  Uncomment these if you want to change the timer length
    //SetChannelLabel 3 Button_1 // (5 min)
    //setChannelType 3 TimerSeconds
    //linkTuyaMCUOutputToChannel 101 val 3
    
    //SetChannelLabel 4 Button_2 // (10 min)
    //setChannelType 4 TimerSeconds
    //linkTuyaMCUOutputToChannel 102 val 4
    
    //SetChannelLabel 5 Button_3 // (30 min)
    //setChannelType 5 TimerSeconds
    //linkTuyaMCUOutputToChannel 103 val 5
    
    //SetChannelLabel 6 Button_4 // (60 min)
    //setChannelType 6 TimerSeconds
    //linkTuyaMCUOutputToChannel 104 val 6
    
    //SetChannelLabel 7 Button_5 // (2 hour)
    //setChannelType 7 TimerSeconds
    //linkTuyaMCUOutputToChannel 105 val 7
    
    //SetChannelLabel 8 Button_6 // (4 hour)
    //setChannelType 8 TimerSeconds
    //linkTuyaMCUOutputToChannel 106 val 8
    
    
    // LED indicator brightness
    tuyaMcu_setDimmerRange 0 100
    SetChannelLabel 9 Led_Brightness
    setChannelType 9 dimmer
    linkTuyaMCUOutputToChannel 107 val 9
    
    // Which button was last pressed, 1 to 6
    SetChannelLabel 10 Active_Key
    setChannelType 10 TextField
    linkTuyaMCUOutputToChannel 108 val 10
    
    // Unclear what this does
    //SetChannelLabel 11 Power_Status
    //setChannelType 11 TextField
    //linkTuyaMCUOutputToChannel 109 enum 11
    
    // LED status countdown indicator
    //  0 = on
    //  1 = blink
    SetChannelLabel 12 Countdown_Status
    setChannelType 12 TextField
    linkTuyaMCUOutputToChannel 110 enum 12
    
    // Force relay on, with no timer countdown
    SetChannelLabel 13 Always_On
    setChannelType 13 toggle
    linkTuyaMCUOutputToChannel 111 bool 13
    
    // Recommended flags for MQTT with HomeAssistant: 2, 10, 21, 45


    Added after 3 [minutes]:

    Home Assistant YAML package file. Make a copy of this file for each device.

    
    # This is a Home Assistant package.
    
    # Create the directory /config/packages, and
    # add the following to configuration.yaml:
    #    homeassistant:
    #      packages: !include_dir_named packages
    
    # Make a copy of this file for each MT10W timer switch.
    
    # Replace "MT10W_Timer" with the MQTT topic that you set in OpenBeken
    
    ---
    mqtt:
      switch:
        - device:
            name: "Minoston MT10W Timer Switch"
            identifiers: &device_id MT10W_Timer
            manufacturer: Minoston
            model: MT10W Timer Switch (OpenBeken)
          unique_id: MT10W_Timer-switch
          name: Switch
          state_topic: "MT10W_Timer/1/get"
          command_topic: "MT10W_Timer/1/set"
          availability_topic: "MT10W_Timer/connected"
          payload_on: 1
          payload_off: 0
          state_on: 1
          state_off: 0
          device_class: switch
    
      number:
        - unique_id: MT10W_Timer-countdown
          name: Countdown
          mode: box
          min: 0
          max: 86400
          unit_of_measurement: "s"
          state_topic: "MT10W_Timer/2/get"
          command_topic: "MT10W_Timer/2/set"
          <<: &common
            availability_topic: "MT10W_Timer/connected"
            device:
              identifiers: *device_id
    
        - unique_id: MT10W_Timer-button-1
          name: Button 1 Time
          state_topic: "MT10W_Timer/3/get"
          command_topic: "MT10W_Timer/3/set"
          <<: &button-time
            mode: box
            min: 1
            max: 86400
            unit_of_measurement: "s"
            entity_category: config
            enabled_by_default: false
            <<: *common
    
        - unique_id: MT10W_Timer-button-2
          name: Button 2 Time
          state_topic: "MT10W_Timer/4/get"
          command_topic: "MT10W_Timer/4/set"
          <<: *button-time
    
        - unique_id: MT10W_Timer-button-3
          name: Button 3 Time
          state_topic: "MT10W_Timer/5/get"
          command_topic: "MT10W_Timer/5/set"
          <<: *button-time
    
        - unique_id: MT10W_Timer-button-4
          name: Button 4 Time
          state_topic: "MT10W_Timer/6/get"
          command_topic: "MT10W_Timer/6/set"
          <<: *button-time
    
        - unique_id: MT10W_Timer-button-5
          name: Button 5 Time
          state_topic: "MT10W_Timer/7/get"
          command_topic: "MT10W_Timer/7/set"
          <<: *button-time
    
        - unique_id: MT10W_Timer-button-6
          name: Button 6 Time
          state_topic: "MT10W_Timer/8/get"
          command_topic: "MT10W_Timer/8/set"
          <<: *button-time
    
        - unique_id: MT10W_Timer-led-brightness
          name: LED Brightness
          min: 1
          max: 100
          entity_category: config
          state_topic: "MT10W_Timer/9/get"
          command_topic: "MT10W_Timer/9/set"
          <<: *common
    
        - unique_id: MT10W_Timer-active-key
          name: Active Key
          min: 1
          max: 6
          state_topic: "MT10W_Timer/10/get"
          command_topic: "MT10W_Timer/10/set"
          <<: *common
    
        - unique_id: MT10W_Timer-power-status
          name: Power Status
          min: 0
          max: 1
          entity_category: config
          enabled_by_default: false
          state_topic: "MT10W_Timer/11/get"
          command_topic: "MT10W_Timer/11/set"
          <<: *common
    
        - unique_id: MT10W_Timer-countdown-status
          name: Countdown Status
          min: 0
          max: 1
          entity_category: config
          state_topic: "MT10W_Timer/12/get"
          command_topic: "MT10W_Timer/12/set"
          <<: *common
    
        - unique_id: MT10W_Timer-always-on
          name: Always On
          min: 0
          max: 1
          enabled_by_default: false
          state_topic: "MT10W_Timer/13/get"
          command_topic: "MT10W_Timer/13/set"
          <<: *common
    
      sensor:
        - unique_id: MT10W_Timer-ssid
          name: SSID
          entity_category: diagnostic
          state_topic: "MT10W_Timer/ssid"
          <<: *common
    
        - unique_id: MT10W_Timer-rssi
          name: RSSI
          entity_category: diagnostic
          state_topic: "MT10W_Timer/rssi"
          <<: *common
    
  • #9 20882987
    p.kaczmarek2
    Moderator Smart Home
    I can see a pull request for this device has been submitted:
    https://github.com/OpenBekenIOT/webapp/pull/67/files
    Thank you, device should be live at our list in few moments:
    https://openbekeniot.github.io/webapp/devicesList.html
    Helpful post? Buy me a coffee.
  • #10 21262247
    larryschapker
    Level 1  
    I understand that this thread is nearing a year old. If I should be posting this elsewhere, please let me know and I'll remove this from here and post it in the proper location.

    I recently purchased a Minoston MT10W (my second one). Using my original, I was able to use Tuya-cloudcutter to gain access. Now add 6 months. My new MT10W seems to have the attack vector "circumvented" (firmware version 2.1.17). Looking at the Tuya-cloudcutter
    I presume that I need to "open up" the timer and solder wires to do a "uart firmware" upgrade. I've never done this type of upgrade (but have no issues soldering wires if I know {somewhat} what I'm doing ). I found this Youtube video (https://youtu.be/PKkiqDNFIx8?si=5WvWAkgdHQSm85hs) from this site or does anyone have other suggestions as to where this newbie should look? Thanks in advance!
  • #11 21262322
    p.kaczmarek2
    Moderator Smart Home
    Hello, no problem, we're here to help, even after a year. Your device is using BK7231N? You can then check newer tutorial with newer tool:


    Download: https://github.com/openshwprojects/BK7231GUIFlashTool

    However, it seems that your device is also TuyaMCU? This means that MCU may block UART lines. See TuyaMCU guide:
    TuyaMCU flashing, setup and configuration guide - configure dpIDs for Home Assistant
    Helpful post? Buy me a coffee.

Topic summary

The discussion centers around the installation of OpenBeken firmware on the Minoston MT10W in-wall timer switch, which utilizes the BK7231N chip and operates through TuyaMCU without the need for GPIO pins. The user successfully performed an OTA firmware update using Tuya-Cloudcutter and later switched to OpenBeken due to instability issues with ESPHome. The conversation includes technical details about configuring the device, including defining channels for TuyaMCU controls and creating an autoexec.bat file for Home Assistant integration. Additional insights are provided on the limitations of the ClampChannel command and the need for a YAML file for proper configuration. A follow-up inquiry addresses challenges with a newer version of the MT10W that may require UART flashing due to firmware updates blocking access.
Summary generated by the language model.
ADVERTISEMENT