WORK IN PROGRESS!!! please refrain from commenting as more devices will follow.
Documenting TuyaMCu sensors, findings and workflow to convert such devices to OBK.
First device in question is generic Thermometer with TuyaMCU.
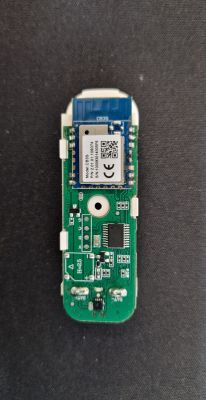
Since I'll be doing this somewhat in depth and on multiple devices I prepared a small setup to make my life easier. Two USB to UART converters to capture both Rx and Tx from the TuyaMCU.
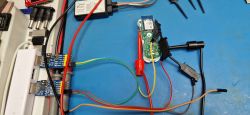
Pairing with Tuya Smart application is straight forward I am working with stock Tuya FW to capture traffic and "decode" dpID's.
This is what the app looks like on the phone:
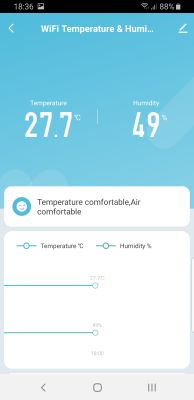
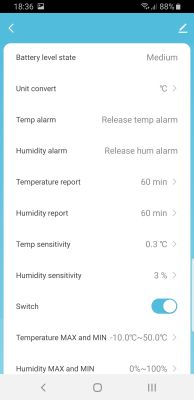
And this is what our Analyzer has captured upon pairing and first readings (change baud rate between 9600 and 115200 if you don't get any readings):
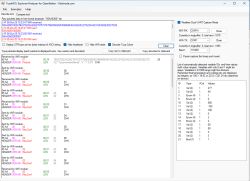
Probably need to mention that on both my UART adapters I am using RX pins attached to Rx and Tx pins of the module as wee need to capture the traffic.
You can find our Analyzer here - https://github.com/openshwprojects/TuyaMCUAnalyzer
Can you spot some patterns and similarities??
So Analyzer got these values:
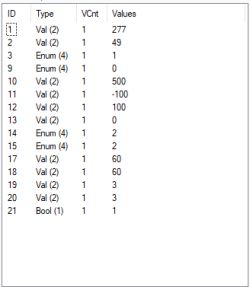
Comparing it to the app we can probably deduct which dpID does what. For example:
ID 1 is temperature reading as a value 277 so it is been reported as a temperature with a division of 10 (important later when we will assign channels in OBK and set up actual value!!)
ID 2 is humidity reding also as a value and a whole number, no division.
This can be easier to determine if we play around with the application and monitor the traffic on the analyzer, doing so I was able to determine several data point ID's and get a very good picture of what I need to do when I convert this device to OBK. For example:
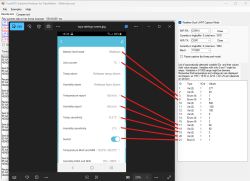
Note that you'll have to reboot the device on any change in the application as it is, by default, set to wake up and report at 60 minutes so changes will not be applied if the device is sleeping. And not all dpID's are covered in this tutorial!!
So from gathered info we have the following findings:
ID1 - temperature_div10
ID2 - humidity
ID3 - battery state read as enum of 0 (low battery), 1 (medium battery) and 2 (high battery)
ID9 - selection of temp reading 0 = Celsius and 1 = Fahrenheit
ID17 - temperature report time in minutes
ID18 - humidity report time in minutes
ID19 - temperature sensitivity again as a whole number 3 which stands for 0.3 (because division by 10)
ID20 - humidity sensitivity as a whole number 3
ID21 - it the whatever the switch in the app is (no idea what it does at this point)
Note again NOT all values are decoded by me in this instance!!! If you have more time you can dig into those deeper (maybe I'll do that at some point too)
From here on in I am confident I have what I need to convert this device to OBK and set it up to communicate with TuyaMCU and report what I set up to Home Assistant.
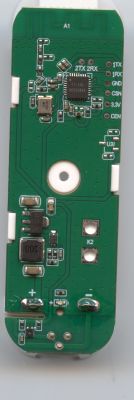
Good practice to do so is to remove the module and program it separately but if unable to do so you can program it in circuit. Be sure to power the module directly and not via battery terminals as TuyaMCU controls a positive power supply via a small FET on the PCB - Q1 on the schematic.
Another note is to power the module from a reliable power source (bench PSU or similar) for flashing, try to avoid using power supplied from your USB to UART adapter if possible and if you experience problems while flashing, remove R2 and/or R3 from the board to disconnect TuyaMCU and avoid it interfering with the flashing process!
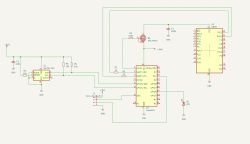
Schematic is for reference purposes, reversed by me and not ideal or 100% accurate as some values and marking are not present!!!
Our GUI flasher tool is constantly being updated and can be found here - https://github.com/openshwprojects/BK7231GUIFlashTool
Flashing procedure is being explained so many times in this forum I will not get into repeating it here.
Once your device is flashed, reboot and while supply voltage is still connected to the module and not the battery terminals we can proceed to set OBK up to communicate with this TuyaMCU.
Device will boot in AP for the first time as OpenBeken_(MAC numbers) in your WiFi search list - conect ot it and access it on 192.168.4.1 for the first time. I prefer to configure device name, and WiFi credentials so I can access it through my network.
First things that I do is to set up couple of flags and I recommend these:
2 - Broadcast self state every 60 seconds by default, can be tweaked if necessary more on that in the documents - https://github.com/openshwprojects/OpenBK7231T_App/blob/main/docs/README.md
10 - Broadcast self state on MQTT connect, self explanatory
19 - Always publish channels used by TuyaMCU, self explanatory
37 - quick connect flag for faster WiFi connection on wakeup, works with flag 51 and/or static IP set
43 - use queue for TuyaMCU as the the device will report multiple values at any given time and OBK need's to recognize that
51 - together with flag 37 will allow your device to remember WiFi credentials and connect to your network within 2-5 seconds
Next thing would be to set ap the autoexec.bat file and configure and link dpID's to a OBK channel and read the values properly. You can do that by clicking on the "Launch Web Application" button on the device index page, navigate over to "File System" tab and click the button "Create file" , default name offered is autoexec.bat and should remain the same for the purposes of this tutorial.
Here is the autoexec I came up with, should be self explanatory but will explain in more detail below:
I'll be using "only" 5 dpID's here to make a point and convey the general principle of converting this particular device, more in depth setup can be done but this explanation will not cover that.
So to start we have to setup and start the TuyaMCU driver and it's tmsensor submodule/driver. Next is to set up OBK UART speed as not all devices use the same, device in question uses 115200. Making sure we are connected to WiFi with waitfor command and proceeding to set up OBK channels and linking them to dpID's.
Starting with linking dpID 1 to CH1, setting up CH1 set to temparature_div10 because we determined how TuyaMCU reports it with the analyzer, next is humidity, same method just assigned dpID2 to CH2 and third is battery, difference being that channel is setup as ReadOnlyLowMidHigh as this is what TuyaMCu is reporting.
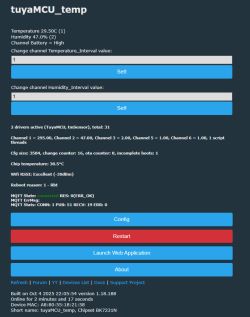
Now dealing with datapoint cache values that can be set in the app namely reporting times for TuyaMCU. Logic here is to check set up those values and tranfer them to TuyaMCU on reboot. Channels 5 and 6 are used for that purpose and the end if you (copy/paste) this autoexec file you should get your index page to look like this:
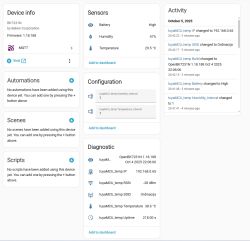
Add your MQTT credentials and after connecting click on the button "HomeAssistant Configuration" under the "Config" menu on the device index page. this will trigger HA autodiscovery and if you have everything set up properly you will get this in you HA MQTT add-on:
Hope this helps somewhat in dealing with TuyaMCU devices, more examples of different devices will follow shortly.
Added after 2 [hours] 18 [minutes]:
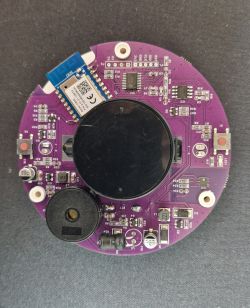
Next device in line will be battery powered smoke detector with temperature and humidity sensor, provided to me by @io2345 (sorry for waiting this long for a response!)
Same principals applies here, working with Tuya Smart App and stock FW on the device to figure out what is going on on the original device and replicate that with OBK.
Link to the original thread and some difficulties with this device is here - https://www.elektroda.com/rtvforum/topic4124648.html
Right from the start i can see some problems with this device, similar to many this device is not "finished" and was pushed to production and sold in that state. For example, @io2345 got these dpID's extracted from his device:
and this what I got from the Analyzer:
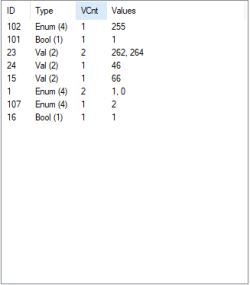
dpID 102 is not mentioned anywhere, I checked on my end and found the same when extracting dpID's so we will have to test and see what it is actually.
So far by test and monitoring the traffic we can determine following dpID's:
ID1 - smoke alarm but inverted, 1 is a normal state (no smoke) and 0 is alarm state (smoke present)
ID15 - battery value in percent from 0 to 100
ID16 - alarm mute asserted if value 1 is pushed to sensor while dpID1 is 0
ID23 - temperature reading similar to the thermostat before sent as a round number divided by 10
ID24 - humidity value
ID101 - self test, pass value is 1 so my guess 0 is fail but can't replicate that, maybe something to do with the sensor (no idea)
ID102 - unknown dpID right now has a value of 255 (max something??)
ID107 - temperature alarm but without the option to set it (predefined maybe - HighMidLow??) current value is enum 2
Now that we got as much data as possible from the app and monitoring traffic on the sensor it's time to backup the original FW from the CB3S module and flash OBK and see what it is we can do and can we adapt it to our needs.
Post will be edited soon as we need to add a new channel type to complete the setup of this device, check of it's functionality and addition to HA.
Preliminary test with some changes from the recent PR, screen shot from HA integration:

Documenting TuyaMCu sensors, findings and workflow to convert such devices to OBK.
First device in question is generic Thermometer with TuyaMCU.

Since I'll be doing this somewhat in depth and on multiple devices I prepared a small setup to make my life easier. Two USB to UART converters to capture both Rx and Tx from the TuyaMCU.

Pairing with Tuya Smart application is straight forward I am working with stock Tuya FW to capture traffic and "decode" dpID's.
This is what the app looks like on the phone:


And this is what our Analyzer has captured upon pairing and first readings (change baud rate between 9600 and 115200 if you don't get any readings):

Probably need to mention that on both my UART adapters I am using RX pins attached to Rx and Tx pins of the module as wee need to capture the traffic.
You can find our Analyzer here - https://github.com/openshwprojects/TuyaMCUAnalyzer
Can you spot some patterns and similarities??
So Analyzer got these values:

Comparing it to the app we can probably deduct which dpID does what. For example:
ID 1 is temperature reading as a value 277 so it is been reported as a temperature with a division of 10 (important later when we will assign channels in OBK and set up actual value!!)
ID 2 is humidity reding also as a value and a whole number, no division.
This can be easier to determine if we play around with the application and monitor the traffic on the analyzer, doing so I was able to determine several data point ID's and get a very good picture of what I need to do when I convert this device to OBK. For example:

Note that you'll have to reboot the device on any change in the application as it is, by default, set to wake up and report at 60 minutes so changes will not be applied if the device is sleeping. And not all dpID's are covered in this tutorial!!
So from gathered info we have the following findings:
ID1 - temperature_div10
ID2 - humidity
ID3 - battery state read as enum of 0 (low battery), 1 (medium battery) and 2 (high battery)
ID9 - selection of temp reading 0 = Celsius and 1 = Fahrenheit
ID17 - temperature report time in minutes
ID18 - humidity report time in minutes
ID19 - temperature sensitivity again as a whole number 3 which stands for 0.3 (because division by 10)
ID20 - humidity sensitivity as a whole number 3
ID21 - it the whatever the switch in the app is (no idea what it does at this point)
Note again NOT all values are decoded by me in this instance!!! If you have more time you can dig into those deeper (maybe I'll do that at some point too)
From here on in I am confident I have what I need to convert this device to OBK and set it up to communicate with TuyaMCU and report what I set up to Home Assistant.
Good practice to do so is to remove the module and program it separately but if unable to do so you can program it in circuit. Be sure to power the module directly and not via battery terminals as TuyaMCU controls a positive power supply via a small FET on the PCB - Q1 on the schematic.
Another note is to power the module from a reliable power source (bench PSU or similar) for flashing, try to avoid using power supplied from your USB to UART adapter if possible and if you experience problems while flashing, remove R2 and/or R3 from the board to disconnect TuyaMCU and avoid it interfering with the flashing process!

Schematic is for reference purposes, reversed by me and not ideal or 100% accurate as some values and marking are not present!!!
Our GUI flasher tool is constantly being updated and can be found here - https://github.com/openshwprojects/BK7231GUIFlashTool
Flashing procedure is being explained so many times in this forum I will not get into repeating it here.
Once your device is flashed, reboot and while supply voltage is still connected to the module and not the battery terminals we can proceed to set OBK up to communicate with this TuyaMCU.
Device will boot in AP for the first time as OpenBeken_(MAC numbers) in your WiFi search list - conect ot it and access it on 192.168.4.1 for the first time. I prefer to configure device name, and WiFi credentials so I can access it through my network.
First things that I do is to set up couple of flags and I recommend these:
2 - Broadcast self state every 60 seconds by default, can be tweaked if necessary more on that in the documents - https://github.com/openshwprojects/OpenBK7231T_App/blob/main/docs/README.md
10 - Broadcast self state on MQTT connect, self explanatory
19 - Always publish channels used by TuyaMCU, self explanatory
37 - quick connect flag for faster WiFi connection on wakeup, works with flag 51 and/or static IP set
43 - use queue for TuyaMCU as the the device will report multiple values at any given time and OBK need's to recognize that
51 - together with flag 37 will allow your device to remember WiFi credentials and connect to your network within 2-5 seconds
Next thing would be to set ap the autoexec.bat file and configure and link dpID's to a OBK channel and read the values properly. You can do that by clicking on the "Launch Web Application" button on the device index page, navigate over to "File System" tab and click the button "Create file" , default name offered is autoexec.bat and should remain the same for the purposes of this tutorial.
Here is the autoexec I came up with, should be self explanatory but will explain in more detail below:
//starting TuyaMCU driver and it's sensor submodule
startDriver TuyaMCU
startDriver tmSensor

// may be needed, depends on device, some devices also use 9600 or other baud rates
tuyaMCU_setBaudRate 115200

//before proceeding make sure we are connected
waitFor WiFiState 4

// dpID 1 is tempererature div 10
linkTuyaMCUOutputToChannel 1 val 1
setChannelType 1 temperature_div10

// dpID 2 is % humidity
linkTuyaMCUOutputToChannel 2 val 2
setChannelType 2 Humidity

// dpID 3 is battery state - low(0), mid(1) and high(2)
linkTuyaMCUOutputToChannel 3 enum 3
setChannelType 3 ReadOnlyLowMidHigh
setChannelLabel 3 Battery

//
// setup dpCache - temperature interval
//
// Show textfield for that
setChannelType 5 TextField
// setup display name
setChannelLabel 5 Temperature_Interval
// Make value persistant (stored between reboots),
// start value -1 means "remember last"
SetStartValue 5 -1
// check and set default value if not set
if $CH5==0 then "setChannel 5 1"
// link dpID 17 to channel 5, the type is val, extra '1' means that its dpCache variable
linkTuyaMCUOutputToChannel 17 val 5 1

setChannelType 6 TextField
setChannelLabel 6 Humidity_Interval
SetStartValue 6 -1
if $CH6==0 then "setChannel 6 1"
linkTuyaMCUOutputToChannel 18 val 6 1
I'll be using "only" 5 dpID's here to make a point and convey the general principle of converting this particular device, more in depth setup can be done but this explanation will not cover that.
So to start we have to setup and start the TuyaMCU driver and it's tmsensor submodule/driver. Next is to set up OBK UART speed as not all devices use the same, device in question uses 115200. Making sure we are connected to WiFi with waitfor command and proceeding to set up OBK channels and linking them to dpID's.
Starting with linking dpID 1 to CH1, setting up CH1 set to temparature_div10 because we determined how TuyaMCU reports it with the analyzer, next is humidity, same method just assigned dpID2 to CH2 and third is battery, difference being that channel is setup as ReadOnlyLowMidHigh as this is what TuyaMCu is reporting.
Now dealing with datapoint cache values that can be set in the app namely reporting times for TuyaMCU. Logic here is to check set up those values and tranfer them to TuyaMCU on reboot. Channels 5 and 6 are used for that purpose and the end if you (copy/paste) this autoexec file you should get your index page to look like this:

Add your MQTT credentials and after connecting click on the button "HomeAssistant Configuration" under the "Config" menu on the device index page. this will trigger HA autodiscovery and if you have everything set up properly you will get this in you HA MQTT add-on:

Hope this helps somewhat in dealing with TuyaMCU devices, more examples of different devices will follow shortly.
Added after 2 [hours] 18 [minutes]:
Next device in line will be battery powered smoke detector with temperature and humidity sensor, provided to me by @io2345 (sorry for waiting this long for a response!)

Same principals applies here, working with Tuya Smart App and stock FW on the device to figure out what is going on on the original device and replicate that with OBK.
Link to the original thread and some difficulties with this device is here - https://www.elektroda.com/rtvforum/topic4124648.html
Right from the start i can see some problems with this device, similar to many this device is not "finished" and was pushed to production and sold in that state. For example, @io2345 got these dpID's extracted from his device:
{
  "result": {
    "properties": [
      {
        "code": "smoke_sensor_state",
        "custom_name": "",
        "dp_id": 1,
        "time": 1749642836349,
        "type": "enum",
        "value": "normal"
      },
      {
        "code": "battery_percentage",
        "custom_name": "",
        "dp_id": 15,
        "time": 1749642855516,
        "type": "value",
        "value": 100
      },
      {
        "code": "muffling",
        "custom_name": "",
        "dp_id": 16,
        "time": 1749642833980,
        "type": "bool",
        "value": false
      },
      {
        "code": "temp_current",
        "custom_name": "",
        "dp_id": 23,
        "time": 1749642855125,
        "type": "value",
        "value": 238
      },
      {
        "code": "humidity_value",
        "custom_name": "",
        "dp_id": 24,
        "time": 1749642855291,
        "type": "value",
        "value": 62
      },
      {
        "code": "self_test",
        "custom_name": "",
        "dp_id": 101,
        "time": 1749642855406,
        "type": "bool",
        "value": true
      },
      {
        "code": "temp_alarm",
        "custom_name": "",
        "dp_id": 107,
        "time": 1749642837479,
        "type": "enum",
        "value": "cancel"
      }
    ]
  },
  "success": true,
  "t": 1749644127214,
  "tid": "c2522a3246bd11f0b492d6238a027bdd"
and this what I got from the Analyzer:

dpID 102 is not mentioned anywhere, I checked on my end and found the same when extracting dpID's so we will have to test and see what it is actually.
So far by test and monitoring the traffic we can determine following dpID's:
ID1 - smoke alarm but inverted, 1 is a normal state (no smoke) and 0 is alarm state (smoke present)
ID15 - battery value in percent from 0 to 100
ID16 - alarm mute asserted if value 1 is pushed to sensor while dpID1 is 0
ID23 - temperature reading similar to the thermostat before sent as a round number divided by 10
ID24 - humidity value
ID101 - self test, pass value is 1 so my guess 0 is fail but can't replicate that, maybe something to do with the sensor (no idea)
ID102 - unknown dpID right now has a value of 255 (max something??)
ID107 - temperature alarm but without the option to set it (predefined maybe - HighMidLow??) current value is enum 2
Now that we got as much data as possible from the app and monitoring traffic on the sensor it's time to backup the original FW from the CB3S module and flash OBK and see what it is we can do and can we adapt it to our needs.
Post will be edited soon as we need to add a new channel type to complete the setup of this device, check of it's functionality and addition to HA.
Preliminary test with some changes from the recent PR, screen shot from HA integration:


