Hello all!
After trying several methods to identify de DpIDs during the "OBKizing" of two devices (a temperature/humidity sensor and a multi-function circuit breaker), and after sharing the idea with @p.kaczmarek2, we thought it would be good to summarize the findings in a stand-alone tutorial.
Identifying the DPs is crucial to be able to use as many capabilities as possible of a TUYA MCU-based device after flashing OBK, so it's interesting to have as much information as possible. As I have seen, in several cases the process involves finding similar devices in the forum and copying/adapting their information, but it would be better to have a systematic approach so we don't leave away any of them.
So, in this post, I'll try to summarize the methods I've employed and also, in the following discussion, maybe we can find better options.
I'll use as an example the aforementioned multi-function circuit breaker, as it's a device with a good deal of DpIDS, so it has enough complexity to be a good reference.
To start with, we can get an idea of the number of DpIDs of the device by "discovering" it in the Tuya App and exploring its control pages. The most interesting screenshots of them for our example are these:
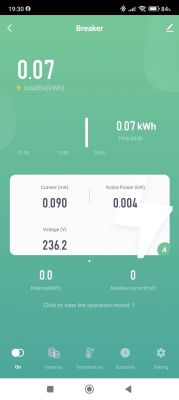
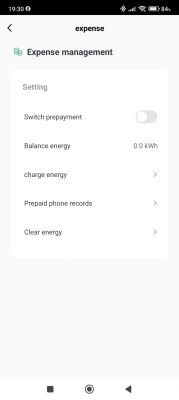
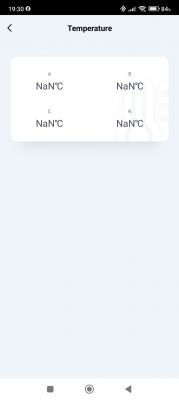
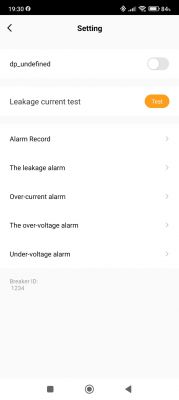
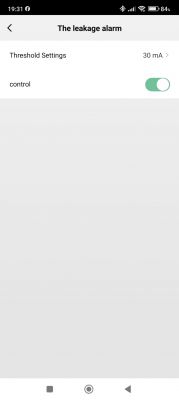
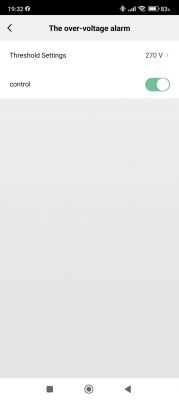
In the first screen, we can see the device can report power, voltage, current, residual current, total energy, and "balance energy" (remaining prepaid energy). The second one allows setting prepayment on or off and recharging or clearing balance energy. The third one should show temperature, but it's a feature the device doesn't support (clearly, the manufacturer is "recycling" the interface from another device...). The fourth allows testing the residual current protection and gives access to the following ones, where you can activate or deactivate the different alarms (whether they should trip the switch or not) and set their thresholds. Each of these values/settings, or groups of them, should have a DpID that we would want to monitor/control in OBK, once we flash the device with it.
The first step to finding out more information about our devices is to create an account on the Tuya IoT Platform (not to be confused with the account for the app).
Then, there are two options: If you want also to use the Tuya integration in Home Assistant (maybe you're already doing that), then follow the instructions here. You need to follow the steps until LINK DEVICES BY APP ACCOUNT, including this one. Alternatively, the same process is also described here (steps 1 to 6).
From this point, you can jump to the last method described below (search [*]) to obtain DpID numbers and descriptions in one step, but you can also follow the next steps on that page, to find some more information.
In the last link, we can follow the next steps from 7 onwards to find the DpID numbers and labels. In our example, after using the "automatic" approach in step 8 I got the following results:
(I've added between brackets the Google translation for the two labels in Chinese)
With this, combined with the previous information from the Tuya App we can already make an idea about the DpID numbers associated with each of the measurements/settings of the device, but we can also get more information from the Tuya developer's website. For example, in step 7 of the previous procedure, instead of "Device Logs", click "Device Debugging", and you'll get the following screen:
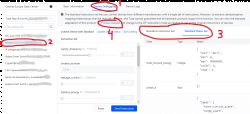
After selecting the device, you can copy the information under "Standard Instruction Set" and "Standard Status Set" to your favorite JSON editor (I use Notepad++), or hit "Product details" (number 4 above) to get a listing of the DpIDs that you can relate with the numbers you got before, as I did here and in the following posts. The following code shows the "Standard Status Set" for our example:
As you can see, there we have more detailed information about the contents of the different DpIDs, and how to interpret them. If you have the patience to follow the device's thread from the point I linked before, you can see how I tried to correlate the information and summarize it in tables, but that's not really necessary as, as I also explain there, there's another place in Tuya developer's website where you can find most of the info in just one step.
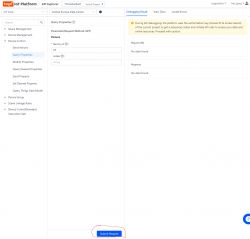
[*] And here is where the abbreviated method continues. Copy the "device id" from the 6th step of any of the alternative methods above and go to to https://eu.iot.tuya.com/cloud/explorer/. Then, select Device Control -> Query Things Data Model, paste the copied "device id" in the corresponding field and hit "submit request":
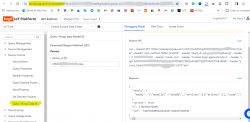
Then, hit "Copy" in the "response" and you get this:
The interesting part is the one enclosed between quotation marks after "model" :
The problem is that is all in one line (no carriage returns), so it's not very legible... in the corresponding post of the device's thread I describe a method to make it more legible using Notepad++ but, following @p.kaczmarek2 suggestion, I searched for an online formatter and found this one that makes a good job. If you paste the code above and hit "Auto repair" and then "format" in the messages that appear below, you get quite a good result:
Still, we have the Chinese parts and some long "description" fields that are complicated to understand. So I did these final steps by hand to get what I consider should be the final product of the process:
(I left the original Chinese and added the automatic English translation afterwards)
But we are in 2023, so there must be better ways... I remembered that @fakuivan in his last post here mentioned chatgpt for doing this, so I tried asking it for that and, why not, also the formatting part. The results are promising but there are two problems: It only translates part of the original JSON (you have to keep hitting "continue" or something like that) and I couldn't get it to format correctly the long descriptions that contained \n for carriage return. I also tried with our local elektrodabot, who managed to format and translate in one step, but also partially... there is still work to make, as you can see
So I'll keep you updated and try to apply all this to a new device I just received. Bye for now!
After trying several methods to identify de DpIDs during the "OBKizing" of two devices (a temperature/humidity sensor and a multi-function circuit breaker), and after sharing the idea with @p.kaczmarek2, we thought it would be good to summarize the findings in a stand-alone tutorial.
Identifying the DPs is crucial to be able to use as many capabilities as possible of a TUYA MCU-based device after flashing OBK, so it's interesting to have as much information as possible. As I have seen, in several cases the process involves finding similar devices in the forum and copying/adapting their information, but it would be better to have a systematic approach so we don't leave away any of them.
So, in this post, I'll try to summarize the methods I've employed and also, in the following discussion, maybe we can find better options.
I'll use as an example the aforementioned multi-function circuit breaker, as it's a device with a good deal of DpIDS, so it has enough complexity to be a good reference.
To start with, we can get an idea of the number of DpIDs of the device by "discovering" it in the Tuya App and exploring its control pages. The most interesting screenshots of them for our example are these:


In the first screen, we can see the device can report power, voltage, current, residual current, total energy, and "balance energy" (remaining prepaid energy). The second one allows setting prepayment on or off and recharging or clearing balance energy. The third one should show temperature, but it's a feature the device doesn't support (clearly, the manufacturer is "recycling" the interface from another device...). The fourth allows testing the residual current protection and gives access to the following ones, where you can activate or deactivate the different alarms (whether they should trip the switch or not) and set their thresholds. Each of these values/settings, or groups of them, should have a DpID that we would want to monitor/control in OBK, once we flash the device with it.
The first step to finding out more information about our devices is to create an account on the Tuya IoT Platform (not to be confused with the account for the app).
Then, there are two options: If you want also to use the Tuya integration in Home Assistant (maybe you're already doing that), then follow the instructions here. You need to follow the steps until LINK DEVICES BY APP ACCOUNT, including this one. Alternatively, the same process is also described here (steps 1 to 6).
From this point, you can jump to the last method described below (search [*]) to obtain DpID numbers and descriptions in one step, but you can also follow the next steps on that page, to find some more information.
In the last link, we can follow the next steps from 7 onwards to find the DpID numbers and labels. In our example, after using the "automatic" approach in step 8 I got the following results:
{"1":"Total forward energy","6":"Phase A","9":"Fault","11":"Switch prepayment","12":"Clear energy","13":"Balance energy","14":"charge energy","15":"Leakage current","16":"Switch","17":"Alarm set1","18":"Alarm set2","19":"Breaker id","21":"Leakage current test","101":"Clear Energy","104":"Power Factor","105":"Grid Frequency","106":"刷新上报 (Refresh report)","116":"Voltage","117":"Current","118":"有功功率 (Active power)"}With this, combined with the previous information from the Tuya App we can already make an idea about the DpID numbers associated with each of the measurements/settings of the device, but we can also get more information from the Tuya developer's website. For example, in step 7 of the previous procedure, instead of "Device Logs", click "Device Debugging", and you'll get the following screen:
ADVERTISEMENT

After selecting the device, you can copy the information under "Standard Instruction Set" and "Standard Status Set" to your favorite JSON editor (I use Notepad++), or hit "Product details" (number 4 above) to get a listing of the DpIDs that you can relate with the numbers you got before, as I did here and in the following posts. The following code shows the "Standard Status Set" for our example:
Code: JSON
As you can see, there we have more detailed information about the contents of the different DpIDs, and how to interpret them. If you have the patience to follow the device's thread from the point I linked before, you can see how I tried to correlate the information and summarize it in tables, but that's not really necessary as, as I also explain there, there's another place in Tuya developer's website where you can find most of the info in just one step.
[*] And here is where the abbreviated method continues. Copy the "device id" from the 6th step of any of the alternative methods above and go to to https://eu.iot.tuya.com/cloud/explorer/. Then, select Device Control -> Query Things Data Model, paste the copied "device id" in the corresponding field and hit "submit request":

Then, hit "Copy" in the "response" and you get this:
Code: JSON
The interesting part is the one enclosed between quotation marks after "model" :
Code: JSON
The problem is that is all in one line (no carriage returns), so it's not very legible... in the corresponding post of the device's thread I describe a method to make it more legible using Notepad++ but, following @p.kaczmarek2 suggestion, I searched for an online formatter and found this one that makes a good job. If you paste the code above and hit "Auto repair" and then "format" in the messages that appear below, you get quite a good result:
Code: JSON
Still, we have the Chinese parts and some long "description" fields that are complicated to understand. So I did these final steps by hand to get what I consider should be the final product of the process:
Code: JSON
(I left the original Chinese and added the automatic English translation afterwards)
But we are in 2023, so there must be better ways... I remembered that @fakuivan in his last post here mentioned chatgpt for doing this, so I tried asking it for that and, why not, also the formatting part. The results are promising but there are two problems: It only translates part of the original JSON (you have to keep hitting "continue" or something like that) and I couldn't get it to format correctly the long descriptions that contained \n for carriage return. I also tried with our local elektrodabot, who managed to format and translate in one step, but also partially... there is still work to make, as you can see
So I'll keep you updated and try to apply all this to a new device I just received. Bye for now!
Cool? Ranking DIY


