GORENJE Smart Kitchen Hood Controller
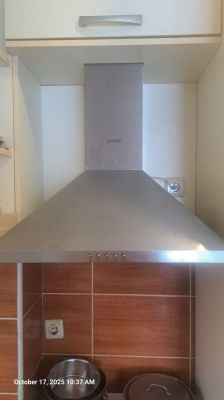
I wanted to make my kitchen a little smarter by upgrading my regular kitchen hood — three fan speeds and a light — to a smart device I could control via Home Assistant, and later automate with sensors.
After looking at DIY projects online, most seemed too time-consuming, so I decided to build a simple, practical solution.
This setup can be used not only for my kitchen hood model but also for any other ventilation hood with 3 fan speeds and a light.
As long as the wiring layout is similar and the fan speeds are controlled through separate lines, this configuration will work perfectly.


to flash the BK72xx (CB3S) module, I followed the detailed guide available in the post below:
👉 Elektroda Forum – Flashing Tuya BK7231 Modules
The instructions there explain how to put the module into flashing mode, connect it via UART, and upload ESPHome firmware.
It’s a very helpful and well-documented process for anyone using Tuya-based modules.
⚡ Components Used
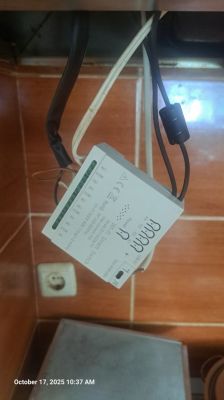
🔌 4-Channel Tuya Smart Switch (220V Wi-Fi module) – ( bk72xx / CB3S ) minimal internal modifications required AliExpress link
🛠️ Relay Module – Reprogrammed to control fan speeds and light. Requires minimal hardware changes.* *Or no changes, if you don't mind a "spaghetti salad" of wires.
✨ Features
💨 Control fan speeds and 💡 light via Home Assistant
🤖 Integrates with sensors and automation for hands-free operation
🧰 Minimal wiring and modifications
📝 Configuration
The full ESPHome YAML file is available here: GitHub – aspirator-v1.2.yaml
❗ IMPORTANT: ADD YOUR OWN CREDENTIALS Fill in your WiFi, API keys, and OTA passwords below Project won't work without these!
Don't forget to update:
WiFi SSID & Password
API Keys
OTA Passwords
⚡ Hardware Modifications
To adapt the 4-channel Tuya relay module for use with the kitchen hood, I made a few simple internal and wiring modifications:
Phase (L) Bridging: The live wire (phase) from the input was bridged to the common terminals of all relays on the PCB.
Neutral (N) Connection: On the fourth relay (used for the light), I disconnected the original NC contact (cut the PCB trace) and reconnected it to neutral (N) instead.
Button Conversion: The original wall switch was replaced with momentary push buttons, which were wired in parallel with the onboard buttons on the relay module.
LED Indicators: Each speed indicator LED is connected in parallel with its corresponding fan relay, so the LED lights up when that speed is active.
These small hardware changes allow the module to safely and correctly control all three fan speeds and the light, while also providing visual feedback through the LEDs.
💡 What This Device Does
This project turns a regular kitchen range hood into a smart, 3-speed fan with a controllable light, fully integrated with Home Assistant. You can control it both via physical buttons and through the Home Assistant interface, including automations and sliders.
⚙️ Main Features
Fan Speed Control
The hood has three fan speeds.
Each speed is controlled by a separate relay (relay1, relay2, relay3) so only one speed is active at a time.
A master switch ensures only one relay is active and controls the overall fan power.
Light Control
The hood’s built-in light can be toggled independently via a dedicated relay (lightfan).
Controlled either through a physical button or Home Assistant.
Physical Buttons
Buttons are mapped to:
Fan speed 1, 2, or 3
Light toggle
Pressing a button sets the corresponding speed or toggles the light. Pressing the same speed button again turns the fan off.
Home Assistant Integration
A slider in Home Assistant allows you to select the fan speed (1–3).
Automations and sensors can control the fan via the master switch and apply_speed script.
The system updates instantly and optimistically, meaning changes are reflected in Home Assistant even before confirmation from the device.
Scripts and Logic
apply_speed: Central handler that sets the correct relay for the chosen speed.
set_speed_1/2/3: Scripts triggered by physical buttons to update the speed and master switch.
Master switch (master): Controls whether the fan is on or off. When off, all relays turn off.
Safety & Reliability
Interlock ensures only one fan relay can be on at a time, preventing multiple speeds from being activated simultaneously.
Debounce filters on physical buttons prevent accidental double presses.
Status Reporting
Device reports Wi-Fi info, IP, MAC address, and ESPHome version via text sensors.
🛠 How It Works
When you press a speed button, the corresponding script sets the fanspeed number and toggles the master switch.
The apply_speed script then turns on the correct relay (relay1, relay2, or relay3) for the chosen speed and ensures the other relays are off.
Pressing the light button toggles the lightfan relay without affecting the fan speed.
The fan can also be controlled directly from Home Assistant via the slider or automations.
In short, this device is a smart, fully automated kitchen hood that can be controlled both manually and digitally, with clear feedback, safety interlocks, and full Home Assistant integration.
🔹 Key Notes
Relay1–Relay3 → Control fan speeds. Only one relay can be on at a time (interlock).
RelayLight → Controls the hood light independently.
Master Switch → Main fan power; when off, all fan relays turn off.
Buttons → Physical control for each fan speed and light toggle. Pressing the same speed again turns the fan off.
Home Assistant → Fan speed slider and light toggle supported, plus automation integration.
MASSIVE SHOUTOUT to 3ative – this project builds on their fantastic work! 👍 https://github.com/3ative/Ultimate-Fan-Project-V4/tree/main?tab=readme-ov-file
I wanted to make my kitchen a little smarter by upgrading my regular kitchen hood — three fan speeds and a light — to a smart device I could control via Home Assistant, and later automate with sensors.
After looking at DIY projects online, most seemed too time-consuming, so I decided to build a simple, practical solution.
This setup can be used not only for my kitchen hood model but also for any other ventilation hood with 3 fan speeds and a light.
As long as the wiring layout is similar and the fan speeds are controlled through separate lines, this configuration will work perfectly.


to flash the BK72xx (CB3S) module, I followed the detailed guide available in the post below:
👉 Elektroda Forum – Flashing Tuya BK7231 Modules
The instructions there explain how to put the module into flashing mode, connect it via UART, and upload ESPHome firmware.
It’s a very helpful and well-documented process for anyone using Tuya-based modules.
⚡ Components Used
🔌 4-Channel Tuya Smart Switch (220V Wi-Fi module) – ( bk72xx / CB3S ) minimal internal modifications required AliExpress link
🛠️ Relay Module – Reprogrammed to control fan speeds and light. Requires minimal hardware changes.* *Or no changes, if you don't mind a "spaghetti salad" of wires.
✨ Features
💨 Control fan speeds and 💡 light via Home Assistant
🤖 Integrates with sensors and automation for hands-free operation
🧰 Minimal wiring and modifications
📝 Configuration
The full ESPHome YAML file is available here: GitHub – aspirator-v1.2.yaml
❗ IMPORTANT: ADD YOUR OWN CREDENTIALS Fill in your WiFi, API keys, and OTA passwords below Project won't work without these!
Don't forget to update:
WiFi SSID & Password
API Keys
OTA Passwords
⚡ Hardware Modifications
To adapt the 4-channel Tuya relay module for use with the kitchen hood, I made a few simple internal and wiring modifications:
Phase (L) Bridging: The live wire (phase) from the input was bridged to the common terminals of all relays on the PCB.
Neutral (N) Connection: On the fourth relay (used for the light), I disconnected the original NC contact (cut the PCB trace) and reconnected it to neutral (N) instead.
Button Conversion: The original wall switch was replaced with momentary push buttons, which were wired in parallel with the onboard buttons on the relay module.
LED Indicators: Each speed indicator LED is connected in parallel with its corresponding fan relay, so the LED lights up when that speed is active.
These small hardware changes allow the module to safely and correctly control all three fan speeds and the light, while also providing visual feedback through the LEDs.
💡 What This Device Does
This project turns a regular kitchen range hood into a smart, 3-speed fan with a controllable light, fully integrated with Home Assistant. You can control it both via physical buttons and through the Home Assistant interface, including automations and sliders.
⚙️ Main Features
Fan Speed Control
The hood has three fan speeds.
Each speed is controlled by a separate relay (relay1, relay2, relay3) so only one speed is active at a time.
A master switch ensures only one relay is active and controls the overall fan power.
Light Control
The hood’s built-in light can be toggled independently via a dedicated relay (lightfan).
Controlled either through a physical button or Home Assistant.
Physical Buttons
Buttons are mapped to:
Fan speed 1, 2, or 3
Light toggle
Pressing a button sets the corresponding speed or toggles the light. Pressing the same speed button again turns the fan off.
Home Assistant Integration
A slider in Home Assistant allows you to select the fan speed (1–3).
Automations and sensors can control the fan via the master switch and apply_speed script.
The system updates instantly and optimistically, meaning changes are reflected in Home Assistant even before confirmation from the device.
Scripts and Logic
apply_speed: Central handler that sets the correct relay for the chosen speed.
set_speed_1/2/3: Scripts triggered by physical buttons to update the speed and master switch.
Master switch (master): Controls whether the fan is on or off. When off, all relays turn off.
Safety & Reliability
Interlock ensures only one fan relay can be on at a time, preventing multiple speeds from being activated simultaneously.
Debounce filters on physical buttons prevent accidental double presses.
Status Reporting
Device reports Wi-Fi info, IP, MAC address, and ESPHome version via text sensors.
🛠 How It Works
When you press a speed button, the corresponding script sets the fanspeed number and toggles the master switch.
The apply_speed script then turns on the correct relay (relay1, relay2, or relay3) for the chosen speed and ensures the other relays are off.
Pressing the light button toggles the lightfan relay without affecting the fan speed.
The fan can also be controlled directly from Home Assistant via the slider or automations.
In short, this device is a smart, fully automated kitchen hood that can be controlled both manually and digitally, with clear feedback, safety interlocks, and full Home Assistant integration.
🔹 Key Notes
Relay1–Relay3 → Control fan speeds. Only one relay can be on at a time (interlock).
RelayLight → Controls the hood light independently.
Master Switch → Main fan power; when off, all fan relays turn off.
Buttons → Physical control for each fan speed and light toggle. Pressing the same speed again turns the fan off.
Home Assistant → Fan speed slider and light toggle supported, plus automation integration.
MASSIVE SHOUTOUT to 3ative – this project builds on their fantastic work! 👍 https://github.com/3ative/Ultimate-Fan-Project-V4/tree/main?tab=readme-ov-file


