
Here I will present the short teardown and OpenBK7231 programming procedure for another Tuya relay, which this time turned out to have a rather unusual CB2S module inside, based on the BK7231N chip (not to be confused with the BK7231T). The programming procedure will be presented in a very beginner-friendly way, step for step. I will describe what tools can be useful for this and what problems I had to solve to add BK7231N support to my firmware. The goal, as usual, will be to pair with Home Assistant and become independent from the manufacturer's servers.
Related Topics.
OpenBK7231 is my alternative open source firwmare for BK7231T, BK7231T and XR809 chips. It's like a Tasmota replacement for those families. It supports MQTT and Home Assistant integration. You can read more about it here:
WB2S / BK7231 Tutorial - creating our own firmware - UDP / TCP / HTTP / MQTT
[BK7231T] My HTTP server, configurator, MQTT support from Home Assistant
I also described the manufacturer's applications (Tuya / eWeLink / Blitzwolf / SmartLife) in previous topics from the series. I will not touch on its subject here.
Additionally:
my Home Assistant tutorial
Qiachip Smart Switch
Qiachip is simply another smart transmitter controlled by WiFi through the manufacturer's mobile application. There is a button on the housing, which also allows you to manually control it. This time the set with it is quite poor:


The manufacturer recommends the SmartLife application for it, which I described in the previous topics in the series.
The interior of the Qiachip Smart Switch
The housing is only held on the catches:


The circuit inside is classic - a transformerless power supply based on the BP2525:


AMS1117 LDO regulator (5V input, 3.3V output for WiFi module):

WiFi module - here CB2S - and a transistor to control the relay:

CB2S is a WiFi / Bluetooth module based on a 32-bit BK7231N microcontroller.
Leads of CB2S:


The circuit looks very similar to the WB2S implemented on the BK7231T:

These PWMs are compatible with the CB2S pins - let's take a look at the list:
 Pin Mapping")
PWM0 to P8 - that's right.
Programming of the BK7321N
I have already solved the problem of programming very similiar chip, BK7231T. I am running a project of a universal open source firmware dedicated to this chip, details in these topics:
WB2S / BK7231 Tutorial - we create our own firmware - UDP / TCP / HTTP / MQTT
[BK7231T] My HTTP server, configurator, MQTT support from Home Assistant
Unfortunately, the BK7231T is not the BK7231N - the architecture is somewhat different. This is evidenced, for example, by the presence of two different versions of the SDK for these systems:
https://github.com/tuya/tuya-iotos-embeded-sdk-wifi-ble-bk7231n
https://github.com/tuya/tuya-iotos-embeded-sdk-wifi-ble-bk7231t
I already know the T version, I tried to run N analogously, but I quickly encountered a strange problem.
During the compilation from the Cygwin level, I received such an error:

I figured it was because Cygwin should use Windows Toolchain files.
Here is the fix:
https://github.com/openshwprojects/OpenBK7231...mmit/61b4204aa0677a8fc886f4e6bd4e235337eb1e85

The next changes I made were adding the SDK to the repository (as it was in the T version, because here I had to copy them from the T version).
My modified N version SDK is published here::
https://github.com/openshwprojects/OpenBK7231N/
The SDK is prepared in such a way that is compatible with my application (Tasmota's equivalent) for the T version, which is available here:
https://github.com/openshwprojects/OpenBK7231T_App
On the application side I had to make a few corrections (eg the name and location of several files changed, additionally Tuya corrected the typos - it used to be "tuya_hal_storge.h" and now it is "tuya_hal_storage.h", but most of them have been similar).
Another difference between the SDK of versions N and T is the presence of tuya source code - in version N it is only in lib (libtuya.a), and in version T we have c sources. I mean, for example, functions such as tuya_hal_flash_read or tuya_hal_wifi_all_ap_scan.
The addresses of the memory sections also differ between the N and T versions:
https://github.com/tuya/tuya-iotos-embeded-sd...k7231n_os/beken378/func/user_driver/Bk.Driver
https://github.com/tuya/tuya-iotos-embeded-sd...37cuser_driver/Bken37cuser_driver/Bken37cuser

Another absurdity that I had to fix was a configuration problem - something was overwriting the BK_PARTITION_NET_PARAM sections. It turned out that the RL_SUPPORT_FAST_CONNECT setting is to blame, which is rigidly given the same address, where the configuration is supposed to be. Well, Tuya has a mess in the SDK:

Ultimately, the application compiles:
 Connecting the programmer
Everything is as in the previously described WB2S or WB3S (BK7231T). USB to UART converter and only connect TX1 and RX1:


Same photo, but with description:
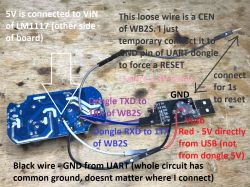
In addition, also CEN to be able to reset the module (but you can without CEN and reset by cutting off the power, as long as it does not reset the USB port due to too high power consumption after connecting the relay). Of course, also the mass and power supply (5V, connected to the 3.3V LDO regulator input).
Attempt to upload the firmware to BKwriter 1.60
First, I tried to use the same program that I uploaded the firmware to BK7231T - BKwriter 1.60. I checked two modes there, one marked as BK7231:


In BK7231 mode, there is always an error with CRC during firmware verification.
And the other BK7231N:


There is a bug with "unprotect" flash on BK7231N. Was it a blocked system?
Attempted to upload a firmware by the Python tool
BKwriter did not work - but there is also a second option. Tool written in Python by Tuya, available, among others. here:
https://github.com/OpenBekenIOT/hid_download_py
The above repo already contains our modifications.
In the readme of this tool, the N version of the layout is mentioned:
Quote:
For BK7231N, set download address to 0x0, and set -u option.
Will it work? Let's try. I developed such a .bat file (you can also enter it from the cmd level):
python uartprogram W:\GIT\OpenBK7231N\apps\OpenBK7231N_App\output\1.0.0\OpenBK7231N_app_QIO_1.0.0.bin --unprotect -d com10 -w --startaddr 0x0
I started it with the module already connected:

Then (at the "Getting bus" stage) I reset the module (you can connect and disconnect the power supply, but I shorted the CEN pin to ground for a while. If it does not work, you can try to give a pull up resistor to CEN and then try to reset shorting to ground) and programming started:

Ready:

Uploaded without errors. I can see that the configuration AP appears - the firmware works!
What does my firmware offer?
My firmware is basically very similar to Tasmota. Creates its own AP after startup:

The configuration page is available there on IP 192.168.4.1.
It can be connected to our router there:

You can freely configure the module (its pins, their roles):


You can connect it with Home Assistant via MQTT:

You can also directly control the module:

There is also an automatic configurator for the smart devices I reviewed:

And let's not forget the configuration generator for Home Assistant, here:

My firmware already supports three platforms - BK7231T, BK7231N and XR809. But details another time ...
PS: And if we connect our device with OpenBK to our WiFi and we want to know the IP address assigned to it by DHCP, it is best to look at the configuration page of our router and find BK by the host name:
 Summary
Ultimately, however, I managed to run my open firmware on this relay based on the CB2S module (BK7231N). There was a bit of porting the source code from the SDK, but fortunately it was only me that had to do. There was also a bit of guesswork with uploading the firmware , but I can already say that in the end the procedure comes down to:
1. we solder the wires to RX, TX, CEN and power supply. RX and TX are connected to the USB UART converter
2. we run
hid_download_py from the command line, more precisely
python uartprogram W: \ GIT \ OpenBK7231N \ apps \ OpenBK7231N_App \ output \ 1.0.0 \ OpenBK7231N_app_QIO_1.0.0.bin --unprotect -d com10 -w --startaddr 0x0 . Yes, we are uploading the QIO version
3.The program will wait for the module reset - we short the CEN to ground (preferably also having a pull up there, i.e. a resistor for power supply) to reset the module
The 4th program will detect the RESET itself and load the firmware
5. done! We configure the rest via the WiFi access point (IP is 192.168.4.1, if the page does not open, it means that DHCP has not started - we can just set our machine ourselves, e.g. IP 192.168.4.10 and reconnect to the BK network)
The question is what firmware - the latest versions of the binary are available here:
https://github.com/openshwprojects/OpenBK7231T_App/releases
For more details, please visit my repositories (README will be updated):
https://github.com/openshwprojects/OpenBK7231T_App
PS: I know from one of the users that Qiachip Smart Switch is also available with WB2S - so there may be different modules inside. Fortunately, WB2S is also supported by my firmware. 


 Pin Mapping")


Comments
Well hello, I'm glad that I found your work , because I've got this beautiful switch and its the CB2S version , but the plate is soldered i guess in that way that i cannot reach the RX TX side ,any suggestions... [Read more]
Can you post a photo? Well, maybe a solder wick, soldering iron and some flux? First put flux on joints, then use solder wick and soldering iron to remove the solder, and when you're done (all solder... [Read more]
I did post a photo but the moderator needs to approve it, I just wanted to ask you that how on earth they are managed to solder it like this, with hotplate I guess, or with some dark magic. Soon the picture... [Read more]
Ah, you are asking for the soldering technique? Well, maybe I could make a short video clip, but for now text description should do it 1. if board is dirty from your previous experiments, clear it with... [Read more]
the funny thing is that no soldered surface is exposed, it's like a sandwich [Read more]
Send me a photo on private message or something in a meantime, maybe you'd be able to use this: https://github.com/tuya-cloudcutter/tuya-cloudcutter/issues/62 ? I'm not sure if it matches your devices,... [Read more]
I ve manged to take it off but I ripped some pads, it is worse than a BGA job, will send the pictures on PM [Read more]
So it seems that you have a very different relay than the one here and pads really are not accessible, because they are totally covered by PCB. I would have try with hot air, but now you already have... [Read more]
yeah, but first I gonna flash it with your software, the FTDI will do ? Added after 1 [minutes]: so we need, 3.3V, GND, RX TX , right ? Added after 34 : no clue what p26 did that I've... [Read more]
Ah, so P26 from the module is also lost? Don't worry, with OpenBeken you can control relay with any other pin. Only 3.3V, GND RX and TX are needed. Some people also like to use CEN, but you can reset... [Read more]
Ok, if you point me to the dump procedure direction, I would appreciate it [Read more]
Well, check the guides linked here: https://github.com/openshwprojects/OpenBK7231T_App but the procedure is 1. connect gnd, tx, and rx (use 3.3V voltage levels for uart converter) 2. set read memory... [Read more]
will do, but first I have to measure my FTDI signal output level, I think it's 3v, but I never know [Read more]
There was some reports from users saying that certain USB to UART converters are problematic, so maybe you can try buying the one I have, it's one of the cheapest one, widely available [Read more]
ok it says it read it but where is the outputted dump? [Read more]
in the same directory that you run .exe from Have you ensured to read whole flash, not just the first partitions? [Read more]
it puts put nothing Added after 2 [minutes]: under a Browse button , is another with weird charachters, what is it for ? Added after 55 [minutes]: kaczmarek, my friend thank you for your guidance,... [Read more]
Thanks, altough I am not sure if you included the whole 2MB. It's just 956KB. At least such flash is still usefull for Tuya-cloudcutter, but it's harder to analyze. Weird characters buttons is "Write",... [Read more]
I'm really upset that they are phasing out the ESP line. It was a good allrounder, maybe it had problems with the wifi stability but still... [Read more]