Teardown and conversion of a Smart Life DS-151 N+L WiFi+BLE curtain switch and skylight opener, replacing Tuya firmware with OpenBeken for Home Assistant control.
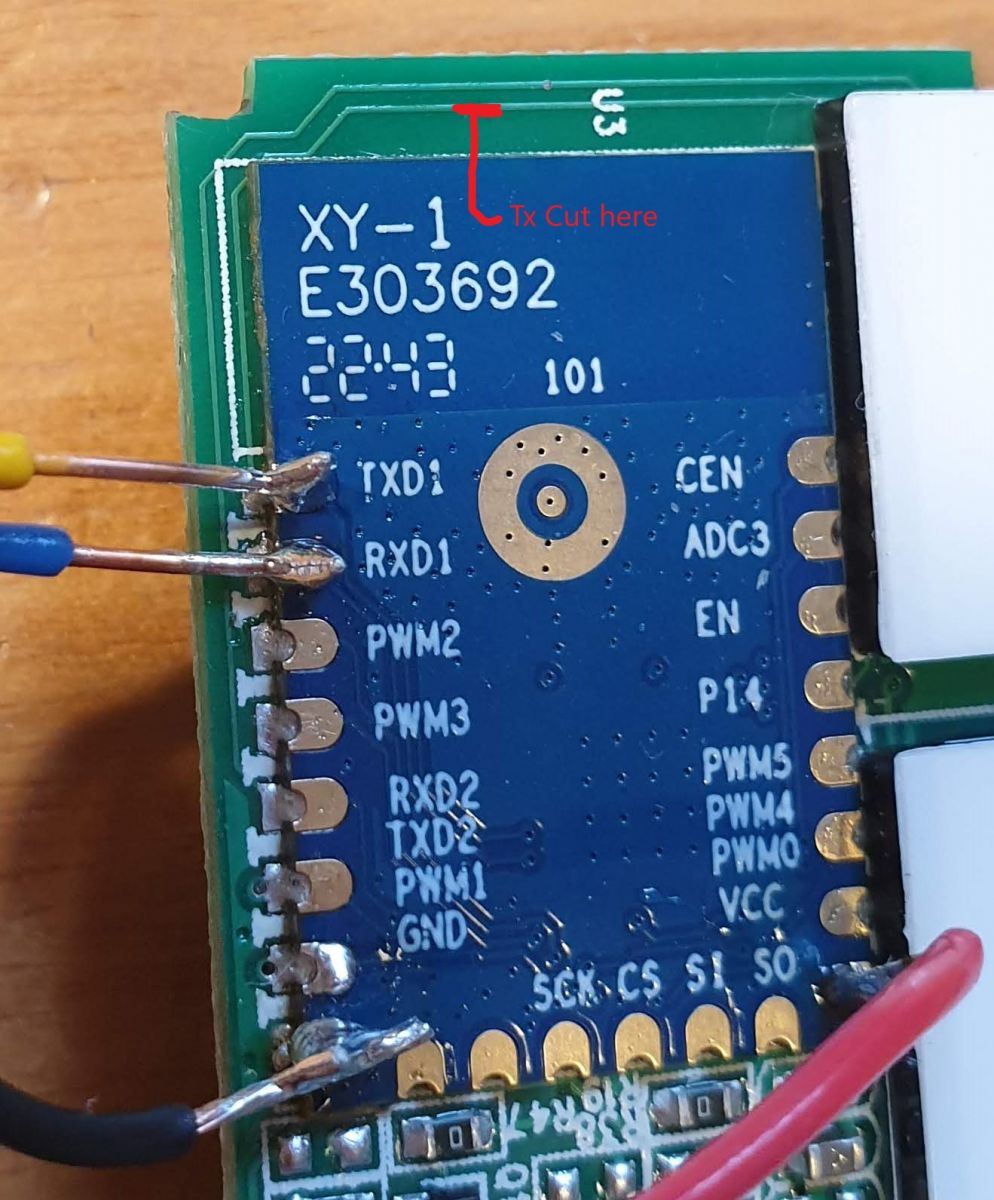
A WB3S module with BK7231T was flashed after cutting the TXD1/RXD1 tracks, because BK_Writer failed and the hid_download_py Python method succeeded.
The controller uses 3 buttons, 3 LEDs, and 2 relays, and the skylight run time was increased from 10 seconds to 15 seconds.
An autoexec.bat script emulates the original Tuya behavior, and Home Assistant MQTT buttons trigger Open, Stop, and Close commands successfully.
Default GUI buttons were hidden to avoid energizing both relays at once, since the actuator’s behavior in that case was uncertain.
Generated by the language model.
https://www.elektroda.com/rtvforum/posting.php?mode=editpost&p=20547099#I bought this Skylight opener and switch from AliExpress Link with the EU Wifi Switch. My skylight is out of reach and I have to get a ladder from that garage to open it! My original intention was to use it with Local Tuya (this would have been my first) within Home Assistant (HA) as I'd read manufacturers had moved away from ESP8266 boards; I'd flashed plenty of those with Tasmota. But then I came across OpenBeken so thought I'd give it a go.
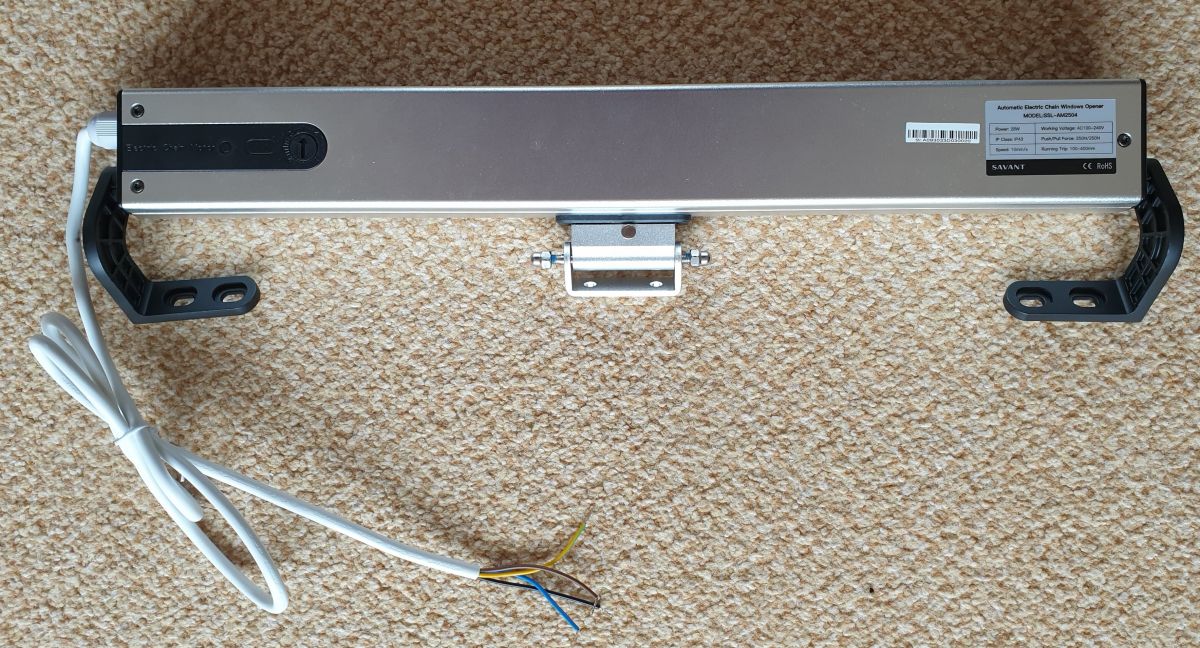
First off, the opener itself is a 4 wire mains device. Green/Yellow - Earth, Blue - Neutral, Brown - Live Open and Black - Live Close.
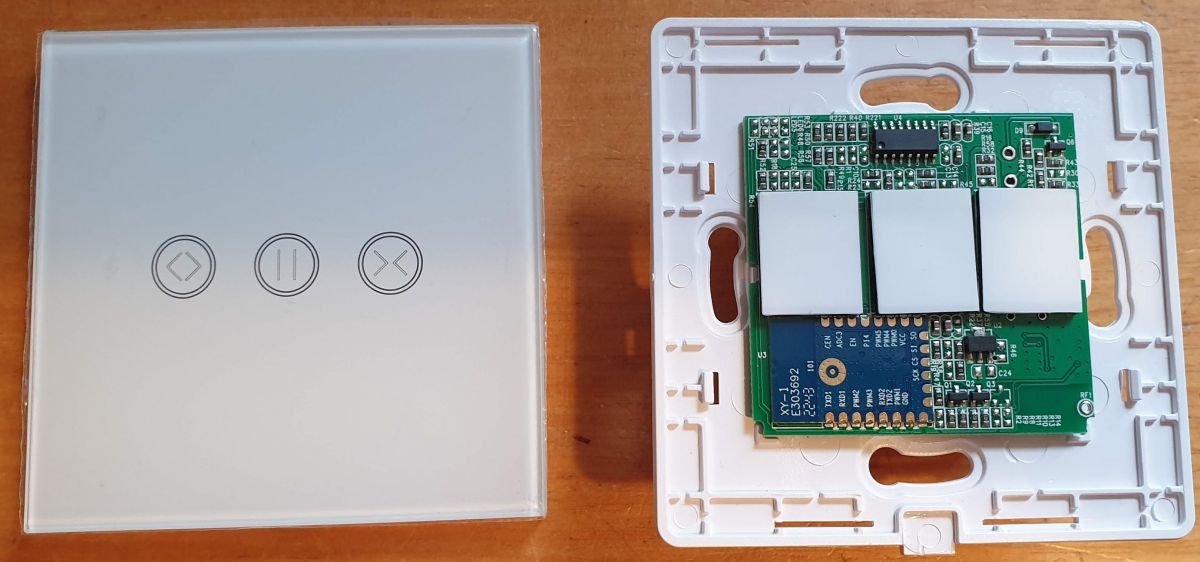
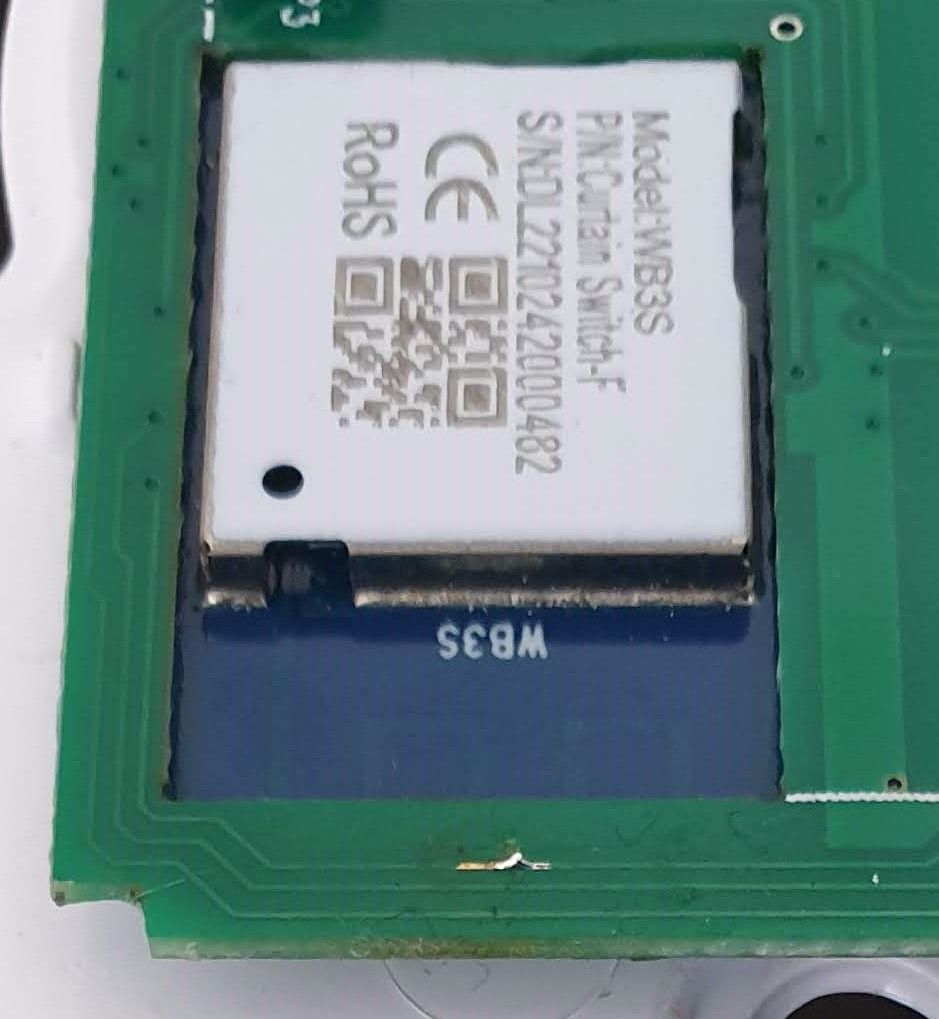
The controller is a Smart Life DS-151 N+L, WiFi+BLE Curtain Switch (as labelled on the box) and fits into a standard UK single wall box. The pic shows it with the front panel already removed (flat screwdriver at the base). The board is a WB3S with the BK7231T processor. . Three buttons for Open, Stop and Close. The terminal block has Live and Neutral in and the Live/Open and Live/Close outputs.
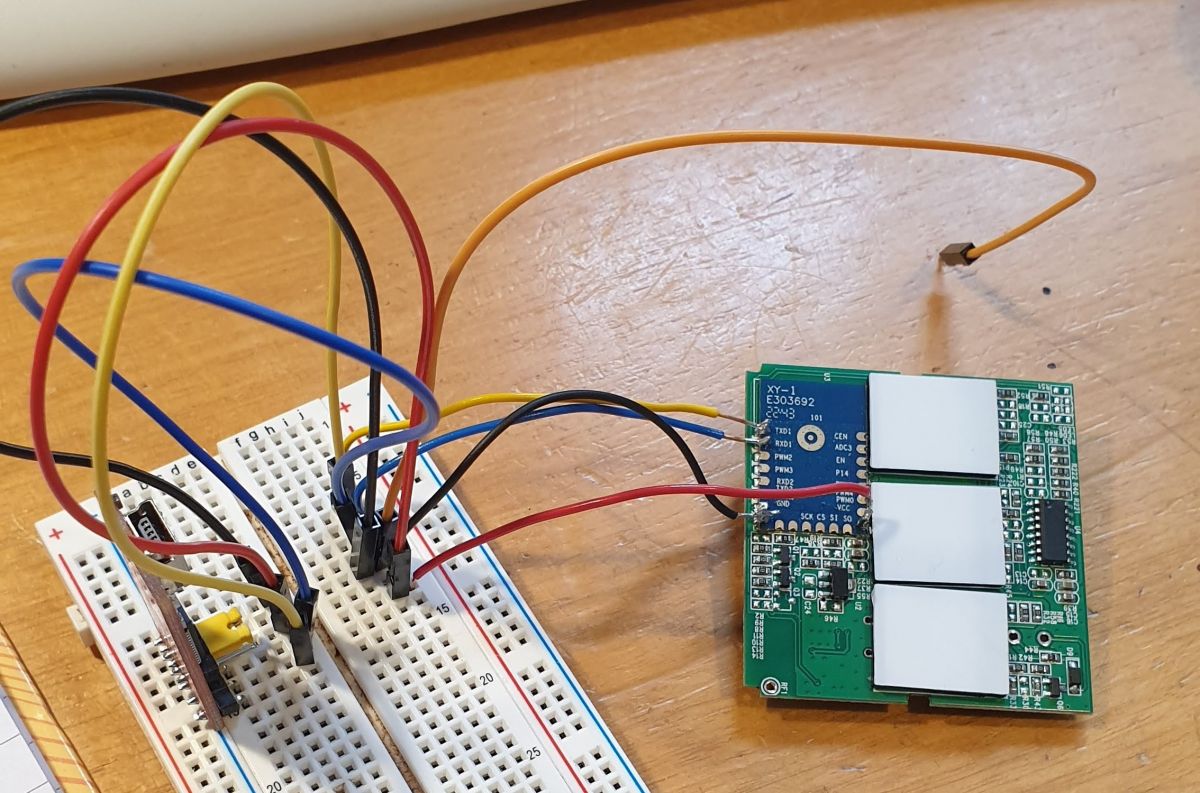
Flashing I soldered wires onto the TXD1, RXD1, GND and VCC pads of the WB3S and connected it up my USB/UART converter set to 3V3, Got the appropriate file to flash it with by this method ( OpenBK7231T_UA_1.15.700.bin), downloaded and 'installed' BK_WriterV1.60.exe, and tried to flash. No joy - got a Failed message!
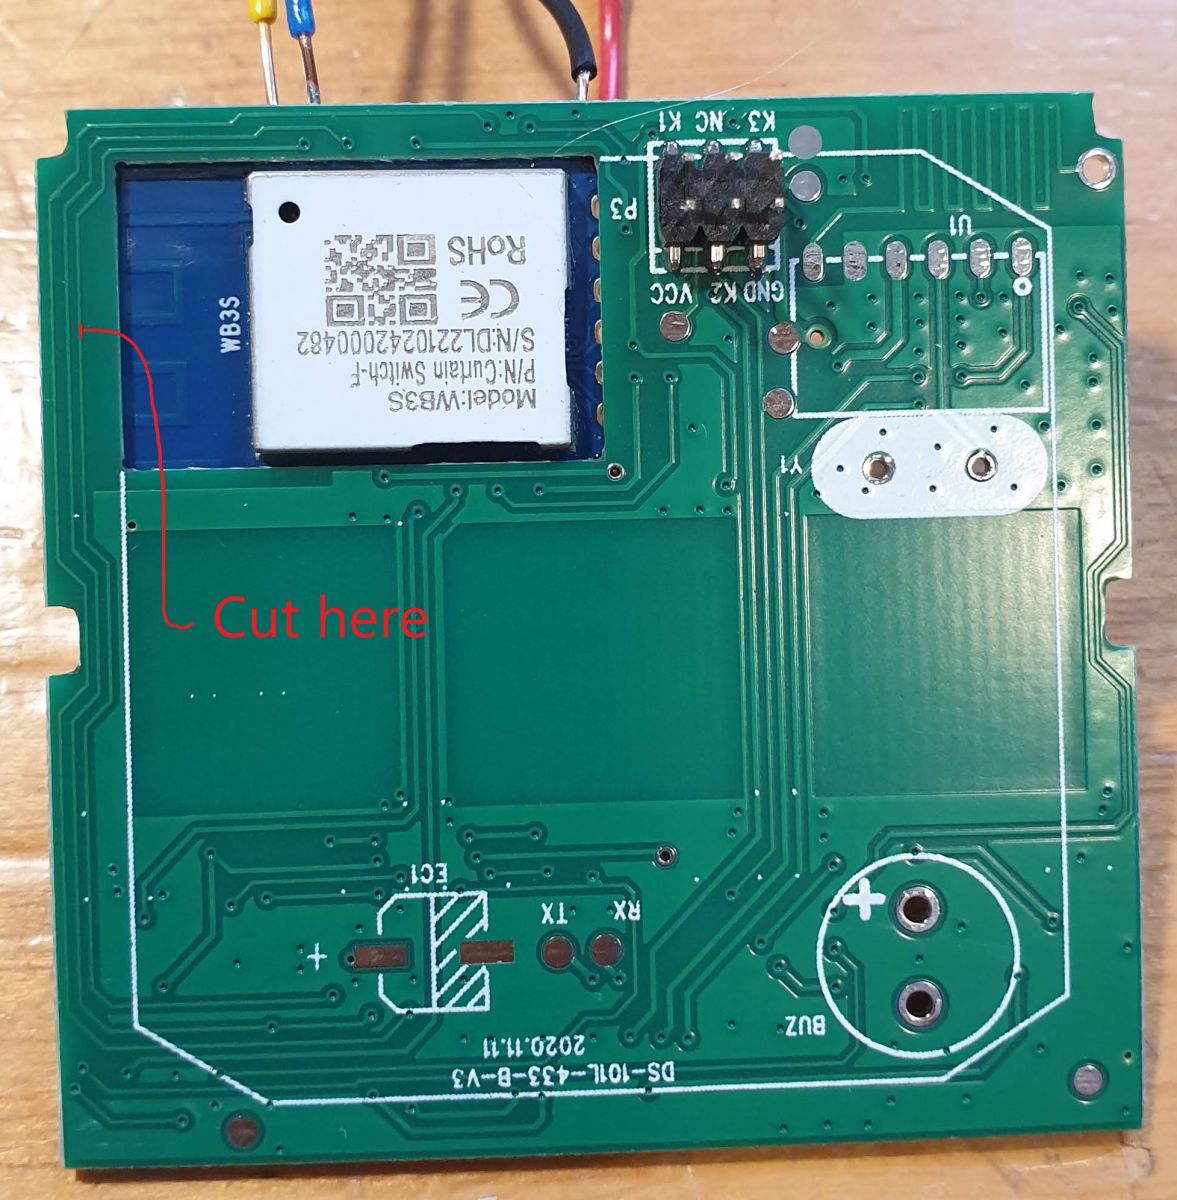
After some advice from the ever so helpful p.kaczmarek2 I had the solution. The Tx and Rx pins are both used by the device as Button input and LED output respectively and the circuitry interfered with the flashing signalling. So I cut the Tracks leading away from those pins in the positions shown.
Tried to flash again using BK_Writer at the default settings but still no joy. Tried again at 115200 baud and this time it started to erase but then failed. I found then that i could read and save the whole of the preloaded firmware so that was progress.
I then turned to another method of flashing using a python program. This was successful so I'll just give the details.
I opened a command window on my PC and created and moved to a directory called 'OpenBKT', then I got the program using the command
I already had Python installed from years back but you might need that too. When I tried to use the flashing program I found I needed something called 'tqdm' so I got that with the command
You will need to change the path and com port as appropriate.
I then repaired the cut tracks. One was easily bridged with a blob of solder but the other just wouldn't so in the end I used a very fine wire.
Connecting Power up the device and use your phone to find and connect to its WiFi - the SSID is pretty obvious. Having done that, open a browser on the phone and go to 192.168.4.1, this should get you into the GUI where you should now enter your own WiFi's credentials. Reboot the device and try and find it through your own router. On my router when I looked at WiFi devices it was actually named so was pretty obvious. You will want to set a reserved IP I guess.
Configuration The Tuya controller has 3 buttons, 3 LEDs which illuminate the buttons and 2 relays. I set them up thus:
"pin":"function":"channel"
"6": "Rel;1",
"8": "Btn;3",
"9": "Rel;3",
"10": "Btn;2",
"11": "LED_n;3",
"14": "LED_n;1",
"24": "Btn;1",
"26": "LED_n;2"
Everything worked as expected but not how it needed to function so don't connect the actuator at this point!!!!!
With more help from p.kaczmarek2 I wrote an autoexec.bat file to emulate the way the Tuya firmware operated. eg pressing the Open button would turn everything off then turn on the Open relay and LED for 10 seconds. It would then turn all off before turning the Stop LED on for just 3 seconds. I think just to confirm all was off and to not leave power going to the actuator when not necessary. As it turns out 10s is not long enough to open the skylight fully so I increased it to 15s. Here's the autoexec.bat file.
// Set up Aliases
alias Set_Stop backlog setChannel 3 0; setChannel 2 0; setChannel 1 0; setButtonColor 3 red; setButtonColor 2 red; setButtonColor 1 red
alias Set_Open backlog setChannel 1 1; setButtonColor 1 blue
alias Set_Close backlog setChannel 3 1; setButtonColor 3 blue
alias Set_Finish backlog setChannel 2 1; setButtonColor 2 blue
alias Start_Opening backlog stopAllScripts; startScript autoexec.bat openSkylight
alias Start_Closing backlog stopAllScripts; startScript autoexec.bat closeSkylight
alias Stop_All backlog stopAllScripts; startScript autoexec.bat stopSkylight

// Channel 60 is seconds for power to be applied
setChannel 60 15

// create GUI buttons for HTTP panel
startDriver httpButtons

setButtonEnabled 1 1
setButtonLabel 1 "Open"
setButtonCommand 1 Start_Opening
setButtonColor 1 red

setButtonEnabled 3 1
setButtonLabel 3 "Close"
setButtonCommand 3 Start_Closing
setButtonColor 3 red

setButtonEnabled 2 1
setButtonLabel 2 "Stop"
setButtonCommand 2 Stop_All
setButtonColor 2 red

// Hide the default GUI buttons
setChannelVisible 1 0
setChannelVisible 2 0
setChannelVisible 3 0

// Loading Event Handlers
addEventHandler OnClick 8 Start_Closing
addEventHandler OnClick 24 Start_Opening
addEventHandler OnClick 10 Stop_All

// Close Skylight on power up
goto closeSkylight

// do not proceed
return

openSkylight:
Set_Stop
delay_s 0.1
Set_Open
delay_s $CH60
Set_Stop
Set_Finish
delay_s 3
Set_Stop
return

closeSkylight:
Set_Stop
delay_s 0.1
Set_Close
delay_s $CH60
Set_Stop
Set_Finish
delay_s 3
Set_Stop
return

stopSkylight:
Set_Stop
Set_Finish
delay_s 3
Set_Stop
return
I hid the default buttons since they could be used to turn both relays on at the same time and I don't know how the actuator would cope with that! After lots of testing, pressing buttons at random, I was satisfied the code worked ok so connected the actuator.
And it works
Home Assistant I then configured the MQTT section of the device (IP, Port, User and Password) and gave the Client Topic as 'skylight'. I then copied the YAML code from the HA configuration section and pasted it, as appropriate, into my configuration.yaml file in HA.
This gave me 3 new buttons as entities, but they all operated individually and cannot be used that way. So I created a card for my dashboard with the following code.
That works properly by calling the MQTT publish service with commands that trigger the event handlers in the autoexec.bat file
And that's it, I just need to fit it to my skylight now and wire it in! If I've missed anything just post a comment and I'll sort it.
Finally, a big shout out to all the characters that develop all this open software; you are amazing.
Edit: All installed now and working. I put the switch panel in the airing cupboard as I intend to automate the window from HA rather than operate it manually, and it keeps those pesky grand children from playing with it!
About Author
richardsg307 wrote 18 posts with
rating 5 .
Been with us since 2023 year.
That's a very useful and well written guide, thank you. It looks like OpenBeken can control shutters well, even without a dedicated driver. We'll send you a free gift for documenting and sharing your... [Read more]
Nanganator
25 Apr 2023 00:29
This is really cool and well documented. Going to try the same thing with some roller shutters. Was just wondering how it handles stopping part way through and changing direction/continuing later if it... [Read more]
p.kaczmarek2
25 Apr 2023 08:37
@nanganator if you have some free time for testing, I could try writing just a hardcoded, C code driver for you with this feature. The only thing is, I don't have shutters at hand and they are pretty expensive... [Read more]
Nanganator
25 Apr 2023 10:48
Absolutely willing to help test. Just moved from BE to PT and our new apartment has electric shutters on every window. So planning to grab a bunch of these https://www.aliexpress.com/item/1005004608903981.html... [Read more]
richardsg307
25 Apr 2023 19:08
My code just applied power for the set time ($CH60). It could have been indefinite as the actuator itself stops gracefully when reaching the limits or the motor stalls. Make sure your blinds have similar... [Read more]
PSlowik
25 Apr 2023 22:22
I have identical drivers, so I'm also thinking about going to OpenBeken [Read more]
Acefx
02 Jul 2023 18:26
Hi,
I wanted to thanks you for your work, that helped me a lot.
Just flashed a "Etersky" wf-cs01 roller shutter module with some of your recommendation
Despite the fact it's running on CB3s and... [Read more]
p.kaczmarek2
03 Jul 2023 06:16
Thank you for sharing. Can you show me the web app log from the moment you touch and hold the physical button, when the relay switches on/off very rapidly?
That script should be good for most cases,... [Read more]
Acefx
03 Jul 2023 11:12
The rapid switching is corrected , it was due to a to high delay & redondant stop command in the original code.
For the testing, i have a dozen of curtain and etersky under openbeke ready to be your... [Read more]
p.kaczmarek2
03 Jul 2023 12:06
I've been thinking about doing a very similar driver to the one in Tasmota, maybe also with the same commands, would that suit all needs? Or should we take another approach? Again, I don't have shutters... [Read more]
Acefx
03 Jul 2023 13:18
Well basically yes, you need 2 ( One for simulating Up Command, the second for down command.
A curtain/shutter motor is a simple motor with rotary physical endstop, nothing more.
The only absolutely... [Read more]
marnypopis1
11 Jul 2023 15:11
I have a broken roller shutter switch. At the moment it works like a regular on/off switch. I can test when I get the firmware file.
I have it on Chipset: BK7231N - latest Firmware from yesterday version... [Read more]
Acefx
22 Jul 2023 20:06
Hey Everybody ! i got some update & a problem !
I use Mqtt for my smart home & i wish to integrate the roller shutter into it.
But the Mqtt command are raw channel one , not the logic one that we... [Read more]
marnypopis1
24 Jul 2023 14:43
I have the same problem, and for now, I'm living with it - I've built a button in the dashboard that triggers states from autoexec, and then it works as it should. Through MQTT, there's only relay 2 working... [Read more]
I may try to come up with something, but I can't promise how and when. Recently I've been focusing on LED stuff again, we've been reverse-engineering KP18058 LED driver: https://www.elektroda.com/rtvforum/topic3985037.html
And... [Read more]
marnypopis1
24 Jul 2023 21:31
HA works on entities - now in this form on this switch, which I have flashed and detached from the cloud, I have only two entities via MQTT. In HA, automation and scenes are built, and for this you need... [Read more]
Acefx
25 Jul 2023 08:52
Hi,
Well the way that HA behave isn't ideal for other systems.
I explain
HA behavior for mqtt is to generate multiple fixed name topics (tele/stat/cmnd) has a prefix and then the name of the device.... [Read more]
Romanusss
21 Dec 2023 09:29
Hello !
Thanks richardsg307 for your great work about this device.
I flashed my own Smartlife DS-151 and got a strange behaviour, if I press Open or Close the button keeps ON or OFF.
https://obrazki.elektroda.pl/8867022900_1703146971_thumb.jpg... [Read more]
FAQ
TL;DR: After cutting two PCB tracks the python UART method delivered a 100 % flash success rate "OpenBeken can control shutters well" [Elektroda, richardsg307, #20547099; p.kaczmarek2, #20548771]. Why it matters: it turns a US$12 cloud-bound curtain switch into a fully local, Home-Assistant-ready controller.
What hardware is inside the Smart Life DS-151 shutter switch?
The board is a WB3S module using the 120 MHz Beken BK7231T Wi-Fi/BLE SoC, with two 230 V relays, three capacitive buttons and three indicator LEDs [Elektroda, richardsg307, post #20547099]
How do I flash OpenBeken when BK_Writer fails?
Solder to TXD1, RXD1, VCC, GND. 2. Cut the PCB tracks leading away from TX and RX to isolate button/LED circuitry. 3. Run python uartprogram firmware.bin -d COMx -w -b 115200. Success appears in under 30 s [Elektroda, richardsg307, post #20547099]
Power the switch, join its AP (SSID starts with OBK), browse to 192.168.4.1, enter your Wi-Fi SSID/password, reboot, then reach it at the new LAN IP [Elektroda, richardsg307, post #20547099]
Use an autoexec.bat script: set $CH60 to the desired seconds, call aliases Start_Opening, Start_Closing, and Stop_All to drive relays and LEDs. A 15–20 s window suits most skylights [Elektroda, richardsg307, post #20555187]
What is the simplest Home-Assistant integration?
Publish MQTT commands cmnd/skylight/Start_Opening, .../Stop_All, .../Start_Closing and expose three button entities; YAML examples are in the thread [Elektroda, richardsg307, post #20547099]
Can I set partial opening percentages?
Only by time. OpenBeken currently lacks position feedback; the script assumes linear travel. "Percentage control needs a dedicated driver like Tasmota Shutter" [Elektroda, Acefx, post #20640181]
What happens if both relays energise together?
Simultaneous Up and Down can damage the motor or destroy buttons; always block dual activation in script logic [Elektroda, Acefx, post #20664100]
How do I fix rapid relay toggling on button press?
Remove redundant stop commands and shorten inter-relay delay to 5 ms; the revised script stops the chatter [Elektroda, Acefx, post #20639305]
Core maintainer plans a C driver mirroring Tasmota commands but needs remote testers; volunteers with multiple shutters are welcome [Elektroda, p.kaczmarek2, post #20639755]


Comments
That's a very useful and well written guide, thank you. It looks like OpenBeken can control shutters well, even without a dedicated driver. We'll send you a free gift for documenting and sharing your... [Read more]
This is really cool and well documented. Going to try the same thing with some roller shutters. Was just wondering how it handles stopping part way through and changing direction/continuing later if it... [Read more]
@nanganator if you have some free time for testing, I could try writing just a hardcoded, C code driver for you with this feature. The only thing is, I don't have shutters at hand and they are pretty expensive... [Read more]
Absolutely willing to help test. Just moved from BE to PT and our new apartment has electric shutters on every window. So planning to grab a bunch of these https://www.aliexpress.com/item/1005004608903981.html... [Read more]
My code just applied power for the set time ($CH60). It could have been indefinite as the actuator itself stops gracefully when reaching the limits or the motor stalls. Make sure your blinds have similar... [Read more]
I have identical drivers, so I'm also thinking about going to OpenBeken [Read more]
Hi, I wanted to thanks you for your work, that helped me a lot. Just flashed a "Etersky" wf-cs01 roller shutter module with some of your recommendation Despite the fact it's running on CB3s and... [Read more]
Thank you for sharing. Can you show me the web app log from the moment you touch and hold the physical button, when the relay switches on/off very rapidly? That script should be good for most cases,... [Read more]
The rapid switching is corrected , it was due to a to high delay & redondant stop command in the original code. For the testing, i have a dozen of curtain and etersky under openbeke ready to be your... [Read more]
I've been thinking about doing a very similar driver to the one in Tasmota, maybe also with the same commands, would that suit all needs? Or should we take another approach? Again, I don't have shutters... [Read more]
Well basically yes, you need 2 ( One for simulating Up Command, the second for down command. A curtain/shutter motor is a simple motor with rotary physical endstop, nothing more. The only absolutely... [Read more]
I have a broken roller shutter switch. At the moment it works like a regular on/off switch. I can test when I get the firmware file. I have it on Chipset: BK7231N - latest Firmware from yesterday version... [Read more]
Hey Everybody ! i got some update & a problem ! I use Mqtt for my smart home & i wish to integrate the roller shutter into it. But the Mqtt command are raw channel one , not the logic one that we... [Read more]
I have the same problem, and for now, I'm living with it - I've built a button in the dashboard that triggers states from autoexec, and then it works as it should. Through MQTT, there's only relay 2 working... [Read more]
indeed ! [Read more]
I may try to come up with something, but I can't promise how and when. Recently I've been focusing on LED stuff again, we've been reverse-engineering KP18058 LED driver: https://www.elektroda.com/rtvforum/topic3985037.html And... [Read more]
HA works on entities - now in this form on this switch, which I have flashed and detached from the cloud, I have only two entities via MQTT. In HA, automation and scenes are built, and for this you need... [Read more]
Hi, Well the way that HA behave isn't ideal for other systems. I explain HA behavior for mqtt is to generate multiple fixed name topics (tele/stat/cmnd) has a prefix and then the name of the device.... [Read more]
Hello ! Thanks richardsg307 for your great work about this device. I flashed my own Smartlife DS-151 and got a strange behaviour, if I press Open or Close the button keeps ON or OFF. https://obrazki.elektroda.pl/8867022900_1703146971_thumb.jpg... [Read more]