logo elektroda
logo elektroda
X

[BK7231N CB3S] Temperature and Humidity Sensor, TH01, PCB:ZY-TH02-CB3S, SHT3X

lktrdng 2568 23
ADVERTISEMENT
  • #1 21451730
    lktrdng
    Level 5  
    [BK7231N CB3S] Temperature and Humidity Sensor, TH01, PCB:ZY-TH02-CB3S, SHT3X

    Again ordered Temperature and Humidity sensor from Aliexpress. Actually two of them.
    I got one of this in ali. It is a device based on CB3S with a CHT8310? sensor and a Tuya chip.
    Model: TH01
    FCC ID: 2A8TU-TH01
    PCB: ZY-TH02-CB3S_V1.0 (2024-12-03)
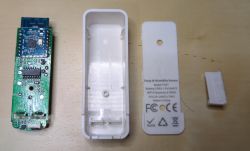
    Disassembled temperature and humidity sensor with visible electronic board and casing.

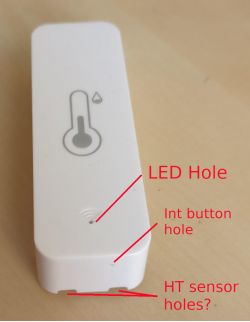
    Case holes detail:
    White rectangular sensor with labeled holes for LED, int button, and possible HT sensor.

    PCB detail:
    Printed circuit board with electronic components.

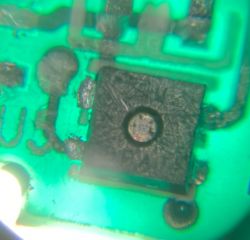
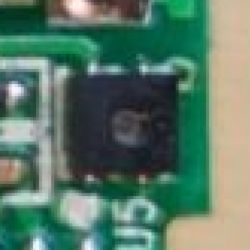
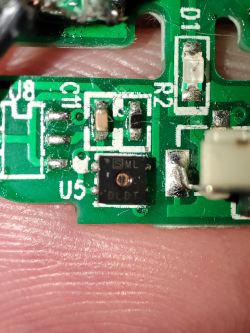
    HT Chip:
    Close-up of a chip labeled SML DPAT. Close-up of a microchip on a PCB.

    CB3S pinout for flashing:

    [BK7231N CB3S] Temperature and Humidity Sensor, TH01, PCB:ZY-TH02-CB3S, SHT3X

    Firmware: Official sensors release

    How it ended:
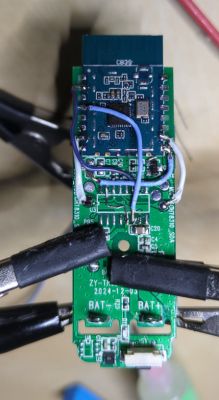
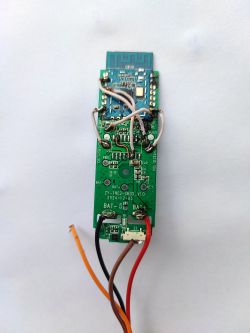
    Printed circuit board with connected wires.

    I wasn't able to put OBK on it using bk7231flasher_1.3.3. No reboot or CEN allowed me. So, I needed to desolder something.
    For first device I tried desoldering the CB3S chip and my (lack of) soldering skills resulted in a lot of pads broken :P. But the CB3S survived and I was able to program OBK on it.
    For second device I tried desoldering the Tuya chip, this time pads survived but still wasn't able to program it, therefore I needed to desolder the CB3S, this time all the pads survived.
    Long story short, after several tries I decided to remove the Tuya chip and connect the CB3S directly to the supposed CHT8310. I assumed the PCB included a CHT8310 based on the picture of it and the fact the PCB literally has CHT8310 printed on it in some test points, specifically CHT8310_SDA, CHT8310_SCL and CHT8310_VDD.
    To leverage the configuration I made to some other device I wired the CHT8310 chip to P9 and P6 of CB3S as per the pinout Here

    When loading the driver I always get temp=125 hum=0, which means for me there is an issue with the communications.
    Therefore I loaded the I2C driver and when I ran scanI2C soft I got
     Info:I2C:Address 0x44 (dec 68)

    That is, as per my understanding the address of a SHT30 chip.
    When trying to load that driver I realized it is not included in the current standard release of OBK, where can I get a version including SHT30 to see if that driver is capable of handling the chip?.

    Autoexec.bat:
    //Start counting seconds in channel 30
    addRepeatingEvent 1 -1 setChannel 30 $CH30+1
    
    /////////////////////////////////////////// Pins and Channel definitions
    SetPinRole 6 SHT3X_SCK
    SetPinChannel 6 1
    
    SetPinRole 9 SHT3X_SDA
    SetPinChannel 9 1 2
    
    //SetPinRole 17 BAT_Relay
    //SetPinChannel 17 5
    
    SetPinRole 14 dInput
    SetPinChannel 14 43
    SetChannelLabel 14 intButton 1
    
    //SetPinRole 23 BAT_ADC
    //SetPinChannel 23 40
    
    //SetPinRole 23 WifiLED_n
    SetPinRole 8 Rel
    SetChannelPrivate 37 true
    SetPinChannel 8 37
    
    /////////////////////////////////////////// Internal Channels definition
    setChannelType 44 ReadOnly
    setChannelLabel 44 LoopMode 1
    // LoopMode=1 for start
    setChannel 44 1 
    
    //Always save power
    PowerSave 1
    
    // hold button to get into safe mode
    addEventHandler OnHold 20 SafeMode
    
    // Battery
    //startDriver battery
    //Battery_Setup 2350 3000
    
    // Temp and Hum sensor 
    startDriver SHT3X
    SHT_calibrate 0.1 10
    
    // 30s timeout to deep sleep 2mins if waits never complete
    addRepeatingEventID 20 -1 5 DeepSleep 300-$CH30
    
    //Turn LED on to indicate beggining of window to press button to exit loop mode
    setChannel 37 1 
    
    addChangeHandler Channel43 == 0 backlog echo "exit loop mode"; cancelRepeatingEvent 5; setChannel 44 0; setChannel 37 0
    
    // wait for MQTT to connect
    waitFor MQTTState 1
    
    cancelRepeatingEvent 5
    
    SHT_Measure
    publishChannel 1
    publishChannel 2
    
    //echo "!!!!!!!!!!!!!!channels published !!!!!!!!!!!!!!!!!!"
    delay_s 3
    
    //Turn LED off, end of exit loop mode window
    setChannel 37 0
    
    // Deep sleep (shut down everything) and reboot automatically when in loop mode
    if $CH44==1 then PinDeepSleep 600-$CH30
    
    //////// if not in loop mode
    clearAllHandlers
    
    // blink the led
    addRepeatingEvent 1 -1 setChannel 37 !$CH37
    
    // stay in mantenance mode 5 mins and then restart
    addRepeatingEvent ID 300-$CH30 -1 6 restart
    
    //reboot if button pressed
    addChangeHandler Channel43 == 0 backlog cancelRepeatingEvent 6; setChannel 37 0; restart
  • ADVERTISEMENT
  • #3 21452607
    max4elektroda
    Level 21  
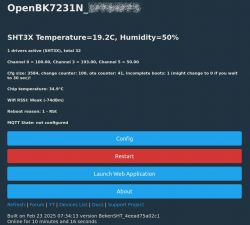
    I knew deep in my box with sensors there was an SHT31 ;-)

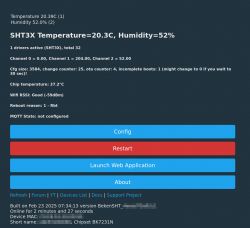
    Looks like it should work:


    Screenshot of OpenBK7231N interface showing temperature and humidity data.
  • ADVERTISEMENT
  • #5 21452702
    max4elektroda
    Level 21  
    Yes, a clear picture of the sensor would be great.

    While 0x44 is the default address for SHT3x, it's also possible on CHT8310:

    See e.g. https://github.com/RobTillaart/CHT8310 :

    The CHT8310 supports up to 4 devices on the I2C bus.
    AD0 Address Notes
    GND 0x40 CHT8310_DEFAULT_ADDRESS
    VCC 0x44
    SDA 0x48
    SCL 0x4C
  • #6 21452715
    divadiow
    Level 36  
    yes and Info:I2C:Address 0x44 (dec 68) was the detection for my CHT8320
  • #7 21454382
    lktrdng
    Level 5  
    >>21452650 I uploaded new images for the chip the best I could and I can confirm, only 4 legs.

    Added after 1 [hours] 14 [minutes]:

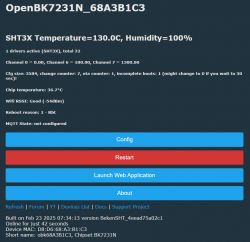
    >>21451932 Tried your firmware and got

    User interface showing temperature and humidity data with configuration options.
  • ADVERTISEMENT
  • #8 21454680
    max4elektroda
    Level 21  
    So it seems it actually is an SHT3x sensor or a clone. Good to know, maybe @divadiow this will solve your non functional device, too?

    Added after 10 [minutes]:

    At least your sensor seems very much the same device like the image above
  • #9 21454700
    divadiow
    Level 36  
    But that's mad! Sensylink said it was a CHT8320...
  • #10 21454729
    max4elektroda
    Level 21  
    Yes, they should know.
    Maybe the protocol is kind of equal so it will give values if requested by the SHT protocol? The values at least look kind of sensible
  • ADVERTISEMENT
  • #11 21454746
    divadiow
    Level 36  
    weird. i must get to the bottom of this!
    User interface of the OpenBK7231N system displaying temperature and humidity information.

    pins are correct. I get expected address with soft scan

    Added after 27 [minutes]:

    max4elektroda wrote:
    So it seems it actually is an SHT3x sensor or a clone.

    also weird. Sensirion SHT3x has 8 legs I thought and the logo in the pic is of Sensylink
  • #12 21454976
    max4elektroda
    Level 21  
    divadiow wrote:
    weird.

    I couldn't find a better word for this.
  • #13 21455006
    lktrdng
    Level 5  
    I moved my LED connection to P8 to free the ADC3 pin, any advice on how to measure the battery voltage?
  • #14 21456145
    max4elektroda
    Level 21  
    lktrdng wrote:
    any advice on how to measure the battery voltage

    Maybe take a look here

    https://www.elektroda.com/rtvforum/topic3959103.html

    it's about the "battery driver" which should do some kind of measuring on the ADC pin.
    Only took a brief look, you will need a voltage divider if I got it right, but it seems to be doable to build a divider like shown here

    https://www.elektroda.com/rtvforum/topic3959103.html#20588380
  • #16 21572955
    rethink621
    Level 3  
    Hello, I have a few of these. Trying to to identify them is difficult when they're all called TH01 and then the PCBs are marked with all sorts of things. It is the same as the pictures in the first post. I have flashed OpenBeken 1.18.109 but I'm trying to get the configuration part correct. I'm looking at the OpenBeken web app config page, but cannot find the exact device in the drop-down list. Really I don't know what to do - I'm fairly new to this, but can see the device in HA. Many thanks for any help.
  • #18 21580179
    p.kaczmarek2
    Moderator Smart Home
    The device in the first post is a TuyaMCU battery powered device. It's a bit hard to convert, but it's supported by OBK, just as you linked.

    There are also battery powered devices without TuyaMCU - they can use deep sleep mechanism. They are a bit more flexible. TuyaMCU battery powered can be converted to "deep sleep" battery powered device with some PCB changes, removal of MCU, etc. This can also work as long as the onboard sensor is supported by OBK itself.
    Helpful post? Buy me a coffee.
  • #19 21583547
    rethink621
    Level 3  
    I've managed to get mine going using BK7231GUIFlashTool-v19.

    1. Desolder CB3S from PCB (or cut RX/TX temporarily as noted and bridge Batt - (0V) to pin 9 GND)
    2. I used one of these flash boards for ESP-12x to flash the CB3S
    [BK7231N CB3S] Temperature and Humidity Sensor, TH01, PCB:ZY-TH02-CB3S, SHT3X
    3. Use a BK7231GUIFlashTool to flash current OpenBeken firmware.
    4. I also used Restore RF Part
    5. Resolder the CB3S onto PCB and bridge Batt- to pin 9 GND, so the MCU is on continuously.
    5. Connect to the AP that it creates.
    6. Configure MQTT, WiFi and reboot
    7. Find the IP address when it connects to your WiFi.
    8. Launch the Web Application and create a new autoexec.bat
    9. Paste in:
    startDriver TuyaMCU
    startDriver tmSensor
    // dpID 27 is temperature div 10
    setChannelType 27 temperature_div10
    linkTuyaMCUOutputToChannel 27 val 27
    // dpID 46 is % humidity
    setChannelType 46 Humidity
    linkTuyaMCUOutputToChannel 46 val 46
    // dpID 101 is battery state - low(0), mid(1) and high(2)
    setChannelType 10 ReadOnly
    linkTuyaMCUOutputToChannel 101 enum 10
    setChannelLabel 10 Battery 


    10. Go to Home Assistant Config and press Start Home Assistant Discovery
    11. HA should find it and see the sensors. It might take a while for values to appear.
    12. Remove the Batt- to pin 9 bridge.

    I've found that my units report about every 40 minutes to HA.
  • #20 21619299
    cobakind
    Level 4  
    @lktrdng Hi! I have exactly the same sensor, but I can't get it to work. I removed the Tuya chip and soldered it exactly like yours. I took the firmware from here, with SHT3x support. But I always have temperature=130 and humidity=100. Can you please tell me how you configured "Pin Settings" and what's in autoexec.bat?
  • #21 21621270
    rethink621
    Level 3  
    The autoexec.bat contains the text in the code box above. There aren't any other settings. Make sure your sensor is exactly the same. Make sure the PCB code is the same (date code may be different) and it looks the same. Post a photo here if you're unsure.
  • #22 21622043
    cobakind
    Level 4  
    >>21621270 Thanks for the quick reply! Yes, I have exactly the same PCB, the date code is the same (photo attached). I don't know if my "Pin Settings" are set up correctly. Can you tell me the correct "Pin Settings" for this PCB?
    ZY-TH02-CB3S board with CB3S module and connected wires
    Close-up of black SML DLD1 chip on green PCB with labeled components
  • #23 21633243
    rethink621
    Level 3  
    You've completely removed the TuyaMCU. The instructions are for leaving the PCB intact as it was originally, with both MCUs and everything else the same. The CB3S (ESP type MCU) just needs removing and then resoldering if you want to make reflashing it easier.
  • #24 21699203
    lktrdng
    Level 5  
    >>21619299 Sorry for the delay, I uploaded the autoexec.bat in which you can find the pin assignment

Topic summary

The discussion centers on identifying and flashing firmware for a temperature and humidity sensor device labeled TH01, based on the BK7231N CB3S chip with a Tuya MCU and a sensor initially thought to be CHT8310 but more likely an SHT3x or its clone. The sensor PCB is marked ZY-TH02-CB3S_V1.0. Visual inspection and I2C address scans suggest the sensor has only 4 legs, inconsistent with the CHT8310 or CHT8320 which have more pins, and the sensor appears to be a Sensirion SHT3x or a clone, despite some confusion due to logos and pin counts. Firmware attempts using bk7231flasher failed without desoldering the CB3S chip; successful flashing was achieved using BK7231GUIFlashTool with OpenBeken firmware. Configuration involves enabling TuyaMCU and tmSensor drivers, mapping Tuya data points for temperature, humidity, and battery state, and setting up MQTT and WiFi. The device is battery powered with a TuyaMCU, which complicates conversion but is supported by OpenBeken. Some users discuss measuring battery voltage via ADC pins using voltage dividers. The thread references external resources for firmware, drivers, and configuration examples, highlighting the challenges of sensor identification and firmware flashing on these Tuya-based BK7231N devices.
Summary generated by the language model.
ADVERTISEMENT