Elektroda.com
Elektroda.com
X

BK7231N/CB3S Tuya generic battery powered temperature and humidity sensor with CHT8305 sensor

minusync 5979 91
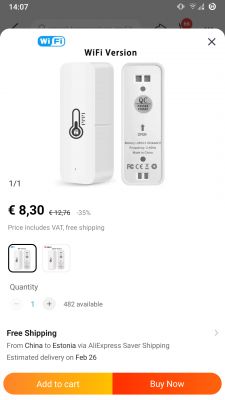
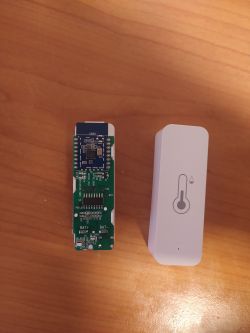
  • Generic battery-powered temperature and humidity sensor.
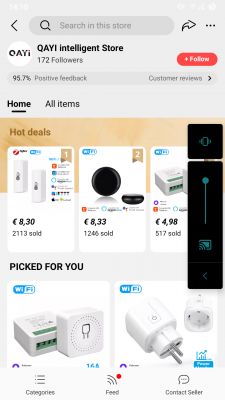
    It is from Aliexpress but as always there simple search there brings up more relevant results then looking at some specific seller

    BK7231N/CB3S Tuya generic battery powered temperature and humidity sensor with CHT8305 sensor
    BK7231N/CB3S Tuya generic battery powered temperature and humidity sensor with CHT8305 sensor


    I can confirm that flashing it using Python and OpenBK7231N_QIO file works. The new flashing tool by OB doesn't seem to be ready yet.
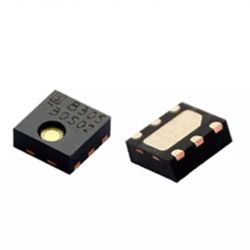
    I am also not sure but it is said to be using a CHT8305 sensor.

    CB3S datasheet: https://developer.tuya.com/en/docs/iot/cb3s?id=Kai94mec0s076
    CHT8305: http://sensylink.com/a/products/lm2/CHT8305.html


    BK7231N/CB3S Tuya generic battery powered temperature and humidity sensor with CHT8305 sensor


    At the moment it seems that it does not have a driver yet, but the discussion about CHT8305 driver seems to be going on here https://github.com/openshwprojects/OpenBK7231T_App/issues/584

    I also have no idea how to set the pins for this device. In addition to temp and hum information, battery information should also be received. Also, this device probably requires a deep sleep option. (Originally in app it had the option to set custom polling time)

    Update:
    Summary of how to get your sensor working.

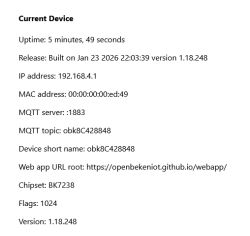
    If you have successfully overwritten the sensor software, connect to the sensor's temporary AP and set up your wifi and MQTT on browser address 192.168.4.1.
    When the sensor restart is done, you can find the sensor's new address in your router's DHCP lease table.
    Connect from your web browser to that address.
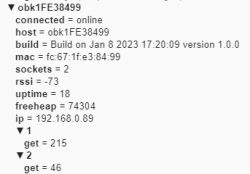
    Set sensor flags 10 and 19 to true.
    In configuring general tab set uptime seconds something btwn 5-15 seconds.
    Open the Web Application and update the software to the latest version. (optional)
    Create an u desktop autoexec.bat file with the following content:

    startDriver tuyaMCU
    startDriver tmSensor
    linkTuyaMCUOutputToChannel 1 val 1
    setChannelType 1 Temperature_Div10
    linkTuyaMCUOutputToChannel 2 val 2
    setChannelType 2 Humidity


    drop bat file to the filesystem box (in web application).
    Restart sensor.
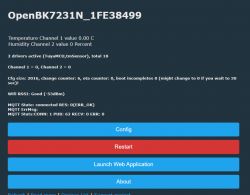
    Wait a few minutes to see if the sensor reads data. On the sensor home page, you should also see that two divers are working.
    If OK, in order for MQTT to work, you must now remove the external power supply of the sensor and leave it only on the batteries. I managed to leave the chip power leads inside the case in case I need them in the future.

    If you are using Home Assistant you need to add to your configuration.yaml file the following (Modify it according to your own setup!):

     mqtt:
      sensor:
        - name: "your sensor name here"
          unique_id: your sensor unique id here (you choose it yourself)
          state_topic: "your sensor mqtt topic here/1/get"
          unit_of_measurement: 'C'
          value_template: "{{ (value | float * 0.1 | round(1)) }}"
          
        - name: "your sensor name here"
          unique_id: your sensor unique id here (you choose it yourself)
          state_topic: "your sensor mqtt topic here/2/get"
          unit_of_measurement: '%'
          value_template: "{{ value }}"


    Restart HA and check your entities.
    These settings may change at any time if HA or OpenBekken changes its software!

    Cool? Ranking DIY
    About Author
    minusync
    Level 6  
    Offline 
    minusync wrote 30 posts with rating 2. Been with us since 2023 year.
  • #2
    p.kaczmarek2
    Moderator Smart Home
    Thank you, the CHT8305 driver submitted by @ByteMangler will be added hopefully today, I am just waiting for his response.

    Your post lacks information where to buy, can you show us where such sensor can be bought and attach screenshots from seller website to the first post?

    So far we have only a simple power saving mode (command: powerSave), deep sleep is not ready yet, we will add it as well. @btsimonh might know more about it.

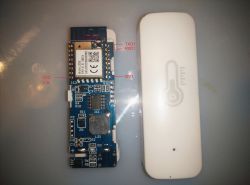
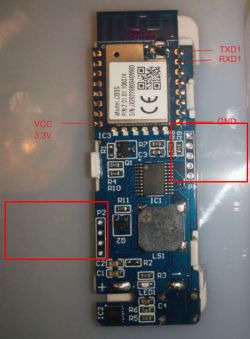
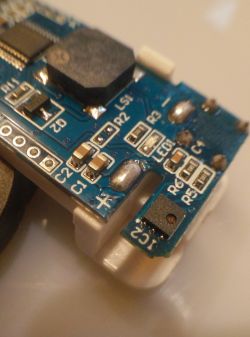
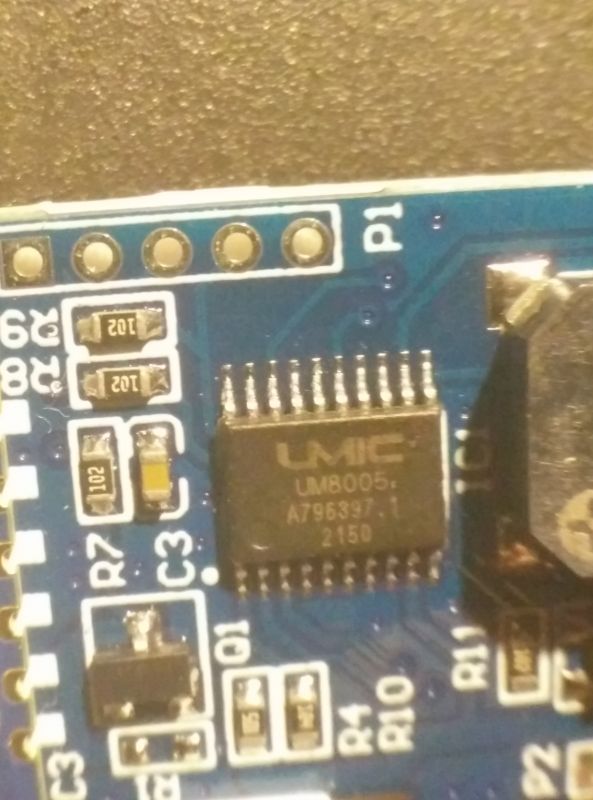
    But wait, what is IC1? Isn't it a TuyaMCU?

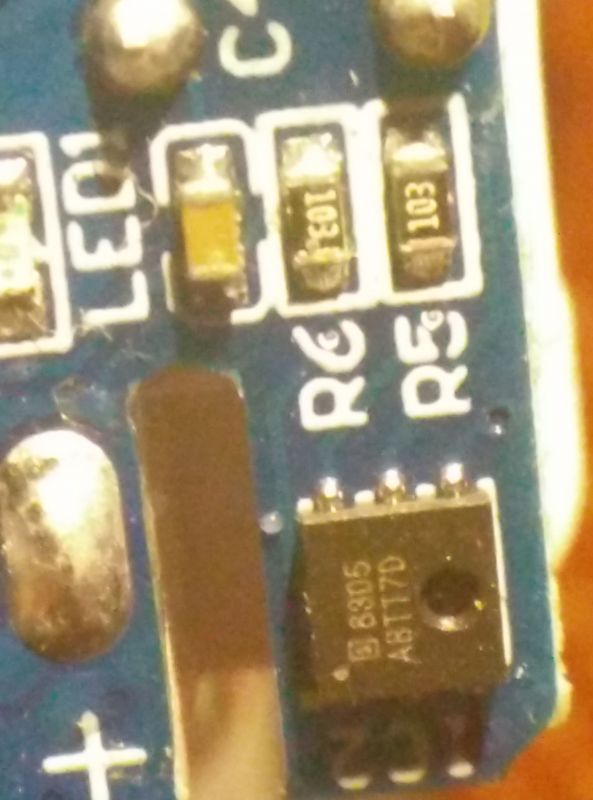
    IC2 is a sensor, I think:
    BK7231N/CB3S Tuya generic battery powered temperature and humidity sensor with CHT8305 sensor
    Can you post a better quality photo of IC1 and IC2?

    Isn't Q1 used to enable/disable WiFi module by IC1 (TuyaMCU)? Then you don't need deep sleep....

    Do you have a multimeter to do some basic checks?

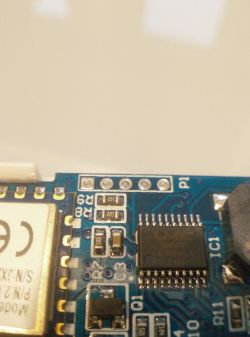
    Two programming headers also suggest TuyaMCU:
    BK7231N/CB3S Tuya generic battery powered temperature and humidity sensor with CHT8305 sensor
    I think this device is using TuyaMCU (UART) to communicate with IC1 and gets measurement by UART. There is no i2c needed. Futhermore, no deep sleep is needed because TuyaMCU (IC2) controls power of WiFi module by Q1. So WiFi module is on only for a short time to report measurement and then powered off by Q1 transistor.
  • #3
    minusync
    Level 6  
    Sure I have multimeter

    BK7231N/CB3S Tuya generic battery powered temperature and humidity sensor with CHT8305 sensor
    BK7231N/CB3S Tuya generic battery powered temperature and humidity sensor with CHT8305 sensor
  • #4
    p.kaczmarek2
    Moderator Smart Home
    What is the marking on IC1 and Q2? I can't see very well.

    Does RXD1 and TXD1 of BK7321 module connects to pins of IC1, and if yes, to which pins?
  • #5
    minusync
    Level 6  
    It is extremely hard to make readable photos bcs the light from markings only reflects at distinct angles.

    about IC1 it should be UM8005
    https://www.unicmicro.com/index.php/en/show-75-127.html
    "UM8005 adopts an optimized 8051 system architecture with a maximum operating frequency of 24MHz, an ultra-low power management system, a sleep current of 0.59μA, and an operating current of 95μA/MHz. It supports timing wake-up and is suitable for various low-power application scenarios; Single-cycle EFLASH, SRAM read, most"
    http://www.gztrchip.com/product/list-18-1.html

    I could not find proper datasheet for 8005 so I cant be 100% sure I count pins correctly but meter gives pins readout
    TXD1 pin 16 and 9
    RXD1 pin 17 and 9


    BK7231N/CB3S Tuya generic battery powered temperature and humidity sensor with CHT8305 sensor

    BK7231N/CB3S Tuya generic battery powered temperature and humidity sensor with CHT8305 sensor


    I did google search and found I think same device discussed here, but not directly with OB setup related https://www.elektroda.com/rtvforum/topic3874289-150.html
  • #6
    superjedi
    Level 2  
    Hi everyone,

    I started working on this module this morning, flashing it is not an issue, (VCC/RX/TX/GND hooked up, needs reset during flashing procedure)

    I can confirm that the UM8005 is the MCU hooked up to the temperature sensor.

    CB3S has a serial connection @ 9600 bps to this MCU.

    I hooked up a logic analyzer and started dumping the serial communication between both ICs, you'll find an excerpt below

    @p.kaczmarek2 these are my first OpenBK devices, can you tell by looking at this dump if these transactions are already supported ?

    Thank you !

    --- 20.2°C --- 50%
    
    > 55AA 00 01 0000 00
    < 55AA 00 01 0024 7B2270223A2271323965627773356164777965316C38222C2276223A22312E302E32227D 52 # {"p":"q29ebws5adwye1l8","v":"1.0.2"}
    
    > 55AA 00 02 0001 02 04
    < 55AA 00 02 0000 01
    
    > 55AA 00 02 0001 04 06
    < 55AA 00 02 0000 01
    < 55AA 00 10 0001 00 10
    < 55AA 00 05 0008 01020004000000CA DD <= temperature = 0xCA = 202 = 20.2°C
    
    > 55AA 00 10 0002 0100 12
    > 55AA 00 05 0001 00 05
    < 55AA 00 05 0008 0202000400000032 46 <= humidity = 0x32 = 50%
    
    > 55AA 00 05 0001 00 05
    
    --- 20.3°C --- 51%
    
    > 55AA 00 01 0000 00
    < 55AA 00 01 0024 7B2270223A2271323965627773356164777965316C38222C2276223A22312E302E32227D 52 # {"p":"q29ebws5adwye1l8","v":"1.0.2"}
    
    > 55AA 00 02 0001 03 05
    < 55AA 00 02 0000 01
    
    > 55AA 00 02 0001 04 06
    < 55AA 00 02 0000 01
    < 55AA 00 10 0001 00 10
    < 55AA 00 05 0008 01020004000000CB DE <= temperature = 0xCB = 203 = 20.3°C
    
    > 55AA 00 10 0002 0100 12
    > 55AA 00 05 0001 00 05
    < 55AA 00 05 0008 0202000400000033 47 <= humidity = 0x33 (51%)
    
    > 55AA 00 05 0001 00 05
    
    --- 20.8°C --- 63% ---
    
    > 55AA 00 02 0001 04 06
    < 55AA 00 02 0000 01
    < 55AA 00 10 0001 00 10
    < 55AA 00 05 0005 0F04000101 1E
    
    > 55AA 00 10 0002 0100 12
    > 55AA 00 05 0001 00 05
    < 55AA 00 05 0008 01020004000000D0 E3 <= temperature = 0xD0 = 208 = 20.8°C
    
    > 55AA 00 05 0001 00 05
    < 55AA 00 05 0008 020200040000003F 53 <= humidity = 0x3F (63%)
    
    > 55AA 00 05 0001 00 05
  • #7
    p.kaczmarek2
    Moderator Smart Home
    I didn't check each packet precisely yet, but in general it looks similar to supported TuyaMCU door sensor. It's worth giving a try

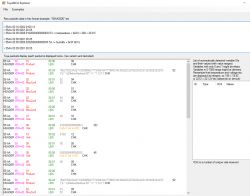
    Here are results from my TuyaMCU analyzer:
    BK7231N/CB3S Tuya generic battery powered temperature and humidity sensor with CHT8305 sensor
    
    55 AA	00	01		00 00		00	
    HEADER	VER=00	Product		LEN		CHK	
    
    55 AA	00	01		00 24	7B2270223A2271323965627773356164777965316C38222C2276223A22312E302E32227D	52	
    HEADER	VER=00	Product		LEN	{"p":"q29ebws5adwye1l8","v":"1.0.2"}	CHK	
    
    55 AA	00	02		00 01	02	04	
    HEADER	VER=00	McuConf		LEN	02	CHK	
    
    55 AA	00	02		00 00		01	
    HEADER	VER=00	McuConf		LEN		CHK	
    
    55 AA	00	02		00 01	04	06	
    HEADER	VER=00	McuConf		LEN	04	CHK	
    
    55 AA	00	02		00 00		01	
    HEADER	VER=00	McuConf		LEN		CHK	
    
    55 AA	00	10		00 01	00	10	
    HEADER	VER=00	Unk		LEN		CHK	
    
    55 AA	00	05		00 08	01020004000000CA	DD	
    HEADER	VER=00	Unk		LEN	fnId=1 Val V=202	CHK	
    
    55 AA	00	10		00 02	0100	12	
    HEADER	VER=00	Unk		LEN		CHK	
    
    55 AA	00	05		00 01	00	05	
    HEADER	VER=00	Unk		LEN		CHK	
    
    55 AA	00	05		00 08	0202000400000032	46	
    HEADER	VER=00	Unk		LEN	fnId=2 Val V=50	CHK	
    
    55 AA	00	05		00 01	00	05	
    HEADER	VER=00	Unk		LEN		CHK	
    
    55 AA	00	01		00 00		00	
    HEADER	VER=00	Product		LEN		CHK	
    
    55 AA	00	01		00 24	7B2270223A2271323965627773356164777965316C38222C2276223A22312E302E32227D	52	
    HEADER	VER=00	Product		LEN	{"p":"q29ebws5adwye1l8","v":"1.0.2"}	CHK	
    
    55 AA	00	02		00 01	03	05	
    HEADER	VER=00	McuConf		LEN	03	CHK	
    
    55 AA	00	02		00 00		01	
    HEADER	VER=00	McuConf		LEN		CHK	
    
    55 AA	00	02		00 01	04	06	
    HEADER	VER=00	McuConf		LEN	04	CHK	
    
    55 AA	00	02		00 00		01	
    HEADER	VER=00	McuConf		LEN		CHK	
    
    55 AA	00	10		00 01	00	10	
    HEADER	VER=00	Unk		LEN		CHK	
    
    55 AA	00	05		00 08	01020004000000CB	DE	
    HEADER	VER=00	Unk		LEN	fnId=1 Val V=203	CHK	
    
    55 AA	00	10		00 02	0100	12	
    HEADER	VER=00	Unk		LEN		CHK	
    
    55 AA	00	05		00 01	00	05	
    HEADER	VER=00	Unk		LEN		CHK	
    
    55 AA	00	05		00 08	0202000400000033	47	
    HEADER	VER=00	Unk		LEN	fnId=2 Val V=51	CHK	
    
    55 AA	00	05		00 01	00	05	
    HEADER	VER=00	Unk		LEN		CHK	
    
    55 AA	00	02		00 01	04	06	
    HEADER	VER=00	McuConf		LEN	04	CHK	
    
    55 AA	00	02		00 00		01	
    HEADER	VER=00	McuConf		LEN		CHK	
    
    55 AA	00	10		00 01	00	10	
    HEADER	VER=00	Unk		LEN		CHK	
    
    55 AA	00	05		00 05	0F04000101	1E	
    HEADER	VER=00	Unk		LEN	fnId=15 Enum V=1	CHK	
    
    55 AA	00	10		00 02	0100	12	
    HEADER	VER=00	Unk		LEN		CHK	
    
    55 AA	00	05		00 01	00	05	
    HEADER	VER=00	Unk		LEN		CHK	
    
    55 AA	00	05		00 08	01020004000000D0	E3	
    HEADER	VER=00	Unk		LEN	fnId=1 Val V=208	CHK	
    
    55 AA	00	05		00 01	00	05	
    HEADER	VER=00	Unk		LEN		CHK	
    
    55 AA	00	05		00 08	020200040000003F	53	
    HEADER	VER=00	Unk		LEN	fnId=2 Val V=63	CHK	
    
    55 AA	00	05		00 01	00	05	
    HEADER	VER=00	Unk		LEN		CHK	


    It reminds me of that topic:
    https://www.elektroda.com/rtvforum/topic3914412.html
    The autoexec for that door sensor was:
    
    startDriver tuyaMCU
    startDriver tmSensor
    linkTuyaMCUOutputToChannel 1 val 1
    setChannelType 1 ReadOnly
    linkTuyaMCUOutputToChannel 3 val 3
    setChannelType 3 ReadOnly;
    

    in this case we have different dpIDs:
    - temperature: fnId=1 Val V=208
    - humidity: fnId=2 Val V=63
    - idk some config var? fnId=15 Enum V=1 (that packet: < 55AA 00 05 0005 0F04000101 1E)

    so the config for this device would be:
    
    startDriver tuyaMCU
    startDriver tmSensor
    linkTuyaMCUOutputToChannel 1 val 1
    setChannelType 1 Temperature_Div10
    linkTuyaMCUOutputToChannel 2 val 2
    setChannelType 2 Humidity


    You also need flags:
    - Flag 10 - [MQTT] Broadcast self state on MQTT connect
    - Flag 19 - [MQTT] Always publish channels used by TuyaMCU

    Please do 2MB firmware backup and try OBK with this config
  • #8
    superjedi
    Level 2  
    p.kaczmarek2 wrote:

    so the config for this device would be:
    
    startDriver tuyaMCU
    startDriver tmSensor
    linkTuyaMCUOutputToChannel 1 val 1
    setChannelType 1 Temperature_Div10
    linkTuyaMCUOutputToChannel 2 val 2
    setChannelType 2 Humidity


    You also need flags:
    - Flag 10 - [MQTT] Broadcast self state on MQTT connect
    - Flag 19 - [MQTT] Always publish channels used by TuyaMCU


    Unfortunately, it fails
    flags 10/19 set to 1
    MQTT configured
    Startup command text being:
    backlog startDriver tuyaMCU; startDriver tmSensor; linkTuyaMCUOutputToChannel 1 val 1; setChannelType 1 Temperature_Div10; linkTuyaMCUOutputToChannel 2 val 2; setChannelType 2 Humidity


    Index shows:
    BK7231N/CB3S Tuya generic battery powered temperature and humidity sensor with CHT8305 sensor

    Do you want me to try a capture of the serial comm ?
  • #9
    minusync
    Level 6  
    I did it Result was not sucess
    Temperature Channel 1 value 0.00 C
    Humidity Channel 2 value 0 Percent
    On the other hand, there is always the possibility that I did something wrong
  • #10
    superjedi
    Level 2  
    Nevermind, it seems to work - I was powering it through direct 3.3V without any batteries but I guess there may be a diode somewhere and/or a different power path to the MCU that prevented it from being powered on.

    I'll do some further tests and keep you updated !

    Thanks a lot

    BK7231N/CB3S Tuya generic battery powered temperature and humidity sensor with CHT8305 sensor
  • #11
    p.kaczmarek2
    Moderator Smart Home
    superjedi wrote:
    Nevermind, it seems to work.

    So it's ok? Do you get results to HA?
    You might also need to set RETAIN flags in flags. Always retain.

    superjedi wrote:
    I was powering it through direct 3.3V without any batteries but I guess there may be a diode somewhere and/or a different power path to the MCU that prevented it from being powered on.

    Do you mean 3.3V directly to WiFi module?
    No, you can't do that. It won't work that way.

    First of all, the MCU is powered through a transistor (Q1) that has it's base controlled by MCU, so 3.3V won't flow backwards.

    Secondly, you can only get results when MCU decides to wake itself up and power on WiFi module. You can't power on WiFi module itself and expect MCU to respond.

    Because of that, that kind of devices is HARD to support.
    And please note - Tasmota has the same issue! It's firmware-agnostic problem.
  • #12
    minusync
    Level 6  
    However, I have a feeling that it doesn't really work. With battery power, I can't access the device settings directly, but HA does not show real data.
    BK7231N/CB3S Tuya generic battery powered temperature and humidity sensor with CHT8305 sensor
  • #13
    p.kaczmarek2
    Moderator Smart Home
    @minusync are you aware about that Home Assistant Discovery does not yet support TuyaMCU devices?
    You have to create the YAML code for that.
    You can find an example there:
    [BK7231T] LCD calendar/thermometer/hygrometer TH06 WiFi for TuyaMCU - Home Assistant
    Discovery for TuyaMCU will be implemented soon.
  • #14
    superjedi
    Level 2  
    p.kaczmarek2 wrote:

    So it's ok? Do you get results to HA?


    No clue, I'm planning to use them with grafana, I have no instance of HA, so far it seems to work but it doesn't seem to be reliable, though, this may not be an OpenBK related issue at all.

    Is there any standard way (standard, as in, tuya protocol) to configure the MCU for a particular wakeup interval ?

    p.kaczmarek2 wrote:

    You might also need to set RETAIN flags in flags. Always retain.


    Done !

    p.kaczmarek2 wrote:

    Do you mean 3.3V directly to WiFi module?
    No, you can't do that. It won't work that way.

    First of all, the MCU is powered through a transistor (Q1) that has it's base controlled by MCU, so 3.3V won't flow backwards.

    Secondly, you can only get results when MCU decides to wake itself up and power on WiFi module. You can't power on WiFi module itself and expect MCU to respond.

    Because of that, that kind of devices is HARD to support.
    And please note - Tasmota has the same issue! It's firmware-agnostic problem.


    Thank you for clarifying this, it was also my thought, that's why I went immediately on battery power.

    It's really a pain to have to get the module wired in to reconfigure it and not being able to have it reconfigured wirelessly (maybe there is a wakeup/downlink wireless reconfiguration option, like in LoRaWAN ?)
  • #15
    minusync
    Level 6  
    p.kaczmarek2 wrote:
    @minusync are you aware about that Home Assistant Discovery does not yet support TuyaMCU devices?
    You have to create the YAML code for that.


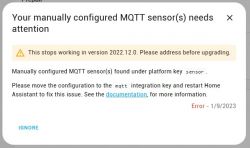
    HA has again changed something

    BK7231N/CB3S Tuya generic battery powered temperature and humidity sensor with CHT8305 sensor


    It seems that the OB yaml guide is no longer correct. Not sure but I think it should be now something like this
    mqtt:
      sensor:
        name: "Temp"
        state_topic: "Temp_hum/1/get"
        unit_of_measurement: 'C'
        value_template: "{{ ((value | float * 0.1 | round(1))) }}"
        
        name: "Temp"
        state_topic: "Temp_hum/2/get"
        unit_of_measurement: '%'
        value_template: "{{ value }}"


    Problem is I still cant read data
    Edit: I noticed that I can read webapp logs even with battery power. So when this could help and you tell me what features u need I could be able to post.
  • #16
    p.kaczmarek2
    Moderator Smart Home
    I don't know currently if there is any way to do a safer OTA with that MCU turning off the WiFi module after a given time. We might need to dig deeper in Tuya docs.

    But yes, it's problematic...

    I am not aware about HA changes yet, but we will update the Yaml generator if necessary. But this is not good, HA changes things too often. And I still have the version from last year.

    @minusync, have you done all the steps from this thread? If so, can you use Home Assistant "listen to MQTT topic" to listen to what your device broadcasts? You should get the obkDev/1/get etc publishes with channel values....
  • #17
    ionoleinic
    Level 10  
    Hi, i have a similar device, tmperature and hum sensor.I think it is powered by mcu on board, and i want to ask if i can flash it now with OpenBeken or i should first read a log file from it with comands that send tuya mcu.
    BK7231N/CB3S Tuya generic battery powered temperature and humidity sensor with CHT8305 sensor
    And to flash, i saw that in device profiles repository of tuya cloudcutter appeared this sensor .There is noted that device had CBU module, but my device has CB3S module inside.Will be this a problem or not?
    Thank you.
  • #18
    minusync
    Level 6  
    p.kaczmarek2 wrote:
    have you done all the steps from this thread? If so, can you use Home Assistant "listen to MQTT topic" to listen to what your device broadcasts? You should get the obkDev/1/get etc publishes with channel values....


    I got another similar device to work. I can now at least read the data from the device menu. I don't know what the problem with the first one was, they are basically clones.
    The bigger problem is the new HA yaml rules. No matter what I try I get a duplicate mapping keys error. Currently, I have not gotten any OB devices to work over MQTT. I only started HA in the fall so I'm not very familiar with yaml code.
  • #19
    p.kaczmarek2
    Moderator Smart Home
    Please always try to make a 2MB flash backup, both for safety and for OTA hack, and post it here, I can forward it to Cutter team. It won't hurt if it's a duplicate..

    @ionoleinic I am unable to guess if your device is the same, manufacturer could change BK7231N firmware version or not, doing an UART capture of packets wouldn't hurt. Or we can just assume it's the same and flash OBK and then check logs there - OpenBeken TuyaMCU logs are showing dpIDs and their contents. It's up to you to decide.

    @minusync I will try to help you with that soon, but at the moment I didn't update my HA yet. I am not happy with them changing syntax so often. We already had such a situation about a year ago and now they do that again. But still, can you post your current Yaml and the error message? I will try to figure out something for you, even though I don't have that new HA.
  • #20
    minusync
    Level 6  
    p.kaczmarek2 wrote:
    I will try to help you with that soon, but at the moment I didn't update my HA yet. I am not happy with them changing syntax so often. We already had such a situation about a year ago and now they do that again. But still, can you post your current Yaml and the error message? I will try to figure out something for you, even though I don't have that new HA.


    I will try to describe the situation with yaml
    this is what was suggested by you but gives a general error about new rules.
    sensor:
      - platform: mqtt
        name: "Temp"
        state_topic: "Temp/1/get"
        unit_of_measurement: 'C'
        value_template: "{{ ((value | float * 0.1 | round(1))) }}"
        
      - platform: mqtt
        name: "Temp"
        state_topic: "Temp/2/get"
        unit_of_measurement: '%'
        value_template: "{{ value }}"

    I think basically the new rule says the sensor cannot be above mqtt
    So I tried to put mqtt first but this will give errors about duplicate mappings
    So this is also wrong
    
    mqtt:
      sensor:
        name: "Temp"
        state_topic: "Temp/1/get"
        unit_of_measurement: 'C'
        value_template: "{{ ((value | float * 0.1 | round(1))) }}"
    	
        name: "Temp"
        state_topic: "Temp/2/get"
        unit_of_measurement: '%'
        value_template: "{{ value }}"
  • #21
    Xinayder
    Level 5  
    minusync wrote:
    p.kaczmarek2 wrote:
    I will try to help you with that soon, but at the moment I didn't update my HA yet. I am not happy with them changing syntax so often. We already had such a situation about a year ago and now they do that again. But still, can you post your current Yaml and the error message? I will try to figure out something for you, even though I don't have that new HA.


    I will try to describe the situation with yaml
    this is what was suggested by you but gives a general error about new rules.
    sensor:
      - platform: mqtt
        name: "Temp"
        state_topic: "Temp/1/get"
        unit_of_measurement: 'C'
        value_template: "{{ ((value | float * 0.1 | round(1))) }}"
        
      - platform: mqtt
        name: "Temp"
        state_topic: "Temp/2/get"
        unit_of_measurement: '%'
        value_template: "{{ value }}"

    I think basically the new rule says the sensor cannot be above mqtt
    So I tried to put mqtt first but this will give errors about duplicate mappings
    So this is also wrong
    mqtt:
      sensor:
        name: "Temp"
        state_topic: "Temp/1/get"
        unit_of_measurement: 'C'
        value_template: "{{ ((value | float * 0.1 | round(1))) }}"
    	
        name: "Temp"
        state_topic: "Temp/2/get"
        unit_of_measurement: '%'
        value_template: "{{ value }}"


    They changed syntax in a way it is no longer supported to add sensors with the MQTT platform; you have to manually add each sensor under the MQTT block inside your configuration file.

    Your code should be like:
    mqtt:
      sensor:
        - name: "Temp"
          state_topic: "Temp/1/get"
          unit_of_measurement: 'C'
          value_template: "{{ ((value | float * 0.1 | round(1))) }}"
    	
        - name: "Temp"
          state_topic: "Temp/2/get"
          unit_of_measurement: '%'
          value_template: "{{ value }}"
    

    You can see an example here: https://www.home-assistant.io/integrations/sensor.mqtt/#json-attributes-template-configuration

    I have a similar device and today I did a quick disassembly and found out I have the same device, BK7231N chipset, CB3S module with the CHT8305 sensor. I tried using cloud cutter to flash OpenBK but didn't succeed, as my firmware version is 2.1.0 and I couldn't do the cloud cutter method with several profiles.

    I'm just waiting for my UART programmer to arrive so I can dump the firmware and flash OpenBK in it.
  • #22
    p.kaczmarek2
    Moderator Smart Home
    Any firmware dump is welcome, altough...
    it would be also helpful if someone captured UART TuyaMCU packets during Tuya pairing mode because it's possible there is some kind of a way to put that TuyaMCU device into "run WiFI module constantly mode" that could be useful for our OBK when we need to do OTA.

    Because, as you may know, otherwise the TuyaMCU will turn off WiFi module power after about 30 to 90 seconds (depending whether WiFi module "talks" with it over TuyaMCU or not).

    Maybe we could also find something in Tuya docs. Idk, maybe in "wifi conf" packet? I may look for the solution in docs if I get some more time later.
  • #23
    minusync
    Level 6  
    Xinayder wrote:
    They changed syntax in a way it is no longer supported to add sensors with the MQTT platform; you have to manually add each sensor under the MQTT block inside your configuration file.

    I almost got it right, but there must be something more bcs whatever I do I am not able to show it up as mqtt device in HA.
    I have some vmbus devices happily as mqtt with exact same credentials but openbeken refuse to work so far.
    I can see that mqtt is connected but HA just refuses to read it
    MQTT State: connected RES: 0(ERR_OK)
    MQTT ErrMsg:
    MQTT Stats:CONN: 6 PUB: 36 RECV: 0 ERR: 0
  • #24
    ionoleinic
    Level 10  
    p.kaczmarek2 wrote:
    Any firmware dump is welcome, altough...
    it would be also helpful if someone captured UART TuyaMCU packets during Tuya pairing mode because it's possible there is some kind of a way to put that TuyaMCU device into "run WiFI module constantly mode" that could be useful for our OBK when we need to do OTA.

    I want to make a capture of packets for my temp and hum module.What i need for this? RealTerm?
    I saw Tx2 and Rx2 on the front of the pcb, can i use 3.3 and GND from batteries?
    Tx1 and Rx1 are on the back of pcb.
    Thanks.
  • #25
    minusync
    Level 6  
    p.kaczmarek2 wrote:
    I will try to help you with that soon, but at the moment I didn't update my HA yet. I am not happy with them changing syntax so often.

    Maybe u have some ideas bcs I have not anymore at this point.
    Sensor clearly is able to connect to HA only thing is it does not come up as device in mqtt.
    I can see in mosquitto logs that it is subscribing to device but it does not appear as real device.
    Only thing I can think is that HA and OB somehow dont want to talk to each other. I dont know if there is something to change in OB settings.
    This is part of mosquitto logs

    2023-01-11 13:46:43.961 DEBUG (MainThread) [homeassistant.components.mqtt.client] Received message on Temp_Kitchen/1/get (qos=0): b'209'
    2023-01-11 13:46:43.963 DEBUG (MainThread) [homeassistant.components.mqtt.models] Rendering incoming payload '209' with variables {'entity_id': 'sensor.temp_hum_Kitchen', 'name': 'Temp_hum_Kitchen', 'this': <template TemplateStateFromEntityId(sensor.temp_hum_Kitchen)>} with default value 'default' and Template("{{ ((value | float * 0.1 | round(1))) }}")
    2023-01-11 13:46:43.974 DEBUG (MainThread) [homeassistant.components.mqtt.client] Received message on Temp_Kitchen/2/get (qos=0): b'24'
    2023-01-11 13:46:43.975 DEBUG (MainThread) [homeassistant.components.mqtt.models] Rendering incoming payload '24' with variables {'entity_id': 'sensor.temp_hum_Kitchen_2', 'name': 'Temp_hum_Kitchen', 'this': <template TemplateStateFromEntityId(sensor.temp_hum_Kitchen_2)>} with default value 'default' and Template("{{ value }}")
    2023-01-11 13:46:44.961 DEBUG (MainThread) [homeassistant.components.mqtt.client] Received message on Temp_Kitchen/2/get (qos=0): b'24'
    2023-01-11 13:46:44.962 DEBUG (MainThread) [homeassistant.components.mqtt.models] Rendering incoming payload '24' with variables {'entity_id': 'sensor.temp_hum_Kitchen_2', 'name': 'Temp_hum_Kitchen', 'this': <template TemplateStateFromEntityId(sensor.temp_hum_Kitchen_2)>} with default value 'default' and Template("{{ value }}")
    2023-01-11 13:46:53.956 DEBUG (MainThread) [homeassistant.components.mqtt.client] Received message on Temp_Kitchen/1/get (qos=0): b'209'/code]
  • #26
    p.kaczmarek2
    Moderator Smart Home
    ionoleinic wrote:

    I saw Tx2 and Rx2 on the front of the pcb, can i use 3.3 and GND from batteries?
    Tx1 and Rx1 are on the back of pcb.
    Thanks.

    If you want to make a packets capture from TuyaMCU device, then use can apply 3.3V power directly to batteries contact. This will just work like the device had batteries.
    On the other hand, applying 3.3V directly to VDD on WiFi module will not work, because the TuyaMCU lower power devices have TuyaMCU control the power of wifi module and TuyaMCU only enables module when it's needed to report the data.

    TuyaMCU here won't respond on request, it is at deep sleep most of the time.
  • #27
    ionoleinic
    Level 10  
    Is somewhere a guide how capture these packets?
    I connected tx2 and rx2 to usb uart.Power and gnd was from batteries.
    I tried with realTerm and my capture.txt file was always empty.
    Thanks.
  • #28
    p.kaczmarek2
    Moderator Smart Home
    TX2 and RX2 are a debug log output. There you can find Tuya firmware log. TuyaMCU communication is on RX1 and TX1, it's on the same port that is used for flashing the device via UART bootloader.

    First make sure that you're getting anything in Realterm without capture. Then try capturing.

    I will write a guide on that topic soon, I have been asked the same just about yesterday.
  • #29
    ionoleinic
    Level 10  
    I am trying to capture packets of TuyaMCU communication of tem and hum sensor.I tried with RealTerm, now with TeraTerm, but still nothing.
    I am doing this for first time and i am not understanding what i am doing wrong.


    Can somebody help me?
    Thanks.
  • #30
    p.kaczmarek2
    Moderator Smart Home
    You have wrong connection. You are supposed to have a common ground connection, just like during flashing. GND of WiFi device and GND of USB to UART converter should be connected together. Then, you can connect USB to UART converter RX pin to TXD1 or RXD1 to capture data.

    Gnd must be common, because all signal levels are measured as relative to ground.