BK7231T/BK7231N is a Tuya WiFi/Bluetooth SoC guide covering datasheet details, QFN32 pinout, module variants, and practical uses in smart sockets, bulbs, switches, and LED lighting.
It explains UART1 flashing, SPI recovery, partition offsets, and module pin maps for WB/CB series, plus how OpenBeken and BK7231 GUI Simple Flasher handle backups and writes.
Key specs include 802.11 b/g/n, up to 120 MHz MCU, 2 Mbyte flash, 256 Kbyte RAM, dual UART/I2C, and PWM outputs on P6, P7, P8, P9, P24, P26.
A major limitation is that UART bootloader access only appears briefly after reboot, and programming in-circuit can clash with TuyaMCU wiring; mains-powered devices are explicitly unsafe to flash.
AI summary based on the discussion. May contain errors.
BK7231T/BK7231N is a popular WiFi & Bluetooth SoC used widely in Tuya Smart products. BK7231 can be found in smart sockets, smart LED bulbs, smart switches, etc. BK7231 usually comes in form of modules which are pin to pin compatible with ESP modules (TYWE2S, TYWE3S, ESP12, etc..). BK7231 devices can be easily programmed by UART and you can free them from the cloud by using open source firmware. Here I will provide some generic information about BK7231 SoC.
Please scroll to the bottom of the post to get the BK7231U, etc, datasheets, manuals, all that I've found
BK7231 features:
- 802.11 b/g/n 1x1 Compliant
- 20/40 MHz bandwidth and STBC
- Working mode Wi-Fi STA, AP, Direct and Repeater SGI、Green-Field Preamble and A-MPDU Support WPA, WPA2 and WAPI
- Support 802.11e and WMM-PS
- Up to 120 MHz for MCU
- In package 2Mbyte FLASH, support transparent download
- On chip 256 Kbyte data RAM
- 50 MHz SDIO interface and SPI
- Full speed USB host and device
- Dual high speed UART
- Dual high speed I2C
- Multi-channel 10bit ADC
- Six 16-bits timer with PWM mode
- Clock signal output
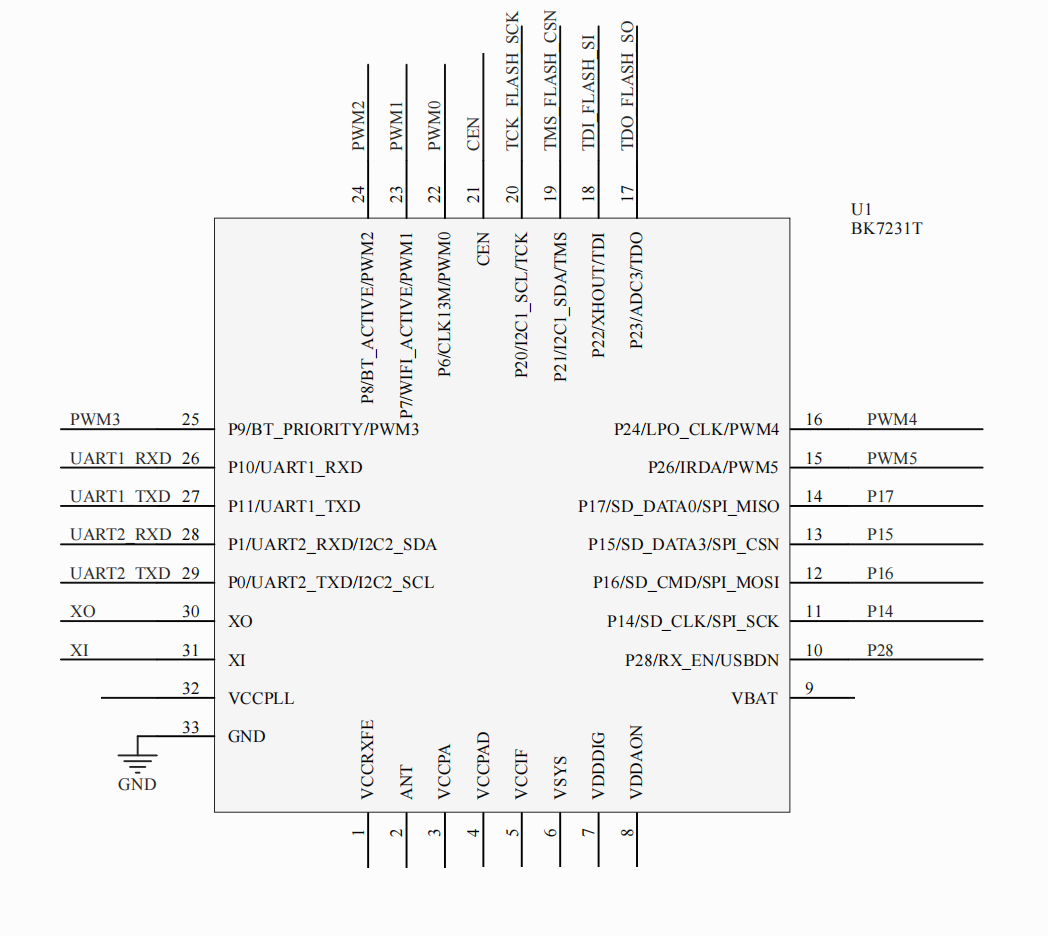
BK7231 QFN32 Pinout Here's the pinout of BK7231 microcontroller:
BK7231 pin table:
Pin Index
Role
1
VCCRXFE
2
ANT
3
VCCPA
4
VCCPAD
5
VCCIF
6
VSYS
7
VDDIG
8
VDDAON
9
VBAT
10
P28/RX_EN/USBDN
11
P14/SD_CLK_SPI_SCK
12
P16/SD_CMD/SPI_MOSI
13
P15/SD_DATA3/SPI_CSN
14
P17/SD_DATA0/SPI_MISO
15
P26/IRDA/PWM5
16
P24/LPO_CLK/PWM4
17
P23/ADC3/TDO
18
P22/XHOUT/TDI
19
P21/I2C1_SDA/TMS
20
P20/I2C1_SCL/TCK
21
CEN
22
P6/CLK13M/PWM0
23
P7/WIFI_ACTIVE/PWM1
24
P8/BT_ACTIVE/PWM2
25
P9/BT_PRIORITY/PWM3
26
P10/UART1_RXD
27
P11/UART1_TXD
28
P1/UART2_RXD/I2C2_SDA
29
P0/UART2_TXD/I2C2_SCL
30
XO
31
XI
32
VCCPLL
33
GND (bottom pad)
Some of more important BK7231 IO features has been highlighted in the following table:
Feature
Description
Used pins
UART1
Programming/TuyaMCU/BL0942 interface port
UART1_RXD is P10, UART1_TXD is P11
UART2
Debugging/log output interface port
UART2_RXD is P1, UART2_TXD is P0
I2C1
First hardware I2C interface
I2C1_SDA is P21, I2C1_SCL is P20
I2C2
Second hardware I2C interface
I2C2_SDA is P28, I2C2_SCL is P29
SPI Memory
SPI port for flashing in SPI mode
SCK is P20, CSN is P21, SI is P22, SO is P23
SPI Interface
Hardware SPI for interfacing peripherals
MISO is P17, CSN is P15, MOSI is P16, SCK is P14
BK7231 PWMs are widely used in RGBCW smart lighting. Here' s the BK7231 PWM mapping:
PWM
IO
PWM0
P6
PWM1
P7
PWM2
P8
PWM3
P9
PWM4
P26
PWM5
P24
BK7231T/BK7231N UART Programming BK7231 microcontroller comes with a preloaded UART bootloader in the 0x0 - 0x11000 flash memory section. Bootloader allows you to read and write the device flash memory by UART1 port.
Unlike in ESP8266/ESP8285 MCUs, there is no special pin used to enable bootloader mode. Bootloader is only enabled for a fraction of a second after device reboot.
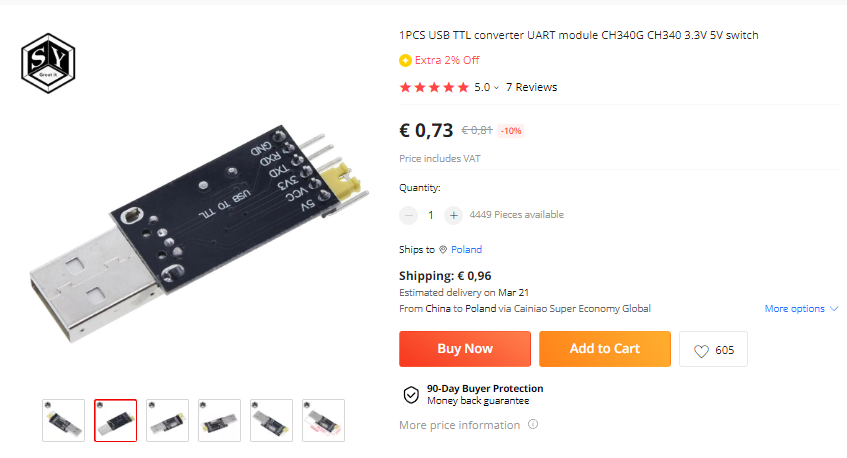
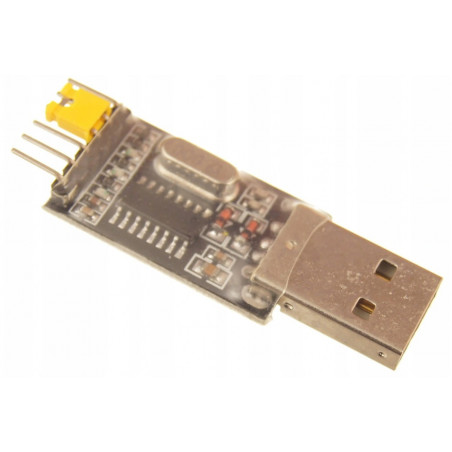
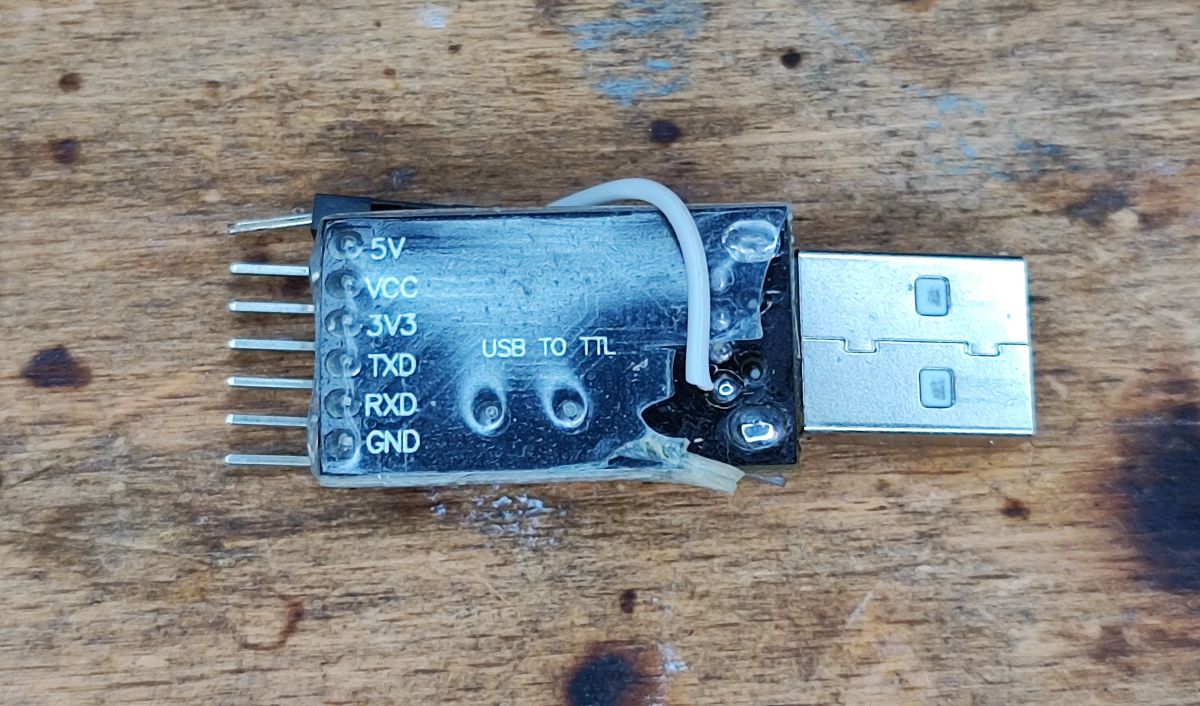
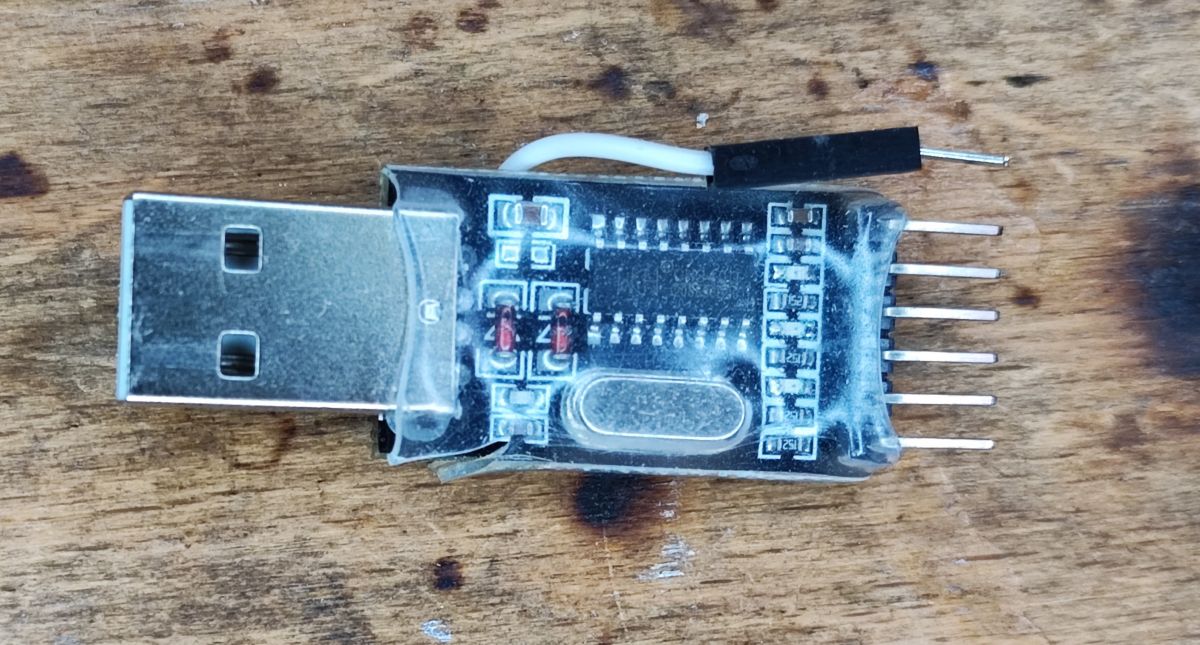
To use TTL UART with your computer, you will need a USB to UART converter that supports 3.3V voltage levels. There are many converters like that on the market, but the one used frequently by us is CH340G:
The programming procedure is the following:
1. connect TXD1, RXD1, VDD and GND. Use UART to USB converter with 3.3V levels
NOTE: As always with UART, RX of one side should connect to TX of the other side, etc. 2. Start flash operation in the chosen tool
3. Reboot device, there are 3 ways to do it:
a) reboot by disconnecting power and reconnecting it
b) reboot by shorting CEN (RESET signal) to ground
c) reboot from firmware (for example, OpenBeken web panel has a 'restart' button
4. Wait for flashing procedure to finish.
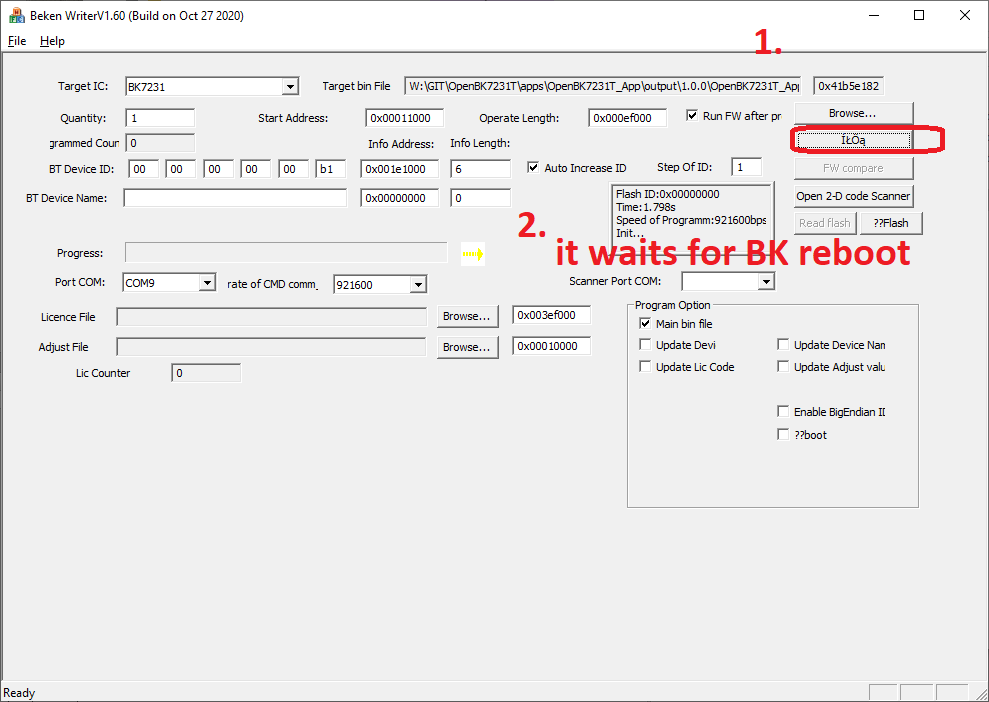
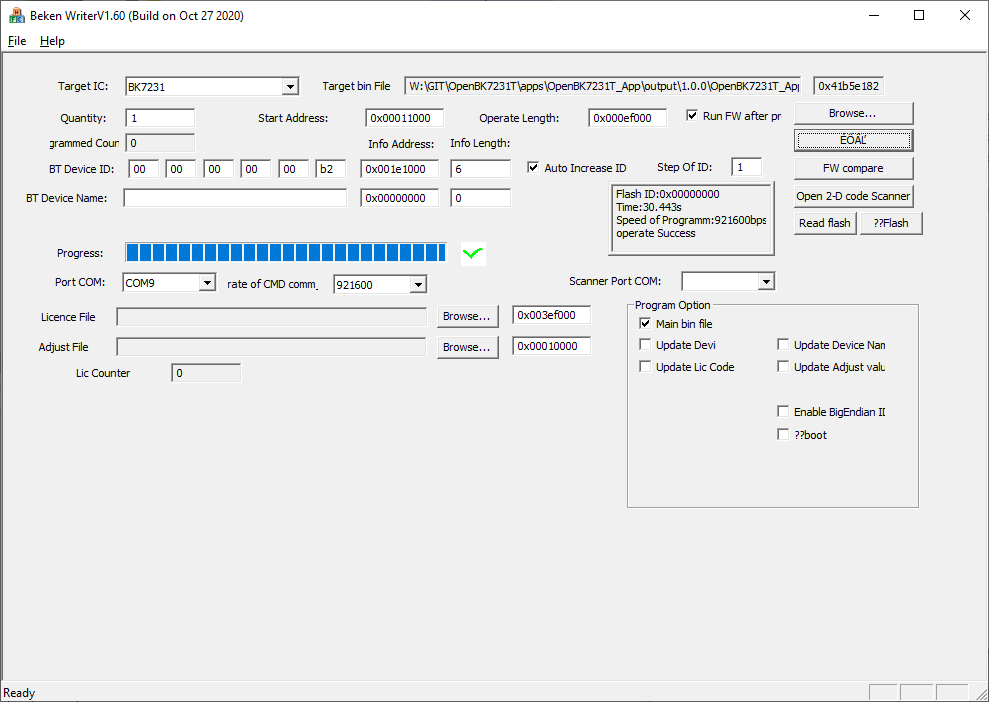
The preferred simple GUI tool for flashing BK7231T and BK7231N is BK7231 GUI Simple Flasher: https://github.com/openshwprojects/BK7231GUIFlashTool Scroll down to see full BK7231 GUI Flasher Guide! The old tool for Windows from Beken Corp is bkWriter 1.60: https://github.com/openshwprojects/OpenBK7231T/blob/master/bk_writer1.60.zip bkWriter 1.60 works well for BK7231T, but it may overwrite your bootloader if you try to write flash memory to address over 0x200000 because of address wrap. Still, it's safe to use it to write OpenBK7231T_UA_* file, as it's smaller than 2MB The current bkWriter 1.60 usage is following: flash UA (User Area) firmware to offset 0x11000 with operation length no longer than 0x001EF000 (0x00200000-0x00011000).
The BK Python tools (hid_download_py, both UART and SPI): https://github.com/OpenBekenIOT/hid_download_py hid_download_py is an old tool for BK7231N operations.
hid_download_py command for BK7231N reading flash (doing firmware backup):
You can program BK7231 both inside the circuit and outside the circuit.
Programming BK7231 inside the circuit may not be a perfect method, because some of the devices are using BK7231 RXD1/TXD1 (UART1) for TuyaMCU communication and it interferes with programming.
Also you should never attempt to program device that is connected to mains.
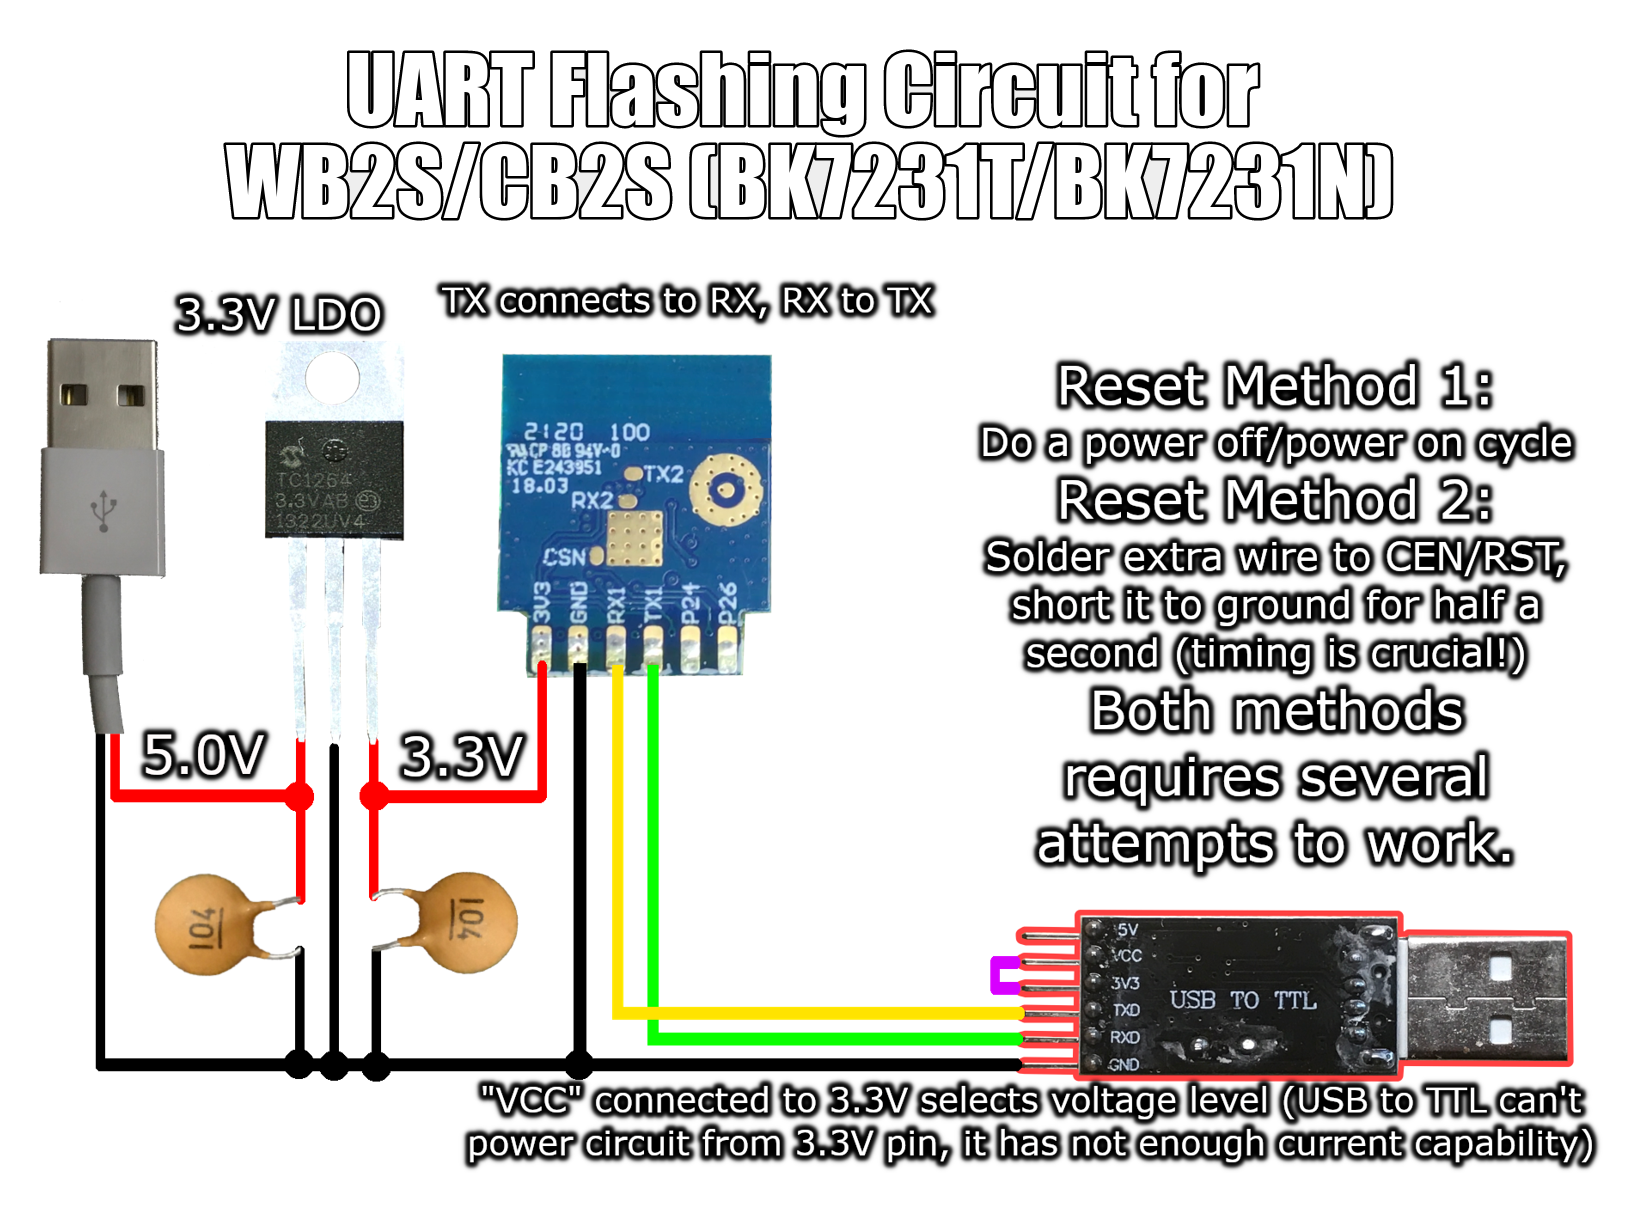
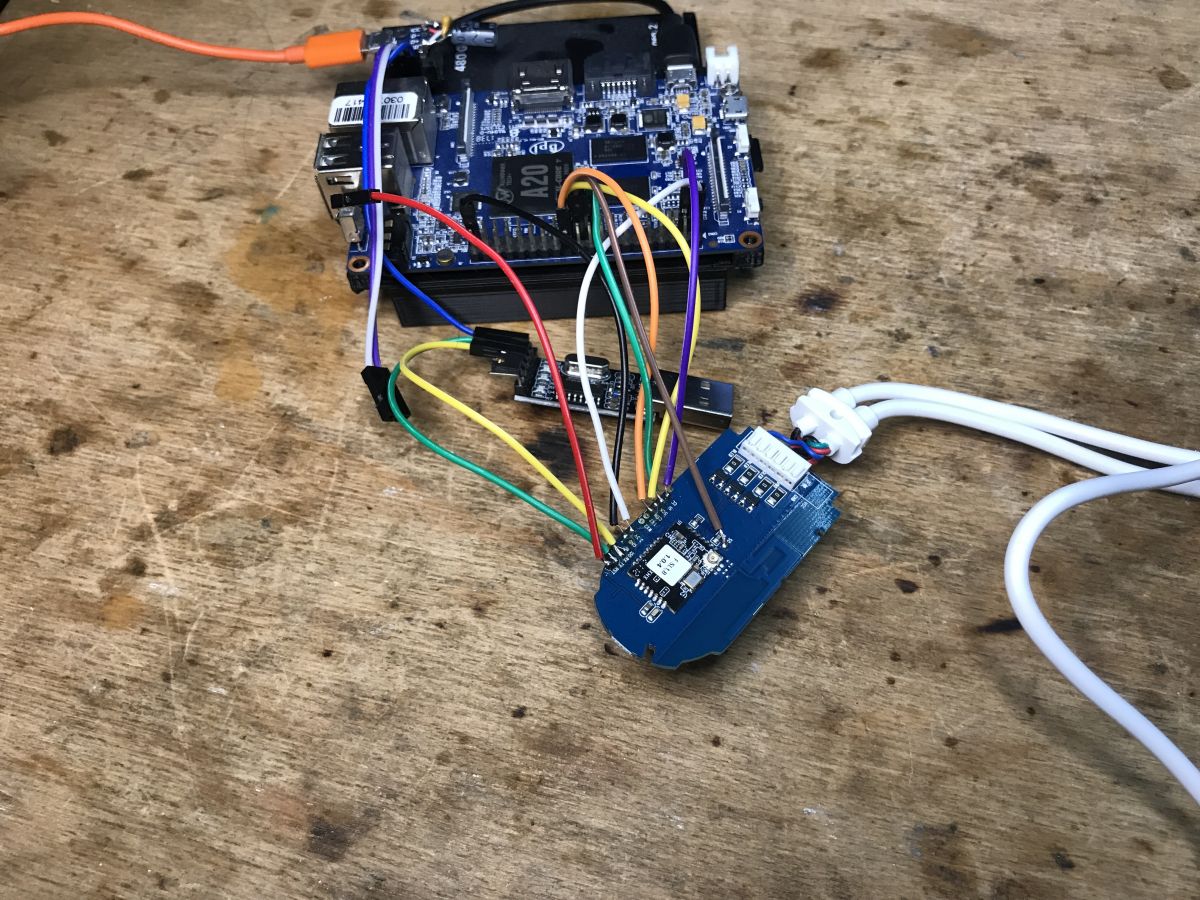
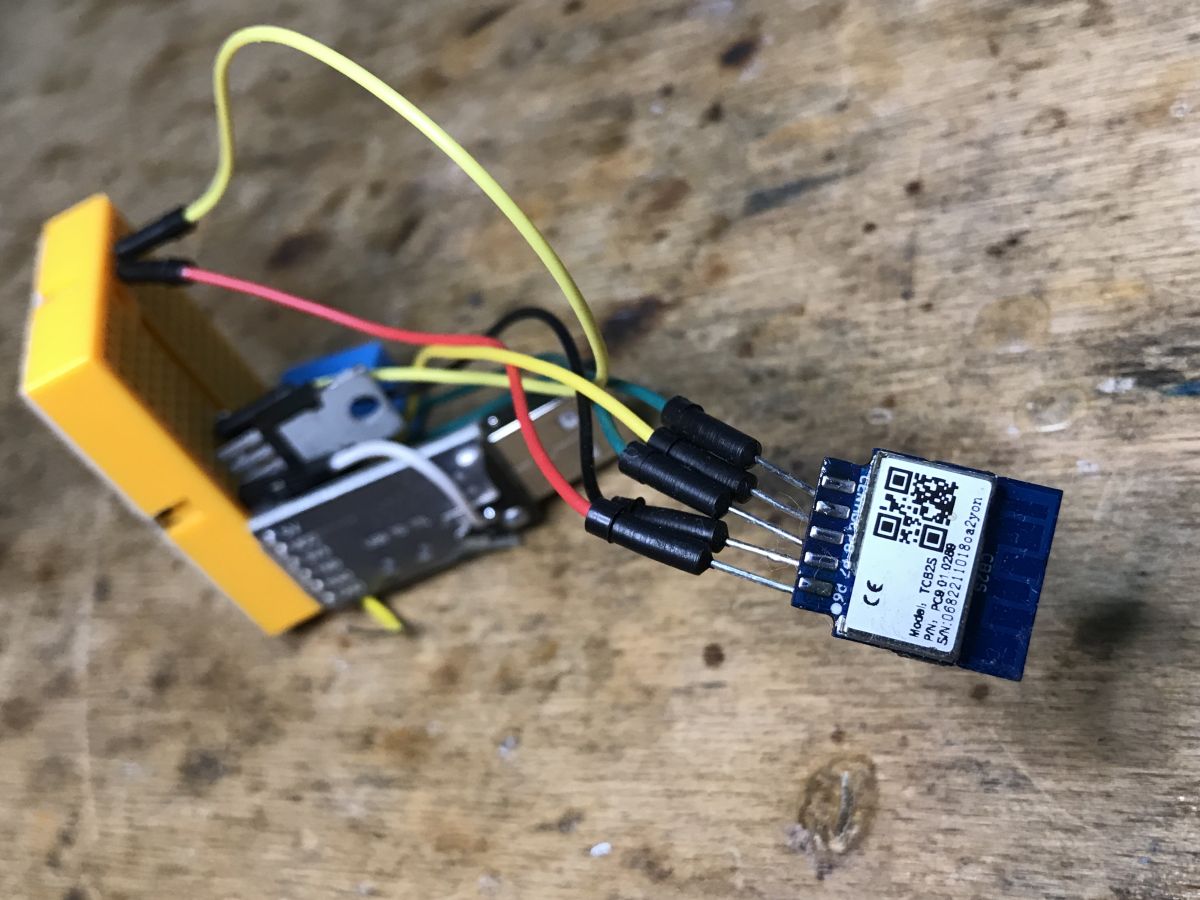
Example flashing circuit (flashing outside the PCB) CB2S/WB2S version:
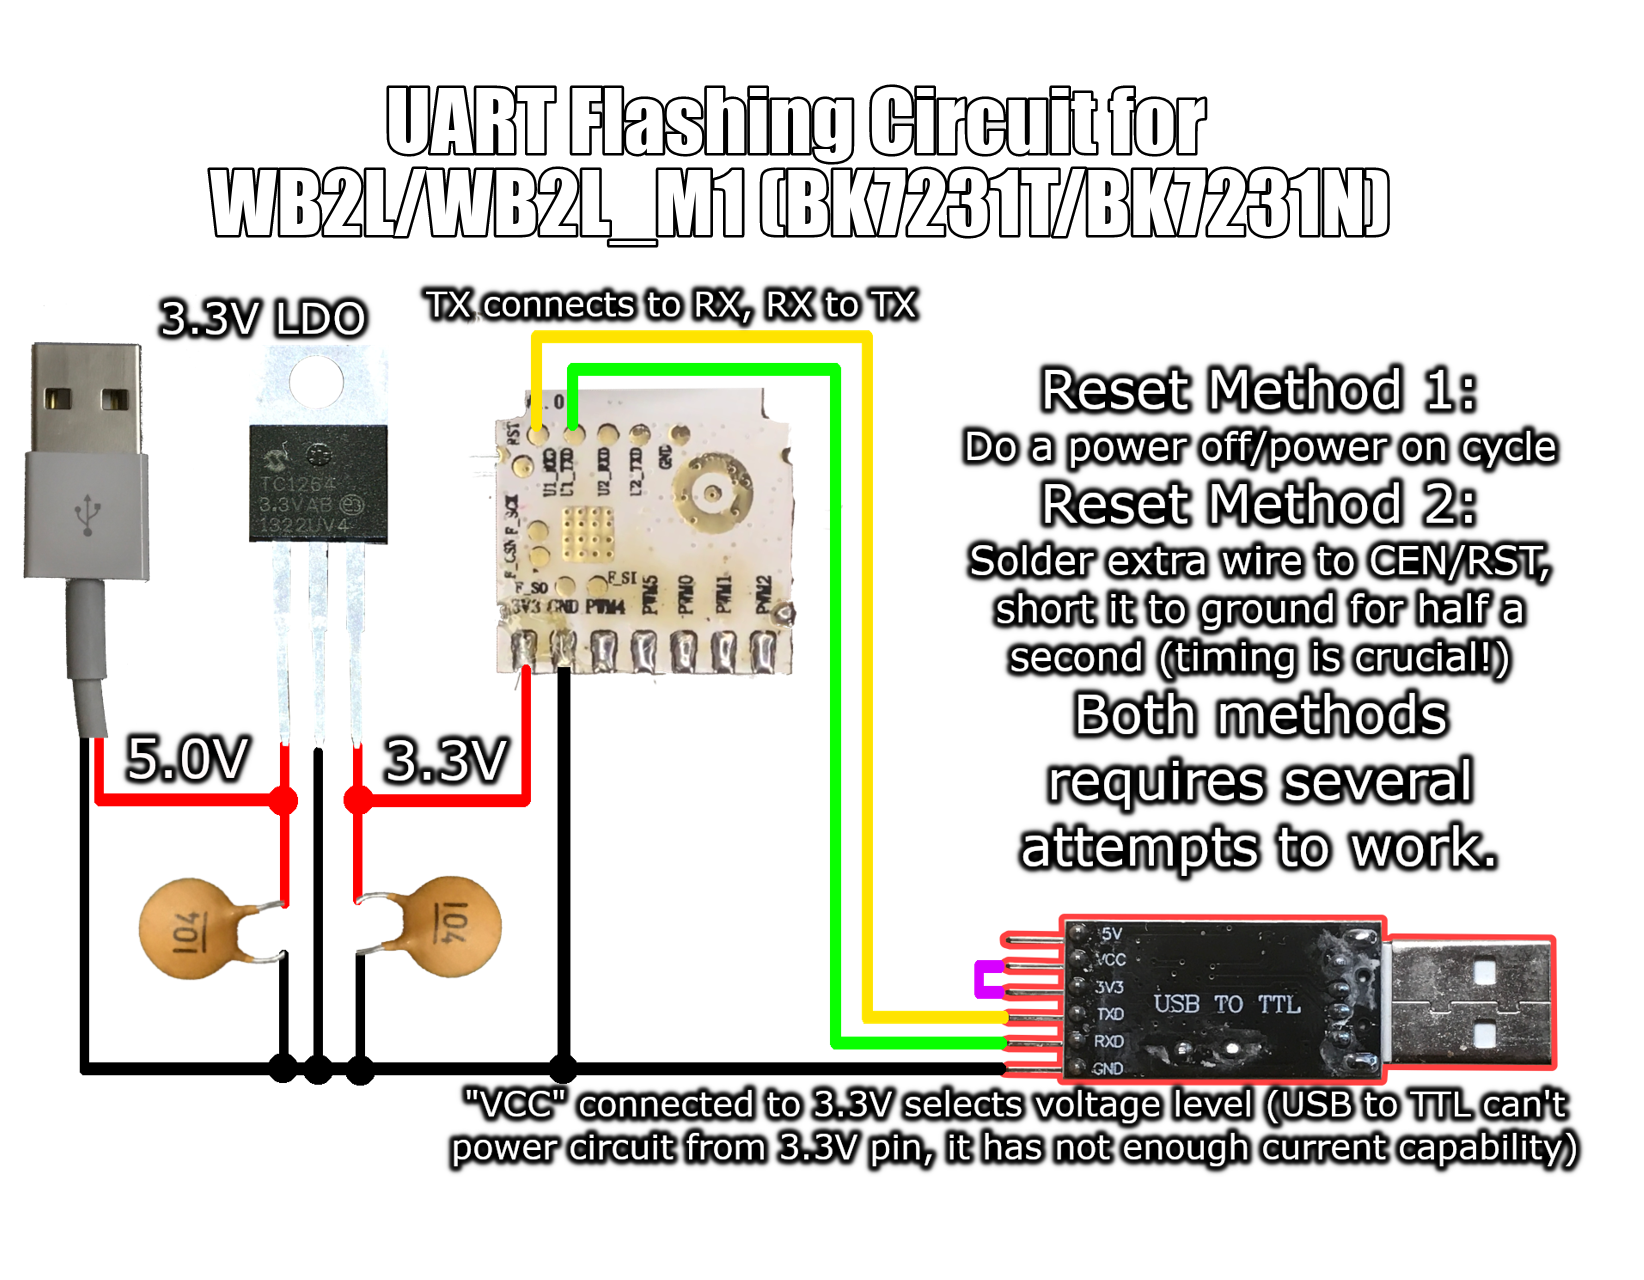
WB2L/WB2L_M1 (BK7231N) version:
WB3S example:
Entire circuit is powered by 3.3V and 5V would damage it.
Shorting those two pins select 3.3V voltage levels:
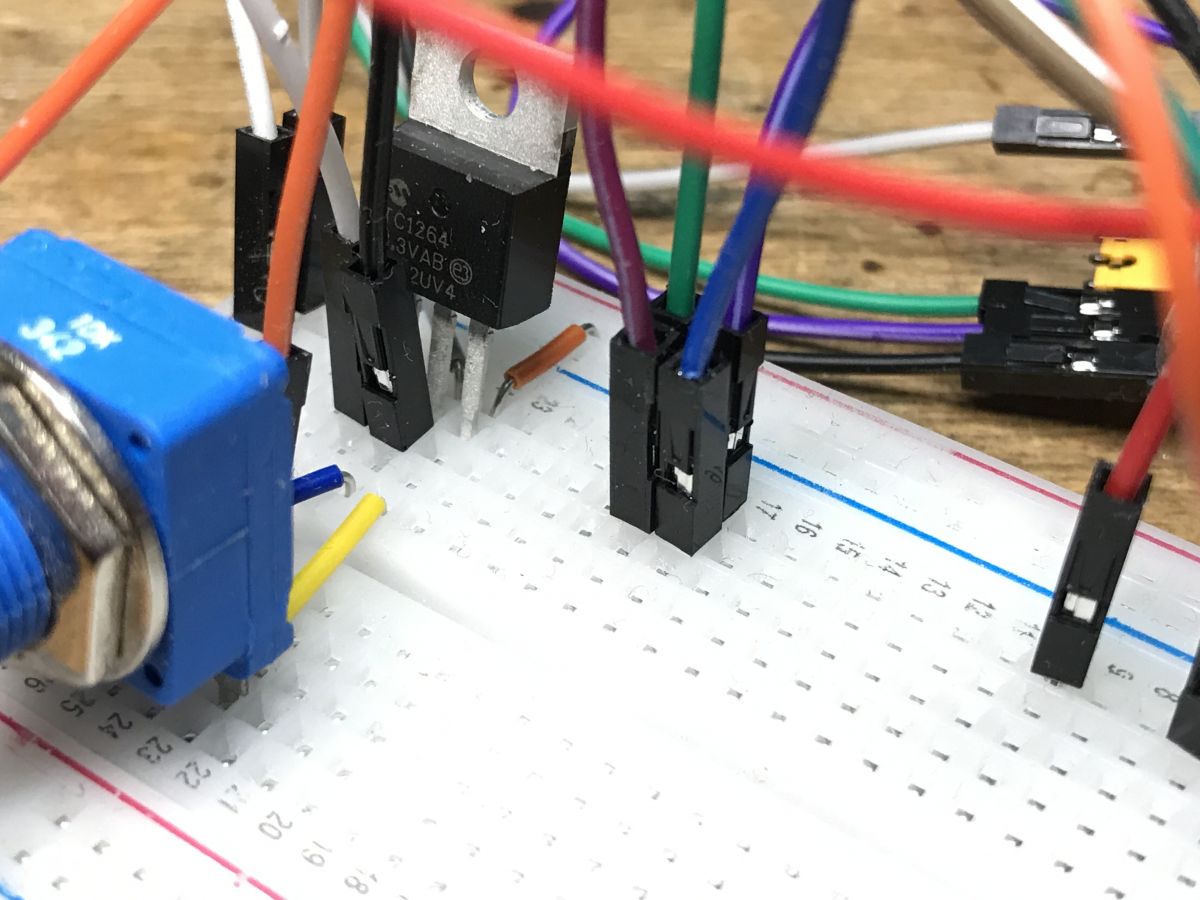
WARNING: You can't use USB to UART converter 5V/3.3V pins to power circuit. They are used to select voltage levels and don't have enough current capability. That's why we're using external LDO (TC1264 3.3V or AMS1117 3.3V)
WARNING: If you don't have external USB cable, you can get 5V directly from USB to UART converter USB socket pin, more about that later.
Reliable 5V from USB to UART converter trick The common CH340G USB to UART (TTL) converter can be very useful for programming BK7231 devices, but it's not able to power to BK7231 from it's 3.3V/5V pins. The 5V/VDD/3.3V pins on the converter are used only to select voltage levels, they can't supply enough current to power the WiFi module.
That's why our common approach is to break out a 5V directly from USB port, by soldering an extra cable to USB connector 5V pin:
Later we can connect that cable to the input of 3.3V LDO regulator and get 3.3V for BK.
BK7231 GUI Simple Flasher Usage BK7231 GUI Flasher is very simple to use, it can even download latest OBK build automatically. Here's a detailed step by step guide:
1. Download and unpack executable from Releases tab 2. Prepare programming circuit for BK7231 (both T and N)
- get a USB to UART bridge with 3.3V voltage signals
- connect the Bridge RX to Module TXD1, and Bridge TX to Module RXD1
- if you want to use CEN RESET method, solder wire to CEN
- power the device from either the bridge or an external power source. All Beken based modules require 3.3v.
⚠️ NEVER try hacking devices while connected to mains power!
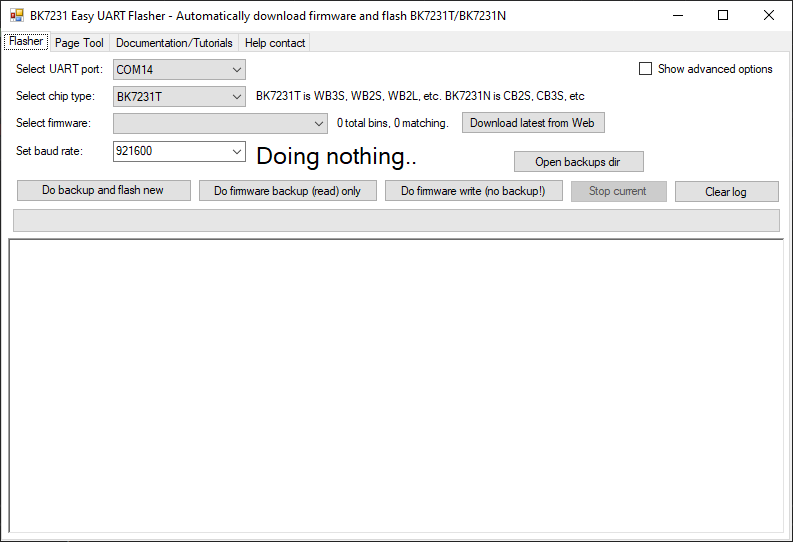
3. Open our flasher:
4. Select proper platform - BK7231T or BK7231N
5. Select your COM port of USB to UART converter
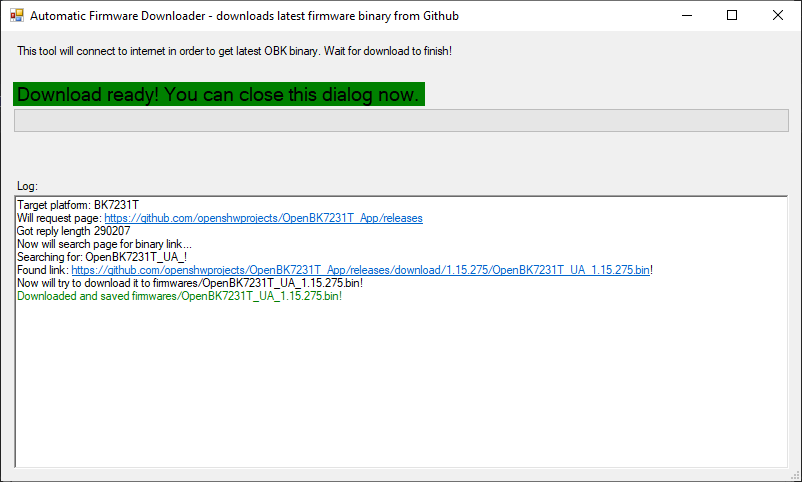
6. Click "Download latest from Web" to get proper binary file
7. Wait for download to finish
8. Close download window
9. Click "Backup and flash new"
10. When the log window is waiting for "Getting bus", do a device reboot. You can do this in two ways, choose one:
- Option A: short CEN to GND for 0.25s (it is tricky to get this right, requires precise timing)
- Option B: power off and on device (of course, it should not be connected to mains, use your own safe 3.3V power supply that can supply enough current)
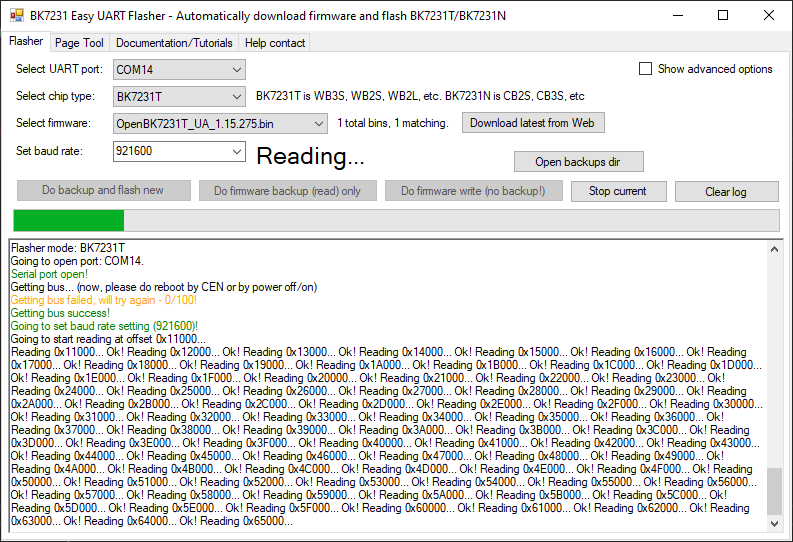
11. It will begin reading (it does first backup, then write)
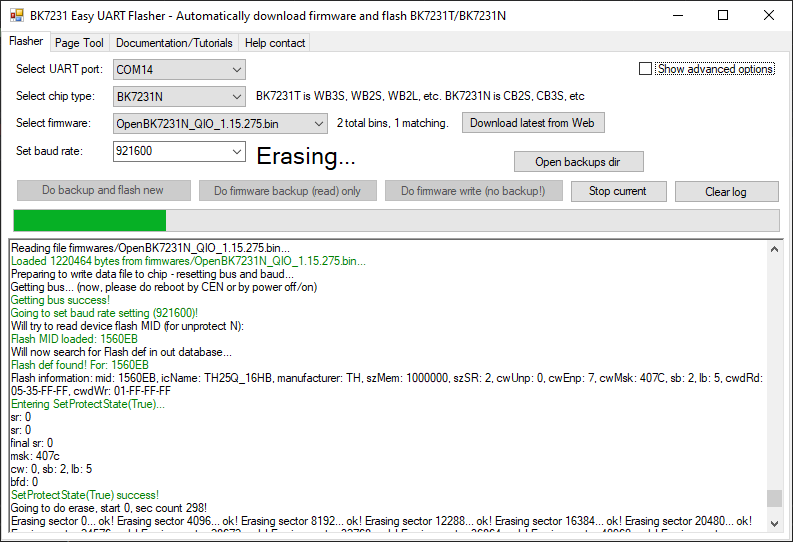
12. After reading, it will start the new firmware erase
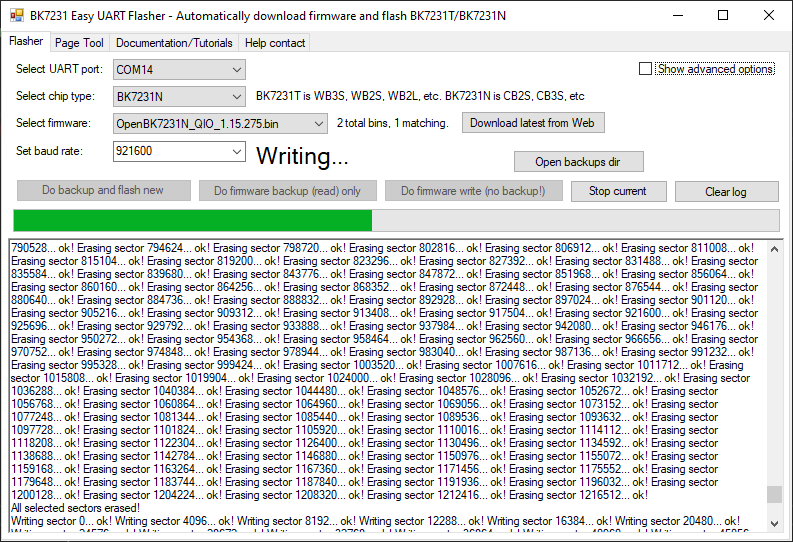
13. And then, automatically, write:
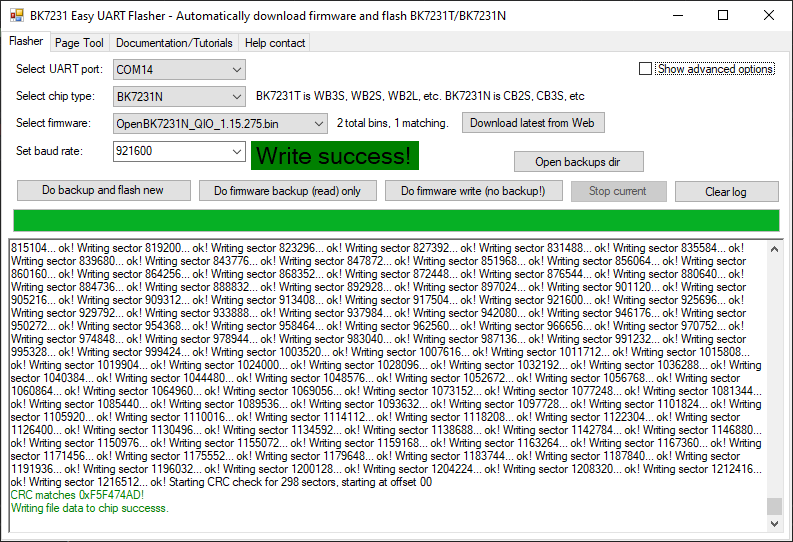
14. Done:
15. Firmware access point show appear now. Connect to it and enter 192.168.4.1 configuration page.
16. Remember that saved firmware backup is in the "backups" dir
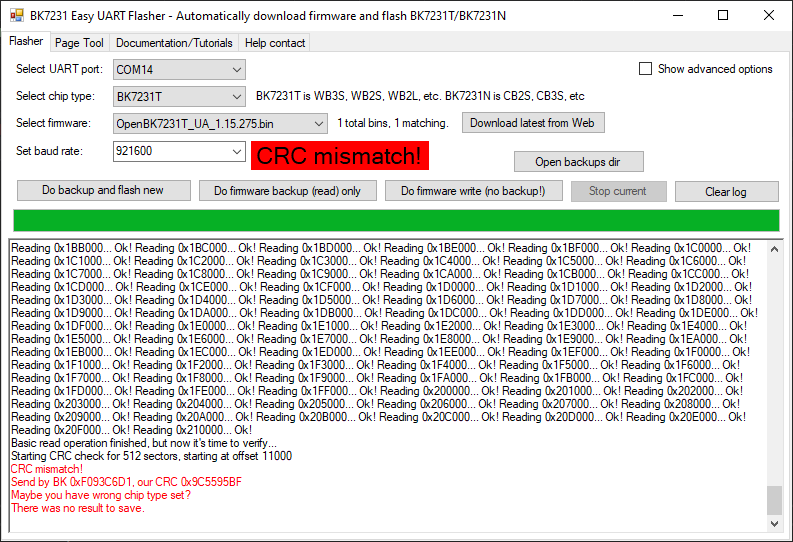
NOTE: If you're getting CRC mismatch, then it means you've selected from platform (T instead or N, or vice versa):
BK7231 T & N binary files classification Tuya/Beken toolset produces various binary files for a single BK build. Here are they respective meanings:
After the chip of this module model is compiled, the following types of .bin files are generated:
- OpenBK7231T_1.15.341.rbl - OTA update (useful for OpenBeken web panel)
- OpenBK7231T_UA_1.15.341.bin - user area firmware (no bootloader; flash it at 0x11000)
- OpenBK7231T_QIO_1.15.341.bin - bootloader + user area firmware (flash it at 0x0)
- OpenBK7231T_UG_1.15.341.bin - update area firmware (not used in OpenBeken, but useful for OTA hack)
The notation is similar for both T and N.
NOTE: OpenBeken flashing guide recommends using _UA_ for T platform at 0x11000 offset and _QIO_ for N platform at 0x0 offset.
BK7231 Memory Layout/Partitions Here's the memory layout used by Tuya.
BK7231T:
Name
Code
Start
Length
Bootloader
BK_PARTITION_BOOTLOADER
0x00000000
0x11000 //68KB
Application
BK_PARTITION_APPLICATION
0x11000
0x121000//1156KB
ota
BK_PARTITION_OTA
0x132000
0x96000, //600KB
RF Firmware
BK_PARTITION_RF_FIRMWARE
0x1e0000
0x1000
NET info
BK_PARTITION_NET_PARAM
0x1e1000
0x1000
BK7231N:
Name
Code
Start
Length
Bootloader
BK_PARTITION_BOOTLOADER
0x00000000
0x11000 //68KB
Application
BK_PARTITION_APPLICATION
0x11000
0x121000//1156KB
ota
BK_PARTITION_OTA
0x12A000
0xA6000 //664KB
RF Firmware
BK_PARTITION_RF_FIRMWARE
0x1D0000
0x1000
NET info
BK_PARTITION_NET_PARAM
0x1D1000
0x1000
Bootloader and Application partitions should be self-explanatory; the UART programming will not work if bootloader partition is overwritten. The OTA partition is used to store pending update (RBL data) that will be unpacked and executed with next reboot (it will be unpacked into Application partition).
NET Info partition is a generic data partition with a key-value system used to store SSID, etc, it is overwritten in OpenBeken with our own structures. RF Firmware/calibration partition stores RF calibration data and MAC address.
NOTE: BK_PARTITION_NET_PARAM partition can be decoded and read on any BK device with a simple UART programmer, so your SSID and password may be leaked if you throw out used IoT device.
There are also some undocumented partitions in the code, for example a quick reconnect block data for WiFi were stored in N SDK at the hardcoded address.
BK7231N generic memory mapping:
Name/Access
Start
Length
flash (rx)
ORIGIN = 0x00010000
LENGTH = 2M - 64k
tcm (rw!x)
ORIGIN = 0x003F0000
LENGTH = 60k - 512
itcm (rwx)
ORIGIN = 0X003FEE00
LENGTH = 4608
ram (rw!x)
ORIGIN = 0x00400100
LENGTH = 192k - 0x100
NOTE: TCM=Tightly-Coupled Memory, ICTM = Instruction Tightly-Coupled Memory
The ITCM section is used for timing-critical functions which are executed from RAM memory. This means there is no extra random delays caused by fetching instructions from flash. Doing a precise bitbang drivers won't work when a function is stored in flash.
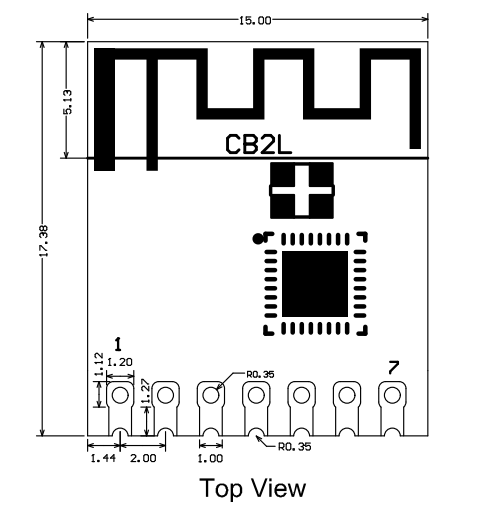
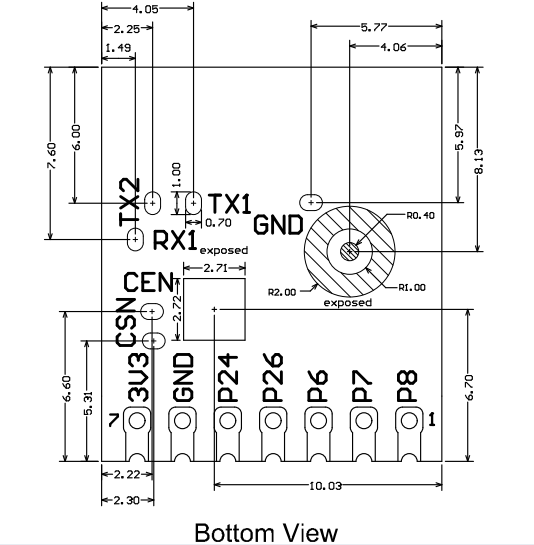
BK7231T/BK7231N Modules BK7231 comes in form of various Tuya modules. Some of the modules have a generic usage, and some of them are dedicated for certain IoT applications, like WB2L/CB2L which is dedicated for LED driving (it has only PWM IOs available).
Tuya is using a standardized format of module names:
- WBXX modules (WB2L, WB2S, etc) are using BK7231T
- CBXX modules (CB2L, CB2S, etc) are using BK7231N.
Let's see the most common Beken modules:
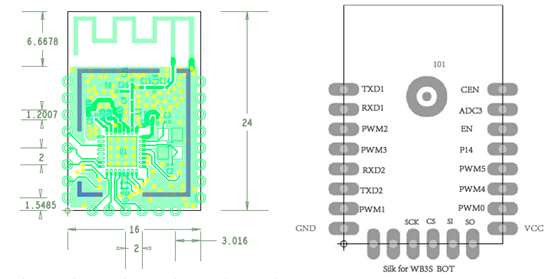
- WB3S (BK7231T):
WB3S pinout is visible on the image.
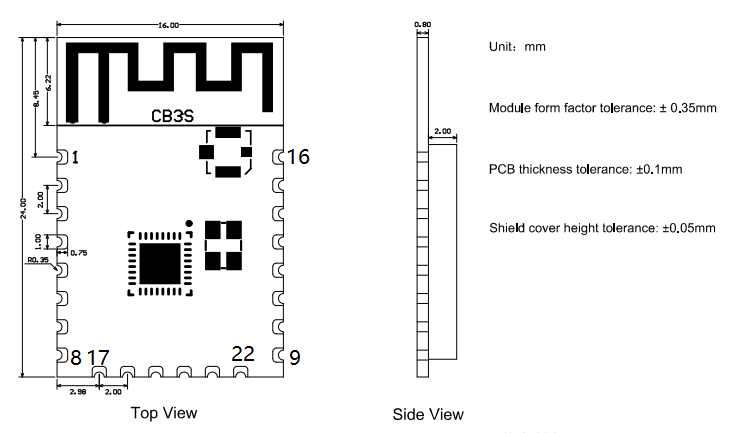
- CB3S (BK7231N)
CB3S Pinout (click to show spoiler):
Spoiler:
Pin number
Symbol
I/O type
Function
1
RST
I
Low-level reset, high level active (the pin has been pulled high internally), correspond to CEN of the IC
2
ADC3
AI
ADC pin, which corresponds to P23 of the IC
3
CEN
I
Enabling pin, which is pulled high internally to be compatible with other modules
4
P14
I/O
A common GPIO interface, which corresponds to P14 of the IC
5
P26
I/O
GPIOP_26, which corresponds to P26 of the IC, PWM 5
6
P24
I/O
GPIOP_24, which corresponds to P24 of the IC, PWM 4
7
P6
I/O
GPIOP_6, which corresponds to P6 of the IC, PWM 0
8
VCC
P
Power supply pin (3.3V)
9
GND
P
Power supply reference ground
10
P9
I/O
GPIOP_9, which corresponds to P9 of the IC, PWM 3
11
TXD2
I/O
UART2_TXD (used to display the module internal information), which corresponds to P0 of the IC
12
CSN
I/O
Production test control pin. If it is used as a common I/O pin, it must be connected to the VCC externally. Do not connect it to the ground before the module is powered on.
13
P8
I/O
GPIOP_8, which corresponds to P8 of the IC, PWM 2
14
P7
I/O
GPIOP_7, which corresponds to P7 of the IC, PWM 1
15
RXD1
I/O
UART1_RXD (user serial interface), which corresponds to P10 of the IC. Do not connect it to the VCC. By default, the MCU serial port should be in low-level or high-impedance state.
16
TXD1
I/O
UART1_TXD (user serial interface), which corresponds to P11 of the IC. Do not connect it to the VCC. By default, the MCU serial port should be in low-level or high-impedance state.
17
ADC3
AI
(Not recommended. If needed, please use Pin 2) ADC port, which corresponds to P23 of the IC. Programmed SPI
18
P22
I/O
(Not recommended ) GPIOP_22, which corresponds to P22 of the IC. Programmed SPI
19
CSN
I/O
The pull-up resistor is needed during usage of customers. Do not connect it to the ground before the module is powered on. Correspond to P21 of the IC.
20
P20
I/O
(Not recommended. ) GPIOP_20, which corresponds to P20 of the IC. Programmed SPI
21
NC
-
-
22
NC
-
-
WB3S and CB3S have similar pinout to TYWE3S/ESP12 - WB2S (BK7231T):
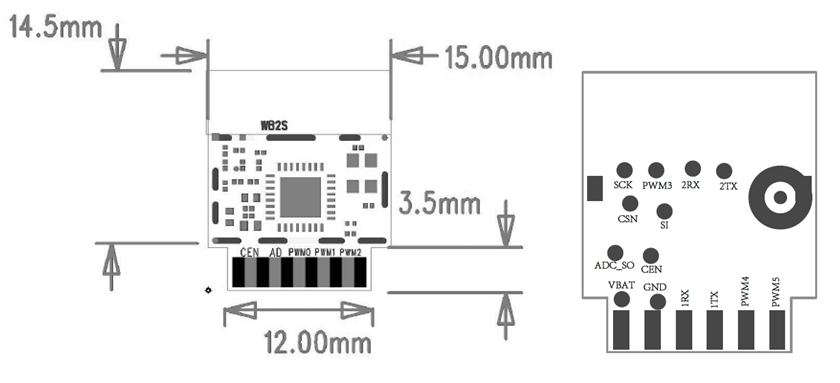
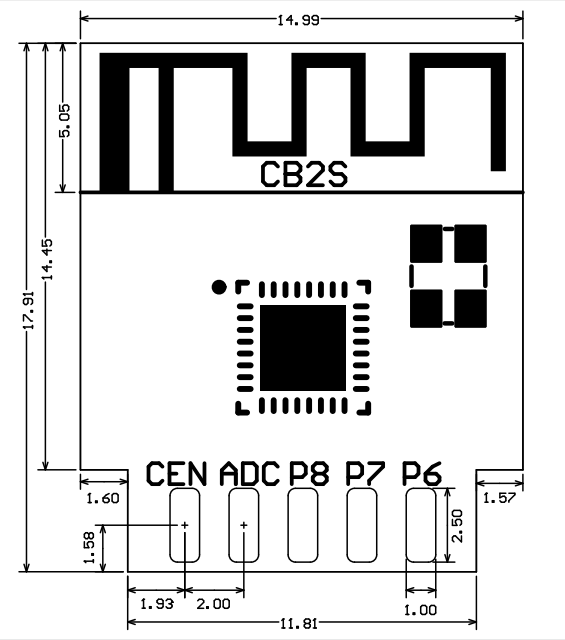
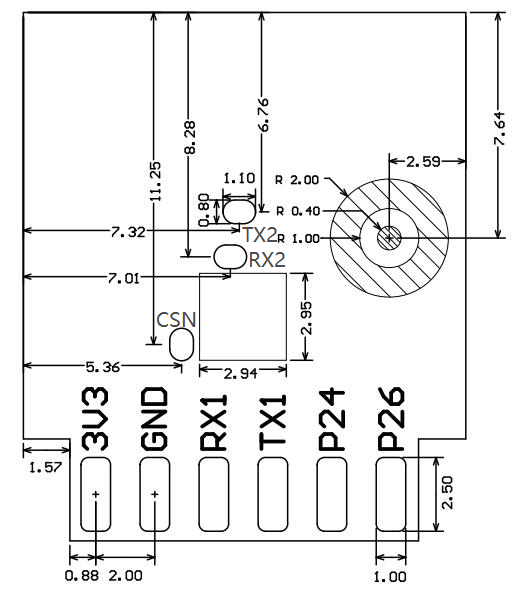
- CB2S (BK7231N):
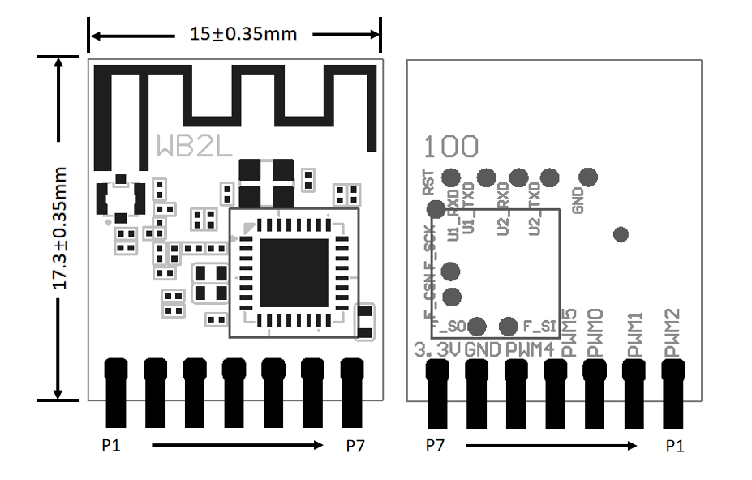
CB2S and WB2S have similar pinout to TYWE2S, etc - WB2L (BK7231T):
NOTE: The UART1 is available only on the back of the module, which is often covered by the PCB. This can be problematic when you want to program new firmware, you might need to use method shown here.
NOTE: There is also a BK7231N version called WB2L_M1.
- CB2L (BK7231N):
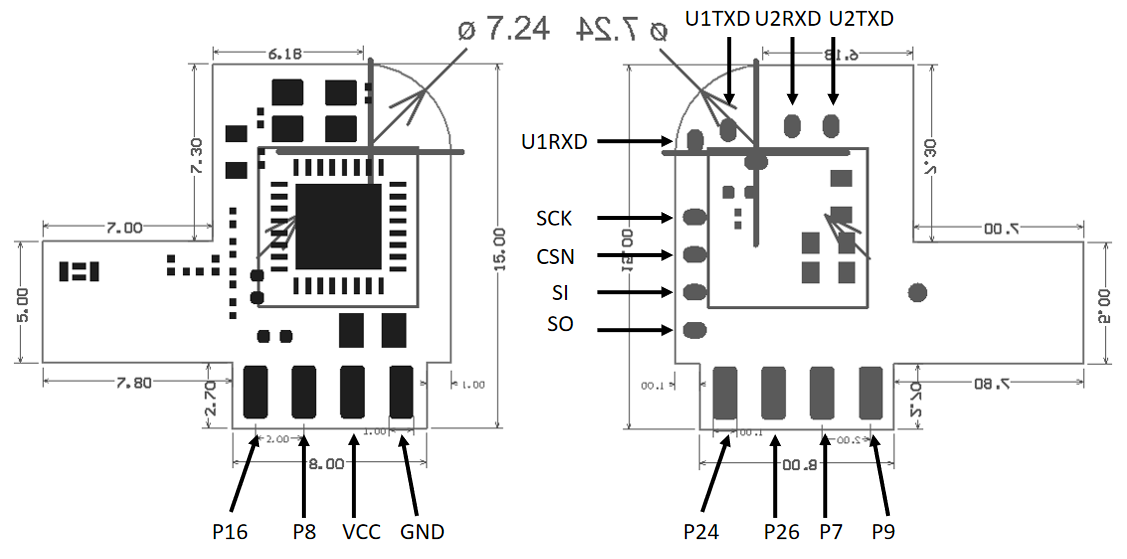
CB2L and WB2L are used mostly in LED lighting, they have only PWM IOs available. - WBLC9 (BK7231T):
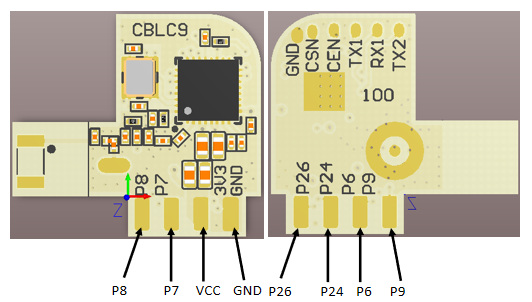
- CBLC9 (BK7231N)
CBLC9 and WBLC9 are also often used in LED bulbs due to their small form factor.
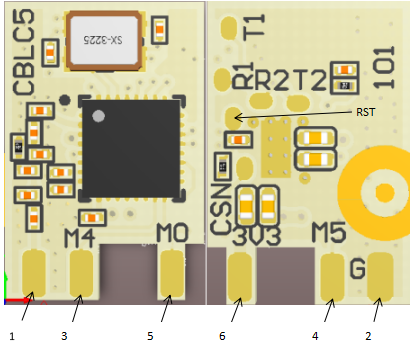
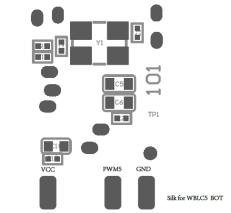
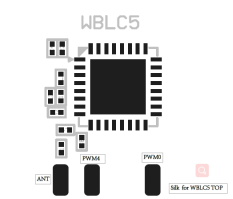
- CBLC5 (BK7231N):
CBLC5 pinout:
Symbol
I/O type
Function
ANT
O
Pad pin for the external antenna
GND
P
Ground pin
M4
I/O
Support hardware PWM and correspond to PA 24 on the internal IC
M5
I/O
Support hardware PWM and correspond to PA 26 on the internal IC
M0
I/O
Support hardware PWM and correspond to PA 6 on the internal IC
3V3
P
Power supply pin
CBLC5 test pads:
Symbol
I/O type
Function
R2
I/O
UART2_RX, LOG RX, which corresponds to P1 on the internal IC
T2
I/O
UART2_TX, LOG TX, which corresponds to P0 on the internal IC
R1
I/O
UART1_RX, user serial interface RX, which corresponds to P10 on the internal IC
T1
I/O
UART1_TX, user serial interface TX, which corresponds to P11 on the internal IC
CSN
I
If connected to the ground before powered on, enter the RF test mode. If not connected or connected to VCC before powered on, enter the firmware application mode.
None
I
RST pin, which corresponds to CEN on the internal IC
- WBLC5 (BK7231T)
WBLC5 test pads are not described on the image above but you can look at the CBLC5 specs.
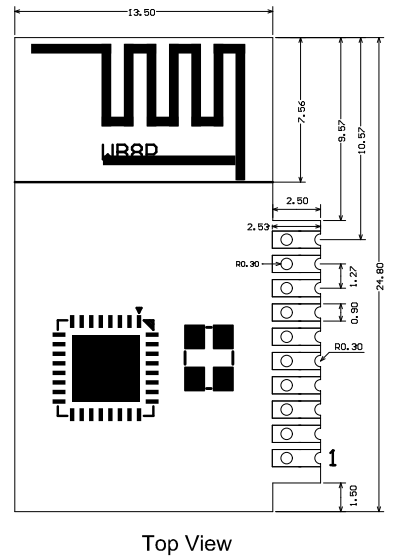
- WB8P (BK7231T), another one with only PWM pads accessible:
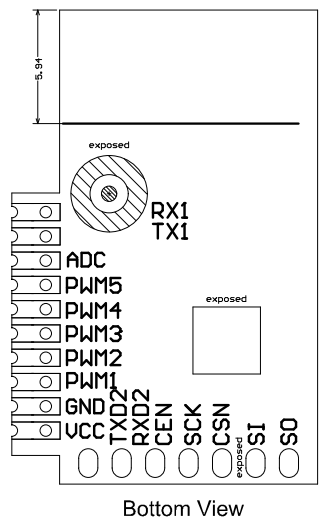
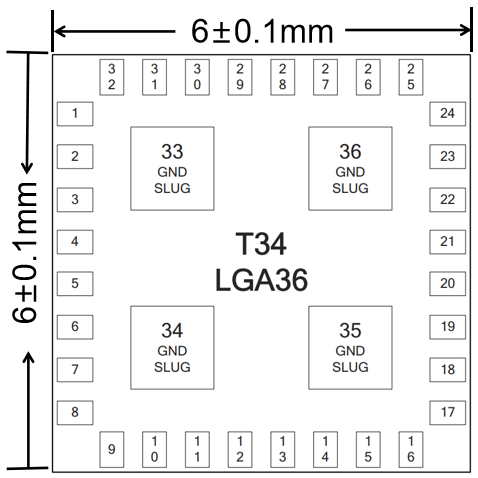
T34 integrated BK7231N module T34 is basically a BK7231N SoC integrated with a crystal, an RF matching circuit and most of the peripheral devices within a single LGA 6x6 36-pin package. The T34 dimensions are 6±0.1 mm (W)×6±0.1 mm (L) ×0.85±0.1 mm (H).
T34 pin definitions:
Spoiler:
Pin number
Symbol
Type
Function
1, 3, 32, 33, 34, 35, and 36
GND
P
Ground 33, 34, 35, and 36 are ground pads at the back of the chip.
2
ANT
I/O
External antenna with 2.4 GHz RF output/input
4 and 5
VCCPA
P
RF PA power input, voltage is 3.0 to 3.6V, 3.3V recommended
6
VDDDIG
O
Digital power output, the voltage is about 1.2V
7
VDDAON
O
Always open power output, the voltage is 1.2V
8
VBAT
I
Chip main-power input, voltage is 3.0 to 3.6V, 3.3 V recommended
9
CEN
I
Enable end of a chip, high effective
10
P28/ADC4/RXEN
I/O
A universal I/O port, ADC4 or set high during receiving of RF
11
P14/SD_CLK/SCK/ANT0
I/O
A universal I/O port, CLK of SD, SCK of SPI, or ANT0 controlled by the Bluetooth LE antenna
12
P16/SD_CMD/MOSI/ANT2
I/O
A universal I/O port, CMD of SD, MOSI of SPI, or ANT2 controlled by the Bluetooth LE antenna
13
P15/CSN/ANT1
I/O
A universal I/O port, CSN of SPI, or ANT1 controlled by the Bluetooth LE antenna
14
P17/SD_D0/MISO/ANT3
I/O
A universal I/O port, D 0 of SD, MISO of SPI, or ANT 3 controlled by the Bluetooth LE antenna
15
P26/ADC1/IRDA/PWM5
I/O
A universal I/O port, ADC 1, infrared receiving or PWM5
16
P24/ADC2/LPO_CLK/PWM4
I/O
A universal I/O port, ADC2, low-power clock 32.768KB output, or PWM 4
17
P23/ADC3/TDO/F_SO
I/O
A universal I/O port, ADC3, TDO of JTAG or data output during the download of flash with SPI
18
P22/ADC5/CLK_26M/TDI/TXEN/F_SI
I/O
A universal I/O port, ADC 5, crystal frequency output, TDI of JTAG, set high during RF transmission, or data input during the download of flash
19
P21/ADC6/I2C1_SDA/TMS/F_CSN
I/O
P21 is the mode selection pin. When it is set to low level, it means entering the RF test mode.
20
P20/I2C1_SCL/TCK/F_SCK
I/O
A universal I/O port, SCL of I2C1, TCK of JTAG, or clock during the download of flash during SPI
21
P6/ CLK13M/PWM0
I/O
A universal I/O port, 1, 2, 4, and 8 frequency division output of crystal clock, or PWM0
22
P7/WIFI_ACT/PWM1
I/O
A universal I/O port or WIFI_ACTIVE coexisting with Wi-Fi and BT, or PWM1
23
P8/BT_ACT/PWM2
I/O
A universal I/O port, BT_ACTIVE coexisting with Wi-Fi and BT, or PWM 2
24
P9/BT_PRIORITY/PWM3
I/O
A universal I/O port, BT_PRIORITY coexisting with Wi-Fi and BT, or PWM 3
25
P10/DL_RX/UART1_RXD
I/O
A universal I/O port, RXD of UART for downloading flash, RXD of the serial UART1
26
P11/DL_TX/UART1_TXD
I/O
A universal I/O port, TXD of UART for downloading flash, TXD of the serial UART1
27
P1/UART2_RXD/I2C2_SDA
I/O
A universal I/O port, RXD of a serial port UART 2, or SDA of I2C2 P1 is used for self-calibration.
28
P0/UART2_TXD/I2C2_SCL
I/O
A universal I/O port, TXD of a serial port UART 2, or SCL of I2C2
29
XI
I
T34 has the built-in crystal, no need to be connected externally
30
XO
O
T34 has the built-in crystal, no need to be connected externally
31
VSYS
O
System power output The voltage is about 2.7 to 3.0V.
T34 schematic diagram:
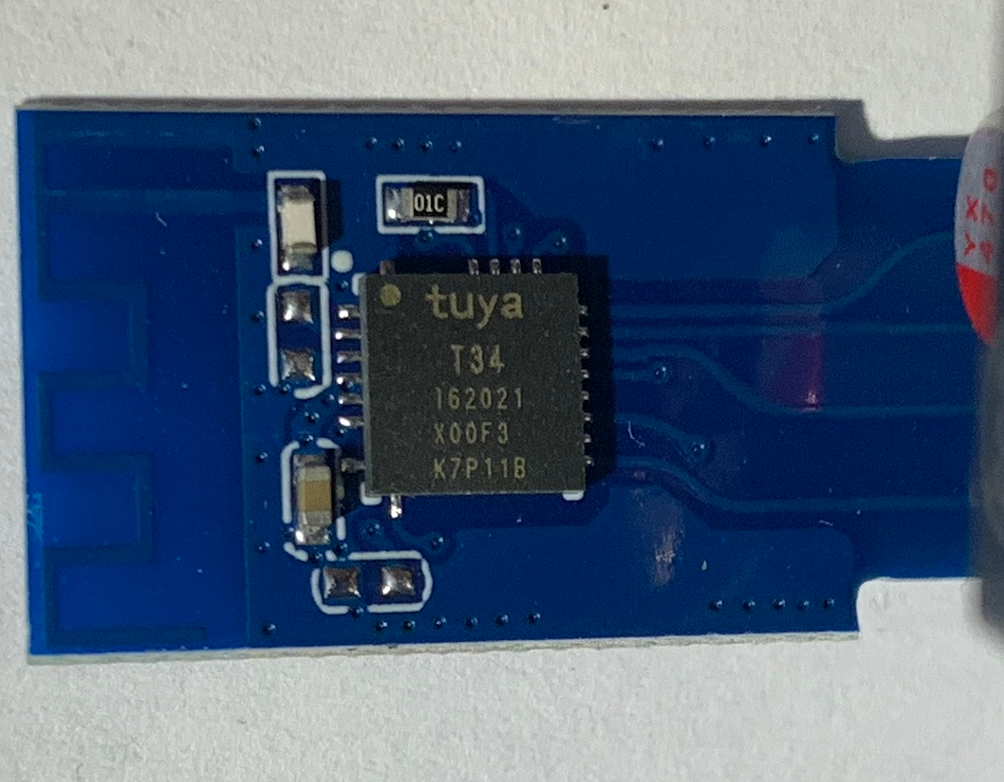
Here's a real photo of T34 SoC:
Replacing BK module with ESP While it's not recommended, because there is already a mature open source firmware for this platform, it's still worth noting that WB/CB modules have usually pinout similar to the TYWE modules, etc. For example, WB3S can be replaced with TYWE3S (ESP12) and WB2S can be replaced by TYWE2S and similar.
Please consult this generic guide for more information on so-called "brain transplant" procedure:
Replacing the WiFi module with ESP12F (ESP8266) in a smart / tuya device Article above refers to the XR809/XR3 IoT module, but the procedure would be similar for WB3S/CB3S, etc.
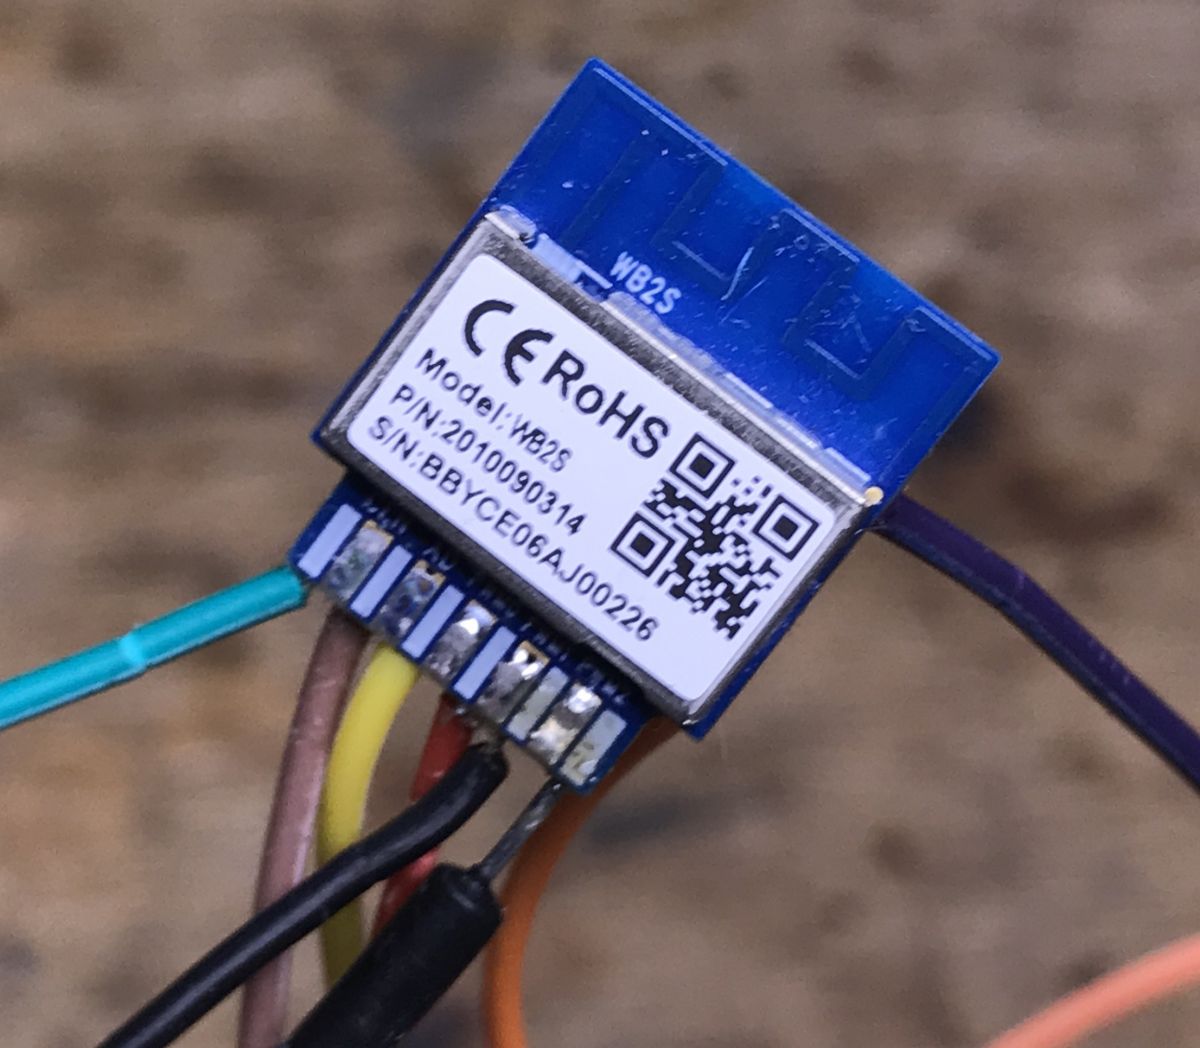
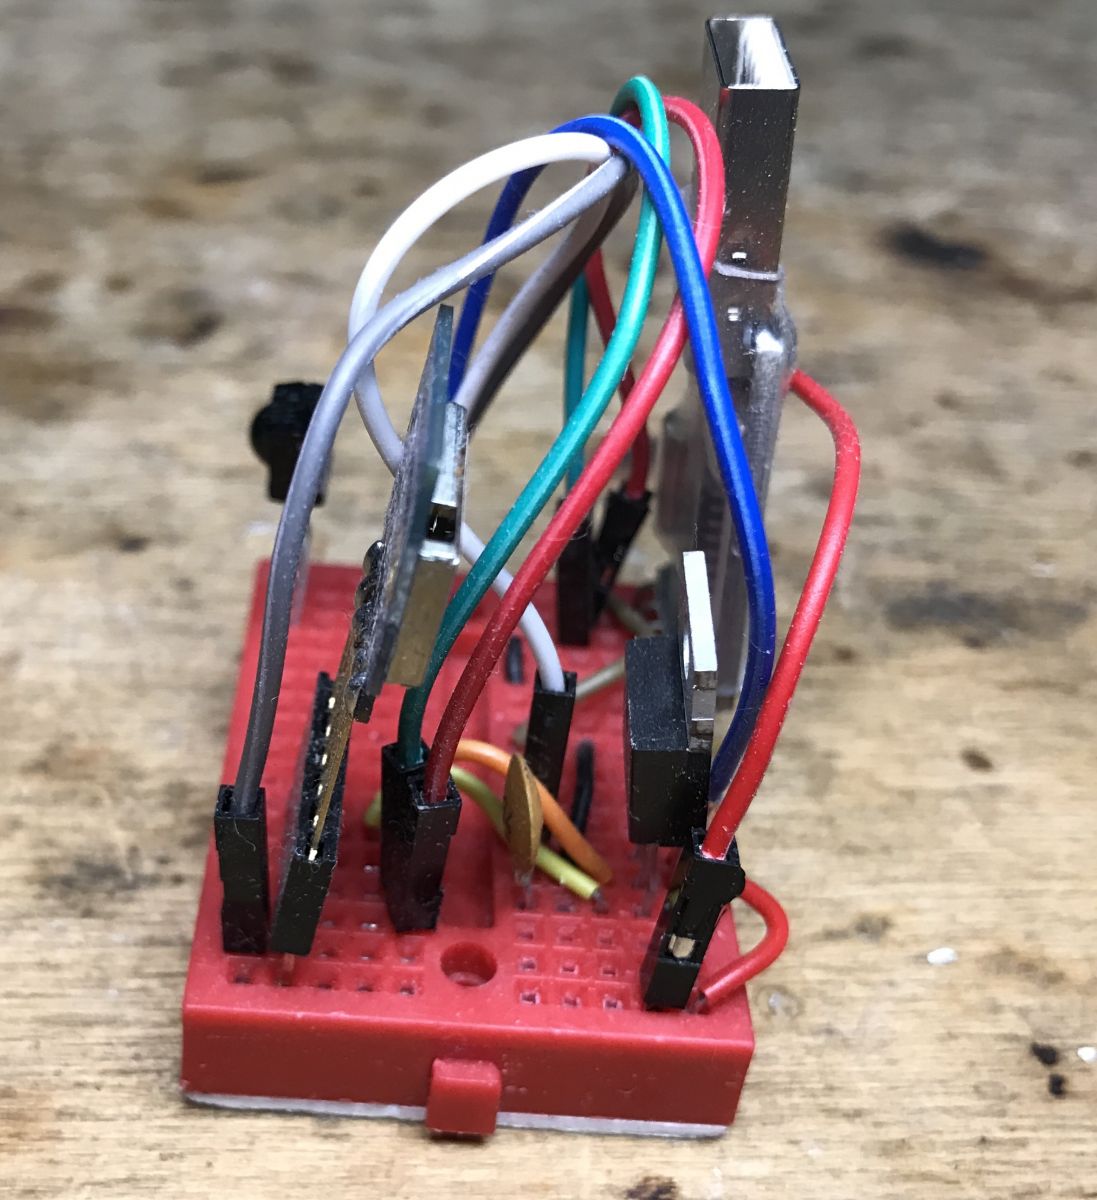
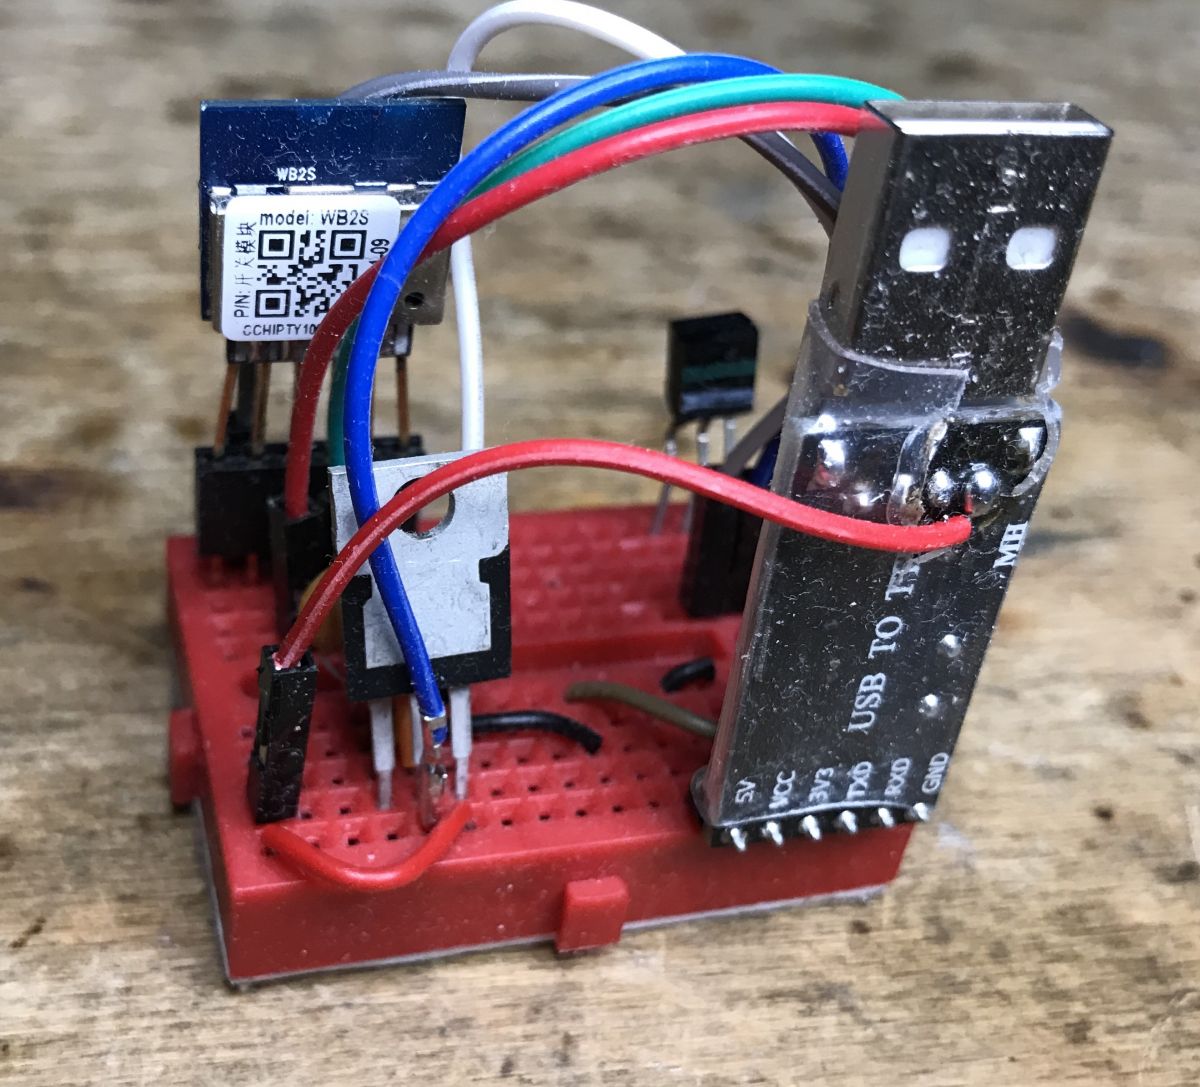
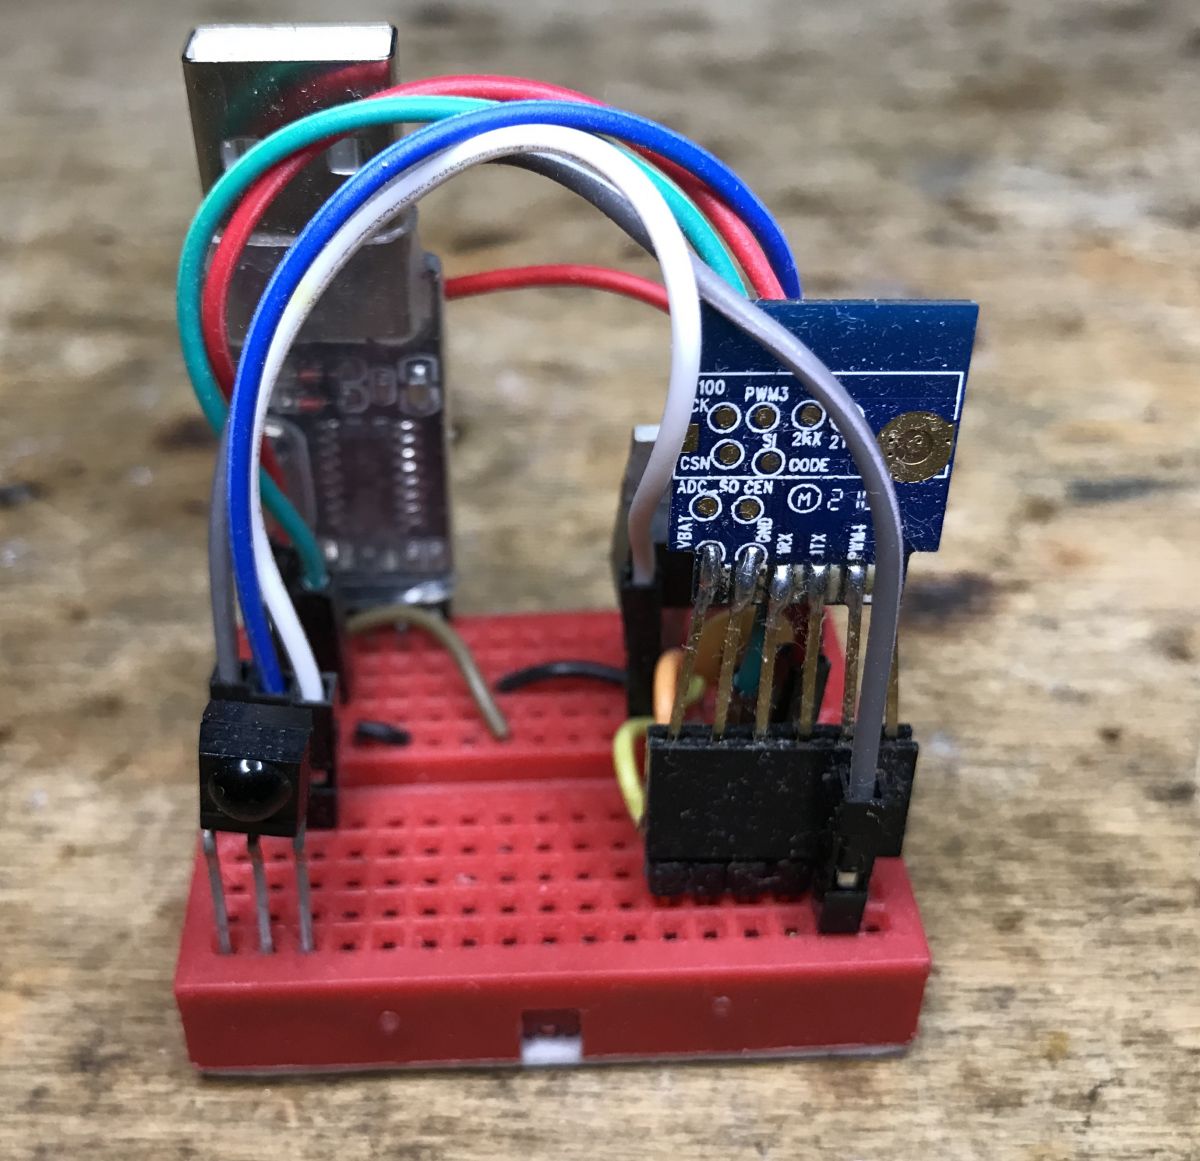
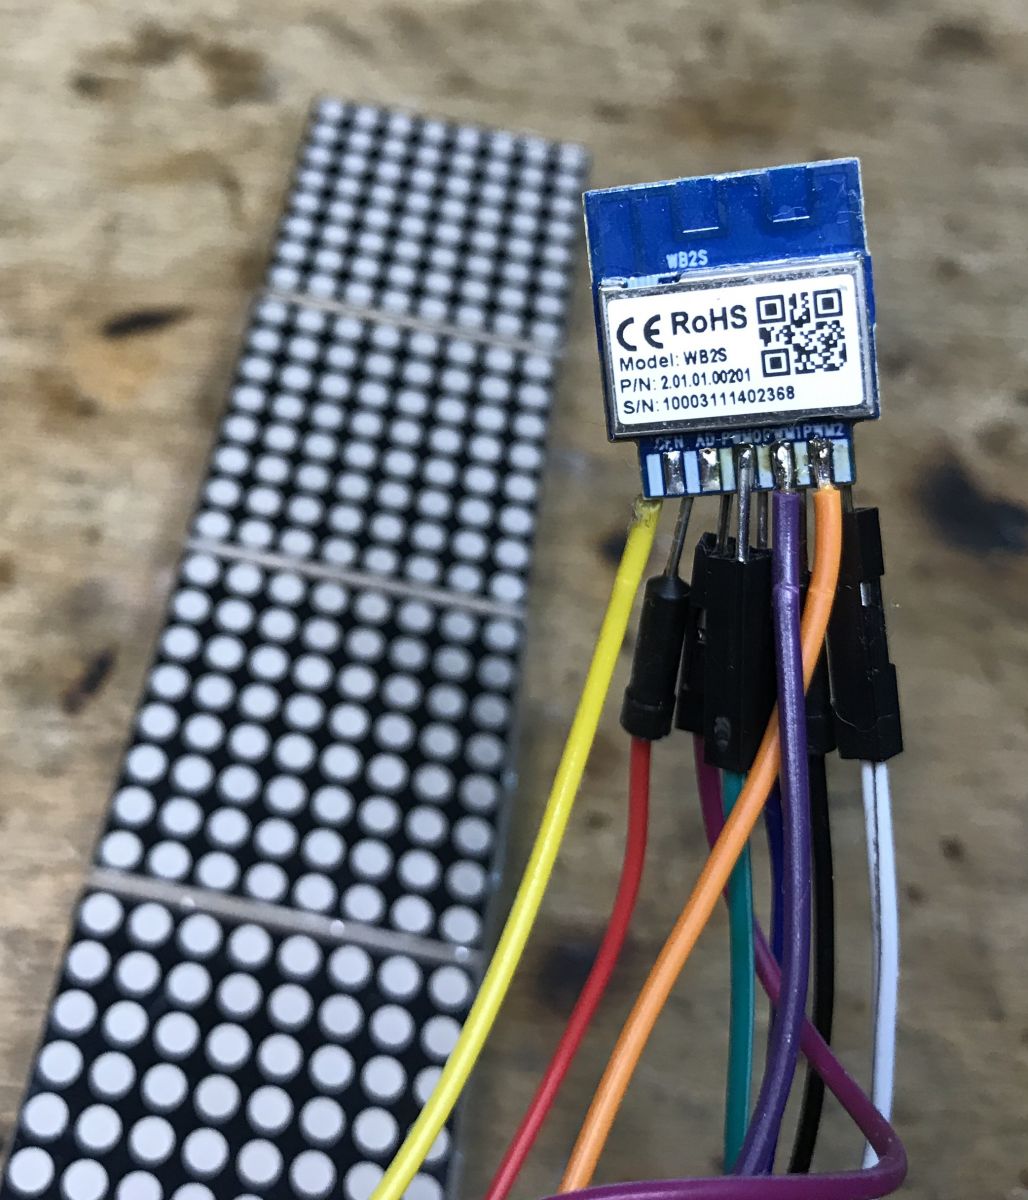
What is required to run BK7231 module in practice? It's important to note that you can easily both flash and run BK7231 modules outside the boards with 0 external components.
To be precise, you will only need a 3.3V power supply with a preferably generic 100nF capacitor at the output. No external resistors, etc. are required.
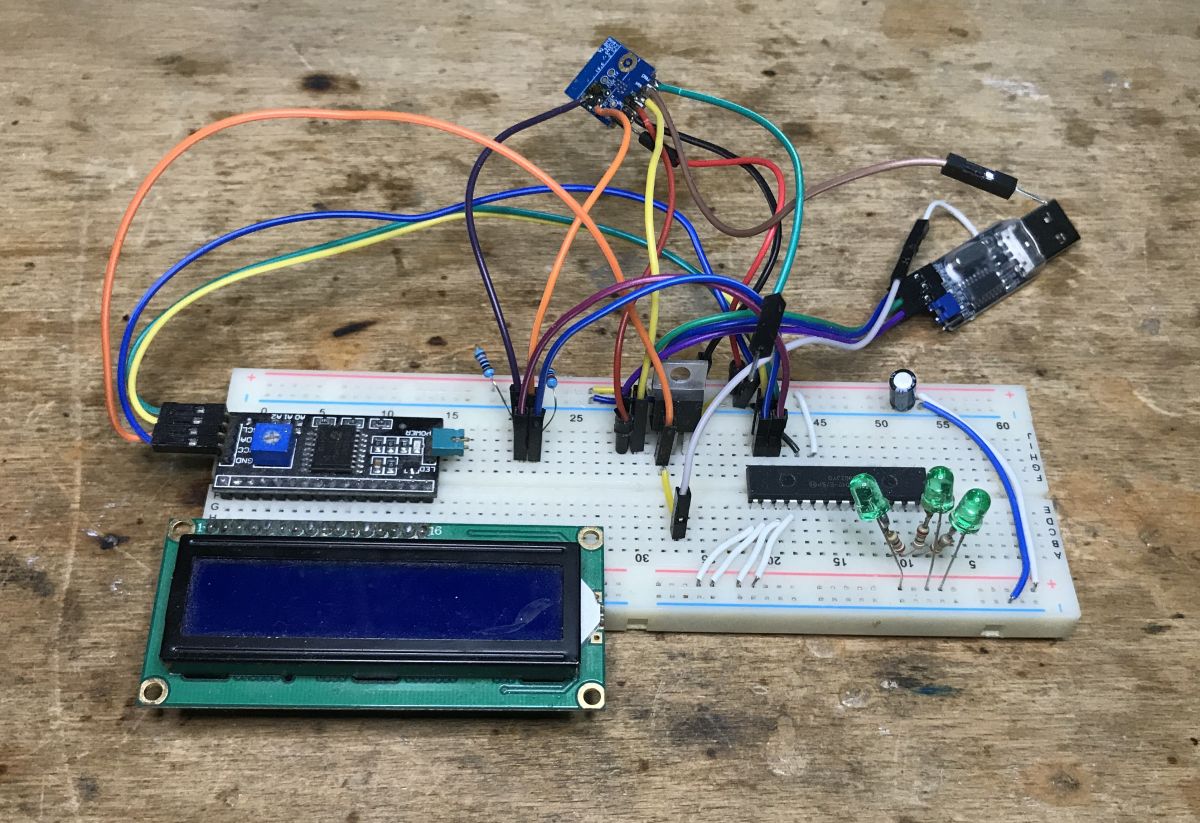
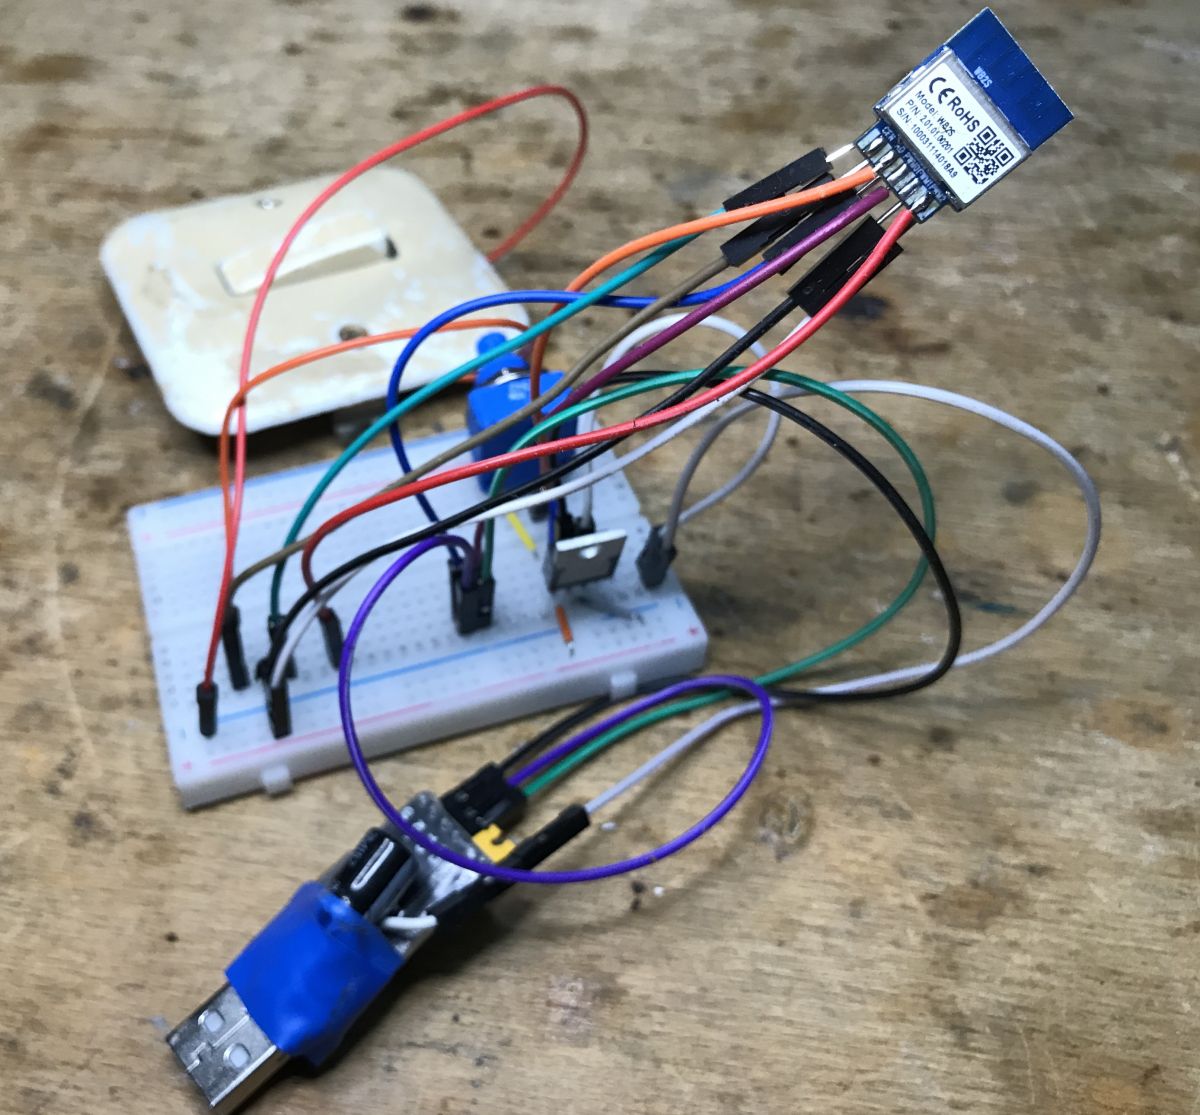
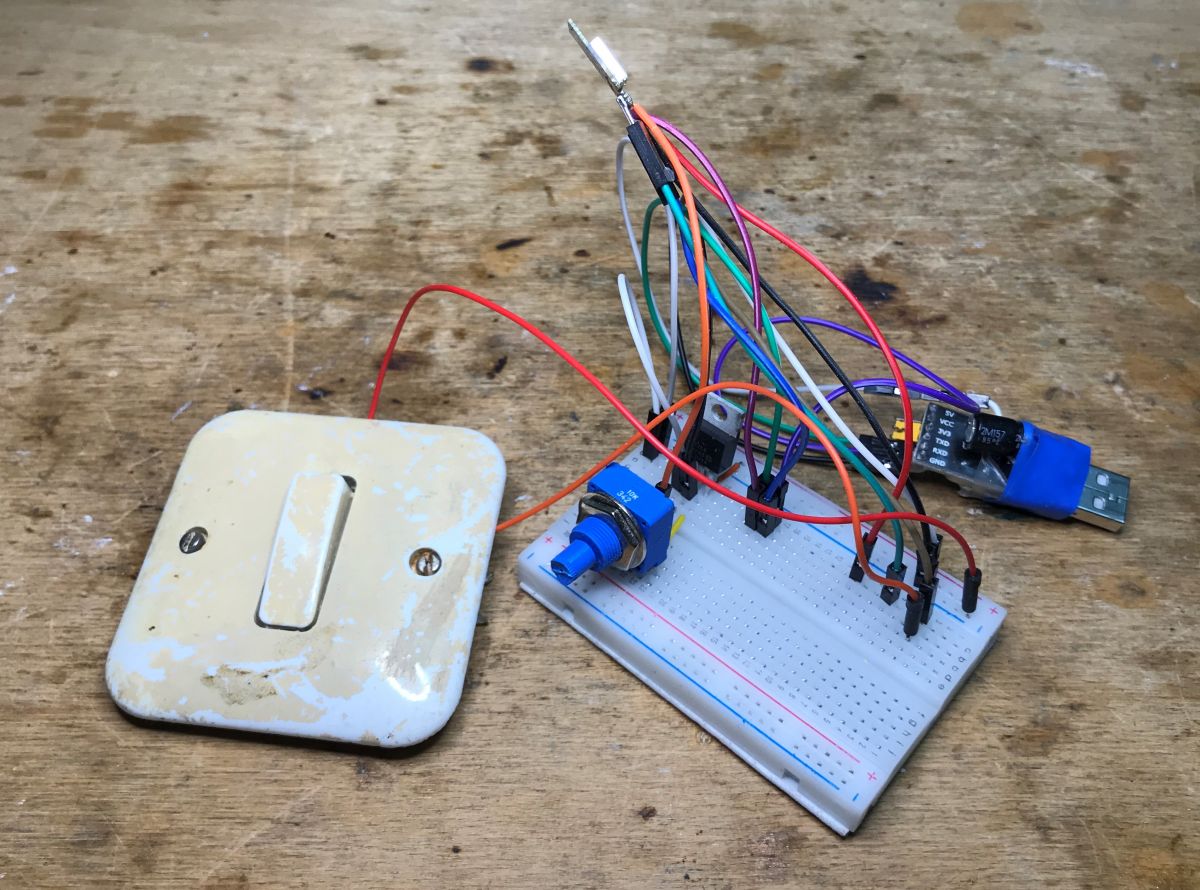
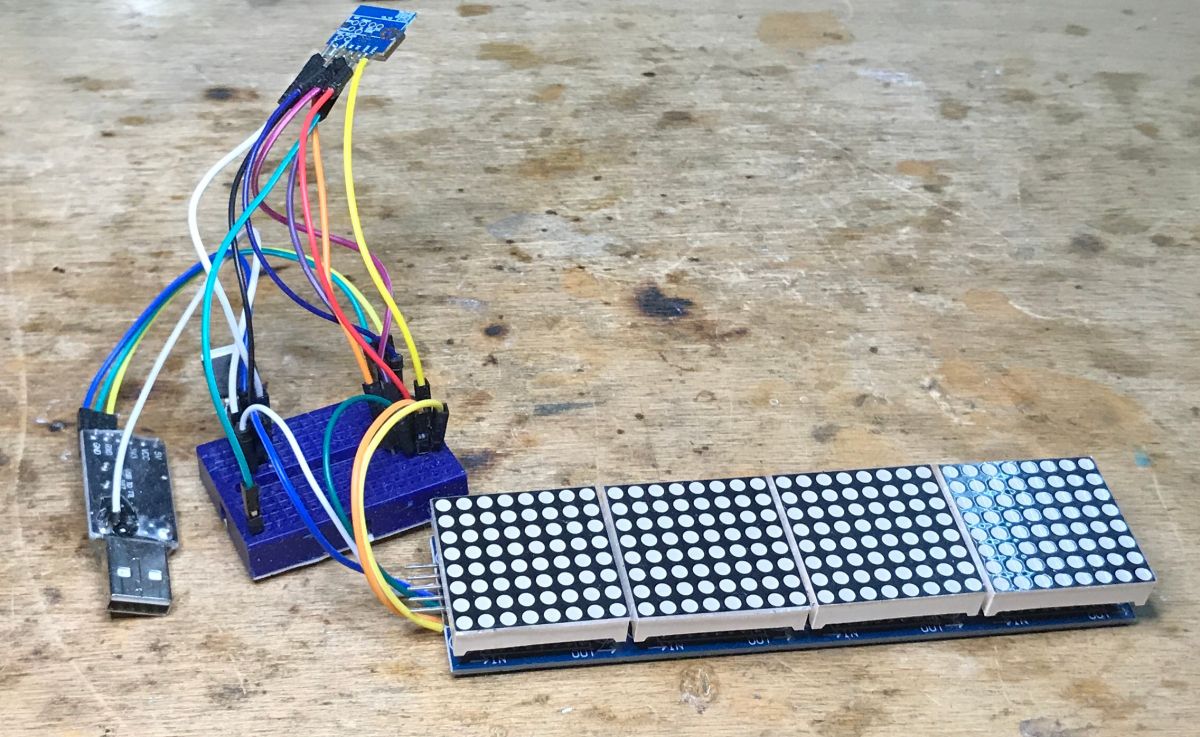
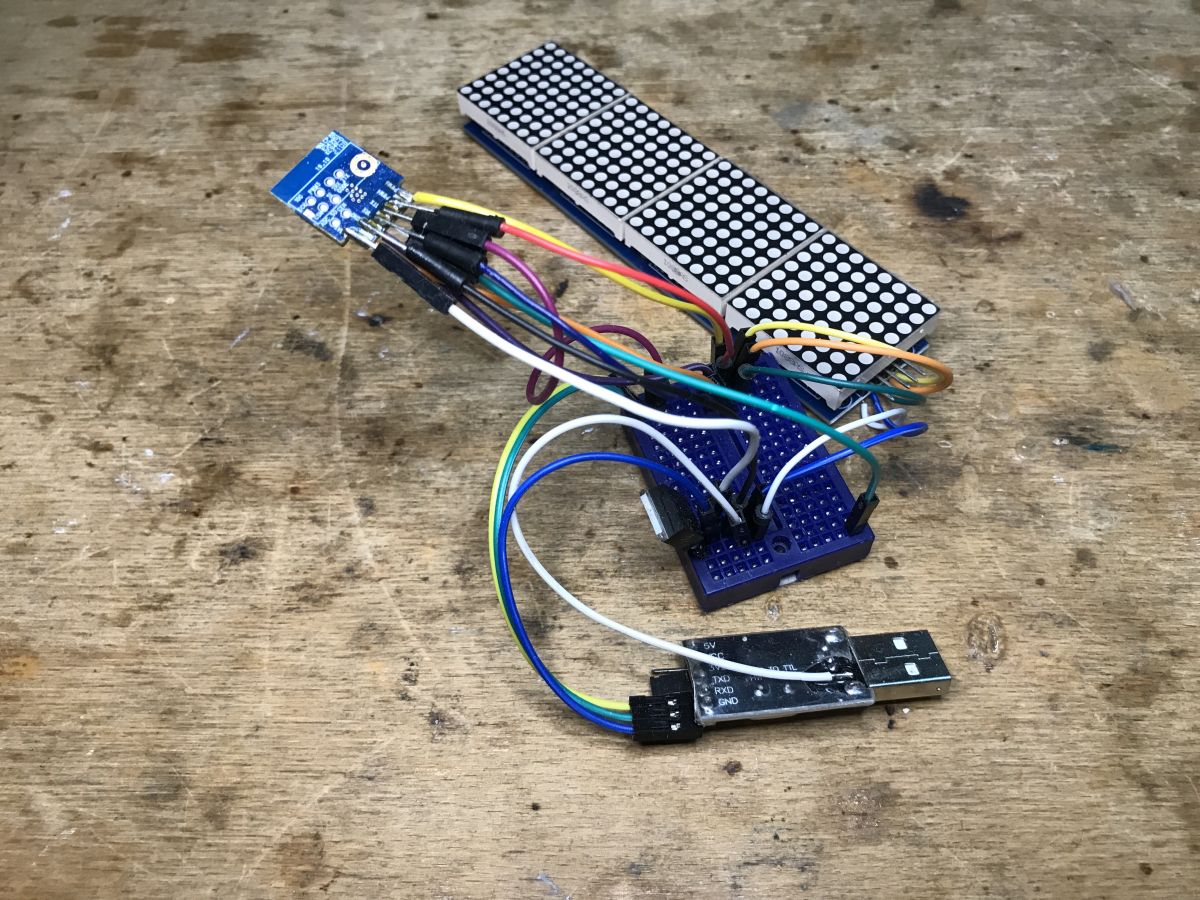
Many test development stands can be constructed that way, for example:
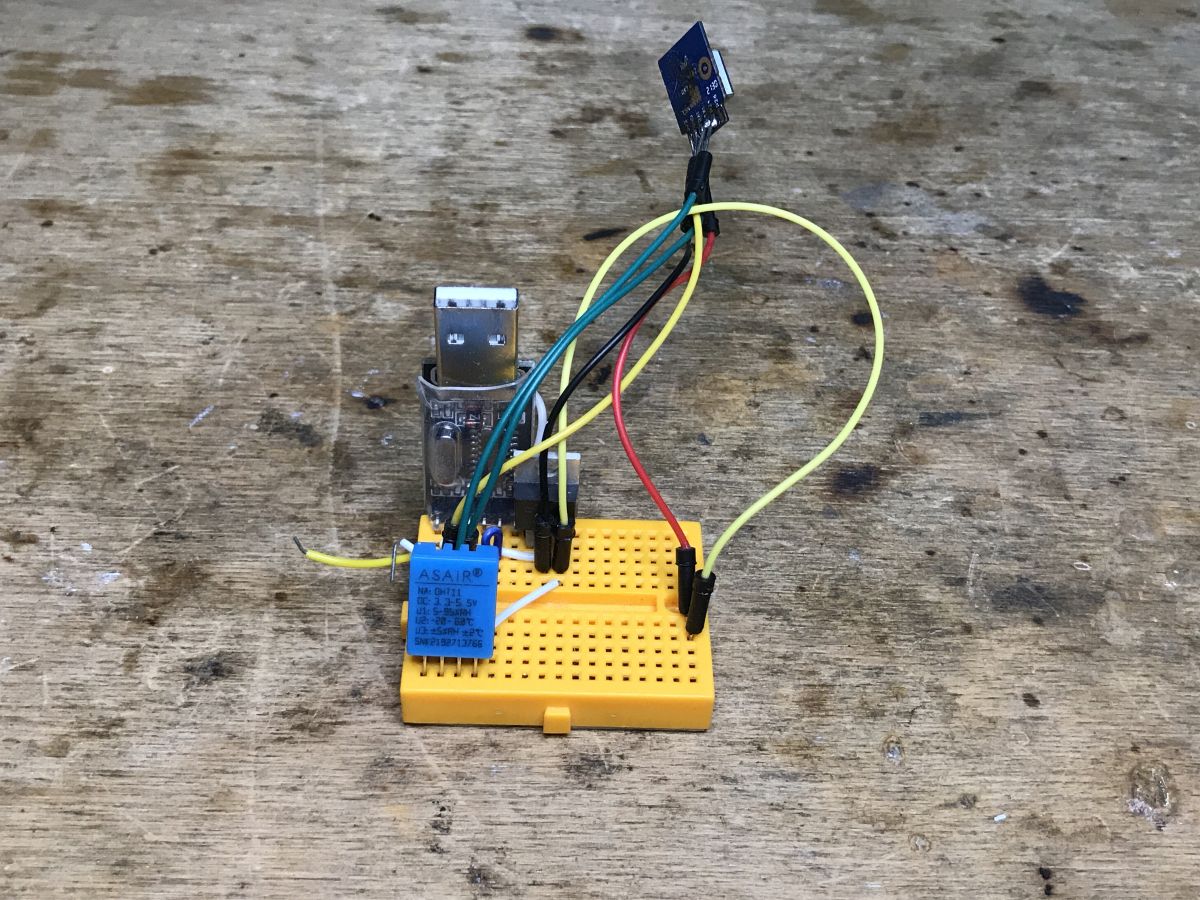
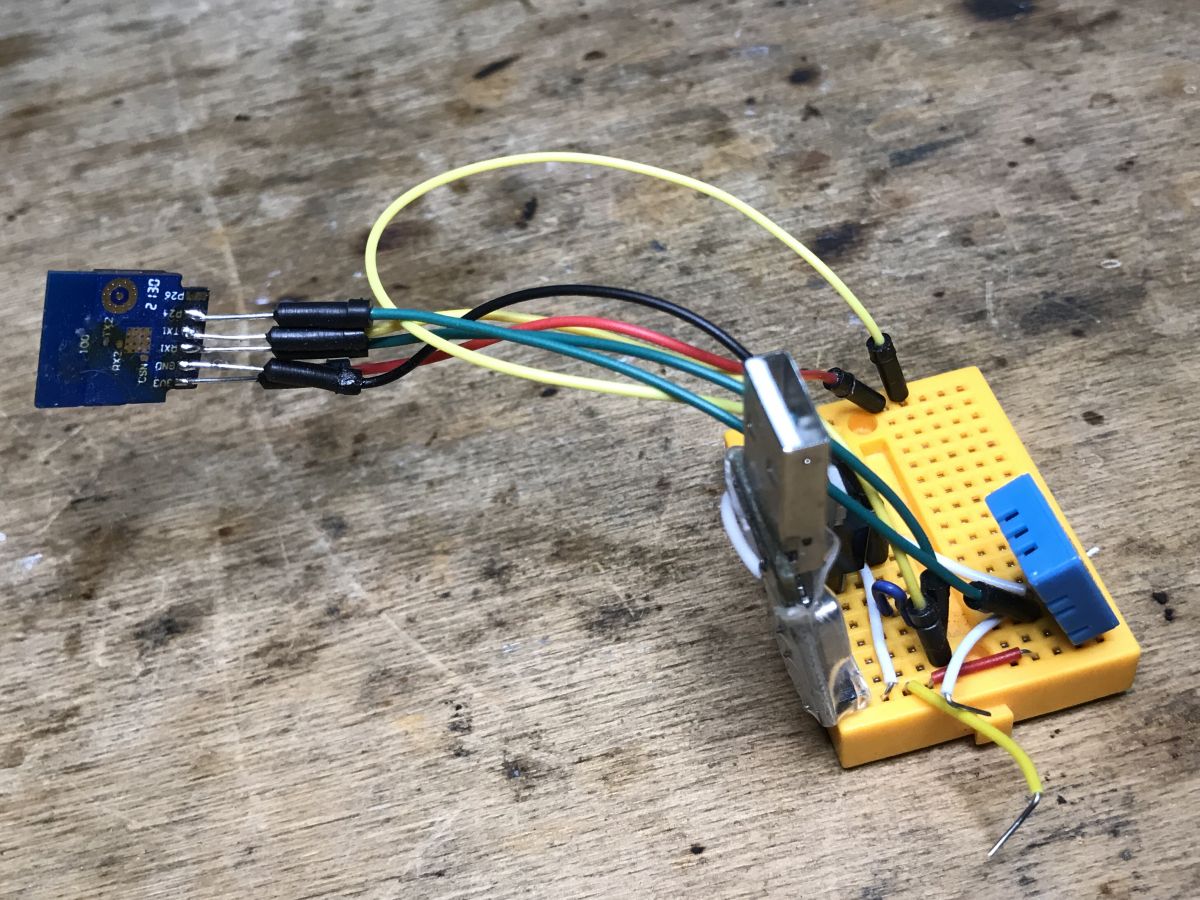
- CB2S + DHT11 test circuit:
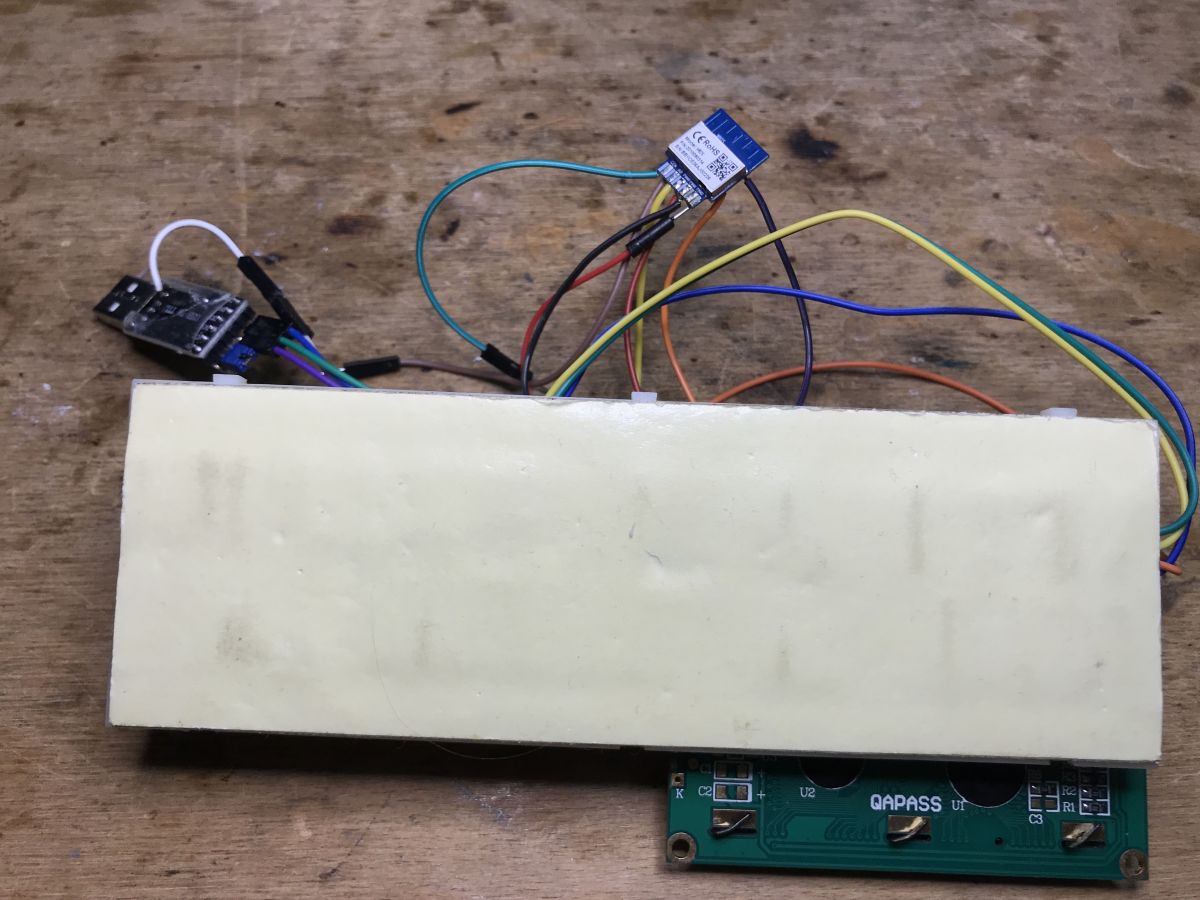
- WB2S + LCD 2x16 with I2C driver + MCP23017 port expander test circuit:
- WB2S + bistable switch and potentiometer test circuit:
- WB2S + IR receiver test circuit:
- WB2S + Software SPI test:
More about my test setups will be covered in dedicated OBK topic.
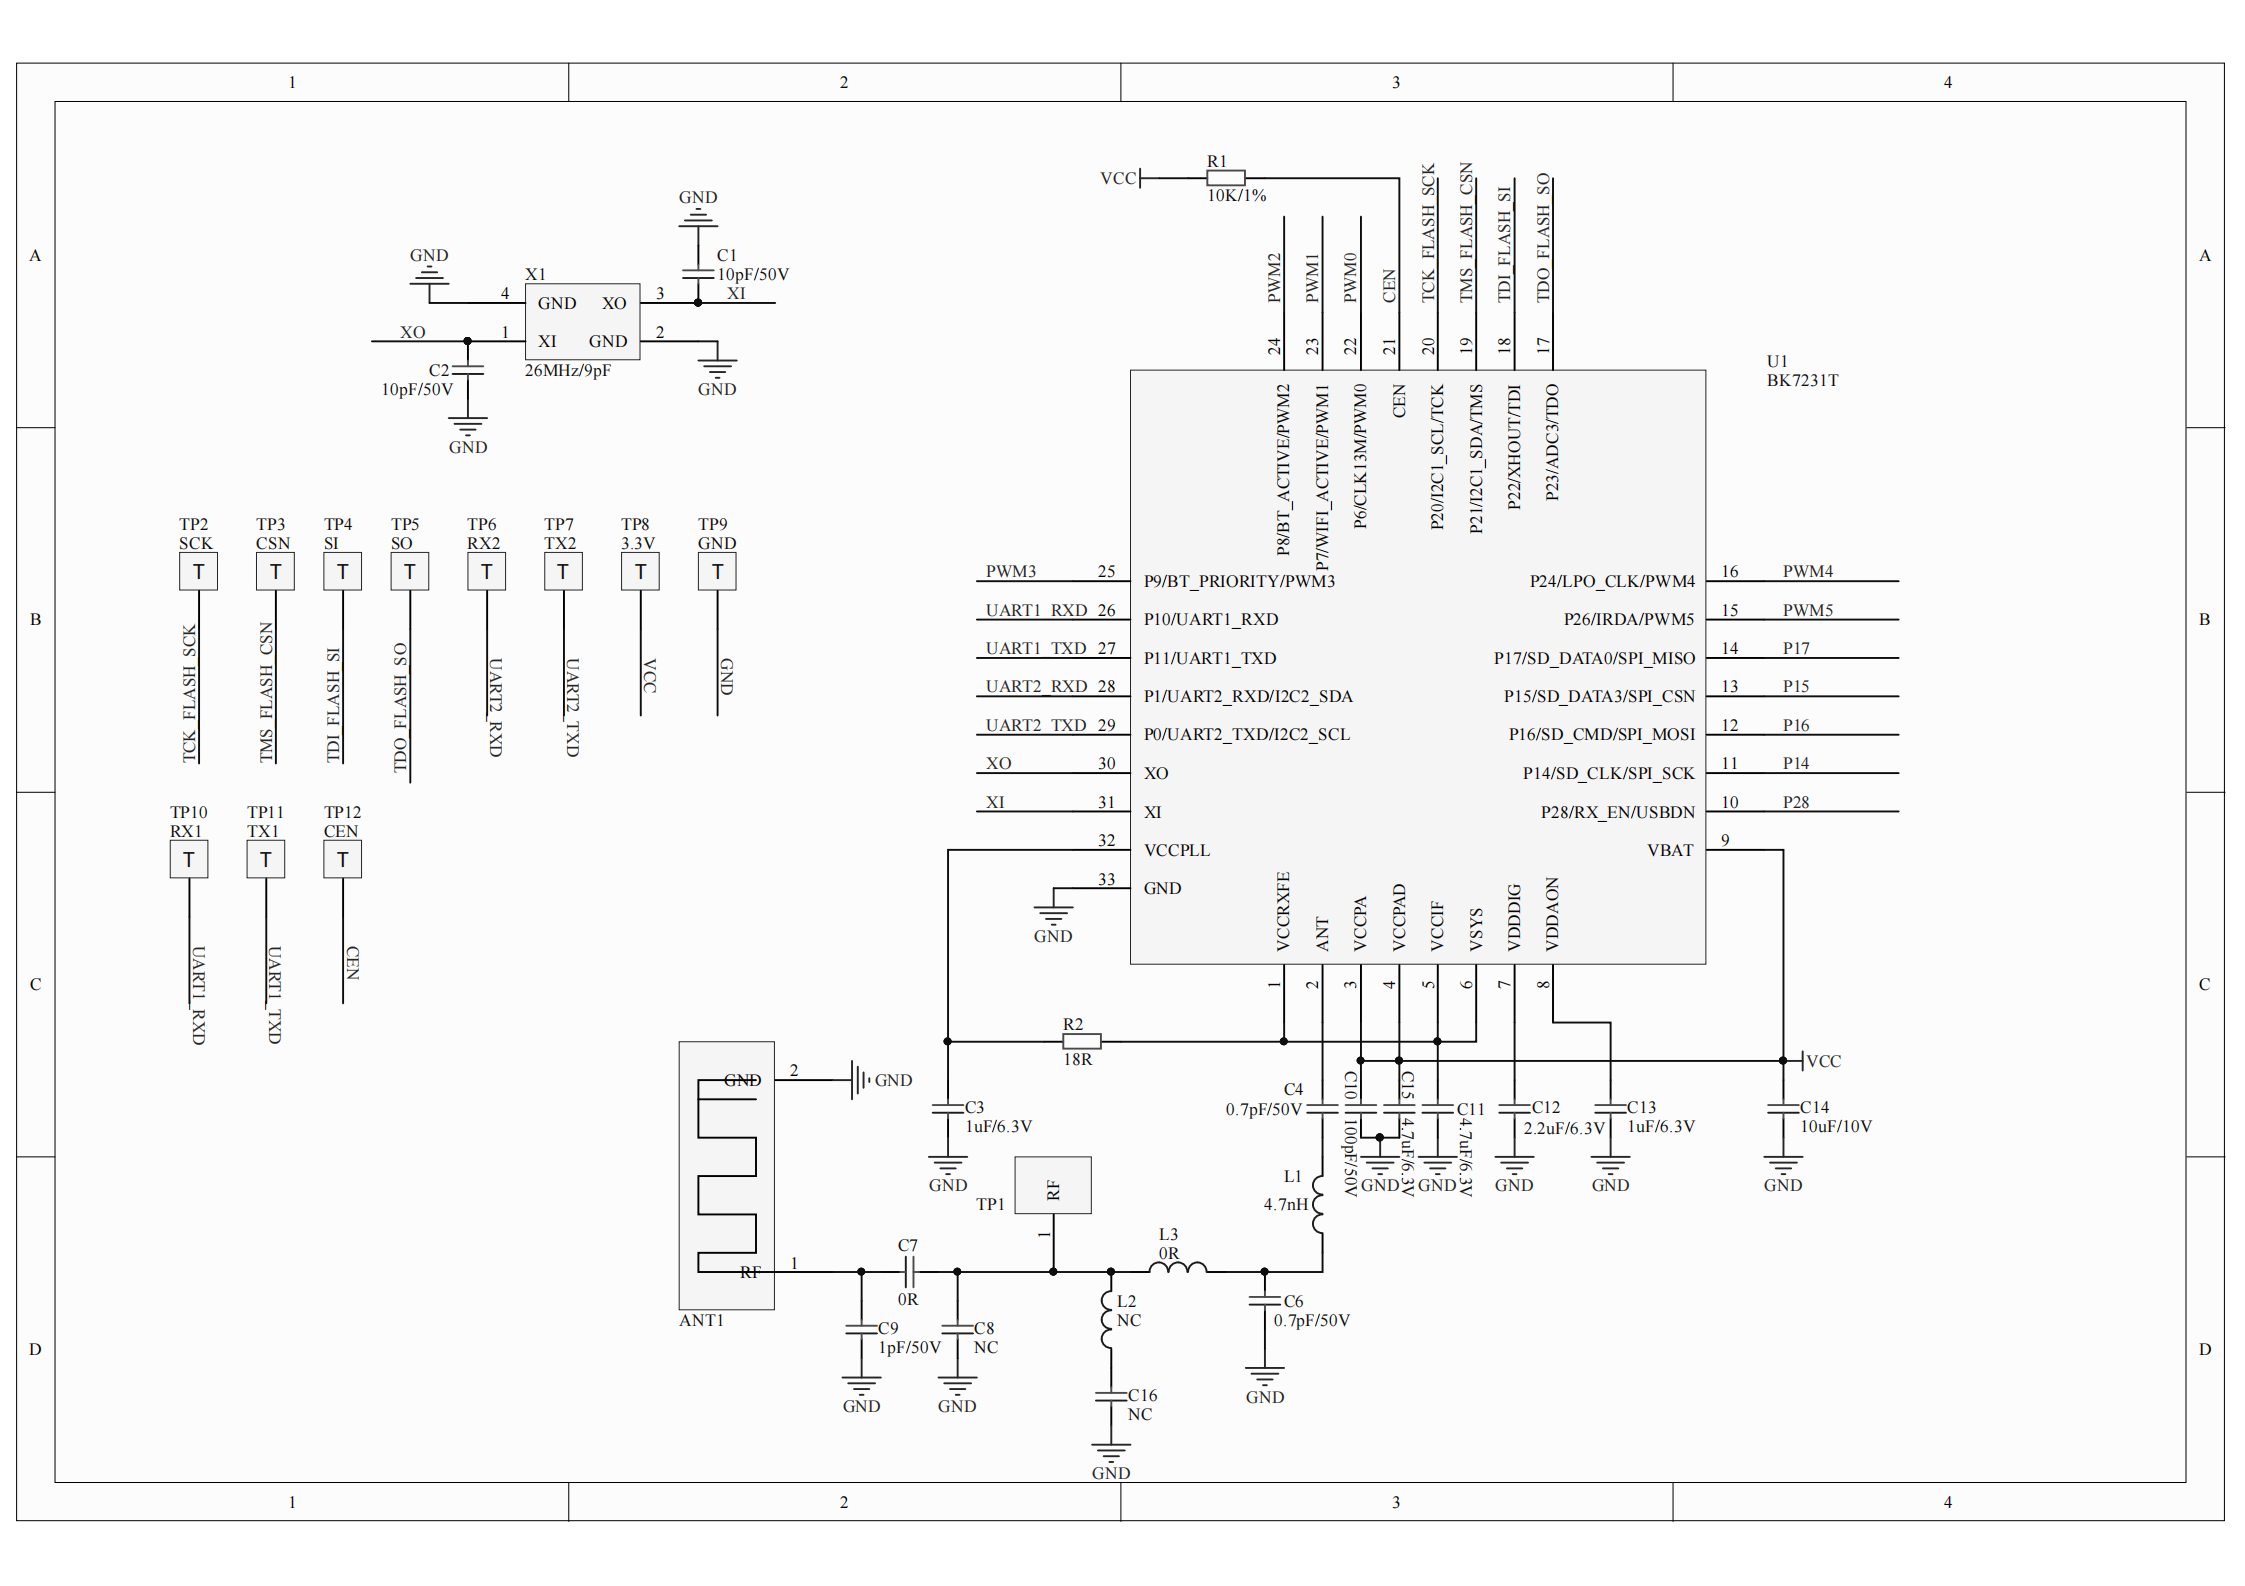
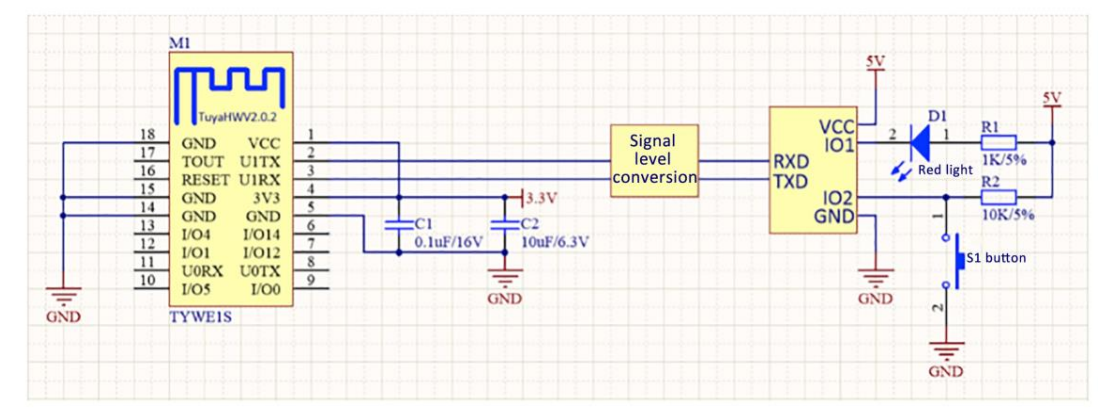
BK7231T/BK7231N Minimal system diagram Here's a minimal BK7231 circuit diagram from Tuya docs. You will most likely not need it, as most of the times BK is available in a form of modules, but it might be useful for a generic reference.
NOTE: the parts from the circuit are already present in the BK7231 modules
BK7231 in LED lighting BK7231 is used widely in LED lighting, including various types of bulbs (CW, RGB, RGBCW, etc), LED strip controllers, ceiling lamps, etc.
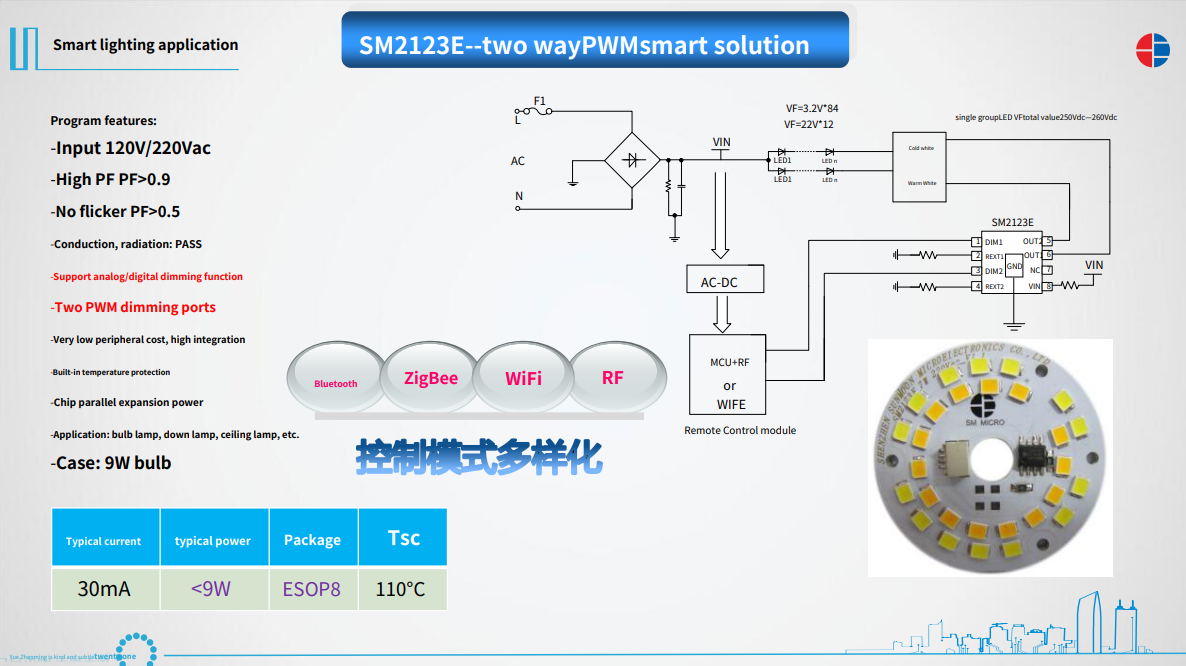
Usually a simple PWM-driven LED chips are used:
Example chips: SM2083, SM2123E, SM15133E
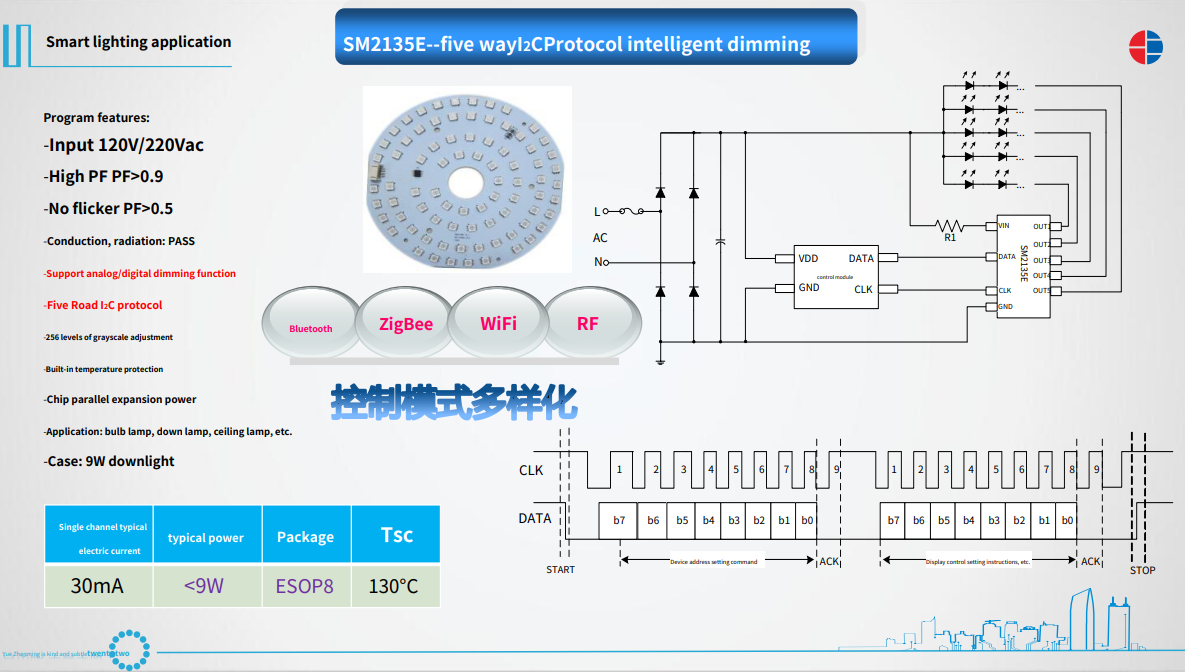
Sometimes, a custom communication protocol is employed (a variation of I2C) and LED channels are controlled by SDA/SCL bus:
Example chips: SM2135 (8 bit colour channel), SM2235 (10 bit version), BP1658CJ (10 bit), BP5758D (10 bit).
Important: there are two types of PWM-controller CW (CCT) drivers CCT, Correlated Color Temperature, is a feature that allows you to customize the temperature of bulb white colour. CCT is defined in degrees Kelvin, so the warm light is around 2700K, neutral white at around 4000K, and cool white is at 5000K or more.
CCT control can be achieved in two ways:
- basic two PWM control - first PWM controls Cool White LEDs, second Warm White LEDs, and their respective fractions are calculated in firmware
- alternate PWM control - first PWM controls the brightness level, and second controls the temperature (then a dedicated CW/CCT driver drives LEDs appropriately)
BK7231 in power metering BK7231 can be used in various smart sockets, where some of them also offer a power metering features, including the measurements of the voltage, current, power and more.
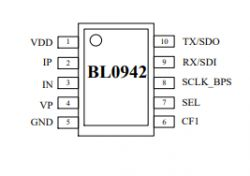
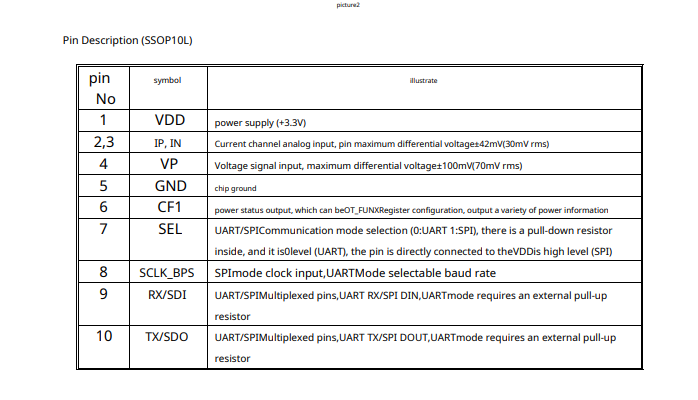
BK7231 can be seen often used with BL0942 power metering chip (they are most often using UART1 port for communication, in rare cases they use SPI mode):
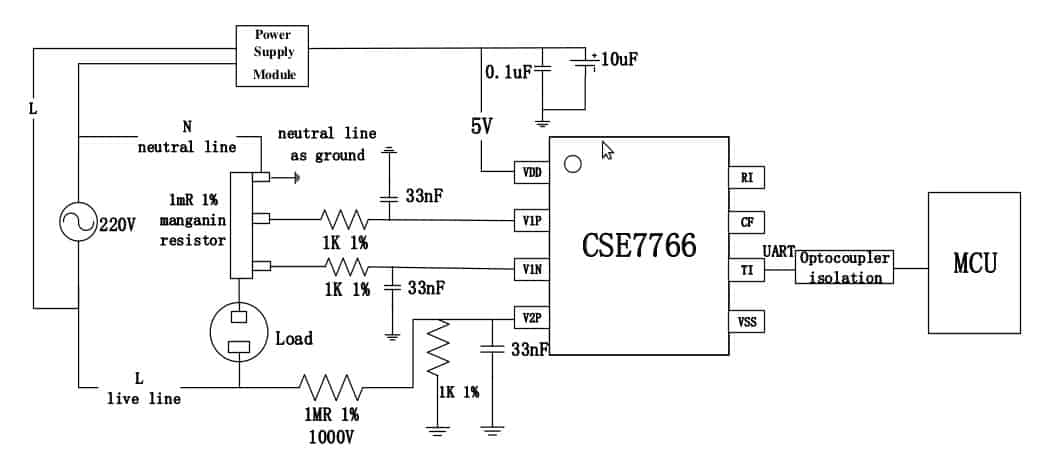
There are few similar chips to BL0942, they can have a slightly different UART protocol, for example CSE7766:
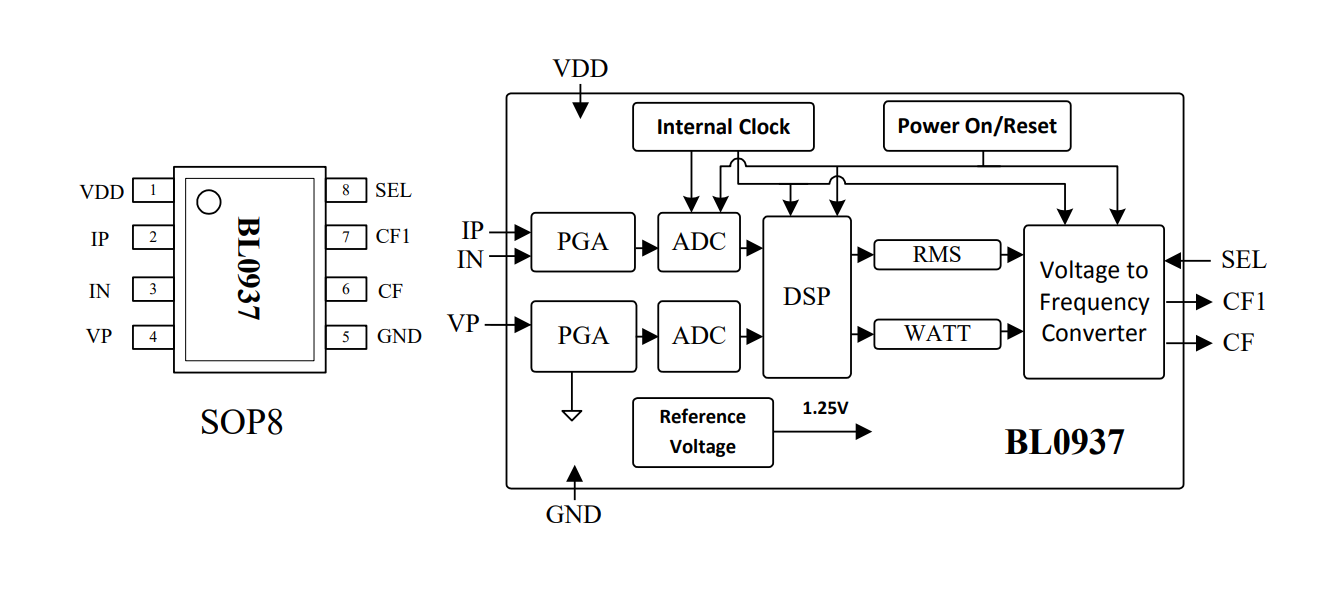
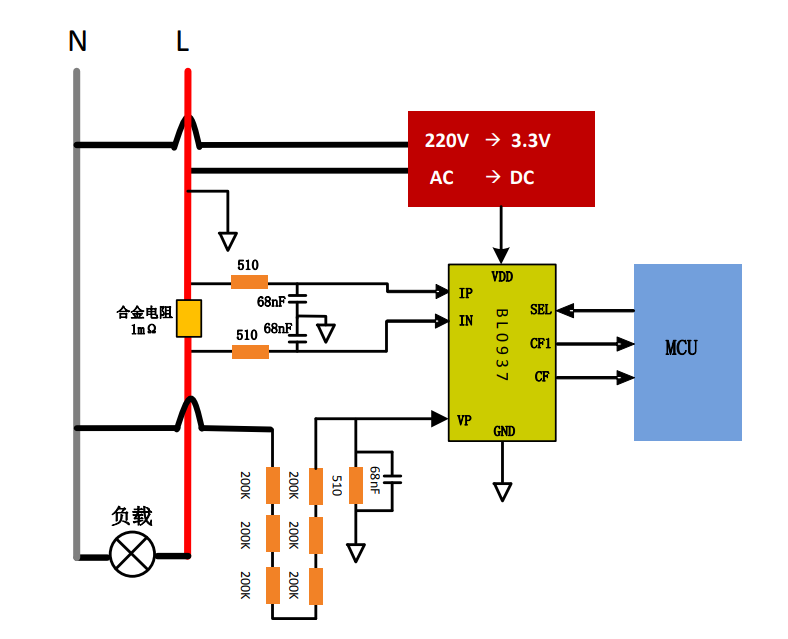
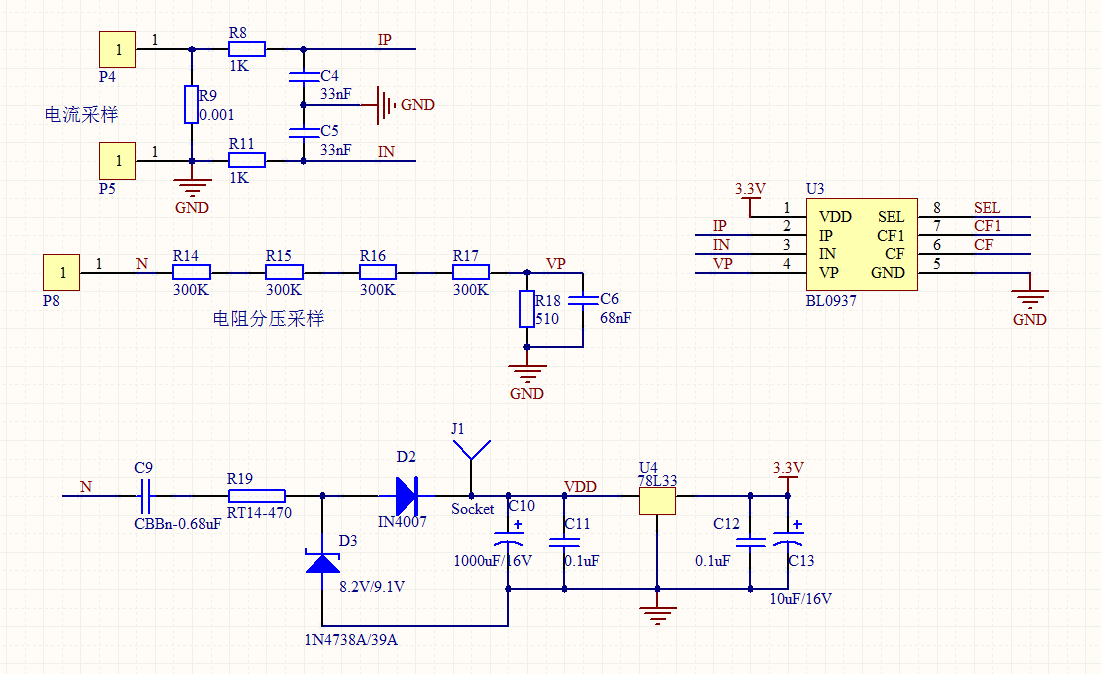
BL0937 is also used, it can use any arbitrary IO of BK7231, but requires IO interrupts to count pulses on CF and CF1 pins (measurement results are encoded as pulses):
A good example of power-metering device can be a LSPA9 socket (BL0942): Read more here:Tuya LSPA9 smart socket - teardown, OpenBeken flashing guide for CB2S, BL0942
BK7231 and TuyaMCU TuyaMCU smart devices, unlike other devices, consists both a WiFi module and an external MCU that takes a certain part of WiFi module duties and communicates with the WiFi module via the UART protocol called TuyaMCU.
In this case often all buttons, relays, power metering features and sensors are connected to the MCU and WiFi module can only control them via dedicated UART protocol. Communication is two-way, so MCU can report a relay switch (caused by user pressing button) to the WiFi module, and WiFi module can also order a relay switch (when user toggles relay state in the mobile App).
Each TuyaMCU variable has an unique ID, called "dpID" and a type (integer, enum, raw bytes data, string....
The IDs (dpIDs) are unique per device model and must be captured or guessed.
There is usually no floating point data in TuyaMCU - values like 22.5 temperature are sent as integers (225).
TuyaMCU usually uses 9600 baud rate, but sometimes higher speeds are also used.
TuyaMCU communication is using UART1 port (RXD1/TXD1) of Beken WiFi modules, so it may interfere with programming.
For more information see Tuya Smart Serial Protocol Guide:
https://images.tuyacn.com/smart/aircondition/Guide-to-Interworking-with-the-Tuya-MCU.pdf Here are few examples of TuyaMCU device.
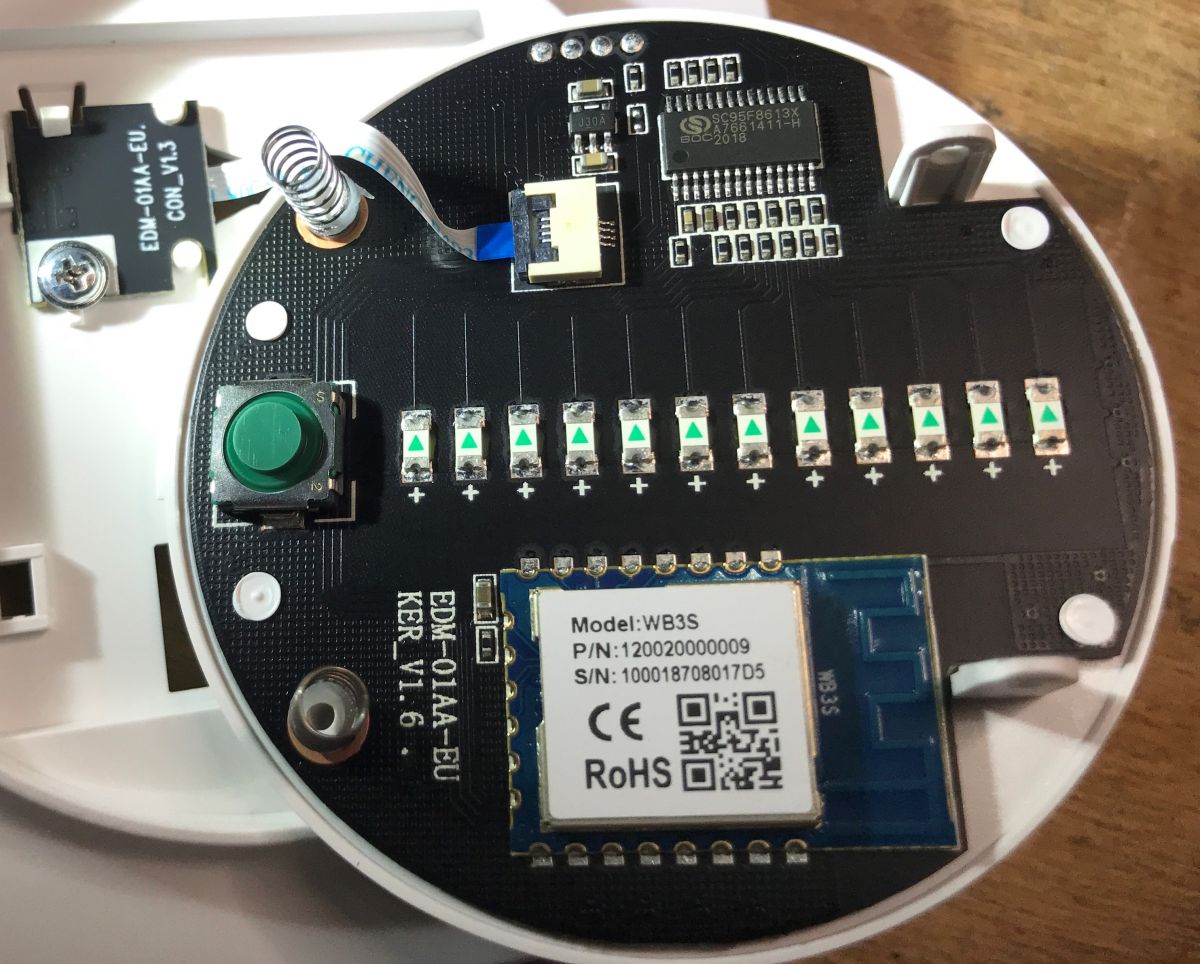
Photo below shows the PCB of smart Dimmer with WB3S and TuyaMCU:
Read more: Dimmer EDM-01AA-EU 300W for BK7231 and TuyaMCU - configuration Photo below shows the PCB of TuyaMCU Fan Controller:
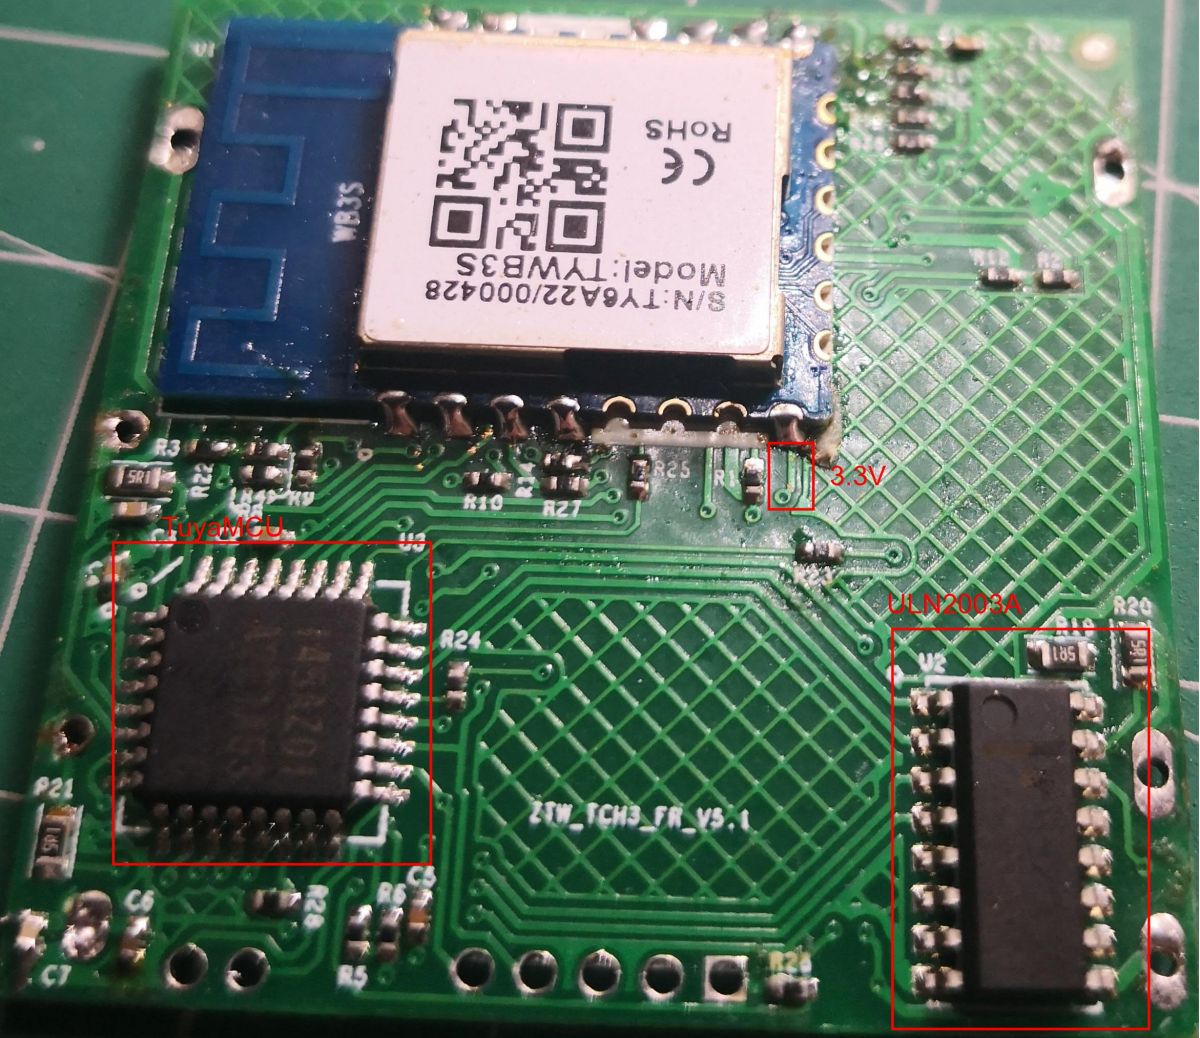
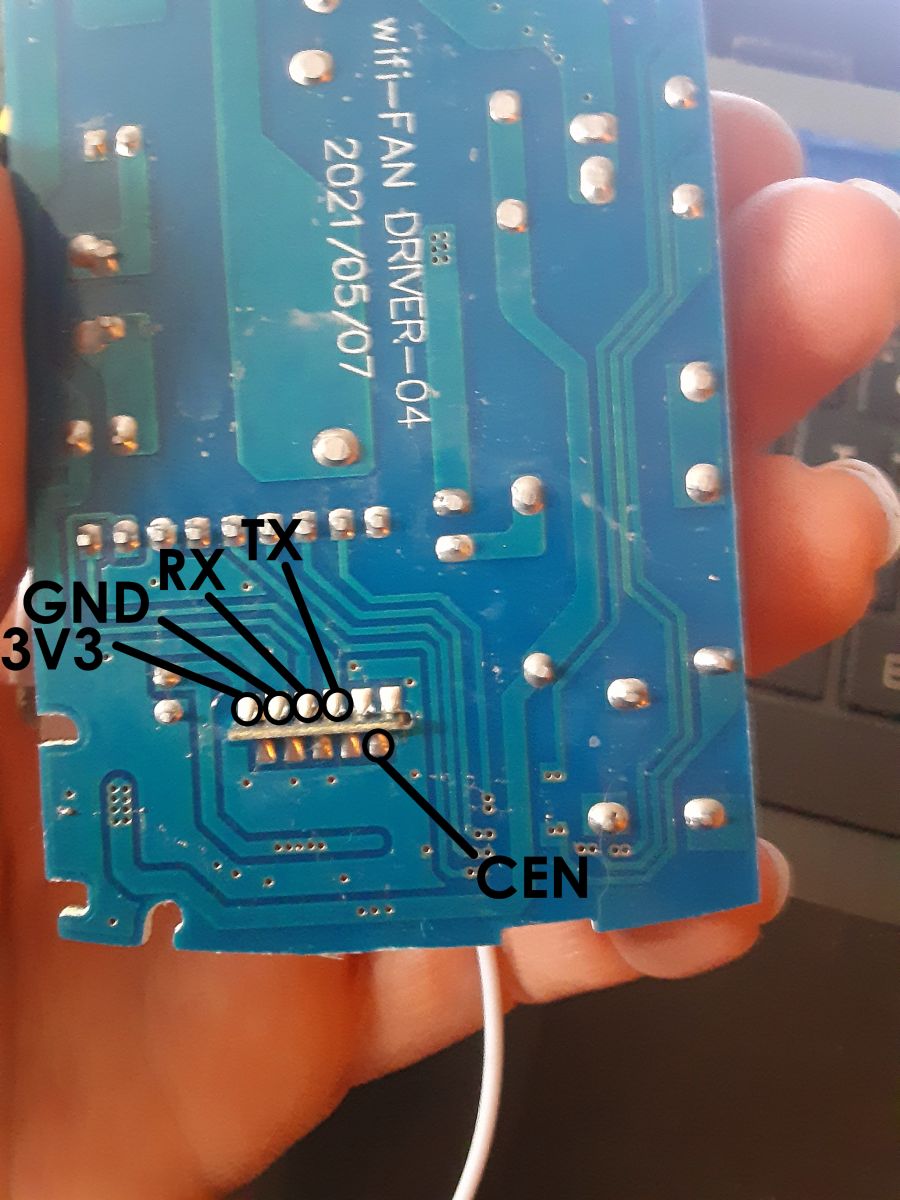
Read more: Tuya 5 Speed Fan Controller by TEQOOZ - Home Assistant Photo below shows the PCB of TuyaMCU Fan Controller:
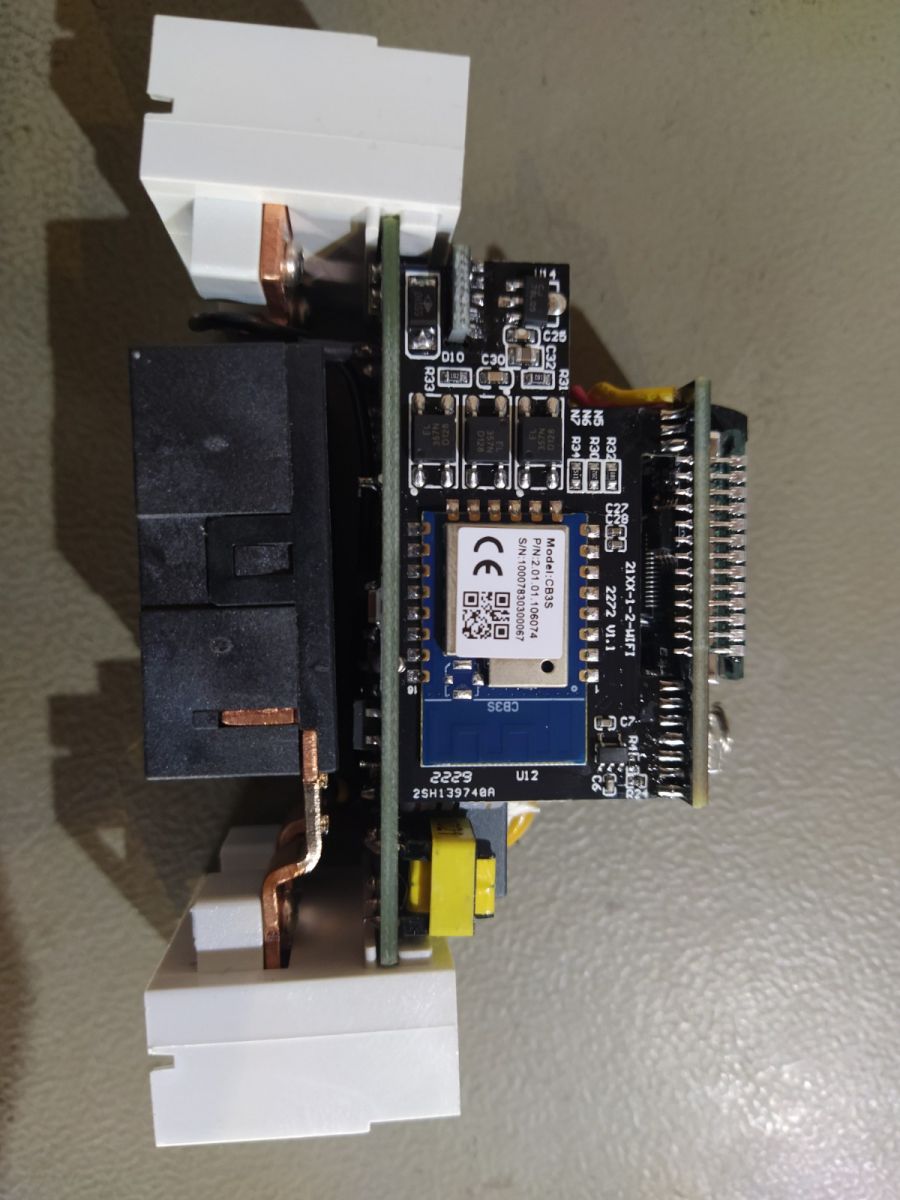
Read more: QIACHIP Universal WIFI Ceiling Fan Light Remote Control Kit - BK7231N - CB2S Photo below shows the PCB of TuyaMCU energy metering device:
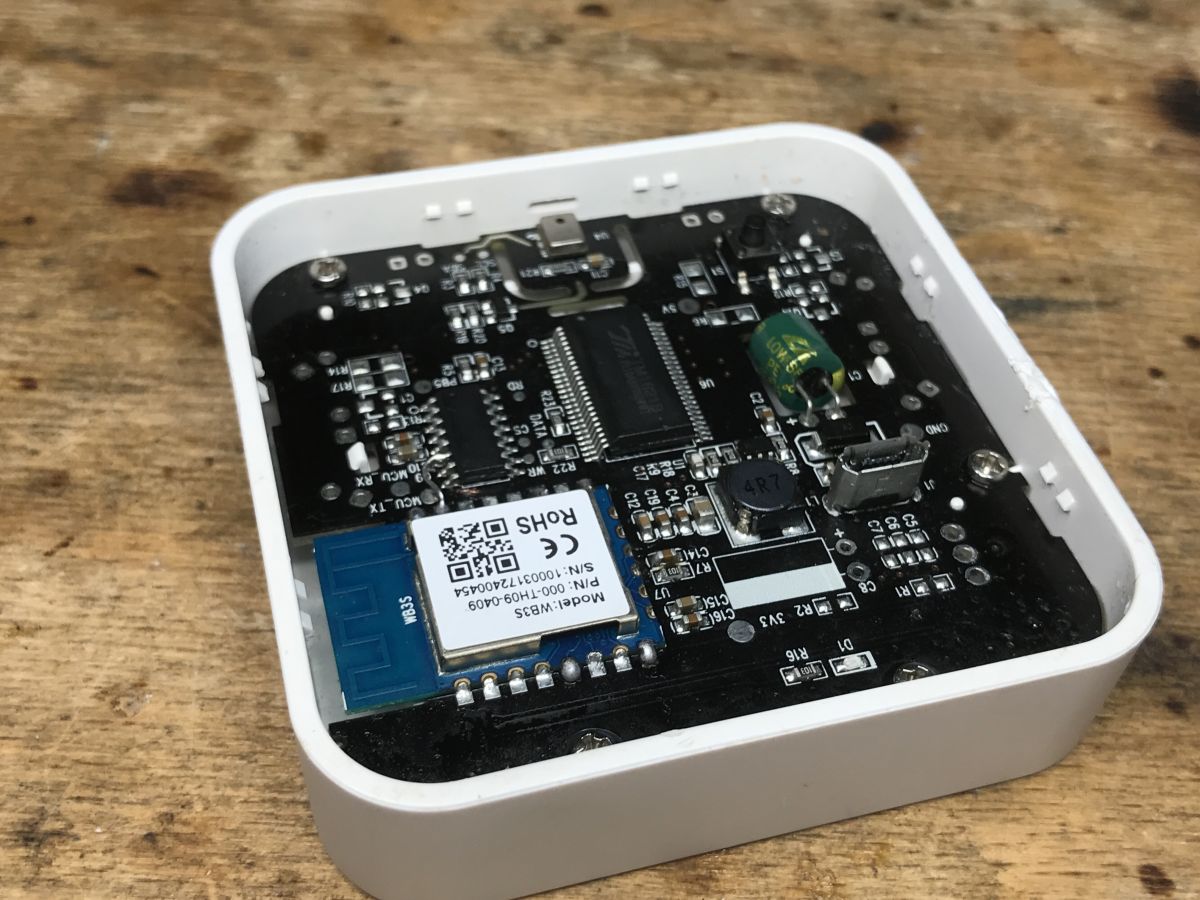
Read more: [TAC2121C] Tuya smart DIN-rail relay/energy meter [BK7231N] Photo below shows the PCB of TH06 Clock, Humidity meter and temperature meter:
Read more: [BK7231T] LCD calendar/thermometer/hygrometer TH06 WiFi for TuyaMCU - Home Assistant
BK7231 and battery powered devices There are basically two kinds of BK7231 battery powered devices on the market.
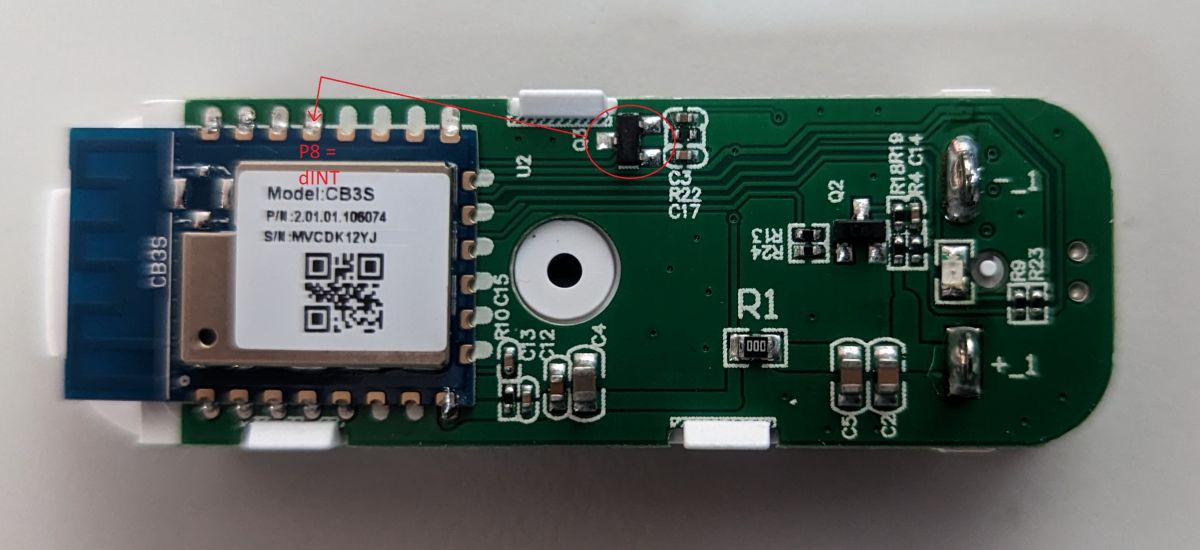
First kind consists only a WiFi module and peripherals, it's using a deep sleep feature to prolong battery life. Deep sleep basically turns off BK for a given amount of time and then BK has to reboot from 0 (no RAM etc is preserved).
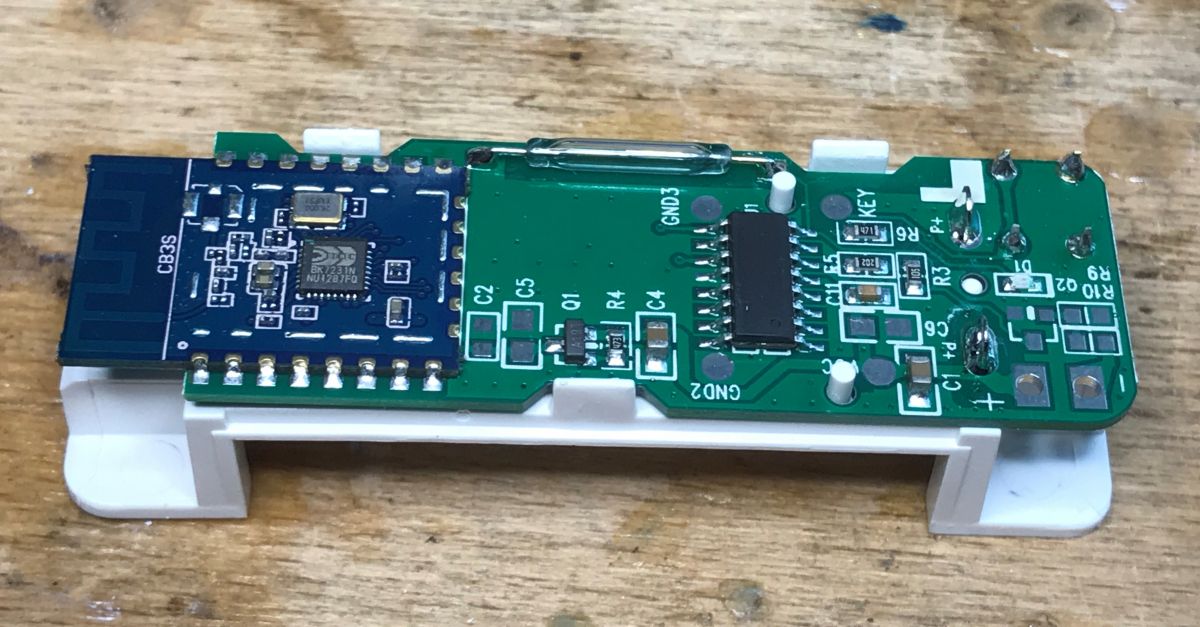
Image source: https://www.elektroda.com/rtvforum/topic3914412.html#20387992 Second kind is a TuyaMCU variation, where the MCU is able to control the WiFi power supply through a simple MOSFET, so basically MCU is in low power state all the time, WiFi module is powered off, and MCU only wakes up when it has to report the status, enables power for WiFi module, and reports the sensor states to WiFi module via UART which then later can report it through WiFi to the cloud.
Here's a detailed analysis and description of such device: Energy-saving (?) Battery-operated door / window sensor for WiFi DS06
BK7231 current consumption BK7231 features both runtime sleep (keeps device active but saves energy) and deep sleep (basically turns off device, clears RAM, and reboots from scratch after given time), but it's still worth to note the standard current consumption during RX/TX operations at runtime:
Communications
Wi-Fi standard
Rate
Transmitted/received power
Typical value
Unit
Transmit
802.11b
11 Mbit/s
+17 dBm
220
mA
Transmit
802.11g
54 Mbit/s
+14 dBm
200
mA
Receive
802.11g
54 Mbit/s
-10 dBm
104
mA
Receive
802.11n
MCS 7
-10 dBm
124
mA
The recommended power supply maximum peak current is at least 400mA.
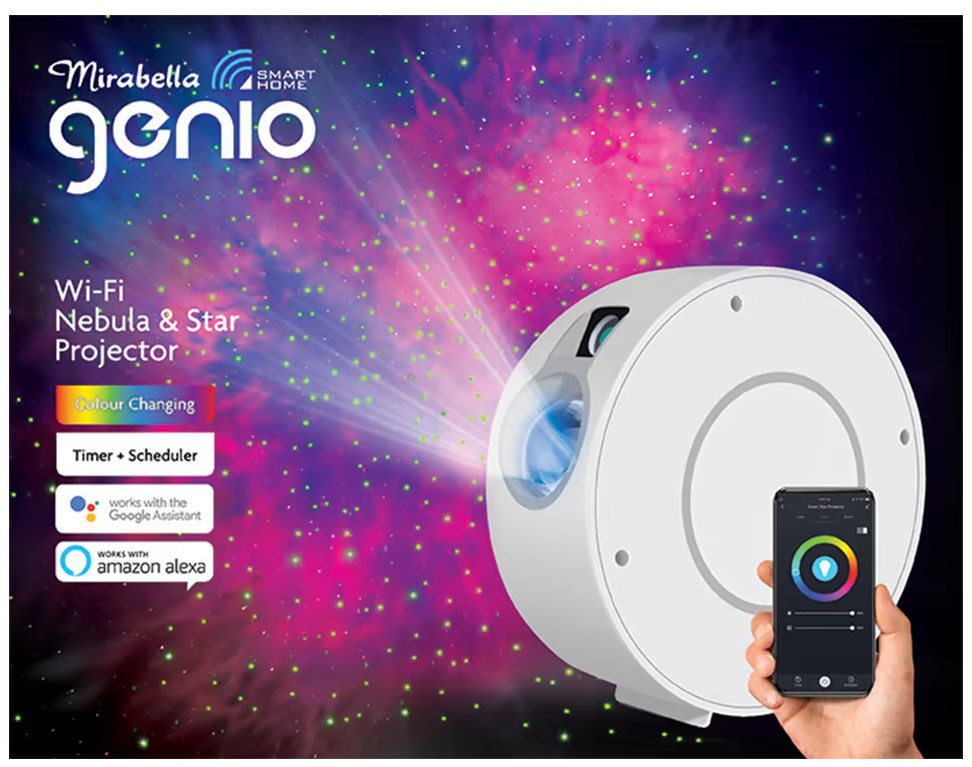
BK7231 custom devices There is much more BK7231 devices on the marked. A good example of custom IoT device featuring RGB light, a motor, and a laser (projector) is the Genio Galaxy Lamp:
Read more about it here: Genio Galaxy Smart Lamp - BK7231T - Teardown + Guide
BK7231U dev board? Now it's time for a small warning for all readers.
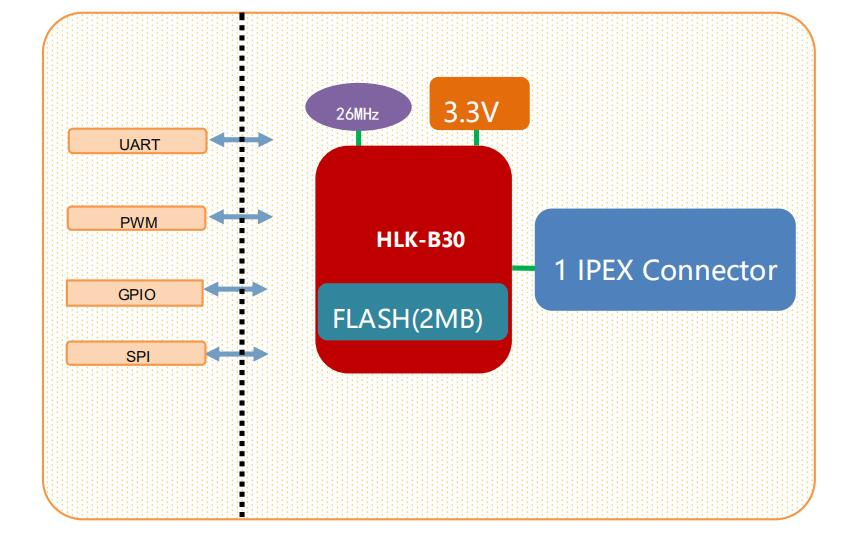
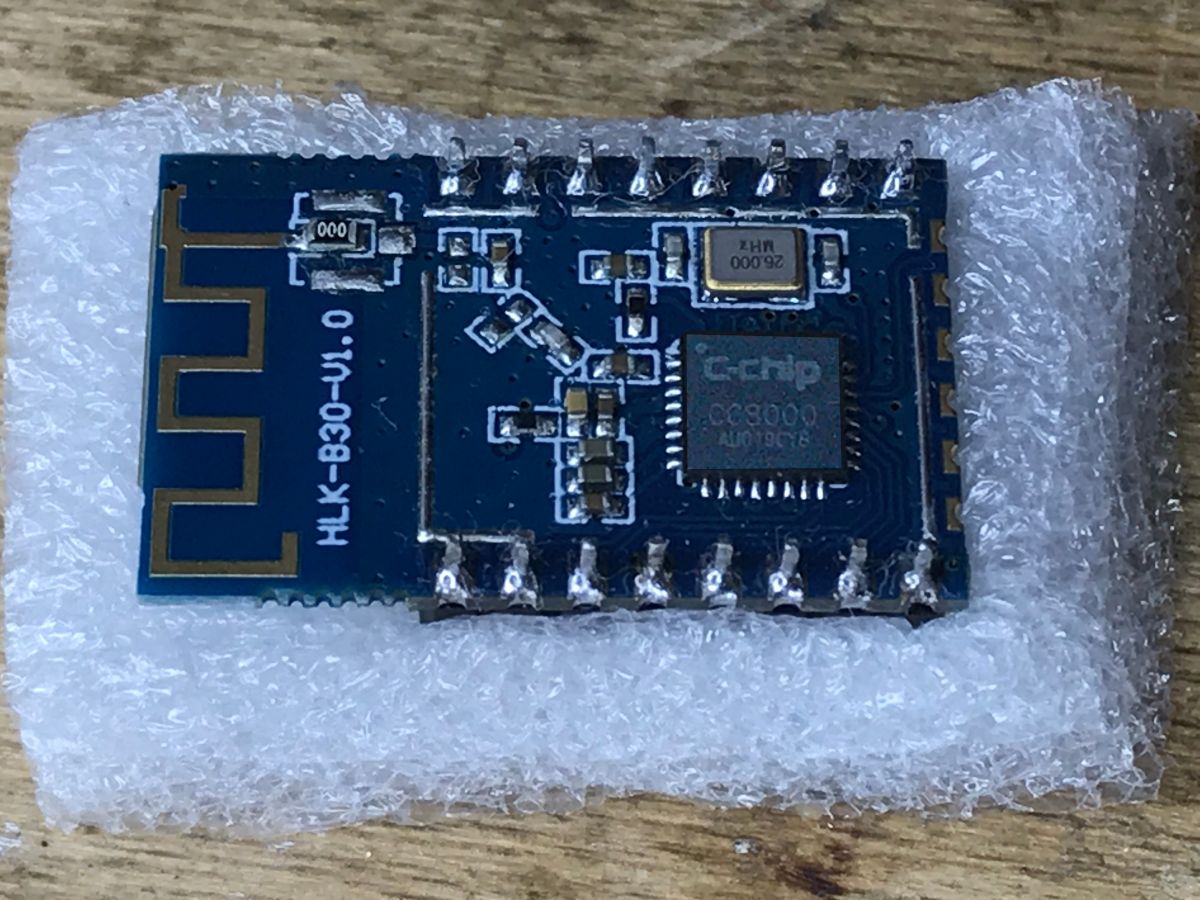
There is supposedly a BK7231U dev board sold on Aliexpress, the HLK-B30-V1.0:
I do not recommend buying this board. The SoC on the pictures is indeed BK7231 but item is shipped with CC8000!
There is also CB3S available on Aliexpress, but I haven't checked that offer. And I think that it would be cheaper to buy whol 5$ smart bulb than to buy a single module..
BK7231 Video Flashing Guides Elektroda.com Youtube channel features teardowns and flashing guides of multiple BK7231 devices. Each firmware flashing guide is shown step by step, and often includes soldering/desoldering details presented in easily accessible form for beginners.
RGBCW Tuya bulb flashing guide - BK7231N (WB2L_M1)
BK7231T/WB3S flashing guide - 2g Tuya wall switch - with SOIC8 chip desoldering - Home Assistant
Tuya Relay CB2S/BK7231N control without Local Tuya - 100% free from cloud with Home Assistant guide
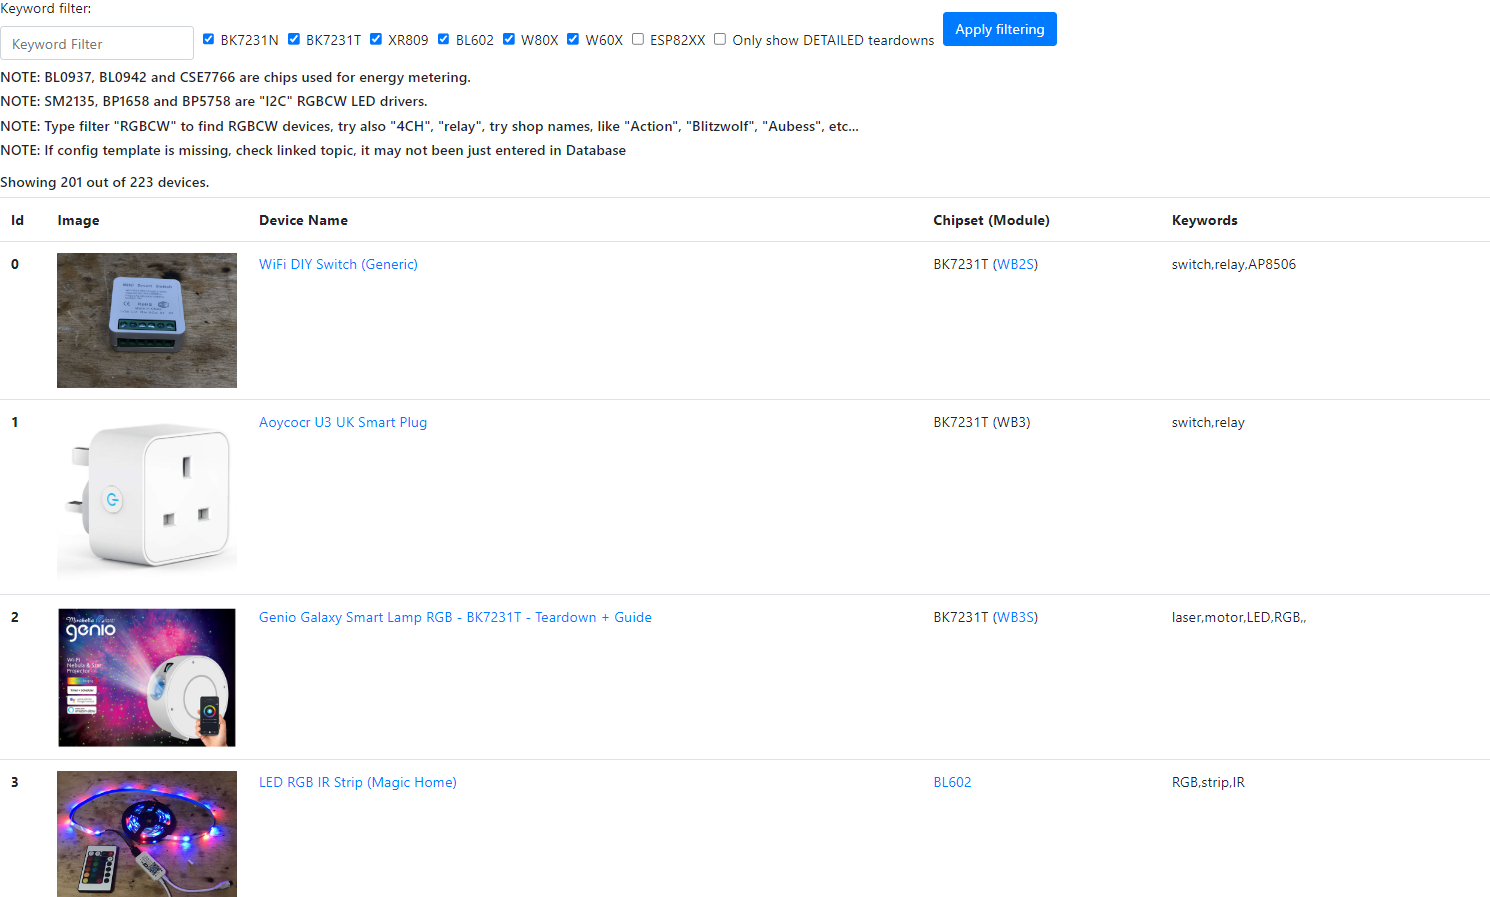
BK7231 Devices List Here's a global list of BK7231 IoT devices, fully maintained by community (you can also add your device there):
https://openbekeniot.github.io/webapp/devicesList.html The list contains also non-BK7231 IoT devices, so there is some ESP8266/ESP8285 devices, BL602 devices, W600/W601 devices, W800/W801 devices, XR809 devices, and much more.
Devices list screenshot:
Thank you for reading Thank you for your attention. This topic will be updated regularly with new information. If you have any questions, please create a separate topic here. This post is a documentation only.
I am attaching related datasheets.
Attachments:
bk7231_freertos_sdk-master2020.zip(13.77 MB)
You must be logged in to download this attachment.
bk7231_rtt_sdk-master2020.zip(36.05 MB)
You must be logged in to download this attachment.
bdk_freertos_old-release-v3.0.zip(100.29 MB)
You must be logged in to download this attachment.
rtt_ota_tools-master-2022.zip(30.98 KB)
You must be logged in to download this attachment.
BK7231Uv0.71.zh-CN.en.pdf(1.49 MB)
You must be logged in to download this attachment.
BK72XX_SDK_User_Manual-3.0.3.pdf(1.05 MB)
You must be logged in to download this attachment.
BL2028N_Datasheet_v1.0fx.pdf(831.77 KB)
You must be logged in to download this attachment.
BK7236 Datasheet_V1.0.pdf(894.36 KB)
You must be logged in to download this attachment.
BK7235 Datasheet_V0.1.pdf(593.94 KB)
You must be logged in to download this attachment.
BK7235 Datasheet_V0.1.pdf(593.94 KB)
You must be logged in to download this attachment.
BK7235 Datasheet_V0.1.pdf(593.94 KB)
You must be logged in to download this attachment.
WB2S Module Datasheet_Tuya Smart_Docs.pdf(549.06 KB)
You must be logged in to download this attachment.
Tuya WB1S Wi-Fi Module.pdf(503.24 KB)
You must be logged in to download this attachment.
2105241716_TUYA-WB3S-82yd_C2830107.pdf(598.89 KB)
You must be logged in to download this attachment.
ITM-7231N-BK Datasheet_V0.3_20211105.pdf(552.55 KB)
You must be logged in to download this attachment.
CB3SE Module Datasheet.pdf(639.9 KB)
You must be logged in to download this attachment.
CBU-IPEX Module Datasheet.pdf(399.83 KB)
You must be logged in to download this attachment.
CB2L Module Datasheet.pdf(495.62 KB)
You must be logged in to download this attachment.
BK7231_chinese_datasheet.pdf(607.69 KB)
You must be logged in to download this attachment.
About Author
p.kaczmarek2 wrote 14750 posts with
rating 12863 , helped 659 times.
Been with us since 2014 year.
It seems that, futhermore, both BK7231N and BK7231T are having a Tuya configuration sector at 0x1EE000 offset. The sector always starts with magic ident string, which is the following;
static... [Read more]
p.kaczmarek2
21 May 2023 09:03
Armino SDK has been released, of course, as an open-source:
https://github.com/bekencorp/armino
The Armino 1.2.0 features:
The tools section is also interesting, there are things like:
- beken_packager
-... [Read more]
p.kaczmarek2
11 Aug 2023 06:14
I've also found a doc covering all 3 SDK options for BK7231:
https://obrazki.elektroda.pl/9124249700_1691727217_thumb.jpg https://obrazki.elektroda.pl/3638523100_1691727222_thumb.jpg https://obrazki.elektroda.pl/3820005000_1691727229_thumb.jpg... [Read more]
p.kaczmarek2
16 Feb 2024 08:26
It is still recommended to use BK7231GUIFlashTool , but here is new bkWriter for reference
bk_writer_gui_V1.6.3.exe
https://obrazki.elektroda.pl/9422258100_1708068194_thumb.jpg
bk_writer_gui_V1.7.5
... [Read more]
Thanks to the reader who send me BK7231M, I've been able to solve the flashing issue. This BK7231M requires a binary built with different encryption keys. Here is final solution:
How to flash BK7231M/BL2028N... [Read more]
p.kaczmarek2
30 Jun 2024 11:13
some interesting tools:
- Linux BEKEN_BKFIL_V2.1.11.8_20240509.zip
- Linux BEKEN_BKFIL_V2.0.12.1_20230811.zip
- Linux BEKEN_BKFIL_V2.0.10.6_20230615
- BEKEN_RF_CAL_V2.2.6.1_20230522.zip
... [Read more]
Why it matters: Knowing limits, pins and tools prevents bootloader loss and speeds up cloud-free firmware installs.
Quick Facts
• 120 MHz ARM core, 256 KB RAM, in-package 2 MB flash [Elektroda, 20396908]
• UART bootloader occupies 0x0–0x11000 (68 KB) [Elektroda, post #20396908]
• Peak TX current: 220 mA @ +17 dBm; RX: 104 mA [Elektroda, 20396908]
• Safe supply: 3.3 V able to source ≥400 mA [Elektroda, post #20396908]
• Encrypted Tuya config sector starts at 0x1EE000 [Elektroda, 20578523]
What is the practical difference between BK7231T and BK7231N?
BK7231T ships in WB-series modules, BK7231N in CB-series. Pinout is the same, but factory flash layouts differ: OTA partition begins at 0x132000 on T and 0x12A000 on N [Elektroda, 20396908] Choose the correct binary (UA at 0x11000 for T, QIO at 0x0 for N) to avoid CRC errors [Elektroda, 20396908]
Which pins must I wire for UART flashing?
Connect P10 (UART1_RXD) to USB-UART TX, P11 (UART1_TXD) to USB-UART RX, plus 3.3 V and GND. Optional: pull CEN low for 0.25 s to reset [Elektroda, 20396908]
How do I enter the bootloader?
No special GPIO is used. The bootloader listens only for a fraction of a second after any reset or power-up. Trigger it by cycling power or momentarily grounding CEN, then start the flashing tool within that window [Elektroda, 20396908]
Which flashing tool is recommended in 2024?
BK7231GUIFlashTool performs automatic backup, download, erase and write in one click. It supports both T and N chips and fetches the newest OpenBeken build [Elektroda, 20963775]
Why do I get a “CRC mismatch” in GUI Flasher?
You selected the wrong platform. Flashing a T image on an N device (or vice-versa) produces an immediate CRC error before any data are written [Elektroda, 20396908]
Can flashing fail permanently?
Yes. bkWriter 1.60 wraps addresses above 0x200000 and can overwrite the bootloader, bricking the module [Elektroda, 20396908] Recovery then requires SPI programming or external flash swap.
How can I recover a bricked BK7231 without bootloader?
Use the SPI flash mode: wire P14-P17 as SCK/MOSI/CS/MISO, run the open-source BK7231_SPI_Flasher, erase and write the full QIO image at 0x0 [Elektroda, 20396908]
What is the 3-step UART flashing workflow?
Start “Backup and Flash” in BK7231GUIFlashTool.
Reset the module (power-cycle or short CEN to GND 0.25 s).
Wait for automatic backup, erase and write to finish—new AP “OpenBK” appears [Elektroda, 20396908]
How much current must my lab supply deliver?
Transmit peaks reach 220 mA; Beken recommends a 400 mA headroom to avoid brown-outs during Wi-Fi association [Elektroda, 20396908]
Where is the encrypted Tuya configuration stored?
Both chips place an AES-ECB block starting with magic 46 DC ED 0E… at flash offset 0x1EE000 [Elektroda, 20578523]
Are ESP replacement “brain transplants” pin-compatible?
WB3S/CB3S match TYWE3S/ESP-12; WB2S/CB2S match TYWE2S. Swap is possible but OpenBeken already removes cloud lock-in, so replacement is rarely needed [Elektroda, 20396908]
Which SDKs are available for developers?
Three options exist: legacy Tuya SDK, Open-source Armino 1.2.0 (Wi-Fi 6, BLE 5.x, CMake) [Elektroda, 20588765], and a minimalist RTOS SDK shown in internal docs [Elektroda, 20689544]
What edge case affects BK7231M modules?
Non-Tuya BK7231M/BL2028N use different encryption keys. Flash a binary rebuilt with 000000 keys per the guide at elektroda.com/topic4058227 to avoid endless reboot loops [Elektroda, 21109476]
How does TuyaMCU communicate with BK7231?
A second MCU exchanges framed UART packets (default 9600 bps) on P10/P11. Each datapoint has an ID; values such as temperature 22.5 °C are sent as integer 225 [Elektroda, 20396908]
AI summary based on the discussion. May contain errors.















Comments
It seems that, futhermore, both BK7231N and BK7231T are having a Tuya configuration sector at 0x1EE000 offset. The sector always starts with magic ident string, which is the following; static... [Read more]
Armino SDK has been released, of course, as an open-source: https://github.com/bekencorp/armino The Armino 1.2.0 features: The tools section is also interesting, there are things like: - beken_packager -... [Read more]
I've also found a doc covering all 3 SDK options for BK7231: https://obrazki.elektroda.pl/9124249700_1691727217_thumb.jpg https://obrazki.elektroda.pl/3638523100_1691727222_thumb.jpg https://obrazki.elektroda.pl/3820005000_1691727229_thumb.jpg... [Read more]
It is still recommended to use BK7231GUIFlashTool , but here is new bkWriter for reference bk_writer_gui_V1.6.3.exe https://obrazki.elektroda.pl/9422258100_1708068194_thumb.jpg bk_writer_gui_V1.7.5 ... [Read more]
RF calibration tools: - Wifi_Test_Tool.zip - BEKEN_RF_CAL_V2.2.7.0_20231211.zip - BEKEN_RF_CAL_V2.2.6.2_20231031.zip [Read more]
Thanks to the reader who send me BK7231M, I've been able to solve the flashing issue. This BK7231M requires a binary built with different encryption keys. Here is final solution: How to flash BK7231M/BL2028N... [Read more]
some interesting tools: - Linux BEKEN_BKFIL_V2.1.11.8_20240509.zip - Linux BEKEN_BKFIL_V2.0.12.1_20230811.zip - Linux BEKEN_BKFIL_V2.0.10.6_20230615 - BEKEN_RF_CAL_V2.2.6.1_20230522.zip ... [Read more]
New files available. BK7231 catalogue note, BK7231 pinout, registers, SDK. BK7258 Datasheet BK7258-Datasheet_V2.1.pdf DS-BK7258-E12 V2.1 2025/5/23 BK3432 Bluetooth Dual Mode SoC Classic... [Read more]