logo elektroda
logo elektroda
X
logo elektroda

OpenBeken on WiFi Smoke Detectors (Tuya CBU Chip) - ESP8266 Alternative, MQTT & Setup

toboxx 25203 162
ADVERTISEMENT
  • #151 21423167
    sithyoda
    Level 7  
    It was not able to figure out what caused the problem.
    Anyhow, I just flashed original tuya firmware over OBK, hooked it up to my wifi and tuya cloud and it worked.
    Then I flashed again OBK, now as config was re-init'ed, no problem anymore.
  • ADVERTISEMENT
  • #152 21431129
    groove6j
    Level 8  
    Hello guys. I fiddled with this smoke detector for quite a while and couldn't figure out why it was detecting smoke all the time. P15 seemed not to change at all. Also, the device was waking from deep sleep with reason: Pin interrupt (when forced into deep sleep).
    I resoldered all solder points from the 10-pin chip to the CBU and it started working correctly.

    So it seems that this config with the autoexec works perfectly here too. The unit's board is A008 version. Will order more definitely.
  • ADVERTISEMENT
  • #153 21449197
    mishak
    Level 1  
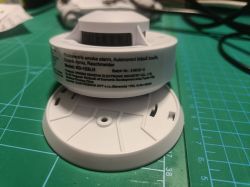
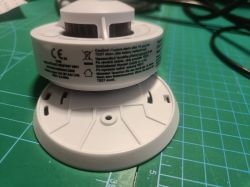
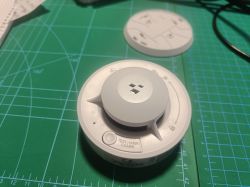
    I bought a new kind of similar Tuya Smoke Detector (Wi-Fi)
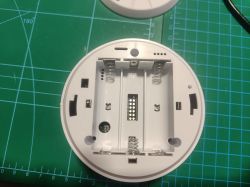
    PCB is marked v2
    I tried all possible tuya-cloudcutter OTA devices and nothing worked.
    So the only thing left is flashing over wire.
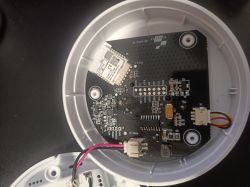
    Which pins are UART TX and RX?

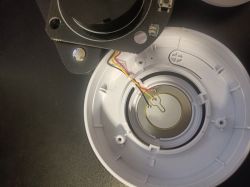
    Smoke detector with visible manufacturer label and model KD-122LH.
    Close-up of a Tuya smoke detector with visible labels on a green mat.
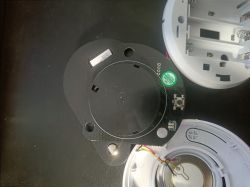
    Image of the inside of a Tuya smoke detector with a circuit board marked v2.
    Tuya smoke detector with PCB labeled v2 on a green cutting mat.
    Disassembled smoke sensor with visible red, yellow, and black wires.
    Tuya smoke sensor circuit board with visible connectors and button.
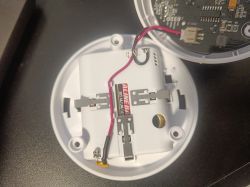
    Open Tuya smoke detector with visible circuit board and wires.
    View of the interior of a smoke detector with electronic circuitry and pins on the printed circuit board.
  • #154 21449209
    p.kaczmarek2
    Moderator Smart Home
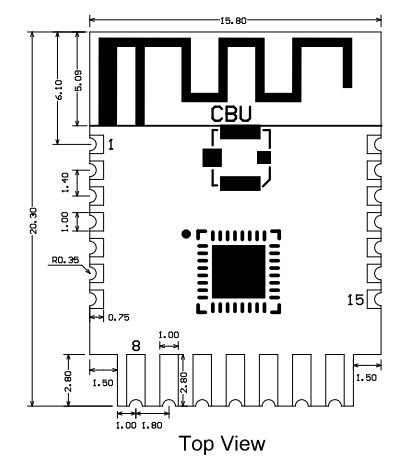
    Here's Tuya CBU module pinout:
    Top view of Tuya CBU module with pin layout.
    Pin numberSymbolI/O typeFunction
    1P14I/OCommon GPIO, which can be reused as SPI_SCK (Correspond to Pin 11 of the IC)
    2P16I/OCommon GPIO, which can be reused as SPI_MOSI (Correspond to Pin 12 of the IC)
    3P20I/OCommon GPIO (Correspond to Pin 20 of the IC)
    4P22I/OCommon GPIO (Correspond to Pin 18 of the IC)
    5ADCI/OADC, which corresponds to P23 on the internal IC (Correspond to Pin 17 of the IC)
    6RX2I/OUART_RX2, which corresponds to P1 on the internal IC. (Correspond to Pin 28 of the IC)
    7TX2I/OUART_TX2, which is used for outputting logs and corresponds to P0 of the internal IC (Correspond to Pin 29 of the IC)
    8P8I/OSupport hardware PWM (Correspond to Pin 24 of the IC)
    9P7I/OSupport hardware PWM (Correspond to Pin 23 of the IC)
    10P6I/OSupport hardware PWM (Correspond to Pin 22 of the IC)
    11P26I/OSupport hardware PWM (Correspond to Pin 15 of the IC)
    12P24I/OSupport hardware PWM (Correspond to Pin 16 of the IC)
    13GNDPPower supply reference ground
    143V3PPower supply 3V3
    15TX1I/OUART_TX1, which is used for transmitting user data and corresponds to Pin 27 of the IC. For the MCU solution, please refer to CBx Module.
    16RX1I/OUART_RX1, which is used for receiving user data and corresponds to Pin 26 of the IC. For the MCU solution, please refer to CBx Module.
    17P28I/OCommon GPIO (Correspond to Pin 10 of the IC)
    18CENI/OReset pin, low active (internally pulled high), compatible with other modules (Correspond to Pin 21 of the IC)
    19P9I/OCommon GPIO (Correspond to Pin 25 of the IC)
    20P17I/OCommon GPIO, which can be reused as SPI_MISO (Correspond to Pin 14 of the IC)
    21P15I/OCommon GPIO, which can be reused as SPI_CS (Correspond to Pin 13 of the IC)
    Test pointCSNI/OMode selection pin. If it is connected to the ground before being powered on, enter the firmware test mode. If it is not connected or connected to VCC before being powered on, enter the firmware application mode. Correspond to Pin 19 on the internal IC.

    You just need 3.3V, GND, UART_TX1 and UART_RX1.
    See flasher page:
    https://github.com/openshwprojects/BK7231GUIFlashTool
    See our guides:
    https://www.youtube.com/@elektrodacom[/table]
    Helpful post? Buy me a coffee.
  • #155 21456485
    doroftei_olivian
    Level 1  
    @dominictauscher

    I followed your steps and everything seems to be fine when the sensor starts up. (used your second script)
    Right after the startup I can see it in home assistant and when I fiddle with the tamper button it goes on/off in HA.

    Now once it goes into sleep it goes completely offline (which is expected), but when I press the tamper button it does not wake up to report the new state. Is this the normal behavior?

    My expectations were that it would wake up when I push the tamper button and it makes me wonder whether it will behave the same when smoke will be detected.

    p.s.: appreciate your efforts and willingness to share it. Kudos, man!

    L.E.:
    I got it figured out eventually. It will wake up from sleep when smoke is detected and it will ring the alarm and go online to report, but it will not wake up when tampered.
    The tampered sensor will only report back if it it happens to be "on" when the current sleep cycle ends. If this happens, then it will keep the sensor online for as long the tamper sensor is "on" or it runs out of battery.
    Given that I don't install it in a rented property I don't care that much about the tamper function so I can let it sleep for one day at a time.

    L.E.2:
    Made some small adjustments to the script so that it measures the battery once every 60s.
    Then at boot it will first check for smoke (in a loop) and if no smoke is detected then it will check to see if the device is tampered.

    If the device is not tampered then it will enter in a ~36 hours (max) deep sleep to preserve battery.
    However if the device is tampered, then it will enter in a 60 minutes deep sleep. This will basically put the device in a 60 minutes (reboot) loop reporting the (tampered) state every hour until someone fixes the issue. Of course that each reboot will also redo the whole initialization and check for smoke, but there's no harm in that.

    I think this script will get the most out of the battery while still reporting the tampering state once an hour.

    WARNING: if no smoke is detected, but the device is tampered you only have 5 minutes to adjust the script at boot before it goes back again in deep sleep for one hour. Only way to bring it back online is to remove the batteries and put them back on, giving you 5 more minutes of uptime.


    Battery_Setup 1500 3000 2 2400 4096
    //measure batt every 60s
    Battery_cycle 60
    //mqtt_broadcastInterval 1
    //mqtt_broadcastItemsPerSec 5
    addEventHandler OnHold 10 SafeMode 5
    
    setChannelLabel 1 Smoke
    setChannelLabel 2 Tamper
    setChannelLabel 4 BatADC
    setChannelLabel 5 BatRelay
    
    // now wait for MQTT
    waitFor MQTTState 1
    // extra delay, to be sure
    delay_s 1
    // publish smoke and tamper state at least once after boot
    publish 1 $CH1
    publish 2 $CH2
    publish 4 $CH4
    publish 5 $CH5
    
    // ------------------------------------------------
    
    // if smoke detected, keep cycling (but drains battery)
    again:
    delay_s 2
    if $CH1!=1 then goto again
    delay_s 10
    
    // at this point there's no smoke so if the device is not tampered, then go to 36 hours deep sleep
    if $CH2==1 then goto dpsleep
    
    // if tampered, keep rebooting once an hour to report (tampered) state
    // the 300s delay window is for maintenance work
    delay_s 30
    if $CH2==1 then goto dpsleep
    delay_s 30
    if $CH2==1 then goto dpsleep
    delay_s 30
    if $CH2==1 then goto dpsleep
    delay_s 30
    if $CH2==1 then goto dpsleep
    delay_s 30
    if $CH2==1 then goto dpsleep
    delay_s 30
    if $CH2==1 then goto dpsleep
    delay_s 30
    if $CH2==1 then goto dpsleep
    delay_s 30
    if $CH2==1 then goto dpsleep
    delay_s 30
    if $CH2==1 then goto dpsleep
    delay_s 300
    if $CH2==1 then goto dpsleep
    PinDeepSleep 21600
    
    dpsleep:
    // All good, sleep for as long as possible (36 hours) to preserve battery
    PinDeepSleep 130000
    delay_s 3
    // nothing
    
    
  • ADVERTISEMENT
  • Helpful post
    #156 21466188
    groove6j
    Level 8  
    >>21423167
    @sithyoda

    I bought another unit. Same board, same everything. And after configuring it just stuck and didn't connect to WiFi anymore.
    Did flash the original fw, booted once, and then all worked.
    Keep the original fw just in case for this device! Or use the attached.
  • #157 21471336
    cijoml
    Level 7  
    I think battery setup in autoexec.bat must be like this. Min 2600 max 3000 and I also change check to be done only hourly which I think would help save energy and still provide info to replace battery
    Battery_Setup 2600 3000 1.94
    Battery_cycle 3600
  • #158 21486316
    drkaresz
    Level 6  
    >>21471336
    Hi!

    After 1-2 weeks of use, the sensors stop sending RSSI values.
    Do you have any idea why?
  • ADVERTISEMENT
  • #159 21515437
    dominictauscher
    Level 3  
    I changed the cor for NiMH rechargeable batteries with ChatGPT to:

    Battery_Setup 2000 2800 2 2400 4096
    Battery_cycle 60
    //mqtt_broadcastInterval 1
    //mqtt_broadcastItemsPerSec 5
    addEventHandler OnHold 10 SafeMode 5


    Explanation of changes:
    2000: Minimum voltage in mV (2.0V)

    2800: Maximum voltage in mV (2.8V)

    2400: Nominal voltage (2.4V) is good for 2x 1.2V cells

    4096: Assuming a 12-bit ADC (unchanged)
  • #160 21540807
    serik32938
    Level 1  
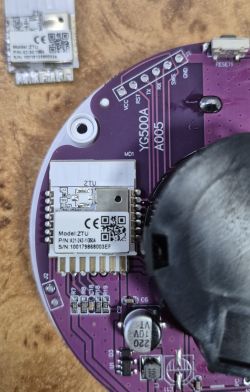
    Close-up of a purple printed circuit board with a mounted ZTU electronic module and visible technical markings.
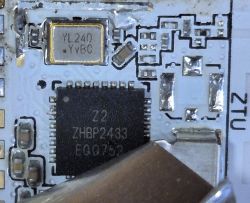
    Close-up of a printed circuit board with an integrated circuit and other electronic components.
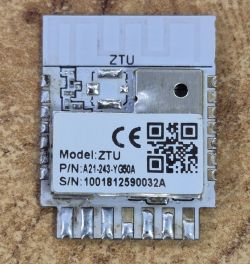
    ZTU electronic module with QR code and technical markings on a white label.
    Привет. Купил такой датчик, на ДИМ срабатывает, вайфай не видит. Может кто подскажет, что это за вайфай чип и как его прошить
  • #161 21540846
    insmod
    Level 22  
    >>21540807
    ZTU is a Zigbee module, it contains TLSR825x chip.
    You either need a zigbee gateway or a pin compatible module to replace it.
    Personally i wouldn't bother to replace it, just buy a zigbee gateway if you don't already own one.
    And zigbee is much better for battery-powered devices, with 3xAAA it can live up to several years.
  • #162 21573858
    jtauscher87
    Level 5  
    >>21466188 wtf - how is that even possible? I thought I had some bad soldering but switching back and forth firmwares did the trick. I have no explanation for such a behavior.
  • #163 21580277
    p.kaczmarek2
    Moderator Smart Home
    Probably user error, however, I also saw some cases where running devices on very low voltage causes flash corruption. It's often mentioned in topics with battery-powered devices. When batteries discharge, the WiFI chip dies and won't work correctly until it's reflashed fully with factory firmware.

    We haven't yet determined what is the cause of this problem. We need to compare a "working" and a "broken" flash dump someday to see.
    Helpful post? Buy me a coffee.

Topic summary

The discussion revolves around the integration of OpenBeken firmware with Tuya CBU chip-based WiFi smoke detectors, specifically the YG400A-W model. Users share experiences with flashing the firmware, configuring MQTT, and troubleshooting issues related to smoke detection and battery management. Key challenges include the device's inability to wake up from deep sleep to report smoke detection, the need for proper pin configuration, and the implementation of battery monitoring. Solutions discussed include using specific pin roles, setting up autoexec.bat for device behavior, and the potential for GPIO and timer wake-up functionality in future firmware updates. Users also express interest in creating a network of interconnected smoke detectors for enhanced alarm capabilities.
Summary generated by the language model.
ADVERTISEMENT