>>21115933Thank you it works now, the command:
linkTuyaMCUOutputToChannel 106 1 10 0 10
linkTuyaMCUOutputToChannel 108 1 11 0 10
Czy wolisz polską wersję strony elektroda?
Nie, dziękuję Przekieruj mnie tam


startDriver TuyaMCU
tuyaMcu_setBaudRate 9600
tuyaMcu_defWiFiState 4

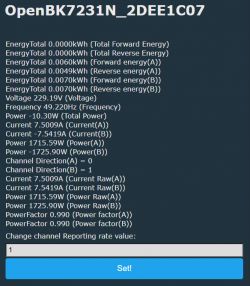
//Total energy forward
setChannelType 1 EnergyTotal_kWh_div1000
SetChannelLabel 1 "Total Forward Energy"
linkTuyaMCUOutputToChannel  1 1 1

//Total energy reverse
setChannelType 2 EnergyTotal_kWh_div1000
SetChannelLabel 2 "Total Reverse Energy"
linkTuyaMCUOutputToChannel  2 1 2

//power A
setChannelType 3 Power_div10
SetChannelLabel 3 "Power(A)"
linkTuyaMCUOutputToChannel  101 1 3

//Direction A
setChannelType 4 Raw
SetChannelLabel 4 "Direction(A)"
linkTuyaMCUOutputToChannel  102 1 4

//Direction B
setChannelType 5 Raw
SetChannelLabel 5 "Direction(B)"
linkTuyaMCUOutputToChannel  104 1 5

//power B
setChannelType 6 Power_div10
SetChannelLabel 6 "Power(B)"
linkTuyaMCUOutputToChannel  105 1 6

//forward energy A
setChannelType 7 EnergyTotal_kWh_div1000
SetChannelLabel 7 "Forward energy(A)"
linkTuyaMCUOutputToChannel  106 1 7

//reverse energy A
setChannelType 8 EnergyTotal_kWh_div1000
SetChannelLabel 8 "Reverse energy(A)"
linkTuyaMCUOutputToChannel  107 1 8

//forward energy B
setChannelType 9 EnergyTotal_kWh_div1000
SetChannelLabel 9 "Forward energy(B)"
linkTuyaMCUOutputToChannel  108 1 9

//reverse energy B
setChannelType 10 EnergyTotal_kWh_div1000
SetChannelLabel 10 "Reverse energy(B)"
linkTuyaMCUOutputToChannel  109 1 10

//power factor A
setChannelType 11 PowerFactor_div100
SetChannelLabel 11 "Power factor(A)"
linkTuyaMCUOutputToChannel  110 1 11

//frequency
setChannelType 12 Frequency_div100
SetChannelLabel 12 "Frequency"
linkTuyaMCUOutputToChannel  111 1 12

//voltage
setChannelType 13 Voltage_div10
SetChannelLabel 13 "Voltage"
linkTuyaMCUOutputToChannel  112 1 13

//current A
setChannelType 14 Current_div1000
SetChannelLabel 14 "Current(A)"
linkTuyaMCUOutputToChannel 113 1 14

//current B
setChannelType 15 Current_div1000
SetChannelLabel 15 "Current(B)"
linkTuyaMCUOutputToChannel 114 1 15

//total power
setChannelType 16 Power_div10
SetChannelLabel 16 "Total Power"
linkTuyaMCUOutputToChannel  115 1 16

//power factor B
setChannelType 17 PowerFactor_div100
SetChannelLabel 17 "Power factor(B)"
linkTuyaMCUOutputToChannel  121 1 17

//reporting rate
setChannelType 18 TextField
SetChannelPrivate 18 true
SetChannelLabel 18 "Reporting rate"
linkTuyaMCUOutputToChannel  129 val 18

addRepeatingEvent 10 1 SetChannel 18 3
// warning! pseudocode! take care!
// I assume that channel 12 is result
// channel 10 is sign
// channel 11 is unsigned val
alias positive setChannel 12 $CH11
alias negative setChannel 12 $CH11*-1
alias myset if $CH10==0 then positive else negative
// WARNING 2 - PSEUDOCODE, NOT TESTED, may have syntax errors
// now trigger it on every change
addEventHandler OnChannelChange 10 myset
addEventHandler OnChannelChange 11 myset
//power A
setChannelType 3 Power_div10
SetChannelLabel 3 "Power(A)"
linkTuyaMCUOutputToChannel  101 1 3

//Direction A
setChannelType 4 Raw
SetChannelLabel 4 "Direction(A)"
linkTuyaMCUOutputToChannel  102 1 4

//Corrected Power
setChannelType 19 Raw
SetChannelLabel 19 "Corrected Power(A)"

// warning! pseudocode! take care!
// I assume that channel 12 is result
// channel 10 is sign 4
// channel 11 is unsigned val 3
alias positive setChannel 19 $CH3
alias negative setChannel 19 $CH3*-1
alias myset if $CH4==0 then positive else negative
// WARNING 2 - PSEUDOCODE, NOT TESTED, may have syntax errors
// now trigger it on every change
addEventHandler OnChannelChange 3 myset
addEventHandler OnChannelChange 4 myset


startDriver TuyaMCU

//Total energy forward
setChannelType 1 EnergyTotal_kWh_div1000
SetChannelLabel 1 "Total Forward Energy"
linkTuyaMCUOutputToChannel  1 1 1

//Total energy reverse
setChannelType 2 EnergyTotal_kWh_div1000
SetChannelLabel 2 "Total Reverse Energy"
linkTuyaMCUOutputToChannel  2 1 2

//forward energy A
setChannelType 3 EnergyTotal_kWh_div1000
SetChannelLabel 3 "Forward energy(A)"
linkTuyaMCUOutputToChannel  106 1 3

//reverse energy A
setChannelType 4 EnergyTotal_kWh_div1000
SetChannelLabel 4 "Reverse energy(A)"
linkTuyaMCUOutputToChannel  107 1 4

//forward energy B
setChannelType 5 EnergyTotal_kWh_div1000
SetChannelLabel 5 "Forward energy(B)"
linkTuyaMCUOutputToChannel  108 1 5

//reverse energy B
setChannelType 6 EnergyTotal_kWh_div1000
SetChannelLabel 6 "Reverse energy(B)"
linkTuyaMCUOutputToChannel  109 1 6

//voltage
setChannelType 7 Voltage_div10
SetChannelLabel 7 "Voltage"
linkTuyaMCUOutputToChannel  112 1 7

//frequency
setChannelType 8 Frequency_div100
SetChannelLabel 8 "Frequency"
linkTuyaMCUOutputToChannel  111 1 8

//total power
setChannelType 9 Power_div10
SetChannelLabel 9 "Total Power"
linkTuyaMCUOutputToChannel  115 1 9

//current A
setChannelType 16 Current_div1000
SetChannelLabel 16 "Current Raw(A)"
linkTuyaMCUOutputToChannel 113 1 16
setChannelType 10 Current_div1000
SetChannelLabel 10 "Current(A)"
addEventHandler OnChannelChange 16 SetChannel 10 $CH16-(2*$CH14*$CH16)

//current B
setChannelType 17 Current_div1000
SetChannelLabel 17 "Current Raw(B)"
linkTuyaMCUOutputToChannel 114 1 17
setChannelType 11 Current_div1000
SetChannelLabel 11 "Current(B)"
addEventHandler OnChannelChange 17 SetChannel 11 $CH17-(2*$CH15*$CH17)

//power A
setChannelType 18 Power_div10
SetChannelLabel 18 "Power Raw(A)"
linkTuyaMCUOutputToChannel  101 1 18
setChannelType 12 Power_div10
SetChannelLabel 12 "Power(A)"
addEventHandler OnChannelChange 18 SetChannel 12 $CH18-(2*$CH14*$CH18)

//power B
setChannelType 19 Power_div10
SetChannelLabel 19 "Power Raw(B)"
linkTuyaMCUOutputToChannel  105 1 19
setChannelType 13 Power_div10
SetChannelLabel 13 "Power(B)"
addEventHandler OnChannelChange 19 SetChannel 13 $CH19-(2*$CH15*$CH19)

//Direction A
setChannelType 14 ReadOnly
SetChannelLabel 14 "Direction(A)"
linkTuyaMCUOutputToChannel  102 1 14

//Direction B
setChannelType 15 ReadOnly
SetChannelLabel 15 "Direction(B)"
linkTuyaMCUOutputToChannel  104 1 15

//power factor A
setChannelType 20 PowerFactor_div100
SetChannelLabel 20 "Power factor(A)"
linkTuyaMCUOutputToChannel  110 1 20

//power factor B
setChannelType 21 PowerFactor_div100
SetChannelLabel 21 "Power factor(B)"
linkTuyaMCUOutputToChannel  121 1 21

//reporting rate
setChannelType 30 TextField
SetChannelPrivate 30 true
SetChannelLabel 30 "Reporting rate"
linkTuyaMCUOutputToChannel  129 val 30

addRepeatingEvent 10 1 SetChannel 30 1

snkbrzmir4 wrote:alias positive setChannel 19 $CH3
alias negative setChannel 19 $CH3*-1
alias myset if $CH4==0 then positive else negative
// WARNING 2 - PSEUDOCODE, NOT TESTED, may have syntax errors
// now trigger it on every change
addEventHandler OnChannelChange 3 myset
addEventHandler OnChannelChange 4 myset
randomalias324 wrote:addEventHandler OnChannelChange 16 SetChannel 10 $CH16-(2*$CH14*$CH16)
uart:
  id: uart_bus
# pin 7	TX1	I/O	UART_TX1, which is used for transmitting user data and corresponds to P11 of the IC. Do not pull it up. By default, the MCU serial port should be in low-level or high-impedance state.
  tx_pin: GPIO11
# pin 5	RX1	I/O	UART_RX1, which is used for receiving user data and corresponds to P10 of the IC. Do not pull it up. By default, the MCU serial port should be in low-level or high-impedance state.
  rx_pin: GPIO10
  baud_rate: 9600

tuya:

sensor:
# --- Total Energy Forward ---
  - platform: tuya
    name: "Total Forward Energy"
    id: energy_total_fwd
    sensor_datapoint: 1
    unit_of_measurement: "kWh"
    accuracy_decimals: 3
    filters:
      - multiply: 0.001
    state_class: "total_increasing"  # Marks it as a total increasing sensor for Home Assistant
    device_class: "energy"           # Marks it as an energy sensor for Home Assistant

# --- Total Reverse Energy ---
  - platform: tuya
    name: "Total Reverse Energy"
    id: energy_total_rev
    sensor_datapoint: 2
    unit_of_measurement: "kWh"
    accuracy_decimals: 3
    filters:
      - multiply: 0.001
    state_class: "total_increasing"  # Marks it as a total increasing sensor for Home Assistant
    device_class: "energy"           # Marks it as an energy sensor for Home Assistant

  # --- Voltage ---
  - platform: tuya
    name: "Voltage"
    id: voltage
    sensor_datapoint: 112
    unit_of_measurement: "V"
    accuracy_decimals: 1
    filters:
      - multiply: 0.1

  # --- Frequency ---
  - platform: tuya
    name: "Frequency"
    id: frequency
    sensor_datapoint: 111
    unit_of_measurement: "Hz"
    accuracy_decimals: 2
    filters:
      - multiply: 0.01

  # --- Total Power ---
  - platform: tuya
    name: "Total Power"
    id: power_total
    sensor_datapoint: 115
    unit_of_measurement: "W"
    accuracy_decimals: 1
    filters:
      - multiply: 0.1

  # --- Current (Phase A) ---
  - platform: tuya
    name: "Current(A)"
    id: current_a
    sensor_datapoint: 113
    unit_of_measurement: "A"
    accuracy_decimals: 3
    filters:
      - multiply: 0.001

  # --- Current (Phase B) ---
  - platform: tuya
    name: "Current(B)"
    id: current_b
    sensor_datapoint: 114
    unit_of_measurement: "A"
    accuracy_decimals: 3
    filters:
      - multiply: 0.001

  # --- Power (Phase A) ---
  - platform: tuya
    name: "Power(A)"
    id: power_a
    sensor_datapoint: 101
    unit_of_measurement: "W"
    accuracy_decimals: 1
    filters:
      - multiply: 0.1

  # --- Power (Phase B) ---
  - platform: tuya
    name: "Power(B)"
    id: power_b
    sensor_datapoint: 105
    unit_of_measurement: "W"
    accuracy_decimals: 1
    filters:
      - multiply: 0.1

  # --- Power Factor (Phase A) ---
  - platform: tuya
    name: "Power Factor(A)"
    id: power_factor_a
    sensor_datapoint: 110
    accuracy_decimals: 2
    filters:
      - multiply: 0.01

  # --- Power Factor (Phase B) ---
  - platform: tuya
    name: "Power Factor(B)"
    id: power_factor_b
    sensor_datapoint: 121
    accuracy_decimals: 2
    filters:
      - multiply: 0.01

  # --- WiFi Signal Strength ---
  - platform: wifi_signal
    name: "WiFi Signal"
    update_interval: 60s
    id: wifi_strength
    unit_of_measurement: "dBm"

  # --- Uptime ---
  - platform: uptime
    name: "Uptime"
    id: uptime_sensor
    update_interval: 60s

text_sensor:
  - platform: tuya
    name: "Reporting Rate"
    id: reporting_rate
    sensor_datapoint: 129

  # --- WiFi IP Address ---
  - platform: wifi_info
    ip_address:
      name: "Device IP"


