logo elektroda
logo elektroda
X
logo elektroda

Exploring the Inner Workings of PJ-MGW1103 CT-Clamp Energy Meter: Tuya, BL0942, CB2S Components

TurkeyMan 19113 134
ADVERTISEMENT
  • #91 20882983
    tony059560
    Level 4  

    Thanks!

    Here is the content of my autoexec.bat:

    
    // config for PJ-MGW1103 CT-Clamp Energy Meter by Tuya, BL0942, CB2S Components
    startDriver TuyaMCU
    tuyaMcu_setBaudRate 115200
    tuyaMcu_defWiFiState 4
    setChannelType 2 Voltage_div10
    setChannelType 3 Power_div10
    setChannelType 4 Current_div1000
    // linkTuyaMCUOutputToChannel dpId variableType tgChannel
    //ch 2(dpid 20) voltage
    linkTuyaMCUOutputToChannel 20 1 2
    //ch 3(dpid 19) power watts
    linkTuyaMCUOutputToChannel 19 1 3
    //ch 4(dpid 18) current in mA
    linkTuyaMCUOutputToChannel 18 1 4
    // every 15 seconds query measurements from the MCU
    addRepeatingEvent 5 -1 tuyaMcu_sendQueryState
    

  • ADVERTISEMENT
  • #93 20883161
    tony059560
    Level 4  

    I've watched this video before but the problem is that when I click on the "Home Assistant Configuration" button, the area where there should be an automatically generated configuration is empty.
    However, I have configured the parameters related to MQTT. In addition, in the main menu, it tells me that the MQTT is connected.

    I still tried to click on the "Start Home Assistant Discovery" button. This new device appeared in my list of MQTT devices in Home Assistant and after a few minutes, the information was correctly displayed.

    In summary, we can still launch Home Assistant discovery, even if the configuration is empty.

    One last question (for beginners), is whether we have the possibility of reinjecting the official firmware in order to be able to integrate it again into the Tuya application. I know I'm not going to do it but I would like to know if it's possible. And if it's possible, where can we find the official firmware and how to re-inject it?
    I think it's useful to know that.
  • #94 20883210
    p.kaczmarek2
    Moderator Smart Home
    The text field is only for basic devices, but HA Discovery button works also for advanced ones, most of the time.

    Our flashing tool, BK7231tools easy flasher:
    https://github.com/openshwprojects/BK7231GUIFlashTool
    Is automatically making a 2MB flash backup on read, so you can always restore device to Tuya with that backup. This is why I always recommend to make a backup first.
    Helpful post? Buy me a coffee.
  • ADVERTISEMENT
  • #95 20922252
    tony059560
    Level 4  

    Hello,
    Can we configure the state of the smart plug when it is plugged in or put it in the state it was in before it was turned off?
    Currently, when my smart plug has no power and then it has power again, its status is off.
  • #96 20922273
    p.kaczmarek2
    Moderator Smart Home
    It is possible but it's a bit more complicated in the case of TuyaMCU device.
    Please see this tutorial:
    How to configure TuyaMCU initial switch state? dpID and script methods for OpenBeken
    You will need to use:
    Method 2 - Manual OBK state save
    Helpful post? Buy me a coffee.
  • Helpful post
    #97 21041947
    nielspiersma
    Level 9  

    Hi All,

    I would like to share that I've successfully got the two clamps version working;
    It did take me a while getting all the required information together, so here a quick write up on the two-clamp version;

    1. Flash the device using tuya-cloudcutter (the device is on the device list as generic "Tuya PJ-MGW1103 "
    2. connect to your wifi
    3. paste the correct autoexec.bat (post 77 https://www.elektroda.com/rtvforum/topic3946128-60.html#20851047)

    
    startDriver TuyaMCU
    tuyaMcu_setBaudRate 9600
    tuyaMcu_defWiFiState 4
    setChannelType 2 Voltage_div10
    setChannelType 3 Current_div1000
    setChannelType 4 Current_div1000
    setChannelType 5 Frequency_div100
    setChannelType 6 Power_div10
    setChannelType 7 Power_div10
    setChannelType 8 PowerFactor_div100
    setChannelType 9 PowerFactor_div100
    // linkTuyaMCUOutputToChannel dpId variableType tgChannel
    //ch 2(dpid 20) voltage
    linkTuyaMCUOutputToChannel  112 1 2
    //ch 3(dpid 19) power watts
    linkTuyaMCUOutputToChannel 113 1 3
    linkTuyaMCUOutputToChannel 114 1 4
    //ch 4(dpid 20) frequency
    linkTuyaMCUOutputToChannel  111 1 5
    linkTuyaMCUOutputToChannel  101 1 6
    linkTuyaMCUOutputToChannel  105 1 7
    linkTuyaMCUOutputToChannel  110 1 8
    linkTuyaMCUOutputToChannel  121 1 9


    4. reboot
    5. done!

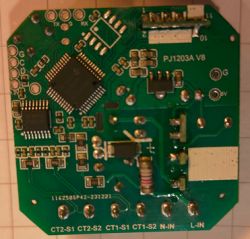
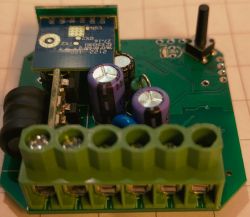
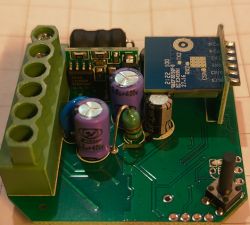
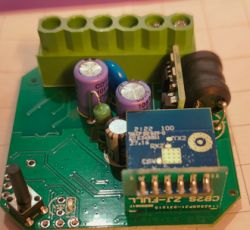
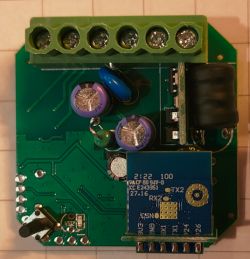
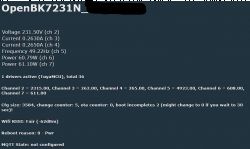
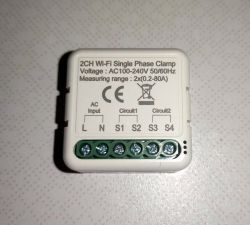
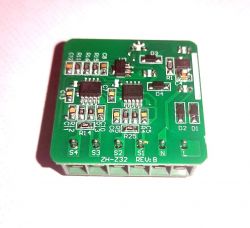
    My device:
    Circuit board of the Tuya PJ-MGW1103 device in a dual-clamp version.
    Image of a circuit board with electronic components and connectors.
    Circuit board with electronic components, including terminals and a blue module.
    Image of an electronic module with a green terminal block and various components.
    Electronic board with components for modifying a Tuya device.

    Lessons learned:
    baud rate needs to be 9600
    no hardware fiddling is required

    Proof;:
    Screenshot showing information about the OpenBK7231N device.
    .
  • #98 21042266
    p.kaczmarek2
    Moderator Smart Home
    Good job. I think you can also improve your config by setting channel labels.
    Helpful post? Buy me a coffee.
  • #99 21047391
    bf1648
    Level 3  
    Hello everyone
    I have a device with Aliexpress "Double Digital Meter". There are two bl0942 chips on the bk7231n board - the first connects to uart1, the second is connected to uart2. There is no Tuya mcu on the board. A channel that works fine on uart1 with the bl0942 driver enabled. How can I make the second channel on uart2 work? Maybe someone can help?
  • #100 21048398
    p.kaczmarek2
    Moderator Smart Home
    Hello! Are you sure that your question is related to the device from the first post? Maybe I should move it to the separate topic?

    Supporing two BL0942's via UART requires a firmware modification, but we can do it together. Do you know C basics?
    Helpful post? Buy me a coffee.
  • #101 21048480
    bf1648
    Level 3  

    Thanks for the answer!
    I'm sorry, but a similar device was discussed in this topic, but with a different board.
    I know very little about C, but I hope that with your help I can figure it out.

    And I'm sorry for the spelling - English is not my native language, I use google translator.
  • ADVERTISEMENT
  • #102 21049535
    snkbrzmir4
    Level 4  
    Hello, checking the logs I discovered that dpid 115 shows the power with the same flow, but the sign is inverted, in dpid 101 it always shows positive, in 115 it shows negative if it is positive and positive if the flow inverts, I did the test here with my ongrid inverter. I haven't discovered how to invert the sign to show it in homeassistant, I believe that simply multiplying by -1 would solve it without any major problems. I appreciate anyone who can help me, I'm new to openbk, but I already have others with it installed, but they are normal smart switches without any major complications.

    Thanks in advance for any help.

    It's also taking a long time between updates, it's like doing it every 1 second?
  • #103 21049968
    p.kaczmarek2
    Moderator Smart Home
    snkbrzmir4 wrote:
    I haven't discovered how to invert the sign to show it in homeassistant, I believe that simply multiplying by -1 would solve it without any major problems.

    Sure, that's a good idea, I added a way to do that.
    Please update the firmware.
    You can now specify a multiplier, -1, for example.
    A section of documentation about the linkTuyaMCUOutputToChannel function with instructions and explanations.
    remember to also specify dpCache value (0 in your case)

    snkbrzmir4 wrote:

    It's also taking a long time between updates, it's like doing it every 1 second?

    You could try to query updates faster but I am not sure if that MCU supports it.
    Helpful post? Buy me a coffee.
  • #104 21050425
    snkbrzmir4
    Level 4  

    Thank you for your feedback, after I thought a little I realized that the clamp can be placed in 2 positions and if I was measuring wrong I had placed it inverted, my fault, I apologize for this error. Regarding sending in a shorter time, it does not seem to be possible, the measurement only comes every 10 seconds, even using the tuyaMcu_sendQueryState command it only responds every 10 seconds. But I saw that the shellyEM that I'm wanting to replace and has a problem and measures incorrectly, sends more than 10s, so it's better than the shelly. Thank you for the help, I'll put names on all the channels and put the second clamp and generate a template to contribute to this at least :)
  • #105 21050470
    p.kaczmarek2
    Moderator Smart Home
    You're welcome, please post any templates, information, teardowns you can get. We're making a devices database and we want to get to 600 entries soon:
    https://openbekeniot.github.io/webapp/devicesList.html
    Helpful post? Buy me a coffee.
  • #106 21050660
    bf1648
    Level 3  

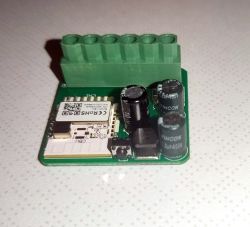
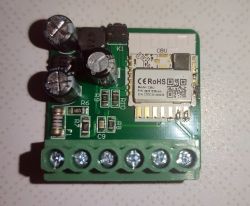
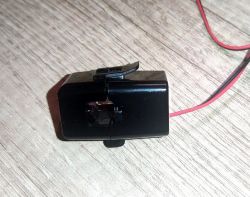
    Here is a photo of my "Double Digital Meter" that I asked about above.
    Dual-channel single-phase clamp with Wi-Fi for current measurement. Image of a printed circuit board with electronic components. Photo of an electronic module with several capacitors and components soldered onto a circuit board. Image of a dual digital meter with visible capacitors and a Wi-Fi module on a green PCB. Black plastic sensor with a red wire on a wooden surface.

    Added after 4 [minutes]:

    p.kaczmarek2, can you help me with the firmware modification?

    Added after 7 [minutes]:

    One bl0942 is soldered to UART_TX1, UART_RX1 (pin 15, 16). The second bl0942 is soldered to UART_TX 2, UART_RX2 (pin 6, 7).

    Added after 4 [minutes]:

    wi-fi led on P9
  • #108 21108761
    erdeidominik1999
    Level 8  

    Hello!
    Is the total used kWh calculated by the Tuya firmware? Is there any way to use that value?
  • #109 21108796
    p.kaczmarek2
    Moderator Smart Home
    i had the same meter and i described my experience in this topic:
    https://www.elektroda.com/rtvforum/topic4053493.html
    I want not able to find a "total used kwh" dpID in that case, but you can also try this method:
    https://www.elektroda.com/rtvforum/topic4021129.html
    Helpful post? Buy me a coffee.
  • ADVERTISEMENT
  • #110 21110187
    erdeidominik1999
    Level 8  

    >>21108796 I extracted some dp-s from serial and I found some info on a forum, now I have info from the whole calibration dp-s, I will write a summary tomorrow, how can I use the calibration easily in openbk? It only sets dp-s on the tuyamcu.
  • #112 21110915
    erdeidominik1999
    Level 8  

    >>21110284Thank you, I reconfigured everything and now the dp value is not set to the channels, the log:
    Info:TuyaMCU:Received: 55 AA 03 07 00 08 65 02 00 04 00 00 01 A0 1D
    Info:TuyaMCU:ProcessIncoming[v=3]: cmd 7 (State) len 15
    Info:TuyaMCU:ParseState: id 101 type 2-val len 4
    Info:TuyaMCU:ParseState: int32 416
    Info:GEN:No change in channel 6 (still set to 0) - ignoring

    and the autoexec for that channel:
    setChannelType 6 Power_div10
    SetChannelLabel 6 "Teljesítmény (A)"
    linkTuyaMCUOutputToChannel 101 1 6 //power A

    But why it says that there is no change?
  • #113 21112085
    p.kaczmarek2
    Moderator Smart Home
    just to be sure, can you reboot your device?
    Helpful post? Buy me a coffee.
  • #114 21113131
    erdeidominik1999
    Level 8  

    >>21112085
    Yes, but I found the problem, the comments at the end of the lines, if I put them to a new line it works. I successfully made a lot of dps working, but the calibration data is not working, I made textfield channels, mapped them, the dp gets read from the tuyamcu, but I cannot set the value, if I set a new value at the web page, it not changes, and I cannot see in the logs, that openbk send it to the tuyamcu.
  • #115 21113324
    p.kaczmarek2
    Moderator Smart Home
    I will try to check that, but in a meantime, have you tried to use the command to send dpID value directly?
    Helpful post? Buy me a coffee.
  • Helpful post
    #116 21114187
    erdeidominik1999
    Level 8  
    p.kaczmarek2 wrote:
    I will try to check that, but in a meantime, have you tried to use the command to send dpID value directly?


    Okay, I think I made everything working, the total values, the calibration, and the update frequency also works. This is my autoexec.bat:
    startDriver TuyaMCU
    tuyaMcu_setBaudRate 9600
    tuyaMcu_defWiFiState 4
    
    //voltage
    setChannelType 2 Voltage_div10
    SetChannelLabel 2 "Voltage"
    linkTuyaMCUOutputToChannel  112 1 2
    
    //current A
    setChannelType 3 Current_div1000
    SetChannelLabel 3 "Current(A)"
    linkTuyaMCUOutputToChannel 113 1 3
    
    //current B
    setChannelType 4 Current_div1000
    SetChannelLabel 4 "Current(B)"
    linkTuyaMCUOutputToChannel 114 1 4
    
    //frequency
    setChannelType 5 Frequency_div100
    SetChannelLabel 5 "Frequency"
    linkTuyaMCUOutputToChannel  111 1 5 
    
    //power A
    setChannelType 6 Power_div10
    SetChannelLabel 6 "Power(A)"
    linkTuyaMCUOutputToChannel  101 1 6 
    
    //power B
    setChannelType 7 Power_div10
    SetChannelLabel 7 "Power(B)"
    linkTuyaMCUOutputToChannel  105 1 7 
    
    //power factor A
    setChannelType 8 PowerFactor_div100
    SetChannelLabel 8 "Power factor(A)"
    linkTuyaMCUOutputToChannel  110 1 8
    
    //power factor B
    setChannelType 9 PowerFactor_div100
    SetChannelLabel 9 "Power factor(B)"
    linkTuyaMCUOutputToChannel  121 1 9 
    
    //forward energy A
    setChannelType 10 EnergyTotal_kWh_div1000
    SetChannelLabel 10 "Total energy(A)"
    linkTuyaMCUOutputToChannel  106 1 10
    
    //forward energy B
    setChannelType 11 EnergyTotal_kWh_div1000
    SetChannelLabel 11 "Total energy(B)"
    linkTuyaMCUOutputToChannel  108 1 11 
    
    
    //reporting rate
    setChannelType 12 TextField
    SetChannelPrivate 12 true
    SetChannelLabel 12 "Reporting rate"
    linkTuyaMCUOutputToChannel  129 val 12
    
    //voltage calibration
    setChannelType 13 TextField
    SetChannelPrivate 13 true
    SetChannelLabel 13 "Voltage calibration"
    linkTuyaMCUOutputToChannel  116 val 13
    
    //current A calibration
    setChannelType 14 TextField
    SetChannelPrivate 14 true
    SetChannelLabel 14 "Current(A) calibration"
    linkTuyaMCUOutputToChannel  117 val 14
    
    //power A calibration
    setChannelType 15 TextField
    SetChannelPrivate 15 true
    SetChannelLabel 15 "Power(A) calibration"
    linkTuyaMCUOutputToChannel  118 val 15
    
    //energy A calibration
    setChannelType 16 TextField
    SetChannelPrivate 16 true
    SetChannelLabel 16 "Total energy(A) calibration"
    linkTuyaMCUOutputToChannel  119 val 16
    
    //frequency calibration
    setChannelType 17 TextField
    SetChannelPrivate 17 true
    SetChannelLabel 17 "Frequency calibration"
    linkTuyaMCUOutputToChannel  122 val 17
    
    //current B calibration
    setChannelType 18 TextField
    SetChannelPrivate 18 true
    SetChannelLabel 18 "Current(B) calibration"
    linkTuyaMCUOutputToChannel  123 val 18
    
    //power B calibration
    setChannelType 19 TextField
    SetChannelPrivate 19 true
    SetChannelLabel 19 "Power(B) calibration"
    linkTuyaMCUOutputToChannel  124 val 19
    
    //energy B calibration
    setChannelType 20 TextField
    SetChannelPrivate 20 true
    SetChannelLabel 20 "Total energy(A) calibration"
    linkTuyaMCUOutputToChannel  125 val 20
    
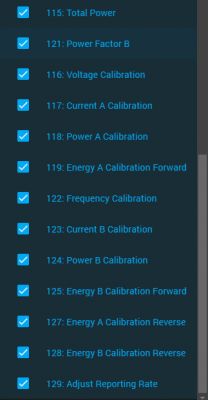
    addRepeatingEvent 10 1 SetChannel 12 3


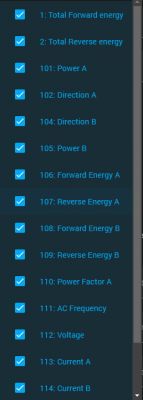
    I found the attached images, and the dps were correct.

    List of selected options on a program screen Configuration list with checked options for calibration of various parameters, such as voltage and current.
  • #117 21114190
    p.kaczmarek2
    Moderator Smart Home
    Thank you for sharing, if I may ask, can you also share autoexec.bat in english so I can add it to our examples?
    Helpful post? Buy me a coffee.
  • #118 21114201
    erdeidominik1999
    Level 8  

    >>21114190 I edited the post.
  • #119 21115686
    erdeidominik1999
    Level 8  

    >>21114190
    I found a problem, the EnergyTotal needs div 100 not div 1000, but the openbk has only EnergyTotal_kWh_div1000.
  • #120 21115933
    p.kaczmarek2
    Moderator Smart Home
    You can now add a custom mult while linking dpID to channel:
    Excerpt from technical documentation with syntax examples and links.
    Helpful post? Buy me a coffee.

Topic summary

The discussion revolves around the PJ-MGW1103 CT-Clamp Energy Meter, focusing on its teardown, functionality, and integration with Tuya and BL0942 components. Users share insights on the device's internal workings, including the communication protocols and data points (dpIDs) for voltage, current, and power measurements. Various configurations for the autoexec.bat file are provided to optimize the device's performance, including baud rate settings and channel mappings. Users also address issues related to data accuracy, calibration, and the need for firmware updates. The conversation highlights the importance of understanding dpIDs for effective monitoring and control of energy consumption.
Summary generated by the language model.
ADVERTISEMENT