logo elektroda
logo elektroda
X
logo elektroda

Uploading OpenBK software to MOES BHT-002-GCLW v4 thermostat with TUYA CB3S BK7231N chip

tomik67 12792 133
ADVERTISEMENT
Treść została przetłumaczona polish » english Zobacz oryginalną wersję tematu
  • #61 20874147
    tomik67
    Level 12  
    Po paru tygodniach testów mogę stwierdzić że OpenBK współpracuje bardzo stabilnie z Home Assistant, do tej pory nie było kłopotów w komunikacji, żadnych zwiech lub innych zdarzeń komplikujących działanie.
    W związku z tym chcę podzielić się moją konfiguracją dla innych szukających rozwiązania.

    Na początek widok końcowy integracji termostatu w Home Assistant, użyłem integracji Better Termostat i przycisków dodatkowych oraz paru innych trików.
    Wygląda to tak.:
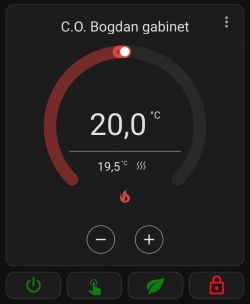
    Screen of a thermostat with the temperature set to 20°C.

    Teraz podstawy.
    Plik /autoexec.bat.:

    
    // Start NTP Driver
    startDriver NTP
    // Set NTP Server
    ntp_setServer 192.168.110.250
    // Set timezone
    ntp_timeZoneOfs +1:00
    startDriver TuyaMCU
    tuyaMcu_defWiFiState 4
    
    setChannelType 1 toggle
    setChannelLabel 1 OnOff
    setChannelType 2 toggle
    setChannelLabel 2 EnergySaving
    setChannelType 3 toggle
    setChannelLabel 3 ButtonLock
    setChannelType 4 toggle
    setChannelLabel 4 ManualMode
    setChannelType 5 ReadOnly
    setChannelLabel 5 RelayState
    setChannelType 6 Temperature_div2
    setChannelLabel 6 CurrentTemperature
    setChannelType 7 Temperature_div2
    setChannelLabel 7 SetTemperature
    setChannelType 8 Temperature_div2
    setChannelLabel 8 TemperatureFloorSensor
    setChannelType 9 ReadOnly
    setChannelLabel 9 HeatingProgram
    // linkTuyaMCUOutputToChannel dpId verType tgChannel
    linkTuyaMCUOutputToChannel 1 bool 1
    linkTuyaMCUOutputToChannel 5 bool 2
    linkTuyaMCUOutputToChannel 6 bool 3
    linkTuyaMCUOutputToChannel 4 enum 4
    linkTuyaMCUOutputToChannel 3 val 6
    linkTuyaMCUOutputToChannel 2 val 7
    linkTuyaMCUOutputToChannel 102 val 8
    linkTuyaMCUOutputToChannel 101 raw 9
    
    waitFor NTPState 1
    echo "NTP is ready"
    // wait for mqtt to connect
    waitFor MQTTState 1
    // extra delay
    delay_s 1
    publish BHT_B_gabinet rebooted
    mqtt_broadcastInterval 300


    Pozycja setChannelType 5 ReadOnly , setChannelLabel 5 RelayState to faktyczny stan przekaźnika załączającego ogrzewanie, oryginalnie ten termostat nie ma tej funkcji, w TUYA porównuje się nastawę temperatury docelowej z aktualną co nie zawsze jest zgodne z prawdą.
    Wymaga to wykonania połączenia pomiędzy jednym ze styków złącza do płyty przekaźnikowej a wolnym wejściem np. P7 (PWM1) CB3S.
    Dla zainteresowanych mogę wykonać fotkę.


    Teraz plik config.yaml komponentu climate w HA.
    W przykładowym pliku skonfigurowane są dwa termostaty, ponieważ w przyszłości będzie ich więcej zastosowałem kotwiczenie powtarzających się, stałych fragmentów kodu aby zapobiec "puchnięciu" kodu.
    Są tam także skonfigurowane przyciski dodatkowe oraz czujnik RSSI.:

    
    climate:
    # Termostaty
    # BHT_B_gabinet
      - unique_id: OpenBK7231N_799F00054_binary_sensor_5
        name: heater_B_gabinet
        current_temperature_topic: 'BHT_B_gabinet/6/get'
        temperature_command_topic: 'BHT_B_gabinet/7/set'
        temperature_state_topic: 'BHT_B_gabinet/7/get'
        power_command_topic: 'BHT_B_gabinet/1/set'
        mode_state_topic: 'BHT_B_gabinet/5/get'
        availability:
          - topic: BHT_B_gabinet/connected
        <<: &bhtens
          modes:
          - "off"
          - heat
          current_temperature_template: '{{ float(value)*0.5|round(2) }}'
          temperature_command_template: '{{ float(value)*2 }}'
          temperature_state_template: '{{ float(value)*0.5|round(2) }}'
          min_temp: 5
          max_temp: 35
          precision: 0.5
          temp_step: 0.5
          mode_state_template: >-
            {{ 'heat' if value == '1' else 'off' }}
          qos: 1
          payload_on: '1'
          payload_off: '0'
          retain: true
    
    # BHT_goscinny
      - unique_id: OpenBK7231N_798400088_binary_sensor_5
        name: heater_goscinny
        current_temperature_topic: 'BHT_goscinny/6/get'
        temperature_command_topic: 'BHT_goscinny/7/set'
        temperature_state_topic: 'BHT_goscinny/7/get'
        power_command_topic: 'BHT_goscinny/1/set'
        mode_state_topic: 'BHT_goscinny/5/get'
        availability:
          - topic: BHT_goscinny/connected
        <<: *bhtens
    
    switch:
    # Przyciski termostatu
    # BHT_B_gabinet
      - name: "heater_OnOff_B_gabinet"
        icon: mdi:power
        state_topic: 'BHT_B_gabinet/1/get'
        command_topic: 'BHT_B_gabinet/1/set'
        <<: &buttons
          payload_on: '1'
          payload_off: '0'
          availability:
            - topic: BHT_B_gabinet/connected
    
      - name: "heater_EnergySaving_B_gabinet"
        icon: mdi:leaf
        state_topic: 'BHT_B_gabinet/2/get'
        command_topic: 'BHT_B_gabinet/2/set'
        <<: *buttons
    
      - name: "heater_ButtonLock_B_gabinet"
        icon: mdi:lock-outline
        state_topic: 'BHT_B_gabinet/3/get'
        command_topic: 'BHT_B_gabinet/3/set'
        <<: *buttons
    
      - name: "heater_ManualMode_B_gabinet"
        icon: mdi:gesture-tap
        state_topic: 'BHT_B_gabinet/4/get'
        command_topic: 'BHT_B_gabinet/4/set'
        <<: *buttons
    
    # BHT_goscinny
      - name: "heater_OnOff_goscinny"
        icon: mdi:power
        state_topic: 'BHT_goscinny/1/get'
        command_topic: 'BHT_goscinny/1/set'
        <<: *buttons
    
      - name: "heater_EnergySaving_goscinny"
        icon: mdi:leaf
        state_topic: 'BHT_goscinny/2/get'
        command_topic: 'BHT_goscinny/2/set'
        <<: *buttons
    
      - name: "heater_ButtonLock_goscinny"
        icon: mdi:lock-outline
        state_topic: 'BHT_goscinny/3/get'
        command_topic: 'BHT_goscinny/3/set'
        <<: *buttons
    
      - name: "heater_ManualMode_goscinny"
        icon: mdi:gesture-tap
        state_topic: 'BHT_goscinny/4/get'
        command_topic: 'BHT_goscinny/4/set'
        <<: *buttons
    
    sensor:
    # Siła sygnału radiowego WiFi termostatów
    # BHT_B_gabinet
      - name: "heater_WiFi_goscinny"
        state_topic: 'BHT_goscinny/rssi'
        <<: &WiFi
          icon: mdi:wifi
          device_class: signal_strength
          state_class: measurement
          unit_of_measurement: dB
    
    # BHT_goscinny
      - name: "heater_WiFi_B_gabinet"
        state_topic: 'BHT_B_gabinet/rssi'
        <<: *WiFi


    Zastosowałem również automatyzację aktualizacji stanu termostatu w wypadku restartu HA lub samego termostatu, tutaj automation.yaml dla jednego urządzenia.:

    
    ---
    alias: Thermostate BHT_B_gabinet State refresh on HA start-up and thermostate reboot
    trigger:
      - platform: homeassistant
        event: start
      - platform: mqtt
        topic: BHT_B_gabinet/BHT_B_gabinet/get
        payload: rebooted
    action:
      - delay:
          seconds: 10
      - service: mqtt.publish
        data:
          topic: 'BHT_B_gabinet/1/get'
          payload: ""
      - delay:
          milliseconds: 500
      - service: mqtt.publish
        data:
          topic: 'BHT_B_gabinet/2/get'
          payload: ""
      - delay:
          milliseconds: 500
      - service: mqtt.publish
        data:
          topic: 'BHT_B_gabinet/3/get'
          payload: ""
      - delay:
          milliseconds: 500
      - service: mqtt.publish
        data:
          topic: 'BHT_B_gabinet/4/get'
          payload: ""
      - delay:
          milliseconds: 500
      - service: mqtt.publish
        data:
          topic: 'BHT_B_gabinet/5/get'
          payload: ""
      - delay:
          milliseconds: 500
      - service: mqtt.publish
        data:
          topic: 'BHT_B_gabinet/6/get'
          payload: ""
      - delay:
          milliseconds: 500
      - service: mqtt.publish
        data:
          topic: 'BHT_B_gabinet/7/get'
          payload: ""


    Mam nadzieję że pomoże to innym w konfiguracji swoich urządzeń.
    Przy okazji chciałbym podziękować twórcy OpenBK za ogromny wysiłek w stworzeniu tego dzieła, i za cierpliwość w tłumaczeniu zawiłości i błędów które popełniałem na początkowym etapie zaznajamiania się z OpenBK oraz chciałem się nieśmiało przypomnieć z prośbą o zaimplementowanie automatycznej zmiany czasu, letni / zimowy.
    Dziękuję.
  • ADVERTISEMENT
  • #62 20923463
    rbobey1989
    Level 1  

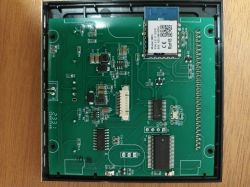
    Hello, I have read this thread several times. I ordered a MOES BHT-002-GCLW thermostat, and to my surprise, it includes a TUYA WB3S wifi module which should not be a problem according to the OpenBeken documentation. This microcontroller is supported. Now I need some help with this device because the PCB is not exactly the same as the one shown by tomik67. I have attached some photos of the PCB. Near the WB3S microcontroller, I have 2 transistors Q1 and Q2 which in the tomik67 model have been desoldered and bridged. On this PCB, they are still close to the WB3S but in the same place on the PCB. Who can give me a little information about these transistors? Thank you in advance. Also, if someone can tell me about the configuration of the autoexec.bat file, I will also be grateful.
    Tomik67, if you can take a photo of the jumper you made from the relay contacts to PWM1, it would be of great help.

    PCB of MOES BHT-002-GCLW thermostat with WB3S Wi-Fi module.
  • ADVERTISEMENT
  • #63 20953953
    tomik67
    Level 12  

    Hi.
    Your heating controller is an earlier version where 5V was used for communication between WB3S and the MCU, not 3.3V as in newer controllers.
    Therefore, in your case, it will be necessary to use a voltage divider described in this thread:

    Link
  • #64 21043359
    tomik67
    Level 12  

    @p.kaczmarek2
    I got the same MOES WHT-002 thermostat model as rbobey1989
    The module is WB3S and a completely different MCU than in the previous thermostats I had.
    Unfortunately, the device freezes about every week, the WB3S module works but does not talk to the MCU, the buttons do not respond, the MCU is probably hanging.
    Is there any command to periodically restart the MCU? Restarting the WB3S module is not enough.
  • #65 21043503
    p.kaczmarek2
    Moderator Smart Home
    Do you have the flag enabled:
    
    43	[TuyaMCU] Use queue
    

    The MCU could reset the WiFi module provided that the MCU has a RESET pin available on the board. Then you can connect and script
    Helpful post? Buy me a coffee.
  • #66 21043545
    tomik67
    Level 12  

    Use queue was not enabled, I enabled it.
    Does PowerSave 1 make sense for devices with MCU?
  • #67 21043553
    p.kaczmarek2
    Moderator Smart Home
    Then don`t change anything else and test now with the queuing flag enabled. This should help. If you test it, let me know, I don`t know, after a week or two, because I`ll probably turn this flag on by default, it should help in theory, but I want to know the users` opinion first...

    PowerSave 1 at the MCU will certainly help to some extent, the WiFi module will heat up slightly less and power consumption will be slightly lower.
    Helpful post? Buy me a coffee.
  • ADVERTISEMENT
  • #69 21044782
    p.kaczmarek2
    Moderator Smart Home
    You could connect the BK7231 output and script RESET, so that it would be triggered, for example, by a timer or an HA command (and the command - alias - would set the channel to 1 and after a while with addRepeatingEvent to 0), but as I wrote, try with queue for now.
    Helpful post? Buy me a coffee.
  • #70 21052458
    tomik67
    Level 12  

    Unfortunately the MCU hangs up repeatedly.
    First it hung up 24 hours after a reboot, after that it lasted more than five days and then froze up again.

    In the logs after filtering the MCU communication it looks like this.:

    Normal operation


    ExtraDebug:TuyaMCU:TuyaMCU heartbeat_valid = 1, product_information_valid=1, self_processing_mode = 1, wifi_state_valid = 1, wifi_state_timer=8
    Info:TuyaMCU:Received: 55 AA 03 07 00 08 03 02 00 04 00 00 00 25 3F 
    Info:TuyaMCU:ProcessIncoming[v=3]: cmd 7 (State) len 15
    Info:TuyaMCU:ParseState: id 3 type 2-val len 4
    Info:TuyaMCU:ParseState: int32 37
    Info:TuyaMCU:Received: 55 AA 03 07 00 08 66 02 00 04 00 00 00 00 7D 
    Info:TuyaMCU:ProcessIncoming[v=3]: cmd 7 (State) len 15
    Info:TuyaMCU:ParseState: id 102 type 2-val len 4
    Info:TuyaMCU:ParseState: int32 0
    ExtraDebug:TuyaMCU:TuyaMCU heartbeat_valid = 1, product_information_valid=1, self_processing_mode = 1, wifi_state_valid = 1, wifi_state_timer=9
    Info:TuyaMCU:Received: 55 AA 03 00 00 01 01 04 
    Info:TuyaMCU:ProcessIncoming[v=3]: cmd 0 (Hearbeat) len 8
    Info:TuyaMCU:Received: 55 AA 03 07 00 08 03 02 00 04 00 00 00 25 3F 
    Info:TuyaMCU:ProcessIncoming[v=3]: cmd 7 (State) len 15
    Info:TuyaMCU:ParseState: id 3 type 2-val len 4
    Info:TuyaMCU:ParseState: int32 37
    Info:TuyaMCU:Received: 55 AA 03 07 00 08 66 02 00 04 00 00 00 00 7D 
    Info:TuyaMCU:ProcessIncoming[v=3]: cmd 7 (State) len 15
    Info:TuyaMCU:ParseState: id 102 type 2-val len 4
    Info:TuyaMCU:ParseState: int32 0
    ExtraDebug:TuyaMCU:TuyaMCU heartbeat_valid = 1, product_information_valid=1, self_processing_mode = 1, wifi_state_valid = 1, wifi_state_timer=9
    Info:TuyaMCU:Received: 55 AA 03 07 00 08 03 02 00 04 00 00 00 25 3F 
    Info:TuyaMCU:ProcessIncoming[v=3]: cmd 7 (State) len 15
    Info:TuyaMCU:ParseState: id 3 type 2-val len 4
    Info:TuyaMCU:ParseState: int32 37
    Info:TuyaMCU:Received: 55 AA 03 07 00 08 66 02 00 04 00 00 00 00 7D 
    Info:TuyaMCU:ProcessIncoming[v=3]: cmd 7 (State) len 15
    Info:TuyaMCU:ParseState: id 102 type 2-val len 4
    Info:TuyaMCU:ParseState: int32 0


    After freezing.:


    ExtraDebug:TuyaMCU:TuyaMCU heartbeat_valid = 0, product_information_valid=0, self_processing_mode = 1, wifi_state_valid = 0, wifi_state_timer=27
    ExtraDebug:TuyaMCU:TuyaMCU heartbeat_valid = 0, product_information_valid=0, self_processing_mode = 1, wifi_state_valid = 0, wifi_state_timer=27
    ExtraDebug:TuyaMCU:TuyaMCU heartbeat_valid = 0, product_information_valid=0, self_processing_mode = 1, wifi_state_valid = 0, wifi_state_timer=27
    ExtraDebug:TuyaMCU:TuyaMCU heartbeat_valid = 0, product_information_valid=0, self_processing_mode = 1, wifi_state_valid = 0, wifi_state_timer=27

    .
  • #71 21053065
    p.kaczmarek2
    Moderator Smart Home
    Then we need to try to do a reset of the MCU. First, find a free GPIO, set it to the Rel role, assign some unused channel and connect it to the RESET pin. Then see if operating on that channel resets the MCU.
    Helpful post? Buy me a coffee.
  • #72 21053299
    tomik67
    Level 12  

    Of course I will, but the worrying thing is that applying ground to this pin with the MCU still frozen did nothing, there was no reset.
    I wonder if this pin doesn't function somehow differently.:

    Excerpt from documentation describing external reset for SC92F836XB. [/img][/quote]

    I soldered pin 6 of the MCU to pin 20 of the CB3S and split channel 10 of the MCUReset

    There seems to be no response.
  • #73 21053507
    p.kaczmarek2
    Moderator Smart Home
    Certain width reset pulse? So precise timing is needed?
    Helpful post? Buy me a coffee.
  • #74 21053524
    tomik67
    Level 12  

    It is more the latter that concerns me.:


    Quote:
    the user can configure pin 1.1 as RST at the client option using computer software before programming


    I don't know if the RST pin is programmed, there are a couple of options for this pin.
  • #75 21059543
    p.kaczmarek2
    Moderator Smart Home
    You could try plugging a transistor into the MCU power supply and unplugging it momentarily to force a RESET.
    Helpful post? Buy me a coffee.
  • #76 21061971
    tomik67
    Level 12  

    I've thought about this too, just going to consider where it would be clearest to do it.
    I've also thought about the instability of the MCU power supply, this is often where problems in other devices come from.
  • #77 21072615
    tomik67
    Level 12  

    I've decided to use the Optocoupler PC817 to cut power to the MCU, I've now got this as a test spider on the table and it's working, I still have to wait for a real hang to see if the power cut is enough. Unfortunately this happens at different intervals, so it will take a while.
    In the meantime, I would like to ask what a script could look like that after e.g. 30 logs
    Quote:
    ExtraDebug:TuyaMCU:TuyaMCU heartbeat_valid = 0

    would e.g. disable 13 P8 I/O GPIOP_8, which corresponds to P8 of the IC, PWM 2 in CB3S for a second, to cut power?.
  • #78 21072631
    p.kaczmarek2
    Moderator Smart Home
    I can plug the counting of seconds without heartbeat into events and then using addChangeHandler will be able to trigger the handling of this.
    Helpful post? Buy me a coffee.
  • #79 21072700
    tomik67
    Level 12  

    This would be a great solution, interestingly enough heartbeat still shows a state of 1 for 10 to 13 seconds after a power cut, only after that time it changes to 0 which I don't understand so far, no action should equal no response.
    It would be nice if after such a reboot there was some trace left in the logs, or a MCU reboot counter similar to the current reboot counter after no ping in the GUI.
  • #80 21072753
    p.kaczmarek2
    Moderator Smart Home
    I can't specifically add a counter, but if there was already a change handler, you could simply increment the selected channel by 1 at the time of such an event (i.e. you could script yourself a counter)
    Helpful post? Buy me a coffee.
  • ADVERTISEMENT
  • #81 21074965
    tomik67
    Level 12  

    Today the MCU crashed again, I can confirm that the one second power interruption passed the test, the MCU started up.
  • #82 21141019
    hard3d
    Level 7  
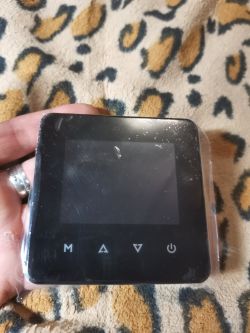
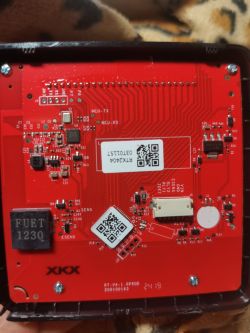
    Hello! I bought a thermostat as shown in the photo below. I want to flash it to Open BK. What are my actions before and after the firmware. How to configure what else the display would show the same as the original firmware.

    Black thermostat with a display, held in hand, against a patterned fabric background. Red printed circuit board of a thermostat with visible electronic components and QR codes.
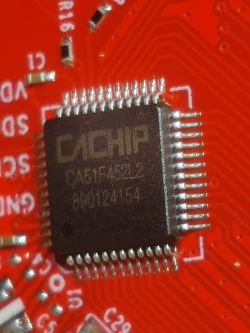
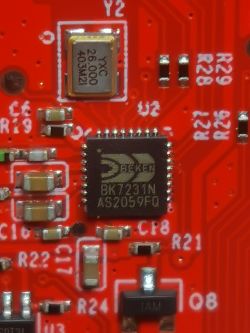
    Close-up of a CACHiP chip on a red circuit board. Close-up of BK7231N microcontroller on a red PCB.
  • #83 21142479
    hard3d
    Level 7  
    Good afternoon. I made a backup of the original firmware and installed the OBK firmware. The chip only works when it is in pairing mode. It is necessary to somehow make the chip work all the time. As I understand it, you need to return the original firmware and try to intercept MCU packets.
  • #84 21142546
    p.kaczmarek2
    Moderator Smart Home
    Do you have:
    
    // set TuyaMCU default wifi state 0x04, which means "paired",
    // because some TuyaMCU MCUs will not report all data
    // unless they think they are connected to cloud
    tuyaMcu_defWiFiState 4
    

    in your autoexec? How your autoexec looks like?
    Helpful post? Buy me a coffee.
  • #85 21143111
    hard3d
    Level 7  
    I used the code from the post above. But it does not start the module when it is turned on.

    /autoexec.bat.:

    
    // Start NTP Driver
    startDriver NTP
    // Set NTP Server
    ntp_setServer 192.168.110.250
    // Set timezone
    ntp_timeZoneOfs +1:00
    startDriver TuyaMCU
    tuyaMcu_defWiFiState 4
    
    setChannelType 1 toggle
    setChannelLabel 1 OnOff
    setChannelType 2 toggle
    setChannelLabel 2 EnergySaving
    setChannelType 3 toggle
    setChannelLabel 3 ButtonLock
    setChannelType 4 toggle
    setChannelLabel 4 ManualMode
    setChannelType 5 ReadOnly
    setChannelLabel 5 RelayState
    setChannelType 6 Temperature_div2
    setChannelLabel 6 CurrentTemperature
    setChannelType 7 Temperature_div2
    setChannelLabel 7 SetTemperature
    setChannelType 8 Temperature_div2
    setChannelLabel 8 TemperatureFloorSensor
    setChannelType 9 ReadOnly
    setChannelLabel 9 HeatingProgram
    // linkTuyaMCUOutputToChannel dpId verType tgChannel
    linkTuyaMCUOutputToChannel 1 bool 1
    linkTuyaMCUOutputToChannel 5 bool 2
    linkTuyaMCUOutputToChannel 6 bool 3
    linkTuyaMCUOutputToChannel 4 enum 4
    linkTuyaMCUOutputToChannel 3 val 6
    linkTuyaMCUOutputToChannel 2 val 7
    linkTuyaMCUOutputToChannel 102 val 8
    linkTuyaMCUOutputToChannel 101 raw 9
    
    waitFor NTPState 1
    echo "NTP is ready"
    // wait for mqtt to connect
    waitFor MQTTState 1
    // extra delay
    delay_s 1
    publish BHT_B_gabinet rebooted
    mqtt_broadcastInterval 300
  • #86 21143585
    hard3d
    Level 7  
    I wrote to the seller. He sent me a list of the DpID of the device. But I do not find in this list how to activate WiFi

    https://docs.google.com/spreadsheets/d/1O1fy5...ouid=104728761365694101895&rtpof=true&sd=true

    Added after 11 [hours] 54 [minutes]:

    I installed the original firmware back and turned on port monitoring. messages are flying in UTF-8 encoding

    Here's the part

    
    [01-01 03:00:09 TUYA N][lr:0x736f5] ret = 0
    [01-01 03:00:09 TUYA N][lr:0xb766f] transporter connect host[m2.tuyaeu.com] success, begin to mqtt connect
    [01-01 03:00:09 TUYA N][lr:0xb76cf] mqtt connect success
    [01-01 03:00:09 TUYA N][lr:0xb784b] mqtt subcribe success
    [01-01 03:00:09 TUYA I][tuya_module_demo.c:784] wifi_status:7
    temp_code:36 - adc_code:328 - adc_trend:[16]:320->[15]:330
    [01-01 03:00:10 TUYA I][lr:0xbb029] GAP init: stop adv
    [01-01 03:00:10 TUYA I][lr:0xbc415] ble_hs_timer reset:0 
    [01-01 03:00:10 TUYA N][lr:0x76301] ble_sdk_send skip, no connect:4
    [01-01 03:00:10 TUYA I][tuya_module_demo.c:205] Post dp_id = 1, val = 1
    [01-01 03:00:10 TUYA I][tuya_module_demo.c:225] Post dp_id = 2, val = 1
    [01-01 03:00:10 TUYA I][tuya_module_demo.c:205] Post dp_id = 10, val = 0
    [01-01 03:00:10 TUYA I][tuya_module_demo.c:210] Post dp_id = 16, val = 50
    [01-01 03:00:10 TUYA I][tuya_module_demo.c:210] Post dp_id = 19, val = 500
    [01-01 03:00:10 TUYA I][tuya_module_demo.c:225] Post dp_id = 23, val = 0
    [01-01 03:00:10 TUYA I][tuya_module_demo.c:210] Post dp_id = 24, val = 267
    [01-01 03:00:10 TUYA I][tuya_module_demo.c:210] Post dp_id = 26, val = 50
    [01-01 03:00:10 TUYA I][tuya_module_demo.c:225] Post dp_id = 31, val = 0
    [01-01 03:00:10 TUYA I][tuya_module_demo.c:225] Post dp_id = 36, val = 0
    [01-01 03:00:10 TUYA I][tuya_module_demo.c:205] Post dp_id = 40, val = 0
    [01-01 03:00:10 TUYA I][tuya_module_demo.c:215] Post dp_id = 45, val = 0
    [01-01 03:00:10 TUYA I][tuya_module_demo.c:210] Post dp_id = 101, val = 14593
    [01-01 03:00:10 TUYA I][tuya_module_demo.c:210] Post dp_id = 102, val = 5
    [01-01 03:00:10 TUYA I][tuya_module_demo.c:220] Post dp_id = 105, val = R9Lite
    [01-01 03:00:10 TUYA I][tuya_module_demo.c:210] Post dp_id = 108, val = 1
    [01-01 03:00:10 TUYA I][tuya_module_demo.c:210] Post dp_id = 109, val = 0
    [01-01 03:00:10 TUYA I][tuya_module_demo.c:205] Post dp_id = 110, val = 0
    [01-01 03:00:10 TUYA I][tuya_module_demo.c:220] Post dp_id = 111, val = 1.1.2
    [01-01 03:00:10 TUYA I][tuya_module_demo.c:210] Post dp_id = 112, val = 10
    [01-01 03:00:10 TUYA I][tuya_module_demo.c:225] Post dp_id = 113, val = 0
    [01-01 03:00:10 TUYA I][tuya_module_demo.c:210] Post dp_id = 115, val = 9100
    [01-01 03:00:10 TUYA E][lr:0x9ac0d] value check err:9100[-300,1000]
    [01-01 03:00:10 TUYA I][lr:0xbc511] ble_hs_timer_exp:
    [01-01 03:00:10 TUYA E][lr:0x924c7] wf_get_connected_ap_info fails -1
    [01-01 03:00:10 TUYA E][lr:0xb8753] uf_open netcfg_log err 8


    I still don't understand which contact I should use to catch messages that start with "55 AA"
  • #87 21144326
    p.kaczmarek2
    Moderator Smart Home
    You have posted UART2 (TX2) output, which is a debug log. TuyaMCU uses UART1 for the communication.
    Helpful post? Buy me a coffee.
  • #88 21144404
    hard3d
    Level 7  
    There are such conclusions. but there are no such messages there either.

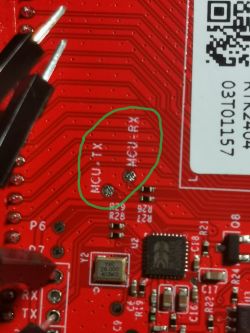
    Close-up of a circuit board with marked UART points.

    Added after 53 [minutes]:

    I have UART1 for debugging messages and firmware. UART2 for MCU

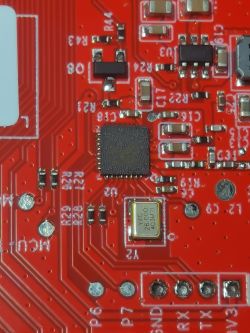
    Close-up of a red printed circuit board with electronic components such as an integrated circuit and a crystal oscillator.
  • #89 21146901
    hard3d
    Level 7  
    Good day. As far as I understand, I need to swap the UART.
    My /autoexec.bat should look like this.

    
    // [MQTT] Always publish channels used by TuyaMCU
    SetFlag 19 1
    
    // [UART] Use alternate UART for BL0942, CSE, TuyaMCU, etc
    SetFlag 26 1
    
    // Here is how you can get log print on UART1, instead of default UART2 on Beken
    // Enable "[UART] Enable UART command line"
    // this also can be done in flags, enable command line on UART1 at 115200 baud
    SetFlag 31 1
    // UART1 is RXD1/TXD1 which is used for programming and for TuyaMCU/BL0942,
    // but now we will set that UART1 is used for log
    logPort 1
    
    // Start TuyaMCu driver
    startDriver TuyaMCU
    // set TuyaMCU baud rate
    // tuyaMcu_setBaudRate 115200
    // set TuyaMCU default wifi state 0x04, which means "paired",
    // because some TuyaMCU MCUs will not report all data
    // unless they think they are connected to cloud
    tuyaMcu_defWiFiState 4


    But the MCU packets still don't get through ((
  • #90 21147078
    p.kaczmarek2
    Moderator Smart Home
    Are you really sure that your device uses UART 2 for TuyaMCU?

    Have you tried to do Tuya config extraction to check the baud rate of the UART?


    Helpful post? Buy me a coffee.

Topic summary

The discussion revolves around uploading OpenBK software to the MOES BHT-002-GCLW v4 thermostat, which contains a TUYA CB3S BK7231N chip. Users share their experiences with flashing the device, including the need to identify dpIDs for proper functionality. The conversation highlights challenges such as the absence of relay status reporting, the necessity of mapping dpIDs to channels, and the importance of configuring the autoexec.bat file correctly. Users also discuss issues with the thermostat freezing and potential solutions, including using a MOSFET for power control and implementing a reset script. Additionally, there are inquiries about integrating the thermostat with Home Assistant and managing temperature settings through MQTT.
Summary generated by the language model.
ADVERTISEMENT