logo elektroda
logo elektroda
X
logo elektroda

Disassembly & Insights on TO-Q-SYS-JWT DIN Rail kWh Meter with Display

Selfdrivers 6495 52
ADVERTISEMENT
Treść została przetłumaczona polish » english Zobacz oryginalną wersję tematu
  • Hello everyone, I recently bought this fuse in DIN format with the option of measuring kWh consumption. This is the TO-Q-SYS-JWT model, a version similar to TO-Q-SY1-JWT, but with a built-in display where you can make changes to the fuse settings (undervoltage, overvoltage, temperature, power protection, etc.). In the photo below we can see the device (the front itself after the disassembly phase).

    DIN fuse with display, held in hand, against a keyboard background.

    I looked on the forum for this fuse model, but to no avail (it`s a total novelty on the forum, so I decided to write this entry).

    Let`s start from the basics, to disassemble the fuse itself, you need to "pick out" the metal pins that hold it together (there are six of them and the side we start from is not important because it is important to bend the edge of the pin inward and then gently knock out the rod), I am writing about this step because I was looking for quite a long time how to disassemble this type of MCB fuse. Once we have removed all the rods (they are gold, so they are easy to see), gently pry off the latches visible on the top of the housing. After these steps, you should now have the MCB switch open.

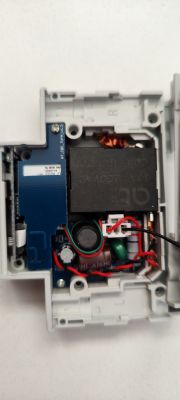
    Now let`s move on to the most interesting stage, i.e. the interior, which looks like this:
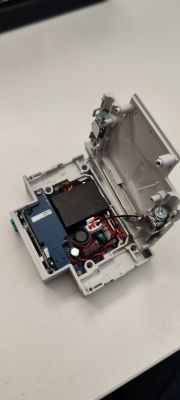
    Open DIN circuit breaker with visible electronic components Interior of a disassembled DIN circuit breaker with electronic components.


    We can see here (as I assume correctly, a 60A 250V relay from "AT"[?]) and quite tightly packed integrated circuits. The whole thing consists of three PCB boards. The first one can be easily removed by unscrewing the screw in the upper right corner of the PCB (with the left side of the MCB facing us). After removing it, the whole thing looks like this:
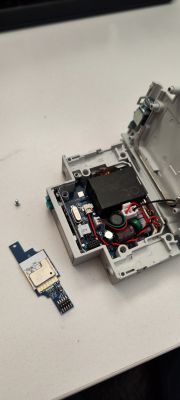
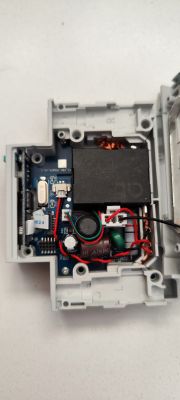
    Open relay with visible electronics inside the housing. Interior view of a DIN format circuit breaker with visible components.

    The board that comes out first is the one that interests us the most because it is responsible for WiFi connectivity. In fact, we could stop at this stage of disassembling the MCB, but since this device is not available on the forum yet, we will take a closer look inside.

    The BK7231N board itself looks like this:
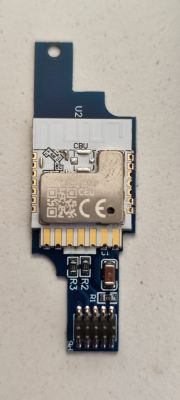
    WiFi module BK7231N on a blue PCB with several components.

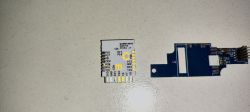
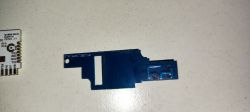
    In order to upload the OpenBeken software, I had to unsolder the white board from the blue board, which actually only connects the E469716 board with the rest of the MCB. Everything after desoldering looks like this:
    Two PCB boards with the BK7231N module viewed from above. Two PCB boards, one white with pin labels, the other blue with electronic components. Close-up of two PCB boards, one white with pin markings and another blue with U2 connector. PCB boards related to the MCB fuse.

    The board with the WiFi module seems to be a normal board, but after reading the software we will get the following result of the tuya config analysis:
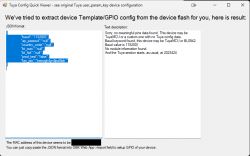
    Screenshot from Tuya Config Quick Viewer showing device configuration.

    The flashing software suggests that it is probably TuyaMCU, but I do not agree with this conclusion, such a poor config is simply due to the fact that the WiFi module is only responsible for communication with WiFi and data transfer in this MCB, it does not directly control anything and he only performs (or rather delegates) the tasks entrusted to him through commands. These tasks are transferred to the HC32F460 microcontroller, which is located on the board with the display (OLED?) and controls it. The display board looks like this:
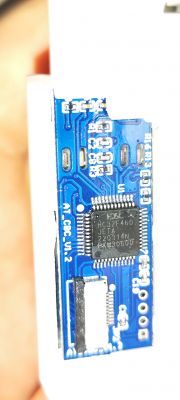
    Circuit board with HC32F460 chip on a blue background.

    HC32F460 is apparently a clone of the more famous stm32f103c8t6 and according to the datasheet it has i2c connectors for communication with an OLED display or other peripherals (of course, there are many more protocols and I am mentioning the ones that concern us here), and a UART bus which is used to communicate with WiFi module (baudrate is probably 115200 because it is set in the WiFi module configuration, but I may be wrong and it concerns something else). The uC itself also has a built-in EEPROM memory, so there are no EEPROM chips on the other boards (probably not, as I wasn`t able to read the markings of one of the chips on the PCB - photo below).
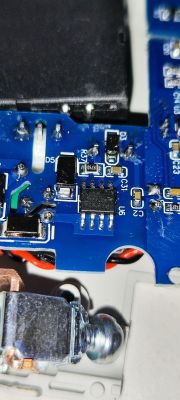
    Close-up of a PCB with electronic components.

    The second die that we can find on the board (HT7017?):
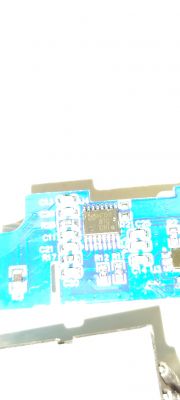
    Close-up of a PCB with an HT7017 integrated circuit.

    This die looks like a die measuring energy consumption.

    The entire back of the PCB (the main and largest one looks like this):
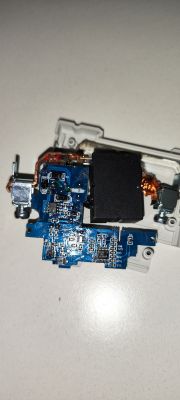
    Close-up of a PCB from a circuit breaker with electronic components.

    I am also sending inputs (with original software) from the BK7231N board.


    When it comes to the configuration of the entire MCB, this is a problem that I have not solved yet (I assume that you need to send the appropriate TuyaMCU commands to the HC32F460, but I still don`t know how to do it exactly and therefore I would also like to ask for some technical support to create a configuration file especially for this MCB with energy consumption measurement.

    NOTE: The display, fuse status memory, buttons, etc. work correctly even after uploading OpenBeken, this is due to the fact that the BK7231N does not control these peripherals, so any changes in its software do not change the operation of the counter (they only "stupid" it with the function of connecting to WiFi and sending data to the application from China). I`m not connecting the MCB itself for now until I manage to create a configuration file (I hope together :) ) for this device. The MCB is currently connected to the dummy load so that it can be easily accessed if necessary and that any calibration can be made based on a known load.

    Cool? Ranking DIY
    About Author
    Selfdrivers
    Level 8  
    Offline 
    Selfdrivers wrote 35 posts with rating 11. Live in city Zielona Góra. Been with us since 2015 year.
  • ADVERTISEMENT
  • #2 20937562
    gulson
    System Administrator
    Very interesting, fuse, current measurement and control/reading by applications in one.
    Thanks for sharing how to remove the fuse and how to change the software.
    If you give me the parcel locker, I will send you a small gift.
  • #3 20937688
    nyquist
    Level 26  
    Selfdrivers wrote:
    This die looks like a die measuring energy consumption


    An interesting article and kudos for using the correct phrase when talking about "energy consumption", while today everyone is trying to convince us that "we consume electricity" on every side, starting from TV commercials and ending with politicians` speeches. and "we pay for electricity"! brrr...
  • #4 20937729
    CosteC
    Level 39  
    Is there any documentation for this or is this just another Chinese improvement that violates safety and common sense?
    It hurts me when I look at the photos, but it`s probably a professional deviation that I expect photos that show some details.
  • #5 20938009
    slaw0
    Level 15  
    In my opinion, calling it a fuse is an overstatement.
  • #6 20938044
    CosteC
    Level 39  
    Quoting the "manufacturer", it is "Smart WiFi Switch with metering function – TO-Q-SY1-JWT"
    It is not a fuse and cannot perform any protective functions per se. It could supposedly be subsumed into a "control" function that turns off the load when the current increases, but looking at the quality of the documentation provided by the "manufacturer", which is pathetic, even this is not worth trusting too much. It doesn`t even have an installation category listed and almost no required markings.
    Measurements... The measurements are consistent with nothing and offer exactly no accuracy. This is what the "producer" offers on its website.

    I highly recommend such technical flowers as "Current Frame: 63A (Suggest under 40A)" at the same time: "Rated Current (In) 1A, 2A, 3A, 4A, 5A, 6A, 16A, 20A, 25A, 32A, 40A, 50A, 63A "

    https://elcb.net/product/to-q-sy1-jwt-din-rail-smart-wifi-switch-with-metering-function/
  • ADVERTISEMENT
  • #7 20938270
    Selfdrivers
    Level 8  
    >>20937729
    Nie do końca wiem o co chodzi ze zdjęciami ale niektóre są prześwietlone specjalnie aby było widać dokładnie oznaczenie chip-u który się tam znajduje. Jestem zawsze otwarty na sugestie :). Jeśli chodzi o dokumentacje to są szczątkowe, wiadomo BK7231N ma dostępną jednak jeśli o np, klon STM32 to niestety ale jakiś lakoniczny opis wraz z schematami PCB i tyle, żadnych dokładniejszych informacji o rejestrach etc. Co do reszty podzespołów próbowałem szukać ale nic nie znalazłem.
  • #8 20938300
    p.kaczmarek2
    Moderator Smart Home
    Selfdrivers wrote:

    When it comes to the configuration of the entire MCB, this is a problem that I have not solved yet (I assume that you need to send the appropriate TuyaMCU commands to the HC32F460, but I still don`t know how to do it exactly and therefore I would also like to ask for some technical support to create a configuration file especially for this MCB with energy consumption measurement.


    I see that the device will be cloud free. To run them in OpenBeken , you need to know the baud rate of TuyaMCU, and the dpID (identifiers) of the variables along with their types, because they change from device to device.

    There are generally three options for figuring this out.
    1. You can capture and analyze packets on the device before changing the firmware:
    https://www.elektroda.pl/rtvforum/topic3970199.html And then observe, for example, what is transmitted when you connect a load of e.g. 60W (and look for the number 60 or rather 600 or 6000 in the variable values)
    2. You can try to get dpIDs from Tuya:
    Extracting DpIDs for TUYA MCU devices
    3. Once the firmware has been changed, simply upload some autoexec.bat to OpenBeken from here:
    https://github.com/openshwprojects/OpenBK7231T_App/blob/main/docs/autoexecExamples.md
    Maybe:
    
    // Start TuyaMCu driver
    startDriver TuyaMCU
    // set TuyaMCU baud rate
    tuyaMcu_setBaudRate 115200
    // set TuyaMCU default wifi state 0x04, which means "paired",
    // because some TuyaMCU MCUs will not report all data
    // unless they think they are connected to cloud
    tuyaMcu_defWiFiState 4
    

    and then restart the device and use the command tuyaMcu_sendQueryState , see command list:
    https://github.com/openshwprojects/OpenBK7231T_App/blob/main/docs/commands.md
    If the device does not report anything, comment out the baud rate line to use the default 9600 and power off/on the whole thing.
    Repeat the procedure, then tuyaMcu_sendQueryState should receive some data.
    Then you have to look at what is sent under what dpID and guess what may be what, e.g. the value of 2300 may be voltage, or more precisely voltage times 10, etc... and again, connect e.g. a 60W load and look for which dpID value has e.g. these 60, or 600, etc. Once you guess, you map the OBK channels, see the already mentioned autoexec examples

    You can enter the keyword "TuyaMCU" here and you will find related device topics on Elektroda:
    https://openbekeniot.github.io/webapp/devicesList.html
    Helpful post? Buy me a coffee.
  • #9 20938473
    __Maciek__
    Level 20  
    I will add one more interesting fact... the relays in these devices are probably bistable - there is an interesting full-bridge circuit for controlling the relay in the sot23-6 housing - I have something similar in the phase selector - I think this is an advantage, in static operation they do not consume current - check if the logic turns off the relay when the power is turned off, there is enough energy in the selector for this.

    In the SO8 housing you have a DC/DC converter, the main power supply is probably 12V, in the part with the measuring system there is a second converter for 3.3V logic power supply.

    Generally, there are more and more of this type of Chinese inventions.
  • ADVERTISEMENT
  • #10 20938495
    p.kaczmarek2
    Moderator Smart Home
    I actually encounter bistable relays in this type of equipment. IN TONGOU TO-Q-SY1-JWT and Zmai90 I saw one like that too. At OBK we wrote a driver for this Bridge . But in order not to mislead anyone, I will write right away that if there is a device on TuyaMCU (such as the one in the first post), you should not run the Bridge controller, because the relay is controlled by the MCU, not the WiFi module.
    Helpful post? Buy me a coffee.
  • ADVERTISEMENT
  • #11 20938576
    Selfdrivers
    Level 8  
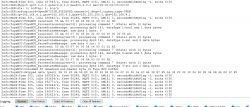
    Console logs related to TuyaMCU startup and command processing.

    This is what I received in the console after starting TuyaMCU (I completely forgot about it yesterday when I wrote the post), it looks like the dpId is given in the above message (I just read your post about TuyaMCU and played around with it), so far I`m trying unsuccessfully to at least drive the relay to it worked as it should (on/off). When it comes to setting the WiFi status, the above commands actually configured the WiFi status correctly (it is now ON). As soon as I manage to work out/determine something, I will write it.

    I`m also planning to buy a few new IoT devices for smathome in the near future, so maybe I`ll be able to add something new, it will always lead to some further development of the project, which I greatly respect and admire and would like to contribute to it to some extent. :) .
  • #12 20938603
    p.kaczmarek2
    Moderator Smart Home
    Post all IoT devices you have, but please do not duplicate existing topics, we want to reach 500 devices soon:
    https://openbekeniot.github.io/webapp/devicesList.html
    I`m afraid to check how many of them are my topics. I`m sure I broke some record here.

    Your screenshot shows that communication is working, although I don`t like the situation with dpID 138 followed by "35 unwanted non-header bytes", could there be an error in the parser? Or maybe it`s a one-off disruption? For this reason, it is sometimes worth intercepting communication using the original firmware, but maybe we can do it without it.

    However, dpID 141 of the boolean type can be a relay.

    If so, the new autoexec.bat looks like:
    
    
    // Start TuyaMCu driver
    startDriver TuyaMCU
    // set TuyaMCU baud rate
    tuyaMcu_setBaudRate 115200
    // set TuyaMCU default wifi state 0x04, which means "paired",
    // because some TuyaMCU MCUs will not report all data
    // unless they think they are connected to cloud
    tuyaMcu_defWiFiState 4
    
    
    // set channel types for OBK GUI (and Hass Discovery)
    setChannelType 1 toggle
    // linkTuyaMCUOutputToChannel dpId verType tgChannel
    linkTuyaMCUOutputToChannel 141 bool 1


    While dpID 141 of the bool type is actually the state of the relay, and the WiFi module can change the state of the relay (no, it is somehow read-only), the above code should allow you to control this relay from the OBK panel. After performing HASS discovery, there should also be control from the HA level.
    Helpful post? Buy me a coffee.
  • #13 20939993
    Selfdrivers
    Level 8  
    dpID 141 looks like it is simply an ID for controlling the display backlight :D , I will try to create a script that will search for dpID by force. As soon as I find out more, I will write an update.
  • #14 20939995
    p.kaczmarek2
    Moderator Smart Home
    Please try the query command again. Does it crash every time with an error after a few IDs?

    Does this device allow you to change the state of the relay using a physical button? The physical operation will make the MCU send a state change to the WiFi module and then you will see the dpID of the relay.
    Helpful post? Buy me a coffee.
  • #15 20940932
    artin.bruyen
    Level 17  
    Where can this "device" be found on the Internet? Any description, photos, price? My google doesn`t know anything about it. :(
  • #16 20941591
    Selfdrivers
    Level 8  
    artin.bruyen wrote:
    Where can this "device" be found on the Internet? Any description, photos, price? My google doesn`t know anything about it. :(


    https://a.aliexpress.com/_EyCIK5X

    I bought this auction on Aliexpress.

    Added after 58 [minutes]:

    p.kaczmarek2 wrote:
    Please try the query command again. Does it crash every time with an error after a few IDs?

    Does this device allow you to change the state of the relay using a physical button? The physical operation will make the MCU send a state change to the WiFi module and then you will see the dpID of the relay.


    I managed to determine that the relay has dpID 16, (but e.g. dpID 11 turns off the relay without the possibility of turning it on again, it looks a bit like it is a "safety" signal), now I am trying to determine where the energy consumption values are, etc. I don`t know why but when changing the relay state using the button, there is no change in the device state by dpID 16, but the toggle itself detects this change and shows the correct and current state of the relay. I don`t know why, but it doesn`t matter, what matters is that he sees the relay status.

    This is what TuyaMCU`s response looks like right after running it:

    The image shows logs of TuyaMCU messages on a computer screen.

    This is the effect of executing the command tuyaMcu_sendQueryState : :

    Quote:
    aMCU:TuyaMCU_ApplyMapping: id 118 with value 1000 is not mapped
    Info:TuyaMCU:TUYAMCU received: 55 AA 03 07 00 08 77 02 00 04 00 00 07 D0 65
    Info:TuyaMCU:TuyaMCU_ProcessIncoming[ver=3]: processing command 7 (State) with 15 bytes
    Info:TuyaMCU:TuyaMCU_ParseStateMessage: processing dpId 119, dataType 2-val and 4 data bytes
    Info:TuyaMCU:TuyaMCU_ParseStateMessage: raw data 4 int: 2000
    Debug:TuyaMCU:TuyaMCU_ApplyMapping: id 119 with value 2000 is not mapped
    Info:TuyaMCU:TUYAMCU received: 55 AA 03 07 00 08 78 02 00 04 00 00 00 0A 99
    Info:TuyaMCU:TuyaMCU_ProcessIncoming[ver=3]: processing command 7 (State) with 15 bytes
    Info:TuyaMCU:TuyaMCU_ParseStateMessage: processing dpId 120, dataType 2-val and 4 data bytes
    Info:TuyaMCU:TuyaMCU_ParseStateMessage: raw data 4 int: 10
    Debug:TuyaMCU:TuyaMCU_ApplyMapping: id 120 with value 10 is not mapped
    Info:TuyaMCU:TUYAMCU received: 55 AA 03 07 00 08 83 02 00 04 00 00 01 55 F0
    Info:TuyaMCU:TuyaMCU_ProcessIncoming[ver=3]: processing command 7 (State) with 15 bytes
    Info:TuyaMCU:TuyaMCU_ParseStateMessage: processing dpId 131, dataType 2-val and 4 data bytes
    Info:TuyaMCU:TuyaMCU_ParseStateMessage: raw data 4 int: 341
    Debug:TuyaMCU:TuyaMCU_ApplyMapping: id 131 with value 341 is not mapped
    Info:TuyaMCU:TUYAMCU received: 55 AA 03 07 00 08 89 02 00 04 00 00 02 58 FA
    Info:TuyaMCU:TuyaMCU_ProcessIncoming[ver=3]: processing command 7 (State) with 15 bytes
    Info:TuyaMCU:TuyaMCU_ParseStateMessage: processing dpId 137, dataType 2-val and 4 data bytes
    Info:TuyaMCU:TuyaMCU_ParseStateMessage: raw data 4 int: 600
    Debug:TuyaMCU:TuyaMCU_ApplyMapping: id 137 with value 600 is not mapped
    Info:TuyaMCU:TUYAMCU received: 55 AA 03 07 00 05 6F 01 00 01 00 7F
    Info:TuyaMCU:TuyaMCU_ProcessIncoming[ver=3]: processing command 7 (State) with 12 bytes
    Info:TuyaMCU:TuyaMCU_ParseStateMessage: processing dpId 111, dataType 1-bool and 1 data bytes
    Info:TuyaMCU:TuyaMCU_ParseStateMessage: raw data 1 byte: 0
    Debug:TuyaMCU:TuyaMCU_ApplyMapping: id 111 with value 0 is not mapped
    Info:TuyaMCU:TUYAMCU received: 55 AA 03 07 00 05 8D 01 00 01 00 9D
    Info:TuyaMCU:TuyaMCU_ProcessIncoming[ver=3]: processing command 7 (State) with 12 bytes
    Info:TuyaMCU:TuyaMCU_ParseStateMessage: processing dpId 141, dataType 1-bool and 1 data bytes
    Info:TuyaMCU:TuyaMCU_ParseStateMessage: raw data 1 byte: 0
    Debug:TuyaMCU:TuyaMCU_ApplyMapping: id 141 with value 0 is not mapped
    Info:TuyaMCU:TUYAMCU received: 55 AA 03 07 00 08 8C 02 00 04 00 00 00 05 A8
    Info:TuyaMCU:TuyaMCU_ProcessIncoming[ver=3]: processing command 7 (State) with 15 bytes
    Info:TuyaMCU:TuyaMCU_ParseStateMessage: processing dpId 140, dataType 2-val and 4 data bytes
    Info:TuyaMCU:TuyaMCU_ParseStateMessage: raw data 4 int: 5
    Debug:TuyaMCU:TuyaMCU_ApplyMapping: id 140 with value 5 is not mapped
    Info:TuyaMCU:TUYAMCU received: 55 AA 03 07 00 05 8E 04 00 01 02 A3
    Info:TuyaMCU:TuyaMCU_ProcessIncoming[ver=3]: processing command 7 (State) with 12 bytes
    Info:TuyaMCU:TuyaMCU_ParseStateMessage: processing dpId 142, dataType 4-enum and 1 data bytes
    Info:TuyaMCU:TuyaMCU_ParseStateMessage: raw data 1 byte: 2
    Debug:TuyaMCU:TuyaMCU_ApplyMapping: id 142 with value 2 is not mapped
    Info:TuyaMCU:TUYAMCU received: 55 AA 03 07 00 04 8A 03 00 00 9A
    Info:TuyaMCU:TuyaMCU_ProcessIncoming[ver=3]: processing command 7 (State) with 11 bytes
    Info:TuyaMCU:TuyaMCU_ParseStateMessage: processing dpId 138, dataType 3-str and 0 data bytes
    Info:TuyaMCU:TUYAMCU received: 55 AA 03 34 00 01 04 3B
    Info:TuyaMCU:TuyaMCU_ProcessIncoming[ver=3]: processing command 52 (Unknown) with 8 bytes


    Interestingly, I keep receiving the following messages (especially after setting the WiFi status to 4, i.e. connected):

    Quote:
    Info:TuyaMCU:TUYAMCU received: 55 AA 03 34 00 01 04 3B
    Info:TuyaMCU:TuyaMCU_ProcessIncoming[ver=3]: processing command 52 (Unknown) with 8 bytes
    Info:TuyaMCU:TuyaMCU_ProcessIncoming: unhandled type 52


    I don`t really know what it means and what data it is intended to transfer, it`s probably not the energy consumption value because when the load is turned on, the value does not change.
  • #17 20942168
    p.kaczmarek2
    Moderator Smart Home
    I haven`t seen a device with a command yet 52 (0x34). It seems that they seriously need to change something and add robots to us. I did some research and it looks like it`s:
    Code: C / C++
    Log in, to see the code

    Also called:
    Code: C / C++
    Log in, to see the code

    Linked:
    https://developer.tuya.com/en/docs/iot/advanced-features?id=Kav0qqgzfj95f
    https://github.com/kangkoilxu/SmartPetFeeder/blob/main/system.cpp
    You receive data 55 AA 03 34 00 01 04 3B That is:
    55 AA - heading
    03 - version
    34 - package type
    00 01 - length
    04 - data
    3B - checksum
    According to above code (translated from Chinese to English):
    Code: C / C++
    Log in, to see the code

    it is:
    Code: C / C++
    Log in, to see the code

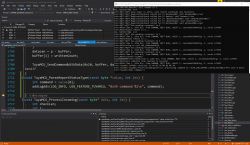
    Unfortunately, even the found code does not show how to handle 0x04, and in our case 0x04 does not have the length 0x02, but I at least added the basis for parsing this package:
    Screenshot of Visual Studio with debugging console and Tuya module source code.
    https://github.com/openshwprojects/OpenBK7231...mmit/e9493e5520f29d765d2eeb6bee2b3225880a70fa
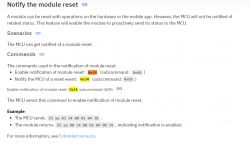
    However, there is something more in the Tuya documentation:
    Screenshot of documentation regarding module reset notification.
    It looks like the WiFi module should respond 55 aa 00 34 00 02 04 00 39 but I don`t see that it would bring us closer to collecting the measurements... I can try to implement this answer, as long as there is nothing useful in other packages
    Helpful post? Buy me a coffee.
  • #18 20942478
    Selfdrivers
    Level 8  
    I`m not sure if this would bring us closer to receiving energy consumption measurements, but if I didn`t try and think about it, I can`t force TuyaMCU to give me the dpID containing the value of energy consumption/energy consumed/voltage/current/power.

    I managed to figure this out:

    Quote:

    startDriver TuyaMCU
    tuyaMcu_setBaudRate 115200
    tuyaMcu_defWiFiState 4
    setChannelType 1 toggle
    setChannelType 2 TextField
    setChannelType 3 TextField
    setChannelType 4 TextField
    setChannelType 5 TextField
    setChannelType 6 TextField
    linkTuyaMCUOutputToChannel 16 bool 1
    linkTuyaMCUOutputToChannel 114 2 2
    linkTuyaMCUOutputToChannel 115 2 3
    linkTuyaMCUOutputToChannel 116 2 4
    linkTuyaMCUOutputToChannel 118 2 5
    linkTuyaMCUOutputToChannel 119 2 6
    tuyaMcu_sendQueryState


    The above script starts the TuyaMCU module and then sets the textField fields appropriately so that you can change the TRIP settings when the relay is to be turned off. I shot some of these IDs, some of which TuyaMCU showed me when executing the command giving the device status. dpID are responsible for:

    Quote:
    16 - relay control (toggle)
    114 - over current setting (2 val 4 data bytes)
    115 - over voltage setting (2 val 4 data bytes)
    116 - under voltage setting (2 val 4 data bytes)
    118 - over temperature shutdown (2 val 4 data bytes) (value is multiplied by 10 so 92 degrees is 920)
    119 - over power protection (2 val 4 data bytes)


    I haven`t found anything else yet, and I have no ideas on how to detect these dpIDs because even changing the values manually (directly on the relay) or changing the state using toggle or sending a command that shows the device status does not help.

    As for my opinion, there may actually be something to the fact that the module must send a response so that TuyaMCU responds with the current energy consumption values, it is not possible to simply send this value "rigidly" with some command just for the test, will it do anything? I`ve seen commands that send HEX values somewhere, maybe there is one that will send the entire message from the console?

    A different question now, how can I delete a channel? I currently have channel 10 set as textField (but I don`t use it) and I would like to remove it completely or hide it, I looked in the documentation but I couldn`t find anything.

    EDIT:

    For now, I am omitting the option of setting the time after which the relay is turned off (e.g. 26A must be on for 5 seconds for the module to react) and such values can also be changed using the command, although I have not set their dpID but I think it is such a priority for the moment it is not the current one, I care more about reading the energy consumption/voltage values etc.

    EDIT2:

    I executed the command uartSendHex 55 aa 00 34 00 02 04 00 39 and the result is that I no longer receive this query with header 52, only heartbeat comes plus questions about RSSI and sometimes device status, but still no energy consumption anywhere, but I think that such an answer could be added because then the MCU stops constantly sending this stupid question about info about restart plus can be added, e.g. when restarting (but in autoexec) to send the restart command, then theoretically it will work just like from the factory.
  • #19 20942514
    p.kaczmarek2
    Moderator Smart Home
    Selfdrivers wrote:
    I`m not sure if this would bring us closer to receiving energy consumption measurements, but if I didn`t try and think about it, I can`t force TuyaMCU to give me the dpID containing the value of energy consumption/energy consumed/voltage/current/power.

    Sometimes it is simpler, sometimes more difficult, dpIDs are not standardized at Tuya. When I was developing another device with @xury, the measurements were immediately available.

    Are you not sending any dpID type? raw be string ?

    Selfdrivers wrote:

    I haven`t found anything else yet, and I have no ideas on how to detect these dpIDs because even changing the values manually (directly on the relay) or changing the state using toggle or sending a command that shows the device status does not help.

    In many devices this was enough, but in your art something must be implemented differently.

    It is definitely recommended to often perform TuyaMCU capture on the original software:
    TuyaMCU analyzer - UART packet decoder for Tuya devices - dpID detector

    I can also add the answer to 0x34 to the code.


    Selfdrivers wrote:

    As for my opinion, there may actually be something to the fact that the module must send a response so that TuyaMCU responds with the current energy consumption values, it is not possible to simply send this value "rigidly" with some command just for the test, will it do anything? I`ve seen commands that send HEX values somewhere, maybe there is one that will send the entire message from the console?

    It is, but you need to know what you want to send.
    We have:
    - uartSendHex
    - tuyaMcu_sendState
    - etc
    Command list: https://github.com/openshwprojects/OpenBK7231T_App/blob/main/docs/commands.md


    Selfdrivers wrote:

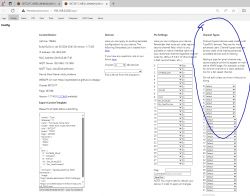
    A different question now, how can I delete a channel? I currently have channel 10 set as textField (but I don`t use it) and I would like to remove it completely or hide it, I looked in the documentation but I couldn`t find anything.

    In Web App:
    Screenshot of a web interface for configuring the BK7231T device.


    Selfdrivers wrote:

    I want to read the energy consumption/voltage values etc.

    Here are my suggestions for what you can do:
    1. play with tuyaMcu_sendQueryState and look at what is being sent, maybe there is a RAW (bytes) or String (ASCII text) packet? For example, some dpId that sends at least 12 bytes, 4 bytes for current, voltage and power? This happens in some devices
    2. according to Tuya documentation, the answer to 55 AA 03 34 00 01 04 3B is 55 aa 00 34 00 02 04 00 39 by default, I entered it in the code in this PR:
    https://github.com/openshwprojects/OpenBK7231T_App/pull/1058/
    you can try to download a new binary from this PR, run an OTA and check what happens
    3. as a last resort, you can restore the Tuya flash (BK7231GUIFlashTool in the backup and flash option makes a 2MB copy of it) and perform packet capture, this will solve any doubts
    Helpful post? Buy me a coffee.
  • #20 20942524
    Selfdrivers
    Level 8  
    As I wrote in the edit of the previous answer, I executed the command uartSendHex 55 aa 00 34 00 02 04 00 39 and the effect is that I no longer receive constant questions from the MCU and the logs have "calmed down", but I am still looking for energy consumption values.

    EDIT:

    the current autoexec looks like this:

    Quote:
    startDriver TuyaMCU
    tuyaMcu_setBaudRate 115200
    tuyaMcu_defWiFiState 4
    setChannelType 1 toggle
    setChannelType 2 TextField
    setChannelType 3 TextField
    setChannelType 4 TextField
    setChannelType 5 TextField
    setChannelType 6 TextField
    linkTuyaMCUOutputToChannel 16 bool 1
    linkTuyaMCUOutputToChannel 114 2 2
    linkTuyaMCUOutputToChannel 115 2 3
    linkTuyaMCUOutputToChannel 116 2 4
    linkTuyaMCUOutputToChannel 118 2 5
    linkTuyaMCUOutputToChannel 119 2 6
    tuyaMcu_sendQueryState
    uartSendHex 55 aa 00 34 00 02 04 00 39


    EDIT:

    the logs look like this after execution uartSendHex : :

    Screenshot showing logs after sending the uartSendHex command for the Tuya Microcontroller.
  • #21 20942532
    p.kaczmarek2
    Moderator Smart Home
    I didn`t see EDIT2 when I wrote my message, but indeed, you came up with what I wanted to ask for.

    Now manually query the state several times and see what TuyaMCU sends us.

    Also check the new build that I provided, because if this answer is correct, I will add it to the main firmware so that it will work for everyone...

    Added after 2 [minutes]:

    EDIT: Do you know what I mean by "manually"? In Web App log you can execute commands outside of autoexec.bat, in real time
    Helpful post? Buy me a coffee.
  • #22 20942561
    Selfdrivers
    Level 8  
    p.kaczmarek2 wrote:
    You know what I mean by "manually"? In Web App log you can execute commands outside of autoexec.bat, in real time


    This is where it executes test commands to check the effects of operation.

    p.kaczmarek2 wrote:
    Also check the new build I provided, because if this answer is correct, I will add it to the main firmware so that it will work for everyone...


    maybe the binary is ready or what does it look like?
  • #23 20942576
    p.kaczmarek2
    Moderator Smart Home
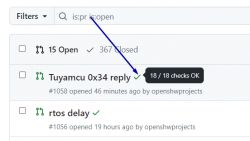
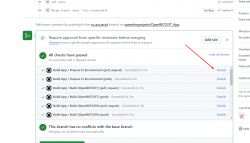
    OpenBeken has an automatic compilation system based on Github workflow, which means that each new version is automatically compiled for all supported platforms. Apparently, each PR and commit is automatically compiled, to download the compiled binaries you need to click the "tick":
    Part of the GitHub panel showing a list of open pull requests with details of one of them.
    Then in details:
    Screenshot showing the results of an automatic compilation on Github for the OpenBeken project.
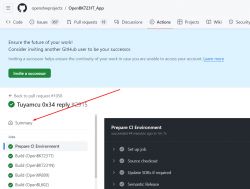
    Then in summary:
    Screenshot of the Github interface with the Actions tab for the OpenBK7231T_App project with the Summary link highlighted.
    After scrolling down you will find a package with compilation results:
    Screenshot of the Artifacts section on GitHub, containing a compiled package.
    Helpful post? Buy me a coffee.
  • #24 20942590
    Selfdrivers
    Level 8  
    It looks like it works:

    Screenshot of Wi-Fi logs related to TuyaMCU processes.

    EDIT:

    In the sense that it does not constantly send this query 52 even though I did not execute the hex command. I`m off to tackle dpID and discovering these devices now.
  • #25 20942614
    p.kaczmarek2
    Moderator Smart Home
    In that case, I will accept this PR and the changes will be in the main firmware. Keep looking, but if you can`t come up with anything else, you will probably have to perform motion capture on the original software, in a safe way, of course, because the system probably has a non-isolated converter. You will probably need a module that provides isolation of UART signals.
    Helpful post? Buy me a coffee.
  • #26 20942897
    Selfdrivers
    Level 8  
    p.kaczmarek2 wrote:
    In that case, I will accept this PR and the changes will be in the main firmware. Keep looking, but if you can`t come up with anything else, you will probably have to perform motion capture on the original software, in a safe way, of course, because the system probably has a non-isolated converter. You will probably need a module that provides isolation of UART signals.


    I think I already know what the problem is, but I don`t know how to get around it, I noticed that sometimes it shows me dpID from 16 upwards (it then cuts off e.g. 130 and higher) and sometimes it gives me values 116 up and it is possible that it also cuts off the upper range somewhere.

    Example:

    I executed the device status command and received the following data:

    Screenshot of Tasmota log showing command processing and debug information for dpID.

    notice that at the very top there is information from Debug that id 110 has not been paired with anything, but id 110 and its value do not appear in the log, my theory is that there are so many devices that it overflows the buffer and hence we are not in able to see values that are responsible for e.g. energy consumption, voltage, current. Do you have any ideas on how to handle this? Maybe a dump to a .log file?

    Added after 4 [minutes]:

    Another example:

    This time it was cut off at the "height" of 116 (debug is there, but not the value itself, i.e. it sees it but does not show it in the console):

    System log screenshot regarding TuyaMCU devices with message and status processing.

    Added after 3 [minutes]:

    One more thing, I read that there are custom manufacturer`s devices above dpID 100, everything below 100 is designed by Tuya, but unfortunately they like to change dpID values very often (I looked in Tasmota`s default list and no dpID from their list works).
  • #27 20942937
    p.kaczmarek2
    Moderator Smart Home
    I can enlarge the buffers or shorten unnecessary messages, but first tell me if you have it open only one WebApp instance ?

    WebApp works in such a way that when you open it in two browser tabs, their instances "fight" for the log and half of the log is in one tab and half in the other.
    Helpful post? Buy me a coffee.
  • #28 20942945
    Selfdrivers
    Level 8  
    p.kaczmarek2 wrote:
    I can enlarge the buffers or shorten unnecessary messages, but first tell me, do you only have one WebApp instance open?


    Yes, there is only one instance of WebApp running and a screen with relay control etc. (this website - a copy of the tape).

    Added after 1 [minute]:

    I think reducing the number of messages will be best. Preferably in the format: dpID - value (type) and one after the other under each other

    EDIT: I`m talking about the effect of executing the command tuyaMcu_sendQueryState

    Added after 2 [minutes]:

    Maybe even create a new function called e.g. tuyaMcu_sendQueryState_short ?
  • #29 20942966
    p.kaczmarek2
    Moderator Smart Home
    It is not worth introducing a new function for this purpose, some platforms only have 1MB flash and there have already been reports that TuyaMCU will also be needed there. However, I would like to shorten the messages, there is no problem with that, I can do it immediately in production.

    Wait 10 minutes for it to compile online and do an OTA and try if anything has changed.

    Added after 1 [minutes]:

    EDIT: We`re talking about OTA for the new public release.

    Added after 0 [seconds]:

    EDIT: We`re talking about OTA for the new public release.
    Helpful post? Buy me a coffee.
  • #30 20943011
    Selfdrivers
    Level 8  
    Is it possible to add a very laconic version as a test?

    type:

    incoming - 119 - 2123 (type 2-val len 4)

    and that`s all? Literally, as a test, turn off all other additional information from Tuya for a moment, only dpid and values.

Topic summary

The discussion revolves around the TO-Q-SYS-JWT DIN Rail kWh meter, which features a built-in display for monitoring energy consumption and adjusting settings such as undervoltage and overvoltage protection. Users share insights on disassembling the device, with specific instructions on removing metal pins to access internal components. Concerns are raised regarding the device's documentation and safety, with some users questioning its classification as a fuse. The conversation also delves into the device's compatibility with TuyaMCU, firmware modifications, and the extraction of dpIDs for energy measurement. Participants discuss the challenges of obtaining accurate energy consumption readings and the potential for integrating the device with home automation systems. Various technical solutions and commands for configuring the device are shared, along with troubleshooting tips for communication issues and data extraction.
Summary generated by the language model.
ADVERTISEMENT