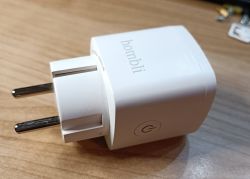
Let me share my adventure with the “Hombli Smart Socket”
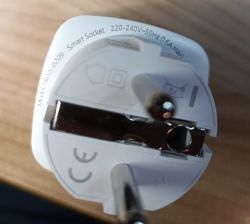
Written on the plug is: HBSS-0209 Smart socket B2030248
From Tuya app: Software version = Main V 1.0.2
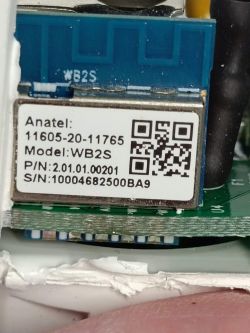
The chip is a WB2S = BK7231T (i only know this, because i have sacrificed 1 of my plug to look inside. )
)


First i try tuya-cloudcutter with different combinations of the 1.0.2 firmware.
None of these attempts were successful, therefore decided to open the plug.
There was no way to do this friendly, so it was down to a saw and cutters

Here i discovered the WB2S and did try to match more combinations from known cloudcutter options, but none of them seam to match this plug.

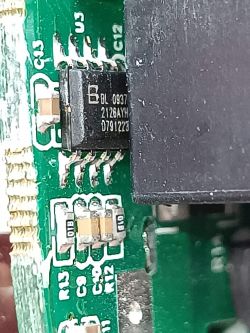
The energy chip.
So I took the shell even further apart to connect the serial reader.
This was my first experience with a BK chip (I am used to working with esp).
I was not able to get the serial reader working, so de-solder the chip.
After that I was able to make a dump
After reading the .bin from the WB2S you need to create a tuya-cloudcutter profile.
This can be done by the following cmds.
Copy the .bin file to the correct name (See Link )
Now the profile is created.
Please post the files for the community.
Link
Then copy the profile to you local system
Now you can run cloudcutter
Follow instructions on screen.
When the flashing is finished.
Power down + power up the plug.
Connect to Wifi of the plug.
Connect to the web-gui ( http://192.168.4.1 )
Click “Open web application”,
Select Chipset: BK7231T
Select Generic Generic Tuya WIFI Smart Socket (LSPA8) with WB2S and BL0937
Press “Copy Device Settings”
You can now test the button, etc.
For the energy meter to work, you need to reboot the plug.
Probably the energy reading will provide some wrong value. To calibrate the BL0937, connect a (traditional) bulb for 60W or 100W or any other system you know will draw a specific power. And you need to measure the real voltage. (I took my Voltage from my energy meter)
Now, in the command line, type commends: VoltageSet [current Voltage Val], CurrentSet [current Current Val] i PowerSet [current Power Val] (i think you only need 2 of these.)
Now the reading should be better.
All works fine...
see tuya-cutter here: Link
Written on the plug is: HBSS-0209 Smart socket B2030248
From Tuya app: Software version = Main V 1.0.2
The chip is a WB2S = BK7231T (i only know this, because i have sacrificed 1 of my plug to look inside.


First i try tuya-cloudcutter with different combinations of the 1.0.2 firmware.
None of these attempts were successful, therefore decided to open the plug.
There was no way to do this friendly, so it was down to a saw and cutters

Here i discovered the WB2S and did try to match more combinations from known cloudcutter options, but none of them seam to match this plug.

The energy chip.
So I took the shell even further apart to connect the serial reader.
This was my first experience with a BK chip (I am used to working with esp).
I was not able to get the serial reader working, so de-solder the chip.
After that I was able to make a dump
After reading the .bin from the WB2S you need to create a tuya-cloudcutter profile.
This can be done by the following cmds.
Copy the .bin file to the correct name (See Link )
# cp /home/christiaan/bk7231/hombli.bin /home/christiaan/bk7231/Hombli_HBSS-0209-Smart-Socket-B2030248-Energy-Plug.bin

# cd /home/christiaan/tuya-cloudcutter/profile-building
# python build_profile.py <path>/Hombli_HBSS-0209-Smart-Socket-B2030248-Energy-Plug.bin
[+] Processing file='/home/christiaan/bk7231/Hombli_HBSS-0209-Smart-Socket-B2030248-Energy-Plug.bin' as Hombli_HBSS-0209-Smart-Socket-B2030248-Energy-Plug
RBL containers:
        0x10f9a: bootloader - [encoding_algorithm=NONE, size=0xdd40]
                extracted to /home/christiaan/bk7231/Hombli_HBSS-0209-Smart-Socket-B2030248-Energy-Plug
        0x129f0a: app - [encoding_algorithm=NONE, size=0xe3300]
                extracted to /home/christiaan/bk7231/Hombli_HBSS-0209-Smart-Socket-B2030248-Energy-Plug
Storage partition:
        0x1ee000: 68 KiB - 9 keys
        - 'gw_bi'
        - 'user_param_key'
        - 'gw_di'
        - 'gw_wsm'
        - 'gw_ai'
        - 'timer_arr'
        - 'tls_ca_cnt'
        - '000002gjf7'
        - 'em_sys_env'
                extracted all keys to /home/christiaan/bk7231/Hombli_HBSS-0209-Smart-Socket-B2030248-Energy-Plug/Hombli_HBSS-0209-Smart-Socket-B2030248-Energy-Plug_storage.json
Storage area `user_param_key`:
        - found! Extracted to /home/christiaan/bk7231/Hombli_HBSS-0209-Smart-Socket-B2030248-Energy-Plug/Hombli_HBSS-0209-Smart-Socket-B2030248-Energy-Plug_user_param_key.json
[+] Searching for known exploit patterns
[+] Matched pattern for BK7231T version SDK 2.0.0 8710_2M, payload type datagram
[+] Searching for datagram payload address
[+] datagram payload address gadget (THUMB): 0x8DB2F
[+] Searching for finish address
[+] Finish address gadget (THUMB): 0x986CF
[+] uuid: 0128ce83831d2800
[+] auth_key: 1ltXs1DTN6fdYaoBWQtaQCHtN1uSaIXs
[+] ap_ssid: SmartLife
[+] swv: 1.0.2
[+] bv: 30.05
[+] firmware key: keym9qkuywghyrvs
[+] product key: keym9qkuywghyrvs
[+] schema: [{'mode': 'rw', 'property': {'type': 'bool'}, 'id': 1, 'type': 'obj'}, {'mode': 'rw', 'property': {'min': 0, 'max': 86400, 'scale': 0, 'step': 1, 'type': 'value'}, 'id': 9, 'type': 'obj'}, {'mode': 'rw', 'property': {'min': 0, 'max': 50000, 'scale': 3, 'step': 100, 'type': 'value'}, 'id': 17, 'type': 'obj'}, {'mode': 'ro', 'property': {'min': 0, 'max': 30000, 'scale': 0, 'step': 1, 'type': 'value'}, 'id': 18, 'type': 'obj'}, {'mode': 'ro', 'property': {'min': 0, 'max': 50000, 'scale': 1, 'step': 1, 'type': 'value'}, 'id': 19, 'type': 'obj'}, {'mode': 'ro', 'property': {'min': 0, 'max': 5000, 'scale': 1, 'step': 1, 'type': 'value'}, 'id': 20, 'type': 'obj'}, {'mode': 'ro', 'property': {'min': 0, 'max': 5, 'scale': 0, 'step': 1, 'type': 'value'}, 'id': 21, 'type': 'obj'}, {'mode': 'ro', 'property': {'min': 0, 'max': 1000000, 'scale': 0, 'step': 1, 'type': 'value'}, 'id': 22, 'type': 'obj'}, {'mode': 'ro', 'property': {'min': 0, 'max': 1000000, 'scale': 0, 'step': 1, 'type': 'value'}, 'id': 23, 'type': 'obj'}, {'mode': 'ro', 'property': {'min': 0, 'max': 1000000, 'scale': 0, 'step': 1, 'type': 'value'}, 'id': 24, 'type': 'obj'}, {'mode': 'ro', 'property': {'min': 0, 'max': 1000000, 'scale': 0, 'step': 1, 'type': 'value'}, 'id': 25, 'type': 'obj'}, {'mode': 'ro', 'property': {'type': 'bitmap', 'maxlen': 6}, 'id': 26, 'type': 'obj'}]
[+] schema 000002gjf7:
[!] No gw_di, No version or key stored, manual lookup required
[+] SDK: 2.0.0
[+] Device class: oem_bk7231s_dltj_test
[+] Schema already present
[+] Creating classic profile oem-bk7231s-dltj-test-1.0.2-sdk-2.0.0-30.05
[+] Creating device profile hombli-hbss-0209-smart-socket-b2030248-energy-plug
Now the profile is created.
Please post the files for the community.
Link
Then copy the profile to you local system
# mkdir /home/christiaan/tuya-cloudcutter/device-profiles/hombli
# cp /home/christiaan/bk7231/Hombli_HBSS-0209-Smart-Socket-B2030248-Energy-Plug/profile-classic/profiles/oem-bk7231s-dltj-test-1.0.2-sdk-2.0.0-30.05.json /home/christiaan/tuya-cloudcutter/device-profiles/hombli
Now you can run cloudcutter
./tuya-cloudcutter.sh -r -f OpenBK7231T_UG_1.15.524.bin -p hombli
Follow instructions on screen.
Successfully built docker image
Loading options, please wait...
Selected Device Slug: hombli
Selected Profile: oem-bk7231s-dltj-test-1.0.2-sdk-2.0.0-30.05
Selected Firmware: OpenBK7231T_UG_1.15.524.bin
================================================================================
Follow instruction on the screen
================================================================================
When the flashing is finished.
Power down + power up the plug.
Connect to Wifi of the plug.
Connect to the web-gui ( http://192.168.4.1 )
Click “Open web application”,
Select Chipset: BK7231T
Select Generic Generic Tuya WIFI Smart Socket (LSPA8) with WB2S and BL0937
Pin 6: WifiLED_n on channel 0
Pin 7: BL0937CF on channel 0
Pin 8: BL0937CF1 on channel 0
Pin 10: Button on channel 0
Pin 24: BL0937SEL on channel 1
Pin 26: Relay on channel 0
Press “Copy Device Settings”
You can now test the button, etc.
For the energy meter to work, you need to reboot the plug.
Probably the energy reading will provide some wrong value. To calibrate the BL0937, connect a (traditional) bulb for 60W or 100W or any other system you know will draw a specific power. And you need to measure the real voltage. (I took my Voltage from my energy meter)
Now, in the command line, type commends: VoltageSet [current Voltage Val], CurrentSet [current Current Val] i PowerSet [current Power Val] (i think you only need 2 of these.)
VoltageSet 230 (enter)
PowerSet 60 (enter)
Now the reading should be better.
All works fine...
see tuya-cutter here: Link
Cool? Ranking DIY


