logo elektroda
logo elektroda
X
logo elektroda

Video tutorial displays NEXTION

ekrzychoooo 40851 274
ADVERTISEMENT
Treść została przetłumaczona polish » english Zobacz oryginalną wersję tematu
  • #31 17247532
    kaino
    Level 12  
    ekrzychoooo wrote:
    - I think it should be s2.bt0.val and not s2.bt0.en
    - Eclipse Window -> preferences -> C / C ++ -> Indexer -> Enable indexer


    but sendCommand ("s1.s10.val = 0");

    s1.s.10.val = 0 is a button and it only shows the change of the icon, and I do not perform the functions assigned to it as it does with the hardware button,

    and i can't operate it from the display
  • ADVERTISEMENT
  • #32 17247975
    ekrzychoooo
    Level 17  
    The button element code will only be executed in two cases
    1 physical touch with a finger
    2 execution of the click function (either on the LCD side or on the arduino side, e.g. sendCommand ("click bt1,0");)
  • ADVERTISEMENT
  • #33 17251908
    kaino
    Level 12  
    Mom has such a problem

    as soon as it reads the temperature from the thermistor or thermocouples and sends it to the text field about the nextion display as if it would slow down there is quite a delay to touch

    What may be the problem


    Code: C / C++
    Log in, to see the code
  • #34 17252127
    ekrzychoooo
    Level 17  
    this code
    Code: C / C++
    Log in, to see the code

    it does not differ in any way from
    Code: C / C++
    Log in, to see the code

    I don't know if that was your intention (semicolon in while line)

    Connect the arduino not to the LCD but to the PC and in the display debugger observe what is happening on the input and output. It seems to me that you have transmissions there non-stop, which may cause temporary overloads.
  • ADVERTISEMENT
  • #36 17264530
    kaino
    Level 12  
    gives arduino code for YT entry


    Code: C / C++
    Log in, to see the code
  • #37 17264919
    ekrzychoooo
    Level 17  
    Please paste the HMI file because the display returns to me with errors
    0x1A 	2,3 	4 	Invalid Variable name or attribute 	0x1A 0xFF 0xFF 0xFF
    Returned when invalid Variable name or invalid attribute was used


    Added after 26 [minutes]:

    In loop, you run update () twice;
    at the beginning of the loop
    Code: C / C++
    Log in, to see the code

    and the second time
    Code: C / C++
    Log in, to see the code


    knock it off the top of the loop

    Added after 7 [hours] 39 [minutes]:

    2018-06-09 at 17:00 live broadcast Live
    1 Repair arduino NexNumber library
    2 Questions to answer

    welcome
  • #38 17356718
    alikwot665
    Level 7  
    Hello!
    At the beginning, I have to thank you very much for the tutorials. They are perfectly prepared and you can learn a lot from each episode :)
    I have a question about graphs or waveforms.
    Is it possible to dynamically change the y-axis range on the fly? My point is that I have a certain measuring device connected to the arduino, which under normal conditions shows 20-30 but can go up to several thousand under certain circumstances. In normal mode, I would like the values on the graph to change in the range, say, from 0 to 30, but if this value is exceeded, the range will automatically increase. This would involve the "flattening" of the current graph so that the appearing higher readings fit and were proportionally higher than the previous ones. If the value of the readings were increased to e.g. 500, the previous readings of the order of 20-30 would flatten to a few pixels so that 500 would also fit.
    I noticed that this is how "on the fly" you can change the color of the graph and the color of the entire drawn graph changes, not just the newly created pixels, so somewhere the display stores information about what the graph looks like. If only it was possible to somehow retrieve this information and then, for example, divide the graph pixel positions by 100 (which will flatten the graph but also make high readings fit on the graph.) And then overwrite the old graph with a new one.
    Is something like this possible?
  • ADVERTISEMENT
  • #39 17433984
    nebari
    Level 2  
    Hello Mr. Krzysztof
    Some time has passed since our discussions on YT - I had a long break from working with the project but I am going back to continuing the topic. After changing / rearranging the pages (order), problems with which I am not able to deal with have broken down. The clock, lamps and thermometers flickered nicely and it was over :-( . The project generally concerns the controller / controller of the aquarium in a slightly expanded version.

    The driver options include:
    - control of two PWM channels with indication of the time of day of lamp operation (LED lamps)
    - temperature control and fan control (two channels) - animation of the fan operation on the panel when one of them is turned on,
    - measurement of the pH value and with the appropriate kH introduced, calculation of the value of carbon dioxide in the water Co2,
    - of course the current date and time,
    - fertilizer dispenser control.

    The whole in the one-channel version works on the arduino nano and the 20x4 LCD display, but there is no possibility of setting parameters from the display position only in the program and the need to reload the program to arduino, which is tiring and cumbersome.
    And now my heartfelt request to the experts from arduino and Nextion displays to help me embrace the subject, because I do not know how to handle it anymore.
    In the connection, I put the file for the display, my model is: NX3224T024_011. The Arduino to be operated is the MEGA 2560 version.
    Of course, if someone sees the use of such a project, I will be happy to share it, but let it work :-( .
    below the skech for arduino:
    [syntax=c]#include "Arduino.h"
    #include "Nextion.h"
    #include
    #include
    #include
    #include
    #include
    #include

    #define ONE_WIRE_BUS 13 // pin 13 termomoetr
    #define TEMPERATURE_RECISION 9
    #define ODSTEP 1000
    #define SensorPin A7 // wejście analogowe dla sensora pH - pin analogowy 7
    #define LED A7 // nowy wpis do pH
    #define samplingInterval 20 // nowy wpis do pH
    #define printInterval 800 // nowy wpis do pH
    #define ArrayLenth 40 // times of collection
    #define Offset 0.50 // kalibracja pH

    //-----------------------PINY WE/WY ---------------------------------
    int W1 = 5; // pin 5 - wyjście do stycznika nr 1 - wentylator
    int dozownik_1 = 6; // pin 6 - wyjście do stycznika nr 2 - dozownik
    int LED1 = 11; // pin 11 - wyjście PWM do sterowania LED1
    int LED2 = 10; // pin 11 - wyjście PWM do sterowania LED2

    int STEP = 1; // długość trwania jednego kroku
    int CZAS; //czas do lampy led
    int czas1;
    int czas2;
    int GODZ; // godziny
    int MIN; // minuty
    int maxD1 = 60; // maksymalna moc kanału LED1
    int maxD2 = 60; // maksymalna moc kanału LED2
    int ZMIANA = 60;

    int godzina_ON; // godzina włączenia dozownika
    int godzina_OFF; // godzina wyłączenia dozownika
    int minuta_ON; // minuty włączenia dozownika
    int minuta_OFF; // minuty wyłączenia dozownika
    int sekunda_ON; // sekunty włączenia dozownika
    int sekunda_OFF; // sekundy wyłączenia dozownika
    int porcja; // ilość wdozowywanego nawozu w ml

    //int dzienG = 7; // początek dnia - godziny
    //int dzienM = 00; // początek dnia - minuty
    //int nocG = 20; // początek nocy - godziny
    //int nocM = 00; // początek nocy - minuty
    unsigned long czas_poprzedni = 0;
    int licznik = 0;
    int stan = 0;
    int pH;
    float b;
    //float pH; // dla sensora pH

    int pHArray[ArrayLenth]; //Store the average value of the sensor feedback
    int pHArrayIndex=0; // nowy wpis do pH

    //-----------------------ZMIENNE DLA TERMOMETRÓW -------------------------------
    NexText t1 = NexText(1, 23, "t2"); //zmienna tekstowa dla termometra 1 (strona0)
    NexText t2 = NexText(1, 24, "t3"); //zmienna tekstowa dla termometra 2 (strona0)


    //-----------------------ZMIENNE DLA RTC -------------------------------

    NexNumber g = NexNumber(1, 16, "page0.n1"); //zmienna numeryczna do zegara dla godzin (strona0)
    NexNumber m = NexNumber(1, 17, "page0.n2"); //zmienna numeryczna do zegara dla minut (strona0)
    NexNumber s = NexNumber(1, 18, "page0.n3"); //zmienna numeryczna do zegara dla sekund (strona0)
    NexNumber d = NexNumber(1, 19, "page0.n4"); //zmienna numeryczna do kalendarza dla dni
    NexNumber mie = NexNumber(1, 20, "page0.n5"); //zmienna numeryczna do kalendarza dla mieięcy
    NexNumber r = NexNumber(1, 21, "page0.n6"); //zmienna numeryczna do kalendarza dla lat


    //-----------------------ZMIENNE DLA TEMPERATURY - WIATRAK -------------------------------

    NexNumber limes = NexNumber(3, 4, "te0"); //zmienna numeryczna dla ustawień temperatury pobierana ze strony 3

    //-----------------------ZMIENNE DLA SONDY PH -------------------------------

    NexNumber PHval = NexNumber(1, 12, "page0.n7"); //zmienna numeryczna dla wartosci pH wyswietlanej na stronie 0

    //-----------------------ZMIENNE DLA TWARTOŚCI/co2 -------------------------------

    NexNumber num1 = NexNumber(1, 31, "n0"); //zmienna numeryczna dla twardości wyświetlanej na stronie 0
    NexNumber co2 = NexNumber(1, 29, "n8"); // obliczenie wartosci Co2 wyswietlanej na stronie 0

    //-----------------------ZMIENNE DO STEROWANIA LAMPAMI -------------------------------

    NexNumber dG1 = NexNumber(3, 5, "page2.dg1"); //zmienna numeryczna dla twardości wyświetlanej na stronie 0
    NexNumber dM1 = NexNumber(3, 7, "page2.dm1"); //zmienna numeryczna dla ustawień twardości pobierana ze strony 5
    NexNumber nG1 = NexNumber(3, 4, "page2.ng1"); //zmienna numeryczna dla twardości wyświetlanej na stronie 0
    NexNumber nM1 = NexNumber(3, 6, "page2.nm1"); //zmienna numeryczna dla ustawień twardości pobierana ze strony 5
    NexNumber dzienG2 = NexNumber(7, 5, "page8.dzienG2"); //zmienna numeryczna dla twardości wyświetlanej na stronie 0
    NexNumber dzienM2 = NexNumber(7, 7, "page8.dzienM2"); //zmienna numeryczna dla ustawień twardości pobierana ze strony 5
    NexNumber nocG2 = NexNumber(7, 4, "page8.nocG2"); //zmienna numeryczna dla twardości wyświetlanej na stronie 0
    NexNumber nocM2 = NexNumber(7, 6, "page8.nocM2"); //zmienna numeryczna dla ustawień twardości pobierana ze strony 5

    NexText pora = NexText(0, 6, "po"); //zmienna tekstowa dla pory dnia oświetlenia
    NexNumber lamp1 = NexNumber(1, 23, "page0.l1"); //zmienna numeryczna dla statusu % lampy 1
    NexNumber lamp2 = NexNumber(1, 24, "page0.l2"); //zmienna numeryczna dla statusu % lampy 2


    NexTouch *nex_Listen_List[]=
    {
    NULL
    };


    char buffer[10] = {0};


    OneWire oneWire(ONE_WIRE_BUS); // termometr one wire
    DallasTemperature sensors(&oneWire); // termometr
    int numberOfDevices;
    DeviceAddress tempDeviceAddress;

    //--------------------------------------------------------------------------------------------------------
    //-------------------SETUP-------------------------------
    //--------------------------------------------------------------------------------------------------------
    void setup() {

    //nexInit();
    sensors.begin(); // aktywacja termometr
    Serial.begin(9600); // aktywacja portu szeregowego
    while (!Serial) ; // wait until Arduino Serial Monitor opens


    numberOfDevices = sensors.getDeviceCount(); // pobranie danych z sensora

    // pinMode(LED1, OUTPUT); // LED 1
    // pinMode(LED2, OUTPUT); // LED 2
    // pinMode(W1, OUTPUT); // wyjście wentylator
    // pinMode(W2, OUTPUT); // wyjście dozownik

    tmElements_t tm;

    } // koniec void setup


    //--------------------------------------------------------------------------------------------------------
    //------------------- loop -------------------------------
    //--------------------------------------------------------------------------------------------------------
    void loop()
    {
    unsigned long czas_aktualny = millis();
    if(czas_poprzedni - czas_aktualny> ODSTEP)

    czas_poprzedni = czas_aktualny;
    licznik = licznik + 1;

    //------------------- ZEGAR -------------------------------
    tmElements_t tm;
    if (RTC.read(tm)) { // pobierz czas na wyświetlacz
    Serial.print("DS1307 configured Time=");
    Serial.print(__TIME__);
    Serial.print(", Date=");
    Serial.println(__DATE__);
    d.setValue(tm.Day);
    mie.setValue(tm.Month);
    r.setValue(tmYearToCalendar(tm.Year));
    g.setValue(tm.Hour);
    m.setValue(tm.Minute);
    s.setValue(tm.Second);
    }

    Serial.println("swiatła start");
    LAMPY(); // dane z bloku lampy
    Serial.println("temperatura start");
    // printTemperature(DeviceAddress deviceAddress, int index); // dane z bloku temperatury
    Serial.print("");
    dozownik(); // dane z bloku dozownika
    Serial.println("dozownik start");

    PH_SONDA(); // dane z bloku sondy pH
    Serial.println("sonda pH start");

    } // konice void loop


    //-----------------------------------------------------------------------------------------

    bool setSys0(uint32_t number)

    {
    char buf[10] = {0};
    String cmd;

    utoa(number, buf, 10);
    cmd += "sys0=";
    cmd += buf;
    sendCommand(cmd.c_str());
    return recvRetCommandFinished();
    } // koniec funkcji bool

    uint32_t numLimes;

    //--------------------------------------------------------------------------------------------------------
    //-------------------void TEMPERATURY-------------------------------
    //--------------------------------------------------------------------------------------------------------

    void printTemperature(DeviceAddress deviceAddress, int index)
    {
    float tempC = sensors.getTempC(deviceAddress);
    memset(buffer, 0, sizeof(buffer));
    String tempTXT = String(tempC, 2);
    tempTXT.toCharArray(buffer, 10);


    if(index == 0){
    t1.setText(buffer);
    Serial.print("temperatura 1=");
    Serial.print(buffer);

    limes.getValue(&numLimes);
    if(tempC > numLimes){
    setSys0(1);
    digitalWrite(W1,HIGH);
    Serial.println("wiatrak 1 - ON");
    }
    else{
    setSys0(0);
    digitalWrite(W1,LOW);
    Serial.println("wiatrak 1 - OFF");
    }
    }
    if(index ==1){

    t2.setText(buffer);
    Serial.print("temperatura 2=");
    Serial.print(buffer);

    }
    }

    uint32_t num;
    uint32_t dg1;
    uint32_t dm1;
    uint32_t ng1;
    uint32_t nm1;

    //uint32_t dG2;
    //uint32_t dM2;
    //uint32_t nG2;
    //uint32_t nM2;


    //--------------------------------------------------------------------------------------------------------
    //-------------------VOID DOZOWNIK-------------------------------
    //--------------------------------------------------------------------------------------------------------
    void dozownik()
    {
    tmElements_t tm;

    sekunda_OFF= porcja*60/100; // przeliczenie porcji w ml na czas dosowania w sekundach
    if((godzina_ON==tm.Hour)&&(minuta_ON==tm.Minute)&&(sekunda_ON==tm.Second)) // warunek włączenia dozownika
    {
    digitalWrite(dozownik_1,HIGH); //właczenie dozownika
    Serial.println("dozownik start");
    }

    if((godzina_OFF==tm.Hour)&&(minuta_OFF==tm.Minute)&&(sekunda_OFF==tm.Second)) // warunek wyłączenia dozownika
    {
    digitalWrite(dozownik_1,LOW); //wyłaczenie dozownika
    Serial.println("dozownik stop");
    }

    } //koniec void dozownik


    //--------------------------------------------------------------------------------------------------------
    //-------------------VOID LAMPY-------------------------------
    //--------------------------------------------------------------------------------------------------------
    void LAMPY()
    {
    //------------------- ZEGAR -------------------------------
    tmElements_t tm;
    if (RTC.read(tm)) { // pobierz czas na wyświetlacz


    //------------------- OŚWIETLENIE -------------------------------


    dG1.getValue(&dg1);
    dM1.getValue(&dm1);
    nG1.getValue(&ng1);
    nM1.getValue(&nm1);

    // dzienG2.getValue(&dG2);
    // dzienM2.getValue(&dM2);
    // nocG2.getValue(&nG2);
    // nocM2.getValue(&nM2);

    GODZ = (tm.Hour); // pobranie godziny z zegara
    MIN = (tm.Minute); // pobranie minut z zegara

    int CZAS = (GODZ*60+MIN); // przejście na minuty - czas ogólny
    int czas1 = (dg1*60+dm1); // przeliczenie na minuty dla czasu gdy dzień
    int czas2 = (ng1*60+nm1); // przeliczenie na minuty dla czsu gdy noc

    // int czas1L2 = (dG2*60+dm2); // przeliczenie na minuty dla czasu gdy dzień
    // int czas2L2 = (nG2*60+nm2); // przeliczenie na minuty dla czsu gdy noc

    static int D1; //stopień rozjaśniania LED1, LED2
    // static int D2; //stopień rozjaśniania LED1, LED2

    // -------------- LAMPA 1 --------------------------------------------

    int mocD1[61] = //stopień rozjaśniania LED1
    {
    0,1,2,3,4,5,6,7,8,9,10,
    11,12,13,14,15,16,17,18,19,20,
    25,30,35,40,45,50,55,60,65,70,
    75,80,85,90,95,100,105,110,115,120,
    125,130,135,140,145,150,155,160,165,170,
    175,175,179,190,205,205,205,205,205,205 // zasilanie na 100%
    };
    int mocD2[61] = //stopień rozjaśniania LED1
    {
    0,1,2,3,4,5,6,7,8,9,10,
    11,12,13,14,15,16,17,18,19,20,
    25,30,35,40,45,50,55,60,65,70,
    75,80,85,90,95,100,105,110,115,120,
    125,130,135,140,145,150,155,160,165,170,
    175,175,179,195,210,215,225,235,245,255 // zasilanie na 100%
    };

    if (CZAS < czas1) // warunek gdy NOC
    {
    D1=0; //
    // sendCommand("po.val=NOC");
    Serial.println("LED - NOC");
    pora.setText("NOC");
    }
    if ((czas1
  • #40 17434161
    Slawek K.
    Level 35  
    So on quickly :

    Code: C / C++
    Log in, to see the code


    You have declared page 1 and then page0.nX, remove page0 in front of the numeric field name, check if these nX are on page 1 and if the IDs match the project in Nextion editor.

    Greetings
  • #41 17435112
    nebari
    Level 2  
    rs6000 wrote:
    So on quickly :

    Code: C / C++
    Log in, to see the code


    You have declared page 1 and then page0.nX, remove page0 in front of the numeric field name, check if these nX are on page 1 and if the IDs match the project in Nextion editor.

    Greetings

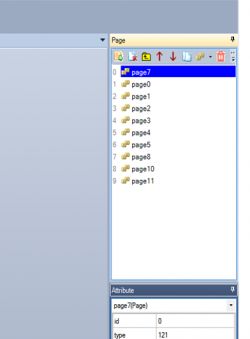
    Unfortunately, it is because first page 0 was created, which was the main page, and only at the end I made the start page, which was page 7 and when I changed the order in the page window, page7 is now with ID 0 and page 0 has ID 1 as in the picture below.
    Anyway, in this version everything was about adding and rearranging numeric fields, the text ID numbers of these fields have changed so I changed them in the code and has been sneezing ever since.
    Video tutorial displays NEXTION
  • #42 17435117
    Slawek K.
    Level 35  
    But you have the wrong objects declared:

    Code: C / C++
    Log in, to see the code

    1 parameter is the page number on which the object is located
    2 parameter is the ID of the object on the given page
    3 parameter is the name of the object

    so if the page number is declared 1 then n1 cannot have page0 in front like you did: page0.n1
    It should be like this (assuming n1 is on page 1 and its ID is 16):

    Code: C / C++
    Log in, to see the code


    Attach the HMI file from Nextion it will be verifiable.

    Greetings
  • #43 17435453
    nebari
    Level 2  
    Please also take a look at the arduino code as before everything was in a void loop. Now I've broken it down into "blocks" to make the whole thing clearer. I am wondering about the correct separation of the clock from the led light control, from the controller to the dispenser. Does it not interfere with retrieving the appropriate data for individual procedures? HMI file for complement
  • #44 17441408
    nebari
    Level 2  
    Welcome
    as I continued to drill down on the problem myself, I found out why. The problem turned out to be trivial and obvious at the same time. Due to the fact that I previously worked on the UNO arduino and then everything worked, the problem appeared after switching to MEGA2560. Why? Because I forgot to activate the additional serial port. Banal right ?? After typing Serial2.begin (9600) - IT STARTED as if nothing had happened :shocked!: :D :crazyeyes: . But since I am not strong with these bricks and I rely on where I can find something and adapt it to my needs, I have a few supplementary questions from the arduino back office.
    The assumption is that the controller is supposed to work after uploading a sketch without the need to additionally connect and install anything - full support via the display.

    1. After starting the program in the form that I entered earlier, the clock's second hand runs very irregularly - once every 1 second and then every 2 seconds. What could be the reason for this?

    2. Is there any other more simple way to PWM software to control dusk and dawn ?? I want to change from the display level (and not convert), for example, the lighting power in this version it is at least problematic.

    3. How to get through the problem of setting the date and time from the display and not refreshing by loading a sketch? There isn't much on the web about it :-( ?

    4. how to solve the topic of memorizing the entered data so that after a power failure everything starts with the same settings as before the power failure. ?
  • #45 17519159
    sq9cyg
    Level 11  
    Please tell me what's wrong with my example.
    The temperature is shown in both fields on the display, but alternately.
    How to make one on one and the other on the other?
    [syntax=c]#include "Nextion.h"
    #include "NexText.h"
    #include "NexGauge.h"
    #include
    #include
    OneWire ds(7); // deklaracja numeru portu podłączenia DS18b20
    #define at_serial Serial1

    char buffer0 [20] = {0};
    char buffer1 [20] = {0};
    NexButton b0 = NexButton (0, 1, "b0");

    NexTouch *nex_listen_list[] = {
    &b0,
    NULL
    };


    uint32_t number = 0;
    uint32_t number1 = 0;
    unsigned long update = 1;
    int32_t timer = -1; /* timer for second */

    NexText temp8E = NexText(0,1,"tem");
    NexText temp56 = NexText(0,2,"tem1");
    NexGauge ptr8E = NexGauge(0,2,"z0");
    NexGauge ptr56 = NexGauge(0,6,"z1");
    //char buffer[10] = {0};
    //char buffer_temperature[10] = {0};
    //char buffer_temp[10] = {0};


    NexTouch *nex_Listen_List[] =
    {

    NULL
    };


    void temperatureDisplay(void)
    {
    byte i;
    byte present = 0;
    byte type_s = 0;
    byte data[12];
    byte addr[8];
    float celsius;

    // ds.search(addr);

    if ( !ds.search(addr)) {
    // Serial.println("No more addresses.");
    // Serial.println();
    ds.reset_search();
    delay(50);
    return;
    }


    ds.reset();
    ds.select(addr);
    ds.write(0x44,1); /* start conversion, with parasite power on at the end */

    delay(100); /* maybe 750ms is enough, maybe not */
    /* we might do a ds.depower() here, but the reset will take care of it. */
    present = ds.reset();
    ds.select(addr);
    ds.write(0xBE); /* Read Scratchpad */

    for ( i = 0; i < 9; i++)
    { /* we need 9 bytes */
    data[i] = ds.read();
    }
    /* convert the data to actual temperature*/
    unsigned int raw = (data[1]
  • #46 17529153
    ekrzychoooo
    Level 17  
    Here is an example of how to read two thermometers:
    github

    You read from one thermometer and display the same value on both fields.
    During the next call to temperatureDisplay, you read another thermometer and again display the same value in both fields.
  • #47 17532536
    Anonymous
    Level 1  
  • #48 17532903
    ekrzychoooo
    Level 17  
    Try CourierNew font with built-in generator.
  • #49 17533093
    Slawek K.
    Level 35  
    Lucida Console's font is ok.

    Greetings
  • #50 17535195
    Anonymous
    Level 1  
  • #51 17535227
    Slawek K.
    Level 35  
    Jarzabek666 wrote:
    rs6000 wrote:
    Lucida Console's font is ok.


    This one did not give a good effect, but I started checking the others and checked with my friend above :D

    The best reeds were "consolas" and "courier news"

    Video tutorial displays NEXTION

    "Reed" you say :D
  • #52 17535241
    Anonymous
    Level 1  
  • #54 17535473
    Anonymous
    Level 1  
  • #55 17535690
    ekrzychoooo
    Level 17  
    ekrzychoooo wrote:
    Give a bearing for this example.

    I meant a link to the code.
    Maybe it's code from the forum, which does not mean that you should write that.

    Simple testing code that runs in the debugger:
    Code: C / C++
    Log in, to see the code

    in n0 it is 0.
  • #56 17535990
    Anonymous
    Level 1  
  • #58 17536027
    Anonymous
    Level 1  
  • #59 17536037
    ekrzychoooo
    Level 17  
    Maybe to show that you do not have to fill in the EEPROM "strictly" only in any addresses. I do not know.
  • #60 17536050
    Anonymous
    Level 1  

Topic summary

A new video tutorial series for NEXTION displays is being developed, focusing on various functionalities and programming techniques. Users discuss the capabilities of NEXTION displays, including sending commands, managing timers, and handling multiple pages. Key topics include using buttons to control outputs, sending data from Arduino to NEXTION, and managing display states across different pages. Users share code snippets for specific tasks, such as updating text fields based on variable values and implementing timers. There are also discussions about troubleshooting issues related to memory usage on Arduino, interfacing with GPS modules, and optimizing communication between Arduino and NEXTION displays.
Summary generated by the language model.
ADVERTISEMENT