logo elektroda
logo elektroda
X
logo elektroda

[BK7231N] [CB3S] [AHT20] TH01 Generic Temperature and Humidity Sensor Teardown

anthonythomas 39138 162
ADVERTISEMENT
  • #121 21552031
    BAGZZlash
    Level 4  
    insmod wrote:
    Add commands 'logfeature 12 1' and 'loglevel 6' to autoexec before starting tuyamcu driver.


    Thanks. Well, that changed the log to this:

    Info:MAIN:Main_Init_Delay done
    Info:MAIN:Main_Init_After_Delay
    Info:MAIN:Using SSID [ZZ-Base]
    Info:MAIN:Using Pass [**censored :-)**]
    Error:HTTP:Created HTTP SV thread with (stack=2048)
    Info:MQTT:MQTT_RegisterCallback called for bT / subT /+/set
    Info:MQTT:MQTT_RegisterCallback called for bT bekens/ subT bekens/+/set
    Info:MQTT:MQTT_RegisterCallback called for bT cmnd// subT cmnd//+
    Info:MQTT:MQTT_RegisterCallback called for bT cmnd/bekens/ subT cmnd/bekens/+
    Info:MQTT:MQTT_RegisterCallback called for bT / subT /+/get
    Info:CMD:CMD_StartScript: started @startup at the beginning
    Info:CMD:CMD_StartScript: started autoexec.bat at the beginning
    Info:MAIN:Main_Init_After_Delay done
    Debug:CMD:loglevel set 6
    Debug:CMD:cmd [startDriver TuyaMCU]
    Debug:CMD:Adding command tuyaMcu_testSendTime
    Debug:CMD:Adding command tuyaMcu_sendCurTime
    Debug:CMD:Adding command linkTuyaMCUOutputToChannel
    Debug:CMD:Adding command tuyaMcu_setDimmerRange
    Debug:CMD:Adding command tuyaMcu_sendHeartbeat
    Debug:CMD:Adding command tuyaMcu_sendQueryState
    Debug:CMD:Adding command tuyaMcu_sendProductInformation
    Debug:CMD:Adding command tuyaMcu_sendState
    Debug:CMD:Adding command tuyaMcu_sendMCUConf
    Debug:CMD:Adding command tuyaMcu_sendCmd
    Debug:CMD:Adding command fakeTuyaPacket
    Debug:CMD:Adding command tuyaMcu_setBaudRate
    Debug:CMD:Adding command tuyaMcu_sendRSSI
    Debug:CMD:Adding command tuyaMcu_defWiFiState
    Debug:CMD:Adding command tuyaMcu_sendColor
    Debug:CMD:Adding command tuyaMcu_setupLED
    Info:MAIN:Started TuyaMCU.
    Debug:CMD:cmd [startDriver tmSensor]
    Info:MAIN:Started tmSensor.
    Info:MAIN:Time 1, idle 206358/s, free 78520, MQTT 0(0), bWifi 0, secondsWithNoPing -1, socks 2/38 
    Info:MAIN:Time 2, idle 190687/s, free 78520, MQTT 0(0), bWifi 0, secondsWithNoPing -1, socks 2/38 
    Info:MAIN:Time 3, idle 190958/s, free 78520, MQTT 0(0), bWifi 0, secondsWithNoPing -1, socks 2/38 
    Info:MAIN:Time 4, idle 191095/s, free 78520, MQTT 0(0), bWifi 0, secondsWithNoPing -1, socks 2/38 
    Info:MAIN:Boot complete time reached (3 seconds)
    Info:CFG:####### Set Boot Complete #######
    Debug:CFG:new offset 5188, boot_count 432, success count 432
    Debug:CFG:new offset after read 5188, boot_count 432, success count 432
    Debug:CFG:re-read - offset 5188, boot count 432, boot success 432, bootfailures 0
    Info:MAIN:Time 5, idle 184261/s, free 78520, MQTT 0(0), bWifi 0, secondsWithNoPing -1, socks 2/38 
    Info:MAIN:Registered for wifi changes
    Info:MAIN:Connecting to SSID [ZZ-Base]
    Info:MAIN:Time 6, idle 183032/s, free 73240, MQTT 0(0), bWifi 0, secondsWithNoPing -1, socks 2/38 
    Info:MAIN:Time 7, idle 189049/s, free 73240, MQTT 0(0), bWifi 0, secondsWithNoPing -1, socks 2/38 
    Info:MAIN:Time 8, idle 86716/s, free 73552, MQTT 0(0), bWifi 0, secondsWithNoPing -1, socks 2/38 
    Info:MAIN:Time 9, idle 0/s, free 73552, MQTT 0(0), bWifi 0, secondsWithNoPing -1, socks 2/38 
    Info:MAIN:Time 10, idle 0/s, free 73552, MQTT 0(0), bWifi 0, secondsWithNoPing -1, socks 2/38 
    Info:GEN:dhcp=0 ip=0.0.0.0 gate=0.0.0.0 mask=0.0.0.0 mac=f8:17:2d:e0:0d:c6
    Info:GEN:sta: 0, softap: 0, b/g/n
    Info:MAIN:Main_OnWiFiStatusChange - WIFI_STA_CONNECTING - 1
    Info:MAIN:Time 11, idle 90576/s, free 73784, MQTT 0(0), bWifi 0, secondsWithNoPing -1, socks 2/38 
    Info:MAIN:Time 12, idle 190782/s, free 73824, MQTT 0(0), bWifi 0, secondsWithNoPing -1, socks 2/38 
    Info:MAIN:Main_OnWiFiStatusChange - WIFI_STA_CONNECTED - 4
    Info:MAIN:Time 13, idle 189394/s, free 73736, MQTT 0(0), bWifi 1, secondsWithNoPing -1, socks 2/38 
    Info:MAIN:Time 14, idle 187900/s, free 73736, MQTT 0(0), bWifi 1, secondsWithNoPing -1, socks 2/38 
    Info:MQTT:mqtt_host empty, not starting mqtt
    Info:MAIN:Time 15, idle 189536/s, free 73736, MQTT 0(1), bWifi 1, secondsWithNoPing -1, socks 2/38 
    Info:MAIN:Time 16, idle 190921/s, free 73736, MQTT 0(1), bWifi 1, secondsWithNoPing -1, socks 2/38 
    Info:MAIN:Time 17, idle 188902/s, free 73736, MQTT 0(1), bWifi 1, secondsWithNoPing -1, socks 2/38 
    Info:MAIN:Time 18, idle 192471/s, free 65128, MQTT 0(1), bWifi 1, secondsWithNoPing -1, socks 3/38 
    Debug:API:GET of api/logconfig
    Info:MAIN:Time 19, idle 192163/s, free 73520, MQTT 0(1), bWifi 1, secondsWithNoPing -1, socks 3/38 
    Debug:API:GET of api/pins
    Debug:API:GET of api/channelTypes
    Info:MAIN:Time 20, idle 187589/s, free 73736, MQTT 0(1), bWifi 1, secondsWithNoPing -1, socks 2/38 
    Info:GEN:dhcp=0 ip=192.168.1.178 gate=192.168.1.1 mask=255.255.255.0 mac=f8:17:2d:e0:0d:c6
    Info:GEN:sta: 1, softap: 0, b/g/n
    Info:GEN:sta:rssi=-66,ssid=ZZ-Base,bssid=1c:b0:44:b9:2c:65,channel=6,cipher_type:CCMP
    Info:MAIN:Time 21, idle 187412/s, free 65128, MQTT 0(1), bWifi 1, secondsWithNoPing -1, socks 3/38 
    Debug:API:GET of api/info
    Info:MAIN:Time 22, idle 192579/s, free 73736, MQTT 0(1), bWifi 1, secondsWithNoPing -1, socks 2/38 
    Info:MAIN:Time 23, idle 188618/s, free 73736, MQTT 0(1), bWifi 1, secondsWithNoPing -1, socks 2/38 
    Info:MAIN:Time 24, idle 194184/s, free 73736, MQTT 0(1), bWifi 1, secondsWithNoPing -1, socks 2/38 
    Info:MAIN:Time 25, idle 192457/s, free 65128, MQTT 0(1), bWifi 1, secondsWithNoPing -1, socks 3/38 
    Info:MAIN:Time 26, idle 199074/s, free 73736, MQTT 0(1), bWifi 1, secondsWithNoPing -1, socks 2/38 
    Info:MAIN:Time 27, idle 189465/s, free 73736, MQTT 0(1), bWifi 1, secondsWithNoPing -1, socks 2/38 
    Info:MAIN:Time 28, idle 194548/s, free 73736, MQTT 0(1), bWifi 1, secondsWithNoPing -1, socks 2/38 
    Info:MAIN:Time 29, idle 188955/s, free 73736, MQTT 0(1), bWifi 1, secondsWithNoPing -1, socks 2/38 
    Info:MAIN:Time 30, idle 190045/s, free 73736, MQTT 0(1), bWifi 1, secondsWithNoPing -1, socks 2/38 
    Info:GEN:dhcp=0 ip=192.168.1.178 gate=192.168.1.1 mask=255.255.255.0 mac=f8:17:2d:e0:0d:c6
    Info:GEN:sta: 1, softap: 0, b/g/n
    Info:GEN:sta:rssi=-66,ssid=ZZ-Base,bssid=1c:b0:44:b9:2c:65,channel=6,cipher_type:CCMP
    Info:MQTT:mqtt_host empty, not starting mqtt
    Info:MAIN:Time 31, idle 186520/s, free 73736, MQTT 0(2), bWifi 1, secondsWithNoPing -1, socks 2/38 
    Info:MAIN:Time 32, idle 199828/s, free 73736, MQTT 0(2), bWifi 1, secondsWithNoPing -1, socks 2/38 
    Info:MAIN:Time 33, idle 190026/s, free 65128, MQTT 0(2), bWifi 1, secondsWithNoPing -1, socks 3/38 
    Info:MAIN:Time 34, idle 195184/s, free 73736, MQTT 0(2), bWifi 1, secondsWithNoPing -1, socks 2/38 
    Info:MAIN:Time 35, idle 189788/s, free 73736, MQTT 0(2), bWifi 1, secondsWithNoPing -1, socks 2/38 
    Info:MAIN:Time 36, idle 195004/s, free 73736, MQTT 0(2), bWifi 1, secondsWithNoPing -1, socks 2/38 
    Info:MAIN:Time 37, idle 193363/s, free 73736, MQTT 0(2), bWifi 1, secondsWithNoPing -1, socks 2/38 
    Info:MAIN:Time 38, idle 191167/s, free 73736, MQTT 0(2), bWifi 1, secondsWithNoPing -1, socks 2/38 
    Info:MAIN:Time 39, idle 196142/s, free 73736, MQTT 0(2), bWifi 1, secondsWithNoPing -1, socks 2/38 
    Info:MAIN:Time 40, idle 190507/s, free 73736, MQTT 0(2), bWifi 1, secondsWithNoPing -1, socks 2/38 
    Info:GEN:dhcp=0 ip=192.168.1.178 gate=192.168.1.1 mask=255.255.255.0 mac=f8:17:2d:e0:0d:c6
    Info:GEN:sta: 1, softap: 0, b/g/n
    Info:GEN:sta:rssi=-66,ssid=ZZ-Base,bssid=1c:b0:44:b9:2c:65,channel=6,cipher_type:CCMP
    Info:MAIN:Time 41, idle 186854/s, free 73736, MQTT 0(2), bWifi 1, secondsWithNoPing -1, socks 2/38 
    Info:MAIN:Time 42, idle 194252/s, free 73736, MQTT 0(2), bWifi 1, secondsWithNoPing -1, socks 2/38 
    Info:MAIN:Time 43, idle 194819/s, free 73736, MQTT 0(2), bWifi 1, secondsWithNoPing -1, socks 2/38 
    Info:MAIN:Time 44, idle 193699/s, free 73736, MQTT 0(2), bWifi 1, secondsWithNoPing -1, socks 2/38 
    Info:MAIN:Time 45, idle 195020/s, free 73736, MQTT 0(2), bWifi 1, secondsWithNoPing -1, socks 2/38 
    Info:MAIN:Time 46, idle 195854/s, free 73736, MQTT 0(2), bWifi 1, secondsWithNoPing -1, socks 2/38 
    Info:MQTT:mqtt_host empty, not starting mqtt
    Info:MAIN:Time 47, idle 191318/s, free 73736, MQTT 0(3), bWifi 1, secondsWithNoPing -1, socks 2/38 
    Info:MAIN:Time 48, idle 191262/s, free 73736, MQTT 0(3), bWifi 1, secondsWithNoPing -1, socks 2/38 
    Info:MAIN:Time 49, idle 196766/s, free 73736, MQTT 0(3), bWifi 1, secondsWithNoPing -1, socks 2/38 
    Info:MAIN:Time 50, idle 191330/s, free 73520, MQTT 0(3), bWifi 1, secondsWithNoPing -1, socks 3/38 
    Info:GEN:dhcp=0 ip=192.168.1.178 gate=192.168.1.1 mask=255.255.255.0 mac=f8:17:2d:e0:0d:c6
    Info:GEN:sta: 1, softap: 0, b/g/n
    Info:GEN:sta:rssi=-66,ssid=ZZ-Base,bssid=1c:b0:44:b9:2c:65,channel=6,cipher_type:CCMP
    Info:MAIN:Time 51, idle 187670/s, free 73736, MQTT 0(3), bWifi 1, secondsWithNoPing -1, socks 2/38 


    More info, but still no "Info:TuyaMCU:TUYAMCU" messages... Autoexec.bat now is

    logfeature 12 1
    loglevel 6
    startDriver TuyaMCU
    startDriver tmSensor
  • ADVERTISEMENT
  • #122 21552042
    insmod
    Level 28  
    So if there are still no messages, then that means either you don't have a mcu, or connection between the module and the mcu is somehow damaged.
    Are you sure that your device is the same as in pictures shared at the start of this thread?
    Another possibility, but less chance of it working that you have enabled flag 26 and mcu uart is connected to module uart1 or flag 26 is disabled and mcu uart is connected to uart2.
  • #123 21552415
    BAGZZlash
    Level 4  
    Thanks. Well, flag 26 wasn't set. I tried checking it, but to no avail.

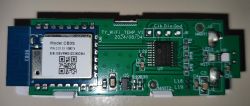
    My device looks like this:

    CB3S WiFi module on a green printed circuit board.

    It's from Aliexpress, this one, to be specific: Link
  • #124 21552482
    p.kaczmarek2
    Moderator Smart Home
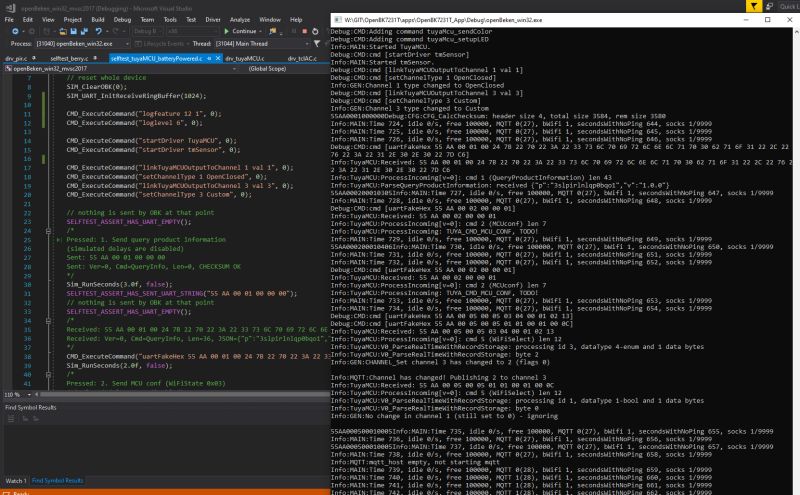
    Out of curiosity, I ran the same in the self test system, with hardcoded responsens from the MCU. Here is how log looks like:
    Screenshot of Visual Studio with source code on the left and a console window displaying debug logs on the right.

    Maybe I could add a debug log print to the point where OBK sends product info query (55 AA 00 01 00 00 00 ) ?

    Added after 26 [seconds]:

    Maybe wrong baud? Maybe you need to try 115200?
    Helpful post? Buy me a coffee.
  • #125 21552797
    BAGZZlash
    Level 4  
    p.kaczmarek2 wrote:

    Maybe wrong baud? Maybe you need to try 115200?

    That did the trick! Wow, thanks! I remember that during tests I had experimented with setting the baud rate to 9600 manually, but that didn't work. It never occurred to me that a higher rate may be required.
  • #126 21552818
    p.kaczmarek2
    Moderator Smart Home
    I'm glad to hear that it works now. I've suspected it because it matched the symptons. I'm just now wondering if we could have figured it earlier - do you have 2MB factory dump of your firmware? It think the baud settings may be present in Tuya partition if you do config extraction with our flasher: https://github.com/openshwprojects/BK7231GUIFlashTool
    Helpful post? Buy me a coffee.
  • ADVERTISEMENT
  • #127 21552888
    BAGZZlash
    Level 4  
    p.kaczmarek2 wrote:
    I'm glad to hear that it works now. I've suspected it because it matched the symptoms. I'm just now wondering if we could have figured it earlier - do you have 2MB factory dump of your firmware? It think the baud settings may be present in Tuya partition if you do config extraction with our flasher: https://github.com/openshwprojects/BK7231GUIFlashTool


    I'm afraid that I don't have that. I tried several times to extract the original firmware, but kept getting read errors. So I flashed OBK without a backup. I had problems doing that, too (write errors and even erase errors). I talked to ChatGPT about that (indeed!) and "he" told me to also overwrite the bootloader. Didn't make sense to me and I still got errors, but after several more tries it succeeded.

    I regret that now. I might have succeeded backing up the original firmware with more patience and I certainly would have succeeded without overwriting the bootloader. The way things are now, I have nothing to help you with. I'm sorry.
  • #128 21552909
    p.kaczmarek2
    Moderator Smart Home
    Actually you should still be able to get Tuya Config partition from OBK, here's tutorial: https://www.youtube.com/watch?v=WunlqIMAdgw
    Helpful post? Buy me a coffee.
  • #129 21552919
    insmod
    Level 28  
    You should still endeavor to take a backup, even if you flashed OBK (but don't share it, as it contains your wifi/mqtt credentials).
    I don't know if TuyaMCU devices are affected, but common devices without it, like door/temperature sensors, can 'die' if batteries are too low (like 1.8v and lower).
    If it dies, then only a full reflash would recover it. Just flashing OpenBeken is not enough. It can probably be recovered if a full flash erase is performed, but then you would lose MAC address and wifi calibration.
    Since you've already flashed OpenBeken, connecting via uart might not be necessary. Look at the guide above, but instead of downloading Tuya GPIO Config, press 'Download full 2MB dump'.
    You might need to temporarily disable mqtt and wake your device several times for it to be completed.
    But like i said earlier, i don't know if TuyaMCU devices are affected, so it might not be needed.
  • #130 21552984
    BAGZZlash
    Level 4  
    Okay, great. I downloaded the 2 MB dump file. Yes, there were my Wifi credentials in there, so I changed it using a hex editor (might result in a bad checksum). MQTT is not configured anyway, so nothing to hide here.

    BK7231N_QI...F12996.bin Download(2 MB)
  • #131 21612886
    oddyutza
    Level 4  
    managed to get the CBU with the green PCB Up and running, with the following Config:
    //Start NTP Driver
    startDriver NTP
    
    //Start Tuya Driver
    startDriver tuyaMCU
    startDriver tmSensor
    
    
    //Configure UTC +3h ( Bucharest TimeZone )
    ntp_timeZoneOfs 3
    
    //Wait for NTP to sync
    waitFor NTPState 1
    
    //Map TUYA MCU Channels for CB3S/CBU CPU
    linkTuyaMCUOutputToChannel 1 val 1
    setChannelType 1 temperature_div10
    
    linkTuyaMCUOutputToChannel 2 val 2
    //for CB3S setChannelType 2 Humidity
    //for CBU setChannelType 2 Humidity_div10
    setChannelType 2 Humidity
    
    // dpID 3 is battery state - low(0), mid(1) and high(2)
    linkTuyaMCUOutputToChannel 3 enum 3
    setChannelType 3 ReadOnlyLowMidHigh
    setChannelLabel 3 Battery
    
    linkTuyaMCUOutputToChannel 18 val 6 60
    linkTuyaMCUOutputToChannel 17 val 5 60
    
    // now wait for MQTT
    waitFor MQTTState 1


    Nevertheless the chip is booting up every 15 -20 seconds, how can i add a 15 minutes delay for example? The battery will be drained in couple of days. Firstly i tried to configure in tuya and then reflash it did not work.
    I also tried to add in the autoexec.bat DeepSleep 900 and it did kinda not work, no more mqtt messages were sent.
    the pcb is here: https://www.elektroda.com/rtvforum/topic4019974-120.html#21612370
  • ADVERTISEMENT
  • #132 21613646
    oddyutza
    Level 4  
    >>21612886
    so any idea on how to put this baby in sleep to preserve battery?
  • #133 21613752
    p.kaczmarek2
    Moderator Smart Home
    Following device is using TuyaMCU. It's not possible to use DeepSleep here, because the MCU controls power of the WiFi module. If you attempt to DeepSleep it, it may be hard to recover.


    The only option to change delay is to check if the delay was configurable via DP cache in original Tuya software.


    Or remove MCU and convert device to Deep Sleep
    Helpful post? Buy me a coffee.
  • #134 21613757
    DeDaMrAz
    Level 20  
    I stand corrected, wasn't paying too much attention that the device is TuyaMCU based.

    But I do agree on the point that there should be a dpID for report timeout, every tuyaMCU battery powered device had something similar.
  • #135 21614406
    oddyutza
    Level 4  
    >>21613757
    those should be channel #17 for temp and #18 for humid, i`ll tackle on that one, i was thinking of something like:
    linkTuyaMCUOutputToChannel 17 val 17 <no_seconds>, because:
    linkTuyaMCUOutputToChannel <channel> val <dpID> <pollInterval>
    the only question remains, because in the openfirmware there are some configurable channels should i choose a higher channel ( out from that list? ) such as 101 ?
  • #136 21615539
    oddyutza
    Level 4  
    Managed to get things working - at least for now.
    I have two types of devices one with a CB3S and one with a CBU
    The one with a CB3S shows 28%RH while the CBU one shows 47%RH ( which is more near the actual value )
    By any chance can the CB3S be calibrated for the RH ?
  • #137 21651067
    sascha0171
    Level 3  
    BobUrban wrote:
    I was able to flash my device successfully with the MCU TX and RX connected.
    When it's powered now, it doesn't properly connect to Wifi, sometimes when I press the button it connects, but the openbk UI only is available for a few seconds.
    Is there anything I could try?

    Is there any recommended similar device to buy instead of this one?

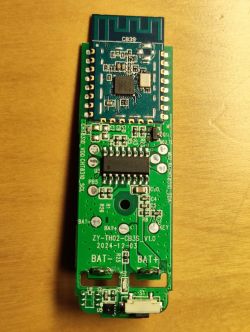
    This is my device:
    PCB with CB3S module and various electronic components.

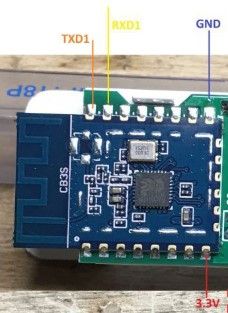
    This is the connections I used for flashing
    CB3S module with TXD1, RXD1, GND, and 3.3V pins connected.


    Hi there, I bought a similar one from Aliexpress , the board reads ZY-TH02-CB3S_V1.0 and 2025-01-18. Although this was my first experience with flashing such device I had nearly no problems doing so and I would like to tell what I did and what my experience is so far.

    First, I tried to get some serial output with the original Tuya-Firmware but without success, tried every possible baud rate but only got garbled text, tried on PuTTY and with the Arduino IDE serial monitor, any suggestions?

    Then I decided to flash with OBK. I connected like in the picture above. I did connect 3.3V and GND also directly to the Bat.-pins and used the Windows GUI Version, I did not desolder or cut anything. Only problem I had, was the device would start to sleep after some seconds while trying to back up the firmware.
    Don't know why, as I was powering CB3S directly on the pins?
    But I managed to flash with pushing the button every 2 or 3 seconds, then back up, erase and flash performed flawlessly.
    Interesting is, that after OBK is running now, the device did not go into sleep when I powered the CB3S directly, so I was able to do all the config in the web portal and was able to add the device to Home Assistant.

    Only problem I have still, is that if I use the module as intended running on battery (so powering it only via the bat.-pins) the device barely has enough time to transmit all data before starting to sleep. I already changed the flags to WiFi quick connect and used static IP, also decreased wait after boot from 5 to 1 second. Good thing is, sensor data is always sent (every 1 hour, or if data is changed more than a specific value), only the diagnostic data is missing most of the time.

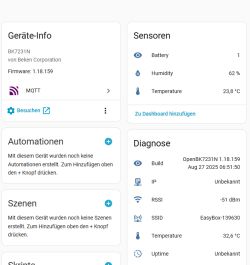
    User interface screen of OpenBK7231N showing device info, sensor data, and system diagnostics.

    This is the startup config I got from a previous post:

    startDriver TuyaMCU
    startDriver tmSensor
    // dpID 27 is temperature div 10
    setChannelType 27 temperature_div10
    linkTuyaMCUOutputToChannel 27 val 27
    // dpID 46 is % humidity
    setChannelType 46 Humidity
    linkTuyaMCUOutputToChannel 46 val 46
    // dpID 101 is battery state - low(0), mid(1) and high(2)
    setChannelType 10 ReadOnly
    linkTuyaMCUOutputToChannel 101 enum 10
    setChannelLabel 10 Battery


    As I understand correctly, the device works like the following:

    - TuyaMCU wakes the CB3S module, then transmits its sensor values to it
    - CB3S sends the data via WiFi
    - ? CB3S tells the TuyaMCU that all data is sent ? Or is it a static timeout?
    - TuyaMCU cuts power to CB3S again

    Anybody could imagine why Tuya is using their MCU at all if you could do the logic completely with the CB3S only? Could it not be to save costs if you need an additional chip.

    Overall it works great though, and I liked getting OBK working without soldering at all as I have many of these and want to roll them out as easily as possible, so thanks for that firmware !
  • #138 21651099
    p.kaczmarek2
    Moderator Smart Home
    Not bad, you did good job on initial research. Ok, here are some hints from my side, bur first, let me say upfront that I haven't looked into battery powered devices for some time since they are usually harder to convert than mains powered. Still, I think you may try to experiment with mqtt_broadcastItemsPerSec to get more data out of MQTT before it goes to sleep. Also make sure that broadcast state on connect is enabled.

    I don't think there is any advanced feedback mechanism from MQTT publish. It just publishes and goes to sleep. However, there is a command to give it more time before sleeping: tuyaMcu_setBatteryAckDelay

    I don't know why they use MCU, but maybe it indeed is more energy-efficient. Someone would have to measure that. Maybe deep sleep on BK7231 consumes a bit more power. Still, if you want, you can convert this device to BK7231 only...

    Regarding mass production - make sure to watch battery state and to keep original firmware copies. There have been some reports that users left their devices to discharge batteries fully and then had to reflash them.

    Maybe @insmod can also give some hints, as far as I remember he has some of those sensors running in everyday use.
    Helpful post? Buy me a coffee.
  • #139 21651125
    insmod
    Level 28  
    I don't have any of them running, only two in storage. One untouched, one with mcu removed. The one with mcu removed gets incorrect data from sensor, and i didn't bother to calibrate it.

    Set mqtt_broadcastItemsPerSec to 9 in autoexec.bat and i suggest disabling diagnostics (unset flag 2 and flag 10).
    I disable diagnostics on every battery-powered devices i use.
  • #140 21651157
    sascha0171
    Level 3  
    Yes, I agree with you about battery-powered devices and wifi, would also prefer Zigbee in most cases, but having a wifi sensor is so easy sometimes at remote locations where you have nothing but wifi. Don't know yet how long those 2xAAA will last but if it's 1/2 year it would be OK for me. Will test your suggestions with the autoexec commands and flags later.
  • ADVERTISEMENT
  • #141 21651166
    insmod
    Level 28  
    BLE can be a good alternative. In some cases, their range can be even longer that wifi.
    I currently use two THB2 sensors with BTHome firmware (https://github.com/pvvx/THB2).
    A very good alternative even for zigbee, since they can last longer without battery replacement.
  • #142 21651250
    sascha0171
    Level 3  
    >>21651166 Those THB2 looks interesting also. Unfortunately I can't find a link to one on Ali or somewhere else. What do you use as gateway to HA?
  • #144 21651310
    sascha0171
    Level 3  
    Finally found this one , most I found first were all BTH01 which were not recommended by the GitHub project.
    Although will try to optimize the Wi-Fi version as an access point is mostly already available at all locations
  • #145 21651314
    insmod
    Level 28  
    BTH01 option is a lottery.
    Later revisions are OK, but earlier ones with CHT8305 sensor - those are bad.
    I myself got one with CHT8305 a year ago - i just replaced it with AHT20. It worked fine since.
  • #146 21651936
    sascha0171
    Level 3  
    insmod wrote:
    I don't have any of them running, only two in storage. One untouched, one with mcu removed. The one with mcu removed gets incorrect data from sensor, and i didn't bother to calibrate it.

    Set mqtt_broadcastItemsPerSec to 9 in autoexec.bat and i suggest disabling diagnostics (unset flag 2 and flag 10).
    I disable diagnostics on every battery-powered devices i use.


    when I set mqtt_broadcastItemsPerSec to 9 or some other value below, the time is indeed enough to transmit all sensor and diagnostic data (left flag 10 enabled for testing). But I have a strange behaviour then, every time when the data is transmitted, it transmits a 0 first and some seconds later the true value, see below. As soon as I remove the mqtt setting it is normal again. No big deal though it still transmits diagnostic data from time to time.

    Also tried to set tuyaMcu_setBatteryAckDelay, but that seems to have no effect on the wakeup time, how would that work if there is no feedback to the TuyaMCU?


    Temperature chart from wifi sensor obk0C02A008 from 17:40 to 18:10
  • #147 21651952
    p.kaczmarek2
    Moderator Smart Home
    Ok, it is another known issue. You are most likely referencing to values read from MCU. But OBK transmits them first, and then reads them. So, work around is to set those channels to -1 in startup. That way sensor will remember previous values and then transmit them first....

    Alternatively, maybe we should add some simple mechanism to transmit channels that were actually ever set, at least once, what do you think, @insmod ?

    Added after 1 [minutes]:

    sascha0171 wrote:

    Also tried to set tuyaMcu_setBatteryAckDelay, but that seems to have no effect on the wakeup time, how would that work if there is no feedback to the TuyaMCU?


    Temperature chart from wifi sensor obk0C02A008 from 17:40 to 18:10

    I think I said that there is no feedback from HA to OBK, not from OBK to TuyaMCU. OBK sends feedback (ack) to MCU when it receives data, so MCU knows it can go to sleep. You can delay it by setting tuyaMcu_setBatteryAckDelay in latest releases.
    Helpful post? Buy me a coffee.
  • #148 21703002
    fjk
    Level 11  
    Hello,
    my device always shows temperature 0 and hum as 0%. I tried few autoexecs from this thread but nothing works :( I have few identical looking devices but some of them have CHT8310 and others AHT20.
    I have problems only with that CHT8310. I have original firmware dump but I don't know how to extract pins from it. How can I discover proper pins or mappings?
    It is powered from main, but also tried on batteries.
    I'm using this autoexec now:

    startDriver TuyaMCU
    startDriver tmSensor
    setChannelType 1 temperature_div10
    linkTuyaMCUOutputToChannel 1 val 1
    setChannelType 2 Humidity
    linkTuyaMCUOutputToChannel 2 val 2


    Photo of my device:

    [BK7231N] [CB3S] [AHT20] TH01 Generic Temperature and Humidity Sensor Teardown
    [BK7231N] [CB3S] [AHT20] TH01 Generic Temperature and Humidity Sensor Teardown
  • #149 21703018
    p.kaczmarek2
    Moderator Smart Home
    You don't need to extract pins for TuyaMCU devices - there are no pins. But extracting baud could help. Maybe your device is using 115200 baud instead of standard 9600 and that's why you receive nothing at all?
    Helpful post? Buy me a coffee.
  • #150 21704038
    fjk
    Level 11  
    How I can recognize baud rate?
    I have only extracted these values from original firmware:

    {
       "abi":"0",
       "id":"null",
       "swv":"2.1.8",
       "bv":"40.00",
       "pv":"2.2",
       "lpv":"3.4",
       "pk":"x3o8epevyeo3z3oa",
       "firmk":"keycx5ftedppgup7",
       "cadv":"1.0.3",
       "cdv":"1.0.0",
       "dev_swv":"1.0.0",
       "s_id":"null",
       "dtp":"9",
       "sync":"0",
       "attr_num":"0",
       "mst_tp_0":"0",
       "mst_ver_0":"null",
       "mst_tp_1":"0",
       "mst_ver_1":"null",
       "mst_tp_2":"0",
       "mst_ver_2":"null",
       "mst_tp_3":"0",
       "mst_ver_3":"null "
    }

Topic summary

The discussion centers on the teardown, firmware flashing, and configuration of the TH01 generic temperature and humidity sensor, which uses a BK7231N WiFi module and a TuyaMCU microcontroller (MCU) managing sensor data and power. Users report challenges flashing the device due to the MCU controlling power to the WiFi module and UART lines being connected between MCU and WiFi module, requiring either cutting UART traces, desoldering the MCU or WiFi module, or powering the WiFi module externally during flashing. The TuyaMCU driver in OpenBK7231N firmware is essential for communication, with dpIDs 1 and 2 corresponding to temperature (divided by 10) and humidity, and dpID 3 likely representing battery state (low, mid, high). Proper autoexec.bat configuration involves starting TuyaMCU and tmSensor drivers, linking dpIDs to OBK channels, and setting channel types accordingly. MQTT integration is commonly used for data reporting, with some users noting duplicate MQTT messages and template adjustments needed for value formatting. Battery-powered operation requires the MCU to cycle power to the WiFi module to conserve energy, so powering the WiFi module externally can prevent data reporting. Flags such as WiFi quick connect and static IP improve connection stability. Some users successfully flash without desoldering by cutting UART traces and powering the WiFi module directly. The community shares detailed pinout photos, flashing procedures, and configuration scripts. Variations in PCB versions and sensor chips (AHT20, AHT30, CHT8315) affect driver selection and configuration. Deep sleep and wakeup configurations are discussed for battery life optimization. Tools like TuyaMCUAnalyzer assist in decoding UART communication. Issues with MQTT hostname configuration can prevent MQTT startup, and firmware updates have improved battery device support. The thread also covers troubleshooting WiFi connectivity, log inspection via WebUI, and Home Assistant integration challenges.
Summary generated by the language model.
ADVERTISEMENT