

![[TYWE2S/ESP8226] Smart plug with RGBW backlight MOKO TX-DE02 and USB charger](https://obrazki.elektroda.pl/5223763000_1682757987.png "[TYWE2S/ESP8226] Smart plug with RGBW backlight MOKO TX-DE02 and USB charger")
Hello, I will present here the interior and configuration of Tasmota for a rather unusual WiFi-controlled plug/socket with backlight composed of RGBW diodes. As a standard, we will free the nest from the cloud and prepare it to work with HA. The plug described here offers basically three functions: relay control via the application, two USB ports (unfortunately without control) 5V 2.1A and effective backlight (RGB and W). This topic, like the previous one, was created in cooperation with my friend @DeDaMrAz.
The product was purchased in a stationary store in Serbia. One package was purchased, here a four-pack, for $28 (about $7 each):
![[TYWE2S/ESP8226] Smart plug with RGBW backlight MOKO TX-DE02 and USB charger](https://obrazki.elektroda.pl/6337156000_1682705932.jpg "[TYWE2S/ESP8226] Smart plug with RGBW backlight MOKO TX-DE02 and USB charger")
![[TYWE2S/ESP8226] Smart plug with RGBW backlight MOKO TX-DE02 and USB charger](https://obrazki.elektroda.pl/1939958100_1682705932.jpg "[TYWE2S/ESP8226] Smart plug with RGBW backlight MOKO TX-DE02 and USB charger")
Contents:
![[TYWE2S/ESP8226] Smart plug with RGBW backlight MOKO TX-DE02 and USB charger](https://obrazki.elektroda.pl/9440947100_1682705942.jpg "[TYWE2S/ESP8226] Smart plug with RGBW backlight MOKO TX-DE02 and USB charger")
At the bottom of the plug is the model name - YX-DE02:
![[TYWE2S/ESP8226] Smart plug with RGBW backlight MOKO TX-DE02 and USB charger](https://obrazki.elektroda.pl/9672305200_1682705973.jpg "[TYWE2S/ESP8226] Smart plug with RGBW backlight MOKO TX-DE02 and USB charger")
![[TYWE2S/ESP8226] Smart plug with RGBW backlight MOKO TX-DE02 and USB charger](https://obrazki.elektroda.pl/8547786500_1682705978.jpg "[TYWE2S/ESP8226] Smart plug with RGBW backlight MOKO TX-DE02 and USB charger")
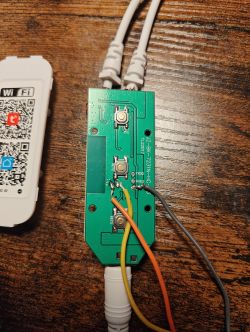
You have to use force to get inside. You should pry the cover and then unfortunately you need to desolder the pins of the socket i.e. flux and braid are necessary.
![[TYWE2S/ESP8226] Smart plug with RGBW backlight MOKO TX-DE02 and USB charger](https://obrazki.elektroda.pl/5414359600_1682706019.jpg "[TYWE2S/ESP8226] Smart plug with RGBW backlight MOKO TX-DE02 and USB charger")
![[TYWE2S/ESP8226] Smart plug with RGBW backlight MOKO TX-DE02 and USB charger](https://obrazki.elektroda.pl/3337279900_1682706018.jpg "[TYWE2S/ESP8226] Smart plug with RGBW backlight MOKO TX-DE02 and USB charger")
The plugin has a characteristic backlight, consisting of four RGB LEDs:
![[TYWE2S/ESP8226] Smart plug with RGBW backlight MOKO TX-DE02 and USB charger](https://obrazki.elektroda.pl/9368772900_1682706049.jpg "[TYWE2S/ESP8226] Smart plug with RGBW backlight MOKO TX-DE02 and USB charger")
The product uses TYWE2S:
![[TYWE2S/ESP8226] Smart plug with RGBW backlight MOKO TX-DE02 and USB charger](https://obrazki.elektroda.pl/9347190900_1682706085.jpg "[TYWE2S/ESP8226] Smart plug with RGBW backlight MOKO TX-DE02 and USB charger")
![[TYWE2S/ESP8226] Smart plug with RGBW backlight MOKO TX-DE02 and USB charger](https://obrazki.elektroda.pl/9846200600_1682706085.jpg "[TYWE2S/ESP8226] Smart plug with RGBW backlight MOKO TX-DE02 and USB charger")
It is not 100% ordinary TYWE2S, but it has standard pins. GPIO0 is available on the back of the module:
![[TYWE2S/ESP8226] Smart plug with RGBW backlight MOKO TX-DE02 and USB charger](https://obrazki.elektroda.pl/4417932400_1682706221.png "[TYWE2S/ESP8226] Smart plug with RGBW backlight MOKO TX-DE02 and USB charger")
![[TYWE2S/ESP8226] Smart plug with RGBW backlight MOKO TX-DE02 and USB charger](https://obrazki.elektroda.pl/2434637800_1682706221.png "[TYWE2S/ESP8226] Smart plug with RGBW backlight MOKO TX-DE02 and USB charger")
Here are the pinouts of the TYWE2S:
![[TYWE2S/ESP8226] Smart plug with RGBW backlight MOKO TX-DE02 and USB charger](https://obrazki.elektroda.pl/6446792500_1682758112.png "[TYWE2S/ESP8226] Smart plug with RGBW backlight MOKO TX-DE02 and USB charger")
A brief PCB analysis shows the following GPIO ESP roles:
IO5 - LED strip W (PWM??)
IO4 - LED status
RX-Relay
IO13 - LED strip G (PWM??)
TX - Btn
IO12 - LED strip R (PWM??)
IO14 - LED strip B (PWM??)
So we have 4 LED colors, RGB and W, separately white.
The batch can be uploaded via esptool.py . There are various methods, but I only solder 3.3V, GND, RX, TX and GPIO0 to ground (bootloader mode), then connect the power supply (so that GPIO0 is grounded at boot time) and use esptool. Then, for the firmware to start, you need to disconnect GPIO0 from ground and perform a power off/on cycle.
Tasmota setup
The Tasmota configuration of this device is available on the web:
https://templates.blakadder.com/maxcio_YX-DE02.html
So there's nothing to mess around with.
![[TYWE2S/ESP8226] Smart plug with RGBW backlight MOKO TX-DE02 and USB charger](https://obrazki.elektroda.pl/1105283200_1682706683.png "[TYWE2S/ESP8226] Smart plug with RGBW backlight MOKO TX-DE02 and USB charger")
We upload the template:
{"NAME":"Maxcio DE02","GPIO":[0,17,0,21,56,22,0,0,37,38,39,0,0],"FLAG":0,"BASE":18}
And everything works:
![[TYWE2S/ESP8226] Smart plug with RGBW backlight MOKO TX-DE02 and USB charger](https://obrazki.elektroda.pl/2598954400_1682706744.png "[TYWE2S/ESP8226] Smart plug with RGBW backlight MOKO TX-DE02 and USB charger")
![[TYWE2S/ESP8226] Smart plug with RGBW backlight MOKO TX-DE02 and USB charger](https://obrazki.elektroda.pl/7787106200_1682706511.png "[TYWE2S/ESP8226] Smart plug with RGBW backlight MOKO TX-DE02 and USB charger")
The buttons visible on the panel are used to control the RGB LED, separately the white lighting and the relay.
LED effects
This time tested with the manufacturer's application. First firing:
![[TYWE2S/ESP8226] Smart plug with RGBW backlight MOKO TX-DE02 and USB charger](https://obrazki.elektroda.pl/5125418800_1682768190.jpg "[TYWE2S/ESP8226] Smart plug with RGBW backlight MOKO TX-DE02 and USB charger")
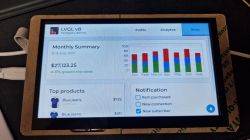
View in the application:
![[TYWE2S/ESP8226] Smart plug with RGBW backlight MOKO TX-DE02 and USB charger](https://obrazki.elektroda.pl/7328937200_1682768490.jpg "[TYWE2S/ESP8226] Smart plug with RGBW backlight MOKO TX-DE02 and USB charger")
![[TYWE2S/ESP8226] Smart plug with RGBW backlight MOKO TX-DE02 and USB charger](https://obrazki.elektroda.pl/5610585700_1682768490.jpg "[TYWE2S/ESP8226] Smart plug with RGBW backlight MOKO TX-DE02 and USB charger")
![[TYWE2S/ESP8226] Smart plug with RGBW backlight MOKO TX-DE02 and USB charger](https://obrazki.elektroda.pl/7126920300_1682768571.jpg "[TYWE2S/ESP8226] Smart plug with RGBW backlight MOKO TX-DE02 and USB charger")
The application has full control of the socket and LEDs.
Summary
Thank you to my colleague @DeDaMrAz for another opportunity to jointly (on my part remotely) change the product firmware. Colleague @DeDaMrAz also began to be very active in working on OpenBeken which is also commendable. This plug, in turn, will serve us, among others. for tests Tasmota Devices Groups for pairing OBK with Tasmota.
As for the product itself - it is the first smart plug z RGBW backlight I haven't seen anything like that. This is new to me, but does it have any use?
It is also a pity that we do not have on / off control over the USB ports, but this is what the manufacturer has already decided.
If the product had an energy meter (usually BL0942 or BL0937), it could be nicely scripted so that, for example, the color reflects the power consumed by the connected device at a given moment, but without it, these colored LEDs are probably just wasted ...
I attach a backup of the ESP batch.
Cool? Ranking DIY Helpful post? Buy me a coffee.

![[TYWE2S/ESP8226] Smart plug with RGBW backlight MOKO TX-DE02 and USB charger](https://obrazki.elektroda.pl/9083260300_1684118955.png "[TYWE2S/ESP8226] Smart plug with RGBW backlight MOKO TX-DE02 and USB charger")