logo elektroda
logo elektroda
X
logo elektroda

[CB3S/BK7231N] Temperature/Humidity Sensor with TuyaMCU - Diagram, Reverse Engin

p.kaczmarek2 25527 63
ADVERTISEMENT
Treść została przetłumaczona polish » english Zobacz oryginalną wersję tematu
Listen:
  • Conditional TuyaMCU link still executes unconditionally

    #31 20746949
    dotkach
    Level 4  
    Posts: 4
    Rate: 2
    is a good example of how to receive all data on request, and I noticed that in every successful example, our device sends the entire packet every time after waking up, even if there are no changes in the settings, which in turn leads to less autonomy from the accumulator, if you take away from the code "linkTuyaMCUOutputToChannel 17 val 5 1" and "linkTuyaMCUOutputToChannel 18 val 6 1" then the device only sends temperature, humidity, and when battery status changes and alarm states.

    I am trying to execute the following logic:
    if "CH7" is set to a high state through mqtt, then insert the following code "linkTuyaMCUOutputToChannel 18 val 6 1", otherwise - do not execute
    if - works improperly regardless of whether the condition is met or not, it still performs the function

    Spoiler:

    waitFor MQTTState 1
    // extra delay, to be sure
    delay_s 1

    startDriver TuyaMCU
    startDriver tmSensor

    // dpID 1 is tempererature div 10
    setChannelType 1 temperature_div10
    linkTuyaMCUOutputToChannel 1 val 1

    // dpID 2 is % humidity
    setChannelType 2 Humidity
    linkTuyaMCUOutputToChannel 2 val 2

    // dpID 3 is battery state - low(0), mid(1) and high(2)
    linkTuyaMCUOutputToChannel 3 enum 3
    setChannelType 3 ReadOnlyLowMidHigh
    setChannelLabel 3 Battery

    setChannelType 7 Toggle
    setChannelLabel 7 seting

    //
    // setup dpCache - temperature interval
    //
    // Show textfield for that
    setChannelType 5 TextField
    // setup display name
    setChannelLabel 5 Temperature Interval
    // Make value persistant (stored between reboots),
    // start value -1 means "remember last"
    SetStartValue 5 -1
    // set default value if not set
    if $CH5=0 then "setChannel 5 1"
    // link dpID 17 to channel 5, the type is val, extra '1' means that its dpCache variable
    if $CH7!=0 then "linkTuyaMCUOutputToChannel 17 val 5 1"

    setChannelType 6 TextField
    setChannelLabel 6 Humidity Interval
    SetStartValue 6 -1
    if $CH6=0 then "setChannel 6 1"
    if $CH7!=0 then "linkTuyaMCUOutputToChannel 18 val 6 1"
  • ADVERTISEMENT
  • #32 20747501
    p.kaczmarek2
    Moderator Smart Home
    Posts: 14770
    Help: 659
    Rate: 12913
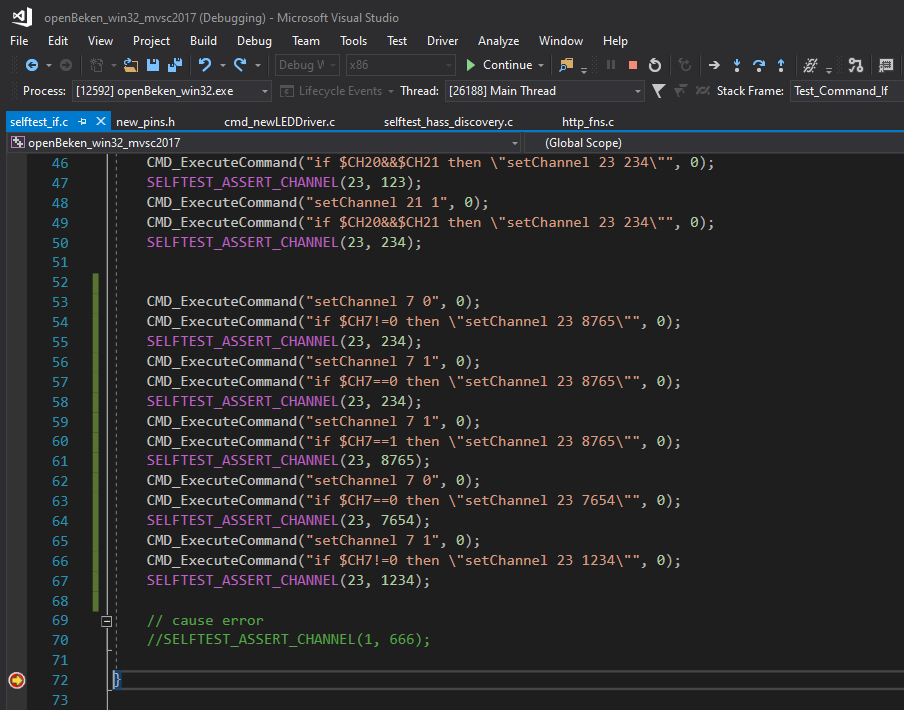
    Following syntax seems correct. I tested in self-test and it passes correctly:
    Screenshot of Visual Studio code editor showing a C code snippet in the openBeken_win32_msvc2017 project.
    How do you know that CH7 is received from MQTT by the time you execute the code?

    TuyaMCU might don't want to wait for MQTT to go online....

    Maybe keep ch7 in flash and receive it in one session and use in next session?
    Helpful post? Buy me a coffee.
  • #33 20750304
    dotkach
    Level 4  
    Posts: 4
    Rate: 2
    you are probably right, I tested it in different modes and found that the MCU turns off before the module has time to process everything

    how can you save the state of the channel in flash memory?
    I think that setting up such a sensor happens quite rarely, so there should be no problems with erasing the flash memory
  • Clarifying TuyaMCU channel mapping syntax

    #34 20900532
    sevastianovv
    Level 5  
    Posts: 8
    Rate: 1
    >>20564338
    Good afternoon. please tell me how to prescribe it correctly.

    backlog startDriver tuyaMCU; startDriver tmSensor; linkTuyaMCUOutputToChannel 1 val 1; setChannelType 1 temperature_div10; linkTuyaMCUOutputToChannel 2 val 2; setChannelType 2 Humidity; linkTuyaMCUOutputToChannel 3 val 3; setChannelType 3 ReadOnly; linkTuyaMCUOutputToChannel 18 val 6 60; setChannelType 6 TextField; linkTuyaMCUOutputToChannel 17 val 5 60; setChannelType 5 TextField;

    Or is it like that?

    backlog startDriver tuyaMCU; startDriver tmSensor; linkTuyaMCUOutputToChannel 1 val 1; setChannelType 1 temperature_div10; linkTuyaMCUOutputToChannel 2 val 2; setChannelType 2 Humidity; linkTuyaMCUOutputToChannel 3 val 3; setChannelType 3 ReadOnly; linkTuyaMCUOutputToChannel 18 val 6 60; linkTuyaMCUOutputToChannel 17 val 5 60;
  • #35 20900536
    p.kaczmarek2
    Moderator Smart Home
    Posts: 14770
    Help: 659
    Rate: 12913
    Hello, why don't you just put it in the autoexec.bat in LittleFS?
    [youtube]
    https://www.youtube.com/watch?v=kXi8S12tmC8
    [/youtube]
    Helpful post? Buy me a coffee.
  • ADVERTISEMENT
  • Clarifying correct TuyaMCU channel mapping commands

    #36 20900584
    sevastianovv
    Level 5  
    Posts: 8
    Rate: 1
    >>20564338
    Good afternoon. please tell me how to prescribe it correctly.

    backlog startDriver tuyaMCU; startDriver tmSensor; linkTuyaMCUOutputToChannel 1 val 1; setChannelType 1 temperature_div10; linkTuyaMCUOutputToChannel 2 val 2; setChannelType 2 Humidity; linkTuyaMCUOutputToChannel 3 val 3; setChannelType 3 ReadOnly; linkTuyaMCUOutputToChannel 18 val 6 60; setChannelType 6 TextField; linkTuyaMCUOutputToChannel 17 val 5 60; setChannelType 5 TextField;

    Or is it like that?

    backlog startDriver tuyaMCU; startDriver tmSensor; linkTuyaMCUOutputToChannel 1 val 1; setChannelType 1 temperature_div10; linkTuyaMCUOutputToChannel 2 val 2; setChannelType 2 Humidity; linkTuyaMCUOutputToChannel 3 val 3; setChannelType 3 ReadOnly; linkTuyaMCUOutputToChannel 18 val 6 60; linkTuyaMCUOutputToChannel 17 val 5 60;
  • #37 20900615
    p.kaczmarek2
    Moderator Smart Home
    Posts: 14770
    Help: 659
    Rate: 12913
    setChannelType 6 TextField
    is optional, it's not required for core functionality. And again, why don't you use LittleFS? Please watch the video I linked.
    Helpful post? Buy me a coffee.
  • #38 20917074
    sevastianovv
    Level 5  
    Posts: 8
    Rate: 1
    Good afternoon. How do I make the date and time sent to mqtt?

    Added after 9 [minutes]:

    >>20900615
    Good afternoon. I've done everything, it's working. Thanks!
  • Request for TH01 Wi-Fi logging credentials

    #39 20921490
    Wen2024
    Level 7  
    Posts: 19
    Rate: 1
    Hello p.kaczmarek2. I have flashed my TH01 with your "tuyaMCU thermostat backup" from your post #1. I want to learn from your good running settings because i don't get any usefull data from my TH01 on any channel. All are set to 0!!! I tried the SSID and the Pass from your "Short wake up and reporting test" to get the WIFI logging. But they don't seem to be right. Can you provide me the data? Best regards!
  • Check TuyaMCU type, dpIDs, and UART1 baud rate

    #40 20922287
    p.kaczmarek2
    Moderator Smart Home
    Posts: 14770
    Help: 659
    Rate: 12913
    Wen2024 wrote:
    Hello p.kaczmarek2. I have flashed my TH01 with your "tuyaMCU thermostat backup" from your post #1.

    You are not supposed to flash this file, you should rather flash latest binary from here:
    https://github.com/openshwprojects/OpenBK7231T_App/releases
    Futhermore, you need to configure your device, and first of all, check:
    - whether your device is TuyaMCU like in this topic or a non-TuyaMCU one (with deep sleep)
    - has the TuyaMCU dpIDs changed or not
    - has the TuyaMCU baud rate changed
    Are you getting any TuyaMCU transactions going on UART1 port?
    Helpful post? Buy me a coffee.
  • #42 20941536
    Wen2024
    Level 7  
    Posts: 19
    Rate: 1
    Hello p.kaczmarek2 and @DeDaMrAz, can someone of your both sent the link of the aliexpress product from post 1? Background: I have already ordered 8 different TH01 / TH08 sensors. In spite of the description, none of them was able to determine the the change and adjust frequency of reporting temperatures (fnID17). Thank you and best regards, Wen2024
  • ADVERTISEMENT
  • Request example for saving channel state to flash

    #43 20973055
    Wen2024
    Level 7  
    Posts: 19
    Rate: 1
    I finally got the right ones. The product description said:"The data update frequency is 1-120 minutes, and the update frequency can be selected as required". However, as the suppliers partly write off from each other, this is also no guarantee...

    Added after 16 [minutes]:

    Hello dotkach from post #33,
    you had asked the question: "How can you save the state of the channel in flash memory?" Have you made any progress with it?
    Background: The battery status is only reported by the MCU when it changes. I would like to cache the current status and report it to the server on each cycle.
    I did not find an example in the forum. What i found at the command.md is SPITestFlash_WriteStr, SPITestFlash_ReadData and SPITestFlash_Erase. But without an example, I see no chance.
    Does anyone have an example? Can anyone help?
    Best regards,
    Wen2024
  • Use start value -1 to persist channel state

    #44 20973103
    p.kaczmarek2
    Moderator Smart Home
    Posts: 14770
    Help: 659
    Rate: 12913
    dotkach wrote:

    how can you save the state of the channel in flash memory?

    Wen2024 wrote:

    you had asked the question: "How can you save the state of the channel in flash memory?

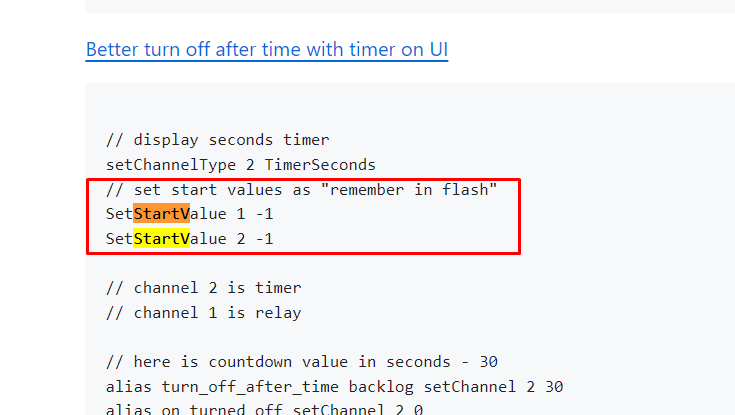
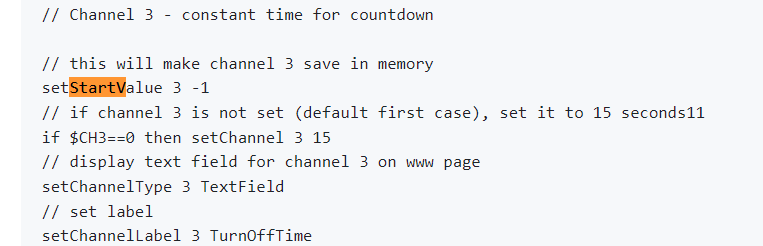
    If you set start value for given channel, for example, set start value of channel 2 to -1, it will remember the previous value.
    Screenshot of a table showing the SetStartValue function and its description.
    So, if you set channel 2 to 123 and reboot, it will be still 123.

    See also:
    https://github.com/openshwprojects/OpenBK7231T_App/blob/main/docs/autoexecExamples.md
    Code snippet with settings for initial channel values. Screenshot of code setting initial channel values in a script.
    Helpful post? Buy me a coffee.
  • #45 20973159
    Wen2024
    Level 7  
    Posts: 19
    Rate: 1
    Great, that works straight away!!! I just have to test whether the switch from full battery to half full and then empty battery works...
    Many thanks, Wen2024
  • #46 20973232
    p.kaczmarek2
    Moderator Smart Home
    Posts: 14770
    Help: 659
    Rate: 12913
    I'm glad to hear it's working. I apologize for the delay in the reply, I must have missed that. Next time feel free to ping me if I don't respond... or send a link to the topic via PM (but ask questions on forum, not on PM)
    Helpful post? Buy me a coffee.
  • Alternate UART flashing procedure for CB3S/BK7231N

    #47 21233509
    xPawelski
    Level 1  
    Posts: 1
    Hello Lads,

    I've found a new way to flash this device (2.1.8 ver from tuya app) without cutting uart traces.

    I've had serious troubles with flashing it over cloudcutter. It was very slow and leaving it overnight also failed.

    After dozens of unsuccessful tries with BK7231 GUI Flash Tool and with hid_download_py I've finally learned the procedure:

    1. Used BigTreeTech BTT Writer 1.0 and BK7231 GUI Flash Tool for that.
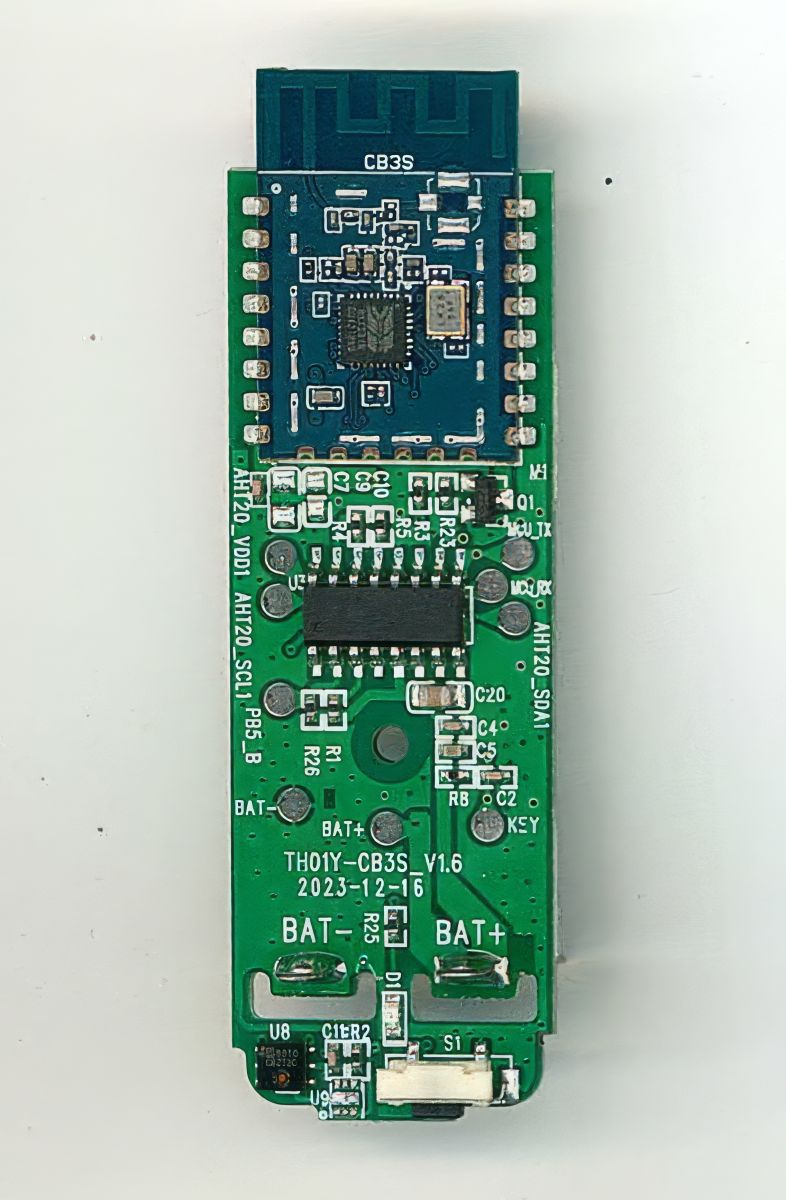
    2. Connected green PCB's BAT+ to 3.3v, BAT- to GND, TX to TX and RX to RX (yes, that's not a mistake)
    3. Turned on Flag 26 - [UART] Use alternate UART for BL0942, CSE, TuyaMCU, etc in order to automatically enter flashing mode.
    4. Downloaded latest OpenBeken QIO
    5. Baud rate set to 1500000 (the faster the better, it increases chances of successful flashing during that short window)
    You have to repeatedly press reset button during the flashing in order to prevent device from sleeping.

    Sadly, it's still impossible to configure device after that. In battery mode AP is up for maybe 2 minutes and goes down immediately after connecting to it.
    In order to configure it, you need to power CB3S (blue PCB) directly with VCC (3.3V) and GND pins. That way AP stays forever.

    Now my problem is that even after using correct autoexec.bat (that's with tuyamcu and tmsensor drivers, dpId's 1/2/3) my sensors are not working. They are showing 0.0000 values, even over the MQTT.
    There are no TuyaMCU logs whatsoever.

    After that many attemps I've flashed device without any backup so I don't have factory params anymore.

    CB3S electronic module on a green PCB with BAT+ and BAT- markings.
  • #48 21310541
    liomio93
    Level 1  
    Posts: 1
    >>21233509 did you manage to solve this?
    I have the exact same problem with this board, in the logs i only see something the first time that i long press the button but tuyaMCU only sends the battery status and nothing else
  • #49 21330668
    przemocmax
    Level 11  
    Posts: 20
    Rate: 7
    Witam, który element w tych czujnikach temperatury

    View of a temperature sensor circuit board with component markings. wifi TUYA odpowiada za pomiar temperatury?
  • #50 21330698
    p.kaczmarek2
    Moderator Smart Home
    Posts: 14770
    Help: 659
    Rate: 12913
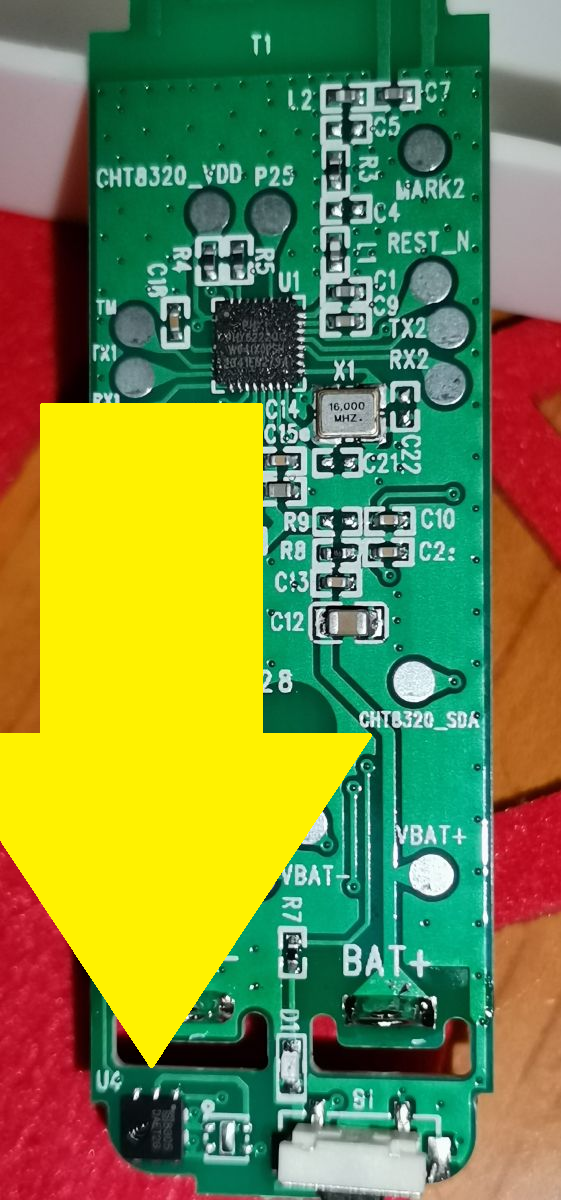
    U4 is temperature/humidity measuring chip:
    Close-up of a circuit board with electronic components, highlighted by a large yellow arrow.
    Helpful post? Buy me a coffee.
  • ADVERTISEMENT
  • #51 21330744
    przemocmax
    Level 11  
    Posts: 20
    Rate: 7
    Super dzięki, a czy jakiś namiar na pdf tego elementu?
  • #52 21332035
    przemocmax
    Level 11  
    Posts: 20
    Rate: 7
    Hello, is it possible to connect an external temperature sensor to this device, if so, which one would work appropriately?
  • #53 21333979
    p.kaczmarek2
    Moderator Smart Home
    Posts: 14770
    Help: 659
    Rate: 12913
    Is your device using chip supported by OpenBeken? What is the marking on the MCU?
    Helpful post? Buy me a coffee.
  • #54 21335587
    przemocmax
    Level 11  
    Posts: 20
    Rate: 7
    PHY62220C?
  • #55 21498222
    slinucs
    Level 1  
    Posts: 1
    >>20564338 Hi, thanks for the guide. I tried to flash my sensor but I forgot to cut the tuyaMCU tracks. I flashed the firmware with ltchiptool. The firmware starts correctly, connects to mqtt and sends data, but they are always all 0. I checked the logs but could not find any entries about tuyaMCU. What could have happened? Can it be fixed or should I just throw out the sensor?
  • #56 21502290
    rodak69
    Level 11  
    Posts: 15
    Rate: 4
    Hi, I have a question from a different angle. Is it possible to add an external temperature and humidity probe to the system? If so, which pins would need to be plugged in?
    Regards
  • TH01 variant uses DpIDs 27, 46, 101

    #57 21605946
    blacksun2
    Level 8  
    Posts: 59
    Rate: 1
    @Wen2024
    I think I have the wrong TH01 as well. The ones that don't work in your case have DpID 27, 46 and 101 (and 20 to switch between F and C)?

    @p.kaczmarek2
    Did you by any chance also check the TH01s that don't have DpIDs 1, 2 and 3 but 27, 46 and 101?
    It seems they are visually indistinguishable. Neither the standard wake-up function nor the ability to set the time seems to exist in these TH01s.
    Consequently, the autoexec.bat file referred to in this thread unfortunately does not work.
  • OpenBeken autoexec works only with 3.3 V supply

    #58 21772323
    helmutbayerlein
    Level 2  
    Posts: 3
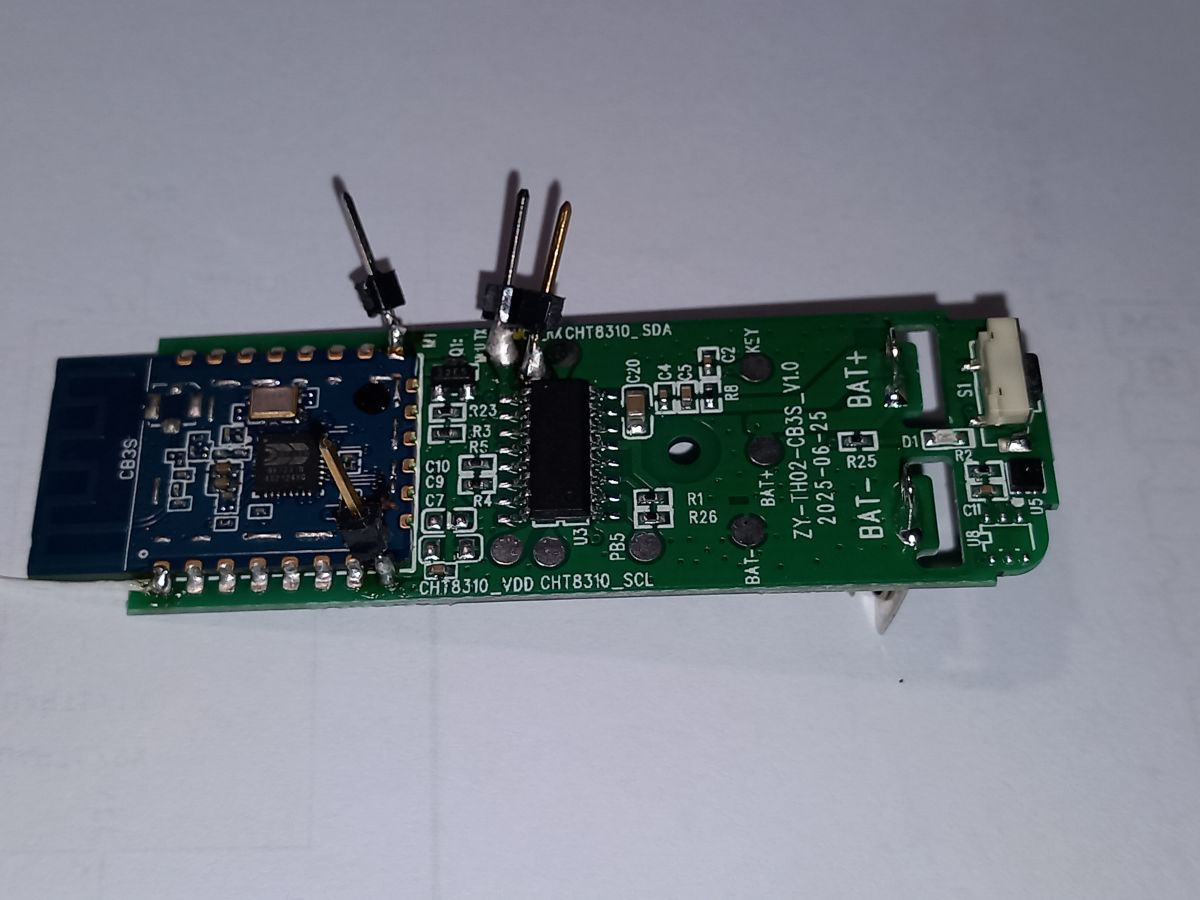
    Hello, I have a similar problem with my TH01, which uses a CHT8310 T/H-Sensor.

    TH01 board with CB3S module and CHT8310 sensor, showing soldered connections.

    Openbeken (1.18.213) could be flashed without problems and I wrote this as autoexec.bat:

    startDriver tuyaMCU
    startDriver tmSensor
    linkTuyaMCUOutputToChannel 1 val 1
    setChannelType 1 Temperature_Div10
    linkTuyaMCUOutputToChannel 2 val 2
    setChannelType 2 Humidity

    But for operation, I always have to connect 3.3V to the CB3S module and the Temp and Hum values show always 0. Chip temperature shows 39.9°C. I guess, the Tuya chip isn't working correct, althought it sends data via serial.
    Do I need some other config except autoexec.bat (flags 10 and 19 are active)?

    Any help is welcome!
  • Sniffed TuyaMCU command sequence for BK7231N sensor

    #59 21777768
    LichtiMC
    Level 2  
    Posts: 3
    Hello, I have the exact same device.
    Following TuyaMCU <--> BK7231N Communication I could sniff:

    BK7231N (0ms):
    55 AA   00   01      00 00      00   
    HEADER   VER=00   Product      LEN      CHK   
    TuyaMCU (+15ms):
    55 AA   00   01      00 24   7B2270223A226A33666A616A66327830617073716770222C2276223A22312E302E30227D   A3   
    HEADER   VER=00   Product      LEN   {"p":"j3fjajf2x0apsqgp","v":"1.0.0"}   CHK   
    
    BK7231N (+1145ms):
    55 AA   00   02      00 01   03   05   
    HEADER   VER=00   McuConf      LEN   03   CHK   
    TuyaMCU (+20ms):
    55 AA   00   02      00 00      01   
    HEADER   VER=00   McuConf      LEN      CHK   
    
    BK7231N (+2077ms):
    55 AA   00   02      00 01   04   06   
    HEADER   VER=00   McuConf      LEN   04   CHK   
    TuyaMCU (+13ms):
    55 AA   00   02      00 00      01   
    HEADER   VER=00   McuConf      LEN      CHK   
    
    TuyaMCU (+165ms):
    55 AA   00   05      00 15   0102000400000101020200040000001C0304000102   50   
    HEADER   VER=00   Unk      LEN   dpId=1 Val V=257,dpId=2 Val V=28,dpId=3 Enum V=2      CHK   
    
    BK7231N (+192ms):
    55 AA   00   05      00 01   00   05   
    HEADER   VER=00   Unk      LEN         CHK   
    

    First part of each paragraph was while listening on TX of Beken and second part while listening on RX of Beken. (I have arranged the commands and responses as I saw fit.)
    EDIT: This is with RX and TX of the BK7231N connected to my logic analyzer, so I now have the exact commands and answers with timing. I edited the code block above.

    Maybe someone could "translate" them into a working template for this device?

    Thanks, regards
    David
  • Unstable temperature and humidity reporting intervals

    #60 21778134
    helmutbayerlein
    Level 2  
    Posts: 3
    >>21772323 After some try, I found the following setup for my device:

    // dpID 27 is temperature div 10
    setChannelType 27 temperature_div10
    linkTuyaMCUOutputToChannel 27 val 27
    // dpID 46 is % humidity
    setChannelType 46 Humidity
    linkTuyaMCUOutputToChannel 46 val 46
    // dpID 101 is battery state - low(0), mid(1) and high(2)
    setChannelType 10 ReadOnly
    linkTuyaMCUOutputToChannel 101 enum 10

    My problem is now, to set the Temperature_Interval and Humidity_Interval. dpID 17 and 18 seem not to be the right values. Randomly, it sends in a constant 2 and 5 minutes interval, sometimes every hour and sometimes every 3 minutes. My values for both are 5 resp. 20.
    Does anybody know, what's the problem with my device? A repetition time of 5 or 10 minutes would be ok, but it should be constant.
Listen:

Topic summary

LABEL_AI_GENERATED
Discussion about reverse engineering a Tuya battery-powered WiFi temperature/humidity sensor based on CB3S/BK7231N and TuyaMCU. The thread covers PCB analysis, schematic reconstruction, UART packet capture, dpID mapping, and OpenBeken firmware replacement to remove cloud dependence and integrate with Home Assistant. It explains TuyaMCU protocol details such as ObtainDPCache, report intervals, battery state handling, persistent channel values, deep sleep behavior, and flashing methods. Later posts compare different sensor variants, identify alternative dpIDs, discuss timing issues in serial sniffing tools, and troubleshoot configuration problems, flashing without cutting traces, and external probe possibilities.
AI summary based on the discussion. May contain errors.

FAQ LABEL_AI_GENERATED

TL;DR: This FAQ is for OpenBeken users converting a CB3S/BK7231N Tuya TH01-style sensor: it measured about 5µA in MCU sleep, and the key warning is "disconnect the UART" before flashing or testing. It explains TuyaMCU dpIDs, OpenBeken autoexec.bat, Home Assistant MQTT, and common zero-reading failures. [#20564338]

Why it matters: Battery Tuya sensors combine cloud firmware, short wake windows, and MCU-controlled power, so one wrong UART or dpID setting can make Home Assistant show only zeros.

Approach Hardware path Sleep behavior OpenBeken impact
TuyaMCU battery sensor Separate MCU + CB3S/BK7231N over UART MCU sleep measured about 5µA Needs TuyaMCU, tmSensor, dpID mapping, and often dpCache
BK7231 deep sleep device WiFi SoC handles sleep itself BK7231 deep sleep measured about 6µA Uses PinDeepSleep, not TuyaMCU dpIDs
Non-TuyaMCU PIR example GPIO/ADC directly on BK7231 Script-controlled wake and sleep Needs pin template, not TuyaMCU UART

Key insight: Treat the MCU as the real always-on controller. OpenBeken must answer its TuyaMCU handshake quickly, publish MQTT, then let the MCU cut CB3S power.

Quick Facts

  • The analyzed sensor uses a CB3S WiFi module based on BK7231N, a separate unidentified MCU, and an SHT30 temperature/humidity sensor read over I2C. [#20564338]
  • The measured sleep current with the WiFi module powered off was about 5µA; a BK7231-only deep sleep comparison measured about 6µA. [#20564338]
  • The captured product information string was { "p":"byusvumeme5iicad", "v":"1.0.0" }, exchanged through TuyaMCU command 0x01. [#20564338]
  • Reporting interval control used dpID 17 for temperature and dpID 18 for humidity; tested values included 1 minute, and the thread mentions 1–120 minutes on suitable products. [#20973055]
  • Some visually similar TH01 sensors use different dpIDs, such as 27 for temperature, 46 for humidity, and 101 for battery, so the original autoexec.bat can fail. [#21778134]

What is TuyaMCU and how does it communicate with a CB3S/BK7231N WiFi module in a battery temperature and humidity sensor?

TuyaMCU is the UART protocol between the always-on MCU and the CB3S/BK7231N WiFi module. "TuyaMCU is a UART based protocol that lets the product MCU exchange dpID status and configuration frames with the WiFi module, while the MCU can also control WiFi power in battery devices." In this sensor, the MCU reads the SHT30 over I2C, turns CB3S power on through a MOSFET, then exchanges 55 AA frames at wake-up. [#20564338]

How do I flash OpenBeken on a CB3S/BK7231N Tuya temperature and humidity sensor without keeping it tied to the Tuya cloud?

Flash OpenBeken by isolating the CB3S UART, powering the module with 3.3V, and writing a BK7231N OpenBeken binary. 1. Disconnect MCU-to-CB3S UART resistors or tracks. 2. Power CB3S directly from a stable 3.3V programmer supply. 3. Flash with BK7231 GUI Flash Tool, then restore UART and add autoexec.bat in LittleFS. The thread’s final setup used MQTT and Home Assistant Discovery after flashing. [#20564338]

Why do I need to disconnect or cut the UART lines between the MCU and CB3S before flashing OpenBeken?

You disconnect the UART because the same CB3S UART port serves both TuyaMCU communication and firmware flashing. If the MCU stays connected, it can drive RX/TX during programming or testing. One user found the sensor showed no values until power, ground, RX, and TX programming wires were removed. The module can also receive parasitic power from the programmer, which changes wake and power behavior. [#20739869]

Which TuyaMCU dpIDs are used for temperature, humidity, battery level, reporting interval, and unit settings in the TH01-style sensor?

The original TH01-style mapping uses dpID 1 for temperature times 10, dpID 2 for humidity percent, and dpID 3 for battery state. dpID 9 selects Celsius or Fahrenheit, with 0 for °C and 1 for °F. dpID 17 controls temperature reporting interval, and dpID 18 controls humidity reporting interval. Similar-looking devices may instead use dpID 27, 46, and 101, so UART capture confirms the real map. [#20564338]

How should I write the OpenBeken autoexec.bat for a TuyaMCU temperature and humidity sensor with Home Assistant MQTT discovery?

Use TuyaMCU, tmSensor, and explicit dpID-to-channel links in autoexec.bat. A minimal setup starts both drivers, maps dpID 1 as Temperature_Div10, dpID 2 as Humidity, and dpID 3 as ReadOnlyLowMidHigh battery. Add linkTuyaMCUOutputToChannel 17 val 5 1 and 18 val 6 1 only when the device supports dpCache intervals. Home Assistant Discovery then exposes the scripted channels through MQTT. [#20564338]

What does the TuyaMCU ObtainDPCache command 0x10 do, and how is it used to change the reporting interval?

Command 0x10 lets the MCU ask the WiFi module for cached settings, such as reporting intervals. The WiFi module replies with dpID, type, and value records. In OpenBeken, the extra 1 in linkTuyaMCUOutputToChannel 17 val 5 1 marks that channel as dpCache data. The MCU can then store values like 1 minute or 60 minutes and use them for future wake cycles. [#20584330]

Why does my OpenBeken-flashed Tuya temperature sensor show 0 values for temperature and humidity even though MQTT is connected?

Zero readings mean OpenBeken is not receiving or decoding the correct TuyaMCU data frames. Check four concrete items: UART restored after flashing, correct baud rate such as 9600 or 115200, correct dpIDs, and working MQTT before the MCU sleeps. Some boards use dpID 27 and 46 instead of 1 and 2. Also avoid flashing old backup images; use current OpenBeken binaries and configure the device separately. [#20922287]

How can I save an OpenBeken channel value in flash memory so it survives reboot or deep sleep wake cycles?

Set the channel start value to -1, which tells OpenBeken to remember the previous channel value in flash. For example, SetStartValue 5 -1 keeps channel 5 across reboots. The thread uses this for report interval fields and later confirms it works for cached values. This helps battery devices reuse settings after the MCU powers the CB3S off. [#20973103]

How can I publish the current date and time to MQTT from an OpenBeken device?

The thread asks this question but does not provide a working date-and-time MQTT command. The same post later confirms the basic sensor setup was working, but no complete time-publish script appears there. Use only documented OpenBeken commands for production, and test during the sensor’s short wake window, which was about 11 seconds in the report-cycle test. [#20917074]

What is the difference between a TuyaMCU battery-powered sensor and a non-TuyaMCU deep sleep sensor in OpenBeken?

A TuyaMCU battery sensor uses a separate low-power MCU to control CB3S power and report dpID data over UART. A non-TuyaMCU deep sleep sensor connects signals directly to BK7231 GPIO or ADC and uses PinDeepSleep. The thread warns that PIR scripts using Rel, dInput, ADC, and PinDeepSleep are for devices without TuyaMCU, not the first TH01 sensor. [#20585154]

BK7231N deep sleep vs separate low-power MCU power control — which approach gives better battery life for Tuya sensors?

The measured results were very close: the TuyaMCU sensor drew about 5µA with CB3S VDD disconnected, while BK7231 deep sleep measured about 6µA. The separate MCU design keeps WiFi fully unpowered until reporting, then the MCU turns it on through a MOSFET. The BK7231-only design can wake from GPIO but keeps the WiFi SoC in deep sleep. [#20564338]

How can I sniff and decode TuyaMCU UART communication using BK7231 GUI Flash Tool, MCUAnalyzer, or SniffUART?

Capture both UART directions, then decode 55 AA TuyaMCU frames into commands, dpIDs, types, and values. BK7231 GUI Flash Tool can do dual UART capture, MCUAnalyzer comments frames, and SniffUART added decoder forms and protocol choices. For TuyaMCU, select the correct protocol family, such as standard MCU serial, low-power MCU, or HomeKit MCU serial. A read timeout near 100 ms was suggested for SniffUART. [#20645958]

Why can dual UART captures show packets in the wrong order, and how do USB serial adapters like CH340, CP2102, and FTDI affect logging?

Dual captures can misorder packets because USB serial and software polling add enough latency to disturb timestamps. The thread reports CH340 dongles, CP2102, and FTDI adapters showing different capture behavior. One user measured Realterm rates of 20 CPS on CP2102 and 5 CPS on FTDI232. The author also noted that even dual capture may need human post-processing. [#20584759]

Which chip on the TH01 temperature and humidity sensor PCB actually measures temperature and humidity, such as SHT30, CHT8310, or U4?

The temperature and humidity sensor is the small sensor IC marked as U4 on the PCB photo, and the original analysis identifies the measured device as SHT30 over I2C. Later variants may use a CHT8310 T/H sensor. The MCU, not the CB3S, reads this sensor and then sends values through TuyaMCU dpIDs. [#21330698]

How can I add an external temperature or humidity probe to a Tuya TH01-style sensor, and which pins or sensor types would be compatible?

The thread does not confirm a working external probe mod for the TuyaMCU TH01 board. The key requirement is firmware and hardware support from the MCU that reads the existing U4/SHT30 or CHT8310 sensor. OpenBeken on CB3S cannot directly replace that reading unless the external sensor connects to supported BK7231 pins and the MCU power design still permits it. The author first asked for the MCU marking, such as PHY62220C. [#21333979]
AI summary based on the discussion. May contain errors.
ADVERTISEMENT