logo elektroda
logo elektroda
X
logo elektroda

CLOUDY BAY 6inch Smart Wifi LED Recessed Lights, RGBCW

justinhunt1223 6441 86
ADVERTISEMENT
  • #31 20846812
    p.kaczmarek2
    Moderator Smart Home
    You need to make sure that you set low temperature on soldering iron, keep the soldering iron tip and use flux.

    Some of the Tuya devices have RX/TX/GND/VDD routed out on some kind of pads, so soldering is easier, but in your case, you have to solder directly to WB3S
    Helpful post? Buy me a coffee.
  • ADVERTISEMENT
  • #32 20846981
    specialdude
    Level 9  
    by saying "low temperature" what should I set my soldering station to?
  • #33 20847100
    p.kaczmarek2
    Moderator Smart Home
    I am usually just experiment to see which one melts solder well but is not too high and it also depend on your solder type (you should have leaded one, not Pb-free) but maybe 340 should be good. I am using sn60pb40 solder and it's recommended to use 340 or so in the docs:
    Helpful post? Buy me a coffee.
  • #34 20854220
    specialdude
    Level 9  
    hi, ok I got all the things I needed to start.

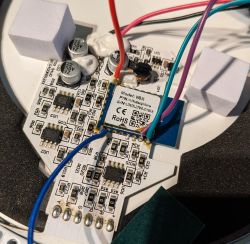
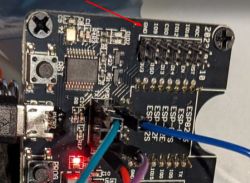
    Soldered as shown below:
    Close-up of an electronic circuit with connected wires.

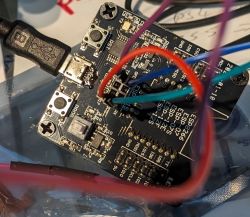
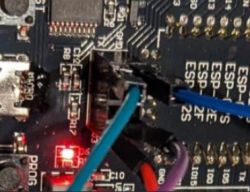
    connected to device ( I actually followed your pic with cable colors same as arrows):
    Printed circuit board with wires and electronic components.

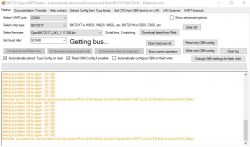
    got the app and the device was detected on COM4:
    Screenshot of BK7231 Easy UART Flasher program attempting to connect to a device.
    I selected the button: "Do firmware backup (read only)"
    red cable is the one I disconnect/reconnect.
    ---------
    Backup name is set to qq.
    Starting read!
    Now is: Saturday, December 9, 2023 4:06:03 PM.
    Flasher mode: BK7231T
    Going to open port: COM4.
    Serial port open!
    Getting bus... (now, please do reboot by CEN or by power off/on)
    Getting bus failed, will try again - 0/100!
    Getting bus failed, will try again - 1/100!
    Getting bus failed, will try again - 2/100!
    ----------

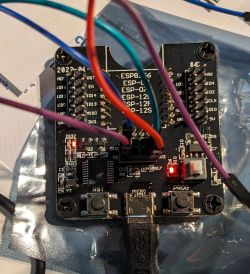
    the device has two red lights blinking very quickly as shown here:
    Close-up of an ESP8266 module with connected wires and two flashing red LEDs.

    hmmm not sure what to do next.
  • ADVERTISEMENT
  • #35 20854299
    p.kaczmarek2
    Moderator Smart Home
    In a meantime, I realized that I actually know your USB to UART board from before - I made even a tutorial about it, but I didn't have it personally, photos are made by @DeDaMrAz :
    https://www.elektroda.com/rtvforum/topic4010939.html
    And it works for flashing, at least worked for him....

    Anyway, so:
    - how long are your wires? long wires can cause too much interference for flashing
    - is there 3.3V on that wire? There is a button on this board, maybe you didn't toggle it? Btw, maybe you can just power on/off with that button
    - have you tried lower baud rates?
    - try swapping TX and RX
    Helpful post? Buy me a coffee.
  • #36 20854327
    specialdude
    Level 9  
    Anyway, so:
    - how long are your wires? long wires can cause too much interference for flashing
    about 11-12inch
    - is there 3.3V on that wire? There is a button on this board, maybe you didn't toggle it? Btw, maybe you can just power on/off with that button
    just tried pressing the white button down.... toggled like to up position and down position, tried a few times some variations....
    triggered this fail shown below by doing so:

    ----------
    Getting bus failed, will try again - 24/100!
    Getting bus failed, will try again - 25/100!
    Exception caught: System.UnauthorizedAccessException: Access to the port 'COM4' is denied.
    at System.IO.Ports.InternalResources.WinIOError(Int32 errorCode, String str)
    at System.IO.Ports.SerialStream.EndWrite(IAsyncResult asyncResult)
    at System.IO.Ports.SerialStream.Write(Byte[] array, Int32 offset, Int32 count, Int32 timeout)
    at System.IO.Ports.SerialPort.Write(Byte[] buffer, Int32 offset, Int32 count)
    at BK7231Flasher.BK7231Flasher.Start_Cmd(Byte[] txbuf, Int32 rxLen, Single timeout) in
    W:\GIT\BK7231GUIFlashTool\BK7231Flasher\BK7231Flasher.cs:line 409
    at BK7231Flasher.BK7231Flasher.linkCheck() in W:\GIT\BK7231GUIFlashTool\BK7231Flasher\BK7231Flasher.cs:line 1519
    at BK7231Flasher.BK7231Flasher.getBus() in W:\GIT\BK7231GUIFlashTool\BK7231Flasher\BK7231Flasher.cs:line 697
    at BK7231Flasher.BK7231Flasher.doGetBusAndSetBaudRate() in W:\GIT\BK7231GUIFlashTool\BK7231Flasher\BK7231Flasher.cs:line 821
    at BK7231Flasher.BK7231Flasher.doGenericSetup() in W:\GIT\BK7231GUIFlashTool\BK7231Flasher\BK7231Flasher.cs:line 867
    at BK7231Flasher.BK7231Flasher.doReadInternal(Int32 startSector, Int32 sectors) in
    W:\GIT\BK7231GUIFlashTool\BK7231Flasher\BK7231Flasher.cs:line 1331
    at BK7231Flasher.BK7231Flasher.doRead(Int32 startSector, Int32 sectors) in
    W:\GIT\BK7231GUIFlashTool\BK7231Flasher\BK7231Flasher.cs:line 781
    There was no result to save.

    ------
    I am not sure about W: as I do not have that drive.

    - have you tried lower baud rates?
    tried 115200 but no change

    - try swapping TX and RX
    swapped and I get this now:
    -----
    Backup name is set to x.
    Starting read!
    Now is: Saturday, December 9, 2023 6:15:04 PM.
    Flasher mode: BK7231T
    Going to open port: COM4.
    Serial port open!
    Getting bus... (now, please do reboot by CEN or by power off/on)
    Getting bus success!
    Going to set baud rate setting (921600)!
    Failed to set baud rate!
    There was no result to save.

    -----
    tried with Going to set baud rate setting (115200)! and Going to set baud rate setting (1500000)!
    but it did not like it....
    what other ones I should try?
  • #37 20854331
    p.kaczmarek2
    Moderator Smart Home
    specialdude wrote:

    about 11-12inch

    Wait, what, really? There is no way it can work.
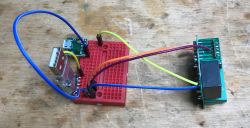
    Take a look at my flashing circuit from a random teardown topic from https://openbekeniot.github.io/webapp/devicesList.html
    Circuit with wires connected to a red breadboard and USB module.
    I am using the shortest Arduino wires around here, 5cm... so 2 inches top

    Please shorten the wires and retry. We already had users on the forum whom making the wires shorter helped.

    specialdude wrote:

    
    Exception caught: System.UnauthorizedAccessException: Access to the port 'COM4' is denied.
    at System.IO.Ports.InternalResources.WinIOError(Int32 errorCode, String str)


    OK, button is the wrong approach, because it turns off whole USB to UART converter. Let's stick to "disconnect 3.3V wire" method.
    Helpful post? Buy me a coffee.
  • ADVERTISEMENT
  • #38 20854335
    specialdude
    Level 9  
    Uhhh so I guess I will shorten them cables ;)
    It is interesting that I actually got the message success on a bus connect, why?
  • #39 20854418
    p.kaczmarek2
    Moderator Smart Home
    It might have been a fluke, or it may have worked for first bytes and then interference broke the connection
    Helpful post? Buy me a coffee.
  • ADVERTISEMENT
  • #40 20855125
    specialdude
    Level 9  
    ok I am not sure now completly....
    the wires are pretty short, and i already tried switching tx/rx... as well..
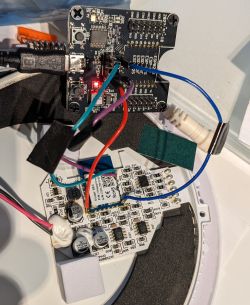
    Electronic module with soldered wires connected to a programmer.

    
    Now is: Sunday, December 10, 2023 9:46:02 AM.
    Flasher mode: BK7231T
    Going to open port: COM4.
    Serial port open!
    Getting bus... (now, please do reboot by CEN or by power off/on)
    Getting bus success!
    Going to set baud rate setting (921600)!
    [b]Failed to set baud rate![/b]
    There was no result to save.
    Backup name is set to dd.
    Starting read!
    Now is: Sunday, December 10, 2023 9:46:28 AM.
    Flasher mode: BK7231T
    Going to open port: COM4.
    Serial port open!
    Getting bus... (now, please do reboot by CEN or by power off/on)
    Getting bus success!
    Going to set baud rate setting (921600)!
    [b]Failed to set baud rate![/b]
    There was no result to save.


    hmm

    forgot to add ,,, they only way I can get output above is when I switch the rx/tx ... and when I press that white button .... so I might be triggering something odd.

    if I just leave the white button alone, and dont touch it... the program is just showing:
    Getting bus failed, will try again - 32/100!
    Getting bus failed, will try again - 33/100!
    Getting bus failed, will try again - 34/100!
    Getting bus failed, will try again - 35/100!

    Added after 55 [minutes]:

    Yeah ... The power button switch (white) I should not be touching .. should be just ON I would say.

    I got a few ESP01 modules with this device ... For test can I load some stuff on it? I would do that just to check if things work as expected between the computer and the flashing module .

    Added after 1 [hours] 12 [minutes]:

    and something new (when I have RX-TX and TX-RX) connection now....

    Starting read!
    Now is: Sunday, December 10, 2023 11:56:40 AM.
    Flasher mode: BK7231T
    Going to open port: COM4.
    Serial port open!
    Getting bus... (now, please do reboot by CEN or by power off/on)
    Getting bus failed, will try again - 0/100!
    Getting bus success!
    Going to set baud rate setting (921600)!
    failed with serial.BytesToRead 11 (expected 12)
    The beginning of buffer in UART contains 0000000000000000000000 data.
    Failed to set baud rate!
    There was no result to save.

    Added after 4 [minutes]:

    i was able to get this message only one time... for some reason ... but I am changing bound rate so who knows.
  • #41 20855391
    p.kaczmarek2
    Moderator Smart Home
    Ok so maybe let's try CEN method?

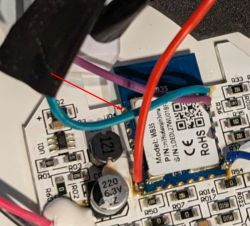
    Leave all 4 wires connected. Get fifth wire, a black one. Connect one side to GND on the board (there are still unused GND pins there), then start the flasher, then manually touch the CEN pin of WB3S for 1 second with that fifth GND wire.... once or twice. CEN is here:
    The image shows a circuit board with a WB3S module indicated by a red wire.
    Helpful post? Buy me a coffee.
  • #42 20855485
    specialdude
    Level 9  
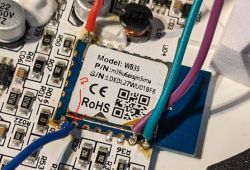
    by saying: " Connect one side to GND on the board (there are still unused GND pins there),"
    so like I should connect to the same location the black wire to the the location where blue is connected now? (2in1?) or are you saying next one to it?: Close-up of a circuit board with wires connected to a module labeled as Model: WB3S.
  • #44 20855532
    specialdude
    Level 9  
    Uhh so I do not solder anything to wb3s... You just want me to get a black wire connected on the uart to USB side as you showed and then touch the pin on wb3s. Was not clear.
    Please confirm.
  • #45 20855591
    p.kaczmarek2
    Moderator Smart Home
    Yes, but keep in mind that you have to have all other 4 wires connected already, then start flashing process (flash read), and then touch CEN with that GND wire once or twice for 0.5 second or 1 second, the flash read process should start
    Helpful post? Buy me a coffee.
  • #46 20855645
    specialdude
    Level 9  
    no improvement. The "receive indicator" and "power indicator" LEDs flash very fast when I click in Flasher "do firmware backup read only", then when I touch the CEN pin for half a second or a second they stop blinking (they are red solid on) , and when I let it go they blink fast again.
    Nothing on Flasher side in log shows much other than....
    Getting bus failed, will try again - 94/100!
    Getting bus failed, will try again - 95/100!
    Getting bus failed, will try again - 96/100!
    Getting bus failed, will try again - 97/100!
  • #47 20855912
    p.kaczmarek2
    Moderator Smart Home
    Are you sure that you've got connected everything correctly? TX, RX, etc?
    Close-up of an ESP board with connected wires, and a lit red LED.
    Do you have a multimeter?
    Have you tried with swapped RX/TX?

    Maybe try:
    1. start flashing in flasher tool
    2. temporary disconnect the red wire that is soldered to WB3S VDD from USB to UART dongle
    3. temporary touch GND with this wire (to force discharge of capacitors). GND is available on USB to UART dongle
    4. reconnect this red wire to 3.3V of USB to UART dongle
    The trick above worked for me several times when I was not able to reset other methods due to the large capacitance on the WiFI module board. The capacitors charging via RX/TX lines (via protection diodes inside BK) also may cause such problems.
    Helpful post? Buy me a coffee.
  • #48 20856555
    specialdude
    Level 9  
    Are you sure that you've got connected everything correctly? TX, RX, etc?
    - 99.9% sure .... I follow my/your arrows colors scheme just for that purpose.

    Do you have a multimeter?
    - Yes

    Have you tried with swapped RX/TX?
    - everytime you suggest something, I try with original setup and then I try with those swapped

    Maybe try:
    1. start flashing in flasher tool
    2. temporary disconnect the red wire that is soldered to WB3S VDD from USB to UART dongle
    3. temporary touch GND with this wire (to force discharge of capacitors). GND is available on USB to UART dongle
    4. reconnect this red wire to 3.3V of USB to UART dongle
    The trick above worked for me several times when I was not able to reset other methods due to the large capacitance on the WiFI module board. The capacitors charging via RX/TX lines (via protection diodes inside BK) also may cause such problems.

    - did not make any difference

    I am in a process of de-soldering and re-soldering the wires just as ... why not I guess at this point.
  • #49 20856566
    p.kaczmarek2
    Moderator Smart Home
    When you have those 3.3V and GND soldered, is there a really 3.3V voltage on WB3S? Can you measure?

    If we fail, in worst case, you could theoretically ship that single light to me and I can try flashing it, but I don't want you to have to buy another light, especially considering that I would have done the same as I told you...

    Alternatively, maybe somehow that single USB to UART dongle you have has wrong timings or is faulty? Do you have any other USB to UART converter? Do you have Arduino?

    Still, as I said on private message, our contributor @DeDaMrAz has in fact tested the board you have and it seemed to work for CB3S... so it's a tested device.... you can read more here in this tutorial:
    https://www.elektroda.com/rtvforum/topic4010939.html
    Helpful post? Buy me a coffee.
  • #50 20856613
    specialdude
    Level 9  
    Sir! I have some good news!
    I desolder/re-solder cables, and tried combinations from a scratch....
    The one that got me thru to READ the module is:
    1) the white BUTTON , pressed IN.
    2) TX/RX SWAPPED....
    3) in EASY UART Flasher... initiated the firmware backup (read only) and then used the black (5th cable on ground) to touch the CEN port.
    4) it started doing stuff and here it is:
    
    Starting read!
    Now is: Monday, December 11, 2023 10:13:37 AM.
    Flasher mode: BK7231T
    Going to open port: COM4.
    Serial port open!
    Getting bus... (now, please do reboot by CEN or by power off/on)
    Getting bus failed, will try again - 0/100!
    Getting bus failed, will try again - 1/100!
    Getting bus success!
    Going to set baud rate setting (921600)!
    Going to start reading at offset 0x00...
    Reading 0x00... Ok! Reading 0x1000... Ok! Reading 0x2000... Ok! Reading 0x3000... Ok! Reading 0x4000... Ok! Reading 0x5000... Ok! Reading 0x6000... Ok! Reading 0x7000... Ok! Reading 0x8000... Ok! Reading 0x9000... Ok! Reading 0xA000... Ok! Reading 0xB000... Ok! Reading 0xC000... Ok! Reading 0xD000... Ok! Reading 0xE000... Ok! Reading 0xF000... Ok! Reading 0x10000... Ok! Reading 0x11000... Ok! Reading 0x12000... Ok! Reading 0x13000... Ok! Reading 0x14000... Ok! Reading 0x15000... Ok! Reading 0x16000... Ok! Reading 0x17000... Ok! Reading 0x18000... Ok! Reading 0x19000... Ok! Reading 0x1A000... Ok! Reading 0x1B000... Ok! Reading 0x1C000... Ok! Reading 0x1D000... Ok! Reading 0x1E000... Ok! Reading 0x1F000... Ok! Reading 0x20000... Ok! Reading 0x21000... Ok! Reading 0x22000... Ok! Reading 0x23000... Ok! Reading 0x24000... Ok! Reading 0x25000... Ok! Reading 0x26000... Ok! Reading 0x27000... Ok! Reading 0x28000... Ok! Reading 0x29000... Ok! Reading 0x2A000... Ok! Reading 0x2B000... Ok! Reading 0x2C000... Ok! Reading 0x2D000... Ok! Reading 0x2E000... Ok! Reading 0x2F000... Ok! Reading 0x30000... Ok! Reading 0x31000... Ok! Reading 0x32000... Ok! Reading 0x33000... Ok! Reading 0x34000... Ok! Reading 0x35000... Ok! Reading 0x36000... Ok! Reading 0x37000... Ok! Reading 0x38000... Ok! Reading 0x39000... Ok! Reading 0x3A000... Ok! Reading 0x3B000... Ok! Reading 0x3C000... Ok! Reading 0x3D000... Ok! Reading 0x3E000... Ok! Reading 0x3F000... Ok! Reading 0x40000... Ok! Reading 0x41000... Ok! Reading 0x42000... Ok! Reading 0x43000... Ok! Reading 0x44000... Ok! Reading 0x45000... Ok! Reading 0x46000... Ok! Reading 0x47000... Ok! Reading 0x48000... Ok! Reading 0x49000... Ok! Reading 0x4A000... Ok! Reading 0x4B000... Ok! Reading 0x4C000... Ok! Reading 0x4D000... Ok! Reading 0x4E000... Ok! Reading 0x4F000... Ok! Reading 0x50000... Ok! Reading 0x51000... Ok! Reading 0x52000... Ok! Reading 0x53000... Ok! Reading 0x54000... Ok! Reading 0x55000... Ok! Reading 0x56000... Ok! Reading 0x57000... Ok! Reading 0x58000... Ok! Reading 0x59000... Ok! Reading 0x5A000... Ok! Reading 0x5B000... Ok! Reading 0x5C000... Ok! Reading 0x5D000... Ok! Reading 0x5E000... Ok! Reading 0x5F000... Ok! Reading 0x60000... Ok! Reading 0x61000... Ok! Reading 0x62000... Ok! Reading 0x63000... Ok! Reading 0x64000... Ok! Reading 0x65000... Ok! Reading 0x66000... Ok! Reading 0x67000... Ok! Reading 0x68000... Ok! Reading 0x69000... Ok! Reading 0x6A000... Ok! Reading 0x6B000... Ok! Reading 0x6C000... Ok! Reading 0x6D000... Ok! Reading 0x6E000... Ok! Reading 0x6F000... Ok! Reading 0x70000... Ok! Reading 0x71000... Ok! Reading 0x72000... Ok! Reading 0x73000... Ok! Reading 0x74000... Ok! Reading 0x75000... Ok! Reading 0x76000... Ok! Reading 0x77000... Ok! Reading 0x78000... Ok! Reading 0x79000... Ok! Reading 0x7A000... Ok! Reading 0x7B000... Ok! Reading 0x7C000... Ok! Reading 0x7D000... Ok! Reading 0x7E000... Ok! Reading 0x7F000... Ok! Reading 0x80000... Ok! Reading 0x81000... Ok! Reading 0x82000... Ok! Reading 0x83000... Ok! Reading 0x84000... Ok! Reading 0x85000... Ok! Reading 0x86000... Ok! Reading 0x87000... Ok! Reading 0x88000... Ok! Reading 0x89000... Ok! Reading 0x8A000... Ok! Reading 0x8B000... Ok! Reading 0x8C000... Ok! Reading 0x8D000... Ok! Reading 0x8E000... Ok! Reading 0x8F000... Ok! Reading 0x90000... Ok! Reading 0x91000... Ok! Reading 0x92000... Ok! Reading 0x93000... Ok! Reading 0x94000... Ok! Reading 0x95000... Ok! Reading 0x96000... Ok! Reading 0x97000... Ok! Reading 0x98000... Ok! Reading 0x99000... Ok! Reading 0x9A000... Ok! Reading 0x9B000... Ok! Reading 0x9C000... Ok! Reading 0x9D000... Ok! Reading 0x9E000... Ok! Reading 0x9F000... Ok! Reading 0xA0000... Ok! Reading 0xA1000... Ok! Reading 0xA2000... Ok! Reading 0xA3000... Ok! Reading 0xA4000... Ok! Reading 0xA5000... Ok! Reading 0xA6000... Ok! Reading 0xA7000... Ok! Reading 0xA8000... Ok! Reading 0xA9000... Ok! Reading 0xAA000... Ok! Reading 0xAB000... Ok! Reading 0xAC000... Ok! Reading 0xAD000... Ok! Reading 0xAE000... Ok! Reading 0xAF000... Ok! Reading 0xB0000... Ok! Reading 0xB1000... Ok! Reading 0xB2000... Ok! Reading 0xB3000... Ok! Reading 0xB4000... Ok! Reading 0xB5000... Ok! Reading 0xB6000... Ok! Reading 0xB7000... Ok! Reading 0xB8000... Ok! Reading 0xB9000... Ok! Reading 0xBA000... Ok! Reading 0xBB000... Ok! Reading 0xBC000... Ok! Reading 0xBD000... Ok! Reading 0xBE000... Ok! Reading 0xBF000... Ok! Reading 0xC0000... Ok! Reading 0xC1000... Ok! Reading 0xC2000... Ok! Reading 0xC3000... Ok! Reading 0xC4000... Ok! Reading 0xC5000... Ok! Reading 0xC6000... Ok! Reading 0xC7000... Ok! Reading 0xC8000... Ok! Reading 0xC9000... Ok! Reading 0xCA000... Ok! Reading 0xCB000... Ok! Reading 0xCC000... Ok! Reading 0xCD000... Ok! Reading 0xCE000... Ok! Reading 0xCF000... Ok! Reading 0xD0000... Ok! Reading 0xD1000... Ok! Reading 0xD2000... Ok! Reading 0xD3000... Ok! Reading 0xD4000... Ok! Reading 0xD5000... Ok! Reading 0xD6000... Ok! Reading 0xD7000... Ok! Reading 0xD8000... Ok! Reading 0xD9000... Ok! Reading 0xDA000... Ok! Reading 0xDB000... Ok! Reading 0xDC000... Ok! Reading 0xDD000... Ok! Reading 0xDE000... Ok! Reading 0xDF000... Ok! Reading 0xE0000... Ok! Reading 0xE1000... Ok! Reading 0xE2000... Ok! Reading 0xE3000... Ok! Reading 0xE4000... Ok! Reading 0xE5000... Ok! Reading 0xE6000... Ok! Reading 0xE7000... Ok! Reading 0xE8000... Ok! Reading 0xE9000... Ok! Reading 0xEA000... Ok! Reading 0xEB000... Ok! Reading 0xEC000... Ok! Reading 0xED000... Ok! Reading 0xEE000... Ok! Reading 0xEF000... Ok! Reading 0xF0000... Ok! Reading 0xF1000... Ok! Reading 0xF2000... Ok! Reading 0xF3000... Ok! Reading 0xF4000... Ok! Reading 0xF5000... Ok! Reading 0xF6000... Ok! Reading 0xF7000... Ok! Reading 0xF8000... Ok! Reading 0xF9000... Ok! Reading 0xFA000... Ok! Reading 0xFB000... Ok! Reading 0xFC000... Ok! Reading 0xFD000... Ok! Reading 0xFE000... Ok! Reading 0xFF000... Ok! Reading 0x100000... Ok! Reading 0x101000... Ok! Reading 0x102000... Ok! Reading 0x103000... Ok! Reading 0x104000... Ok! Reading 0x105000... Ok! Reading 0x106000... Ok! Reading 0x107000... Ok! Reading 0x108000... Ok! Reading 0x109000... Ok! Reading 0x10A000... Ok! Reading 0x10B000... Ok! Reading 0x10C000... Ok! Reading 0x10D000... Ok! Reading 0x10E000... Ok! Reading 0x10F000... Ok! Reading 0x110000... Ok! Reading 0x111000... Ok! Reading 0x112000... Ok! Reading 0x113000... Ok! Reading 0x114000... Ok! Reading 0x115000... Ok! Reading 0x116000... Ok! Reading 0x117000... Ok! Reading 0x118000... Ok! Reading 0x119000... Ok! Reading 0x11A000... Ok! Reading 0x11B000... Ok! Reading 0x11C000... Ok! Reading 0x11D000... Ok! Reading 0x11E000... Ok! Reading 0x11F000... Ok! Reading 0x120000... Ok! Reading 0x121000... Ok! Reading 0x122000... Ok! Reading 0x123000... Ok! Reading 0x124000... Ok! Reading 0x125000... Ok! Reading 0x126000... Ok! Reading 0x127000... Ok! Reading 0x128000... Ok! Reading 0x129000... Ok! Reading 0x12A000... Ok! Reading 0x12B000... Ok! Reading 0x12C000... Ok! Reading 0x12D000... Ok! Reading 0x12E000... Ok! Reading 0x12F000... Ok! Reading 0x130000... Ok! Reading 0x131000... Ok! Reading 0x132000... Ok! Reading 0x133000... Ok! Reading 0x134000... Ok! Reading 0x135000... Ok! Reading 0x136000... Ok! Reading 0x137000... Ok! Reading 0x138000... Ok! Reading 0x139000... Ok! Reading 0x13A000... Ok! Reading 0x13B000... Ok! Reading 0x13C000... Ok! Reading 0x13D000... Ok! Reading 0x13E000... Ok! Reading 0x13F000... Ok! Reading 0x140000... Ok! Reading 0x141000... Ok! Reading 0x142000... Ok! Reading 0x143000... Ok! Reading 0x144000... Ok! Reading 0x145000... Ok! Reading 0x146000... Ok! Reading 0x147000... Ok! Reading 0x148000... Ok! Reading 0x149000... Ok! Reading 0x14A000... Ok! Reading 0x14B000... Ok! Reading 0x14C000... Ok! Reading 0x14D000... Ok! Reading 0x14E000... Ok! Reading 0x14F000... Ok! Reading 0x150000... Ok! Reading 0x151000... Ok! Reading 0x152000... Ok! Reading 0x153000... Ok! Reading 0x154000... Ok! Reading 0x155000... Ok! Reading 0x156000... Ok! Reading 0x157000... Ok! Reading 0x158000... Ok! Reading 0x159000... Ok! Reading 0x15A000... Ok! Reading 0x15B000... Ok! Reading 0x15C000... Ok! Reading 0x15D000... Ok! Reading 0x15E000... Ok! Reading 0x15F000... Ok! Reading 0x160000... Ok! Reading 0x161000... Ok! Reading 0x162000... Ok! Reading 0x163000... Ok! Reading 0x164000... Ok! Reading 0x165000... Ok! Reading 0x166000... Ok! Reading 0x167000... Ok! Reading 0x168000... Ok! Reading 0x169000... Ok! Reading 0x16A000... Ok! Reading 0x16B000... Ok! Reading 0x16C000... Ok! Reading 0x16D000... Ok! Reading 0x16E000... Ok! Reading 0x16F000... Ok! Reading 0x170000... Ok! Reading 0x171000... Ok! Reading 0x172000... Ok! Reading 0x173000... Ok! Reading 0x174000... Ok! Reading 0x175000... Ok! Reading 0x176000... Ok! Reading 0x177000... Ok! Reading 0x178000... Ok! Reading 0x179000... Ok! Reading 0x17A000... Ok! Reading 0x17B000... Ok! Reading 0x17C000... Ok! Reading 0x17D000... Ok! Reading 0x17E000... Ok! Reading 0x17F000... Ok! Reading 0x180000... Ok! Reading 0x181000... Ok! Reading 0x182000... Ok! Reading 0x183000... Ok! Reading 0x184000... Ok! Reading 0x185000... Ok! Reading 0x186000... Ok! Reading 0x187000... Ok! Reading 0x188000... Ok! Reading 0x189000... Ok! Reading 0x18A000... Ok! Reading 0x18B000... Ok! Reading 0x18C000... Ok! Reading 0x18D000... Ok! Reading 0x18E000... Ok! Reading 0x18F000... Ok! Reading 0x190000... Ok! Reading 0x191000... Ok! Reading 0x192000... Ok! Reading 0x193000... Ok! Reading 0x194000... Ok! Reading 0x195000... Ok! Reading 0x196000... Ok! Reading 0x197000... Ok! Reading 0x198000... Ok! Reading 0x199000... Ok! Reading 0x19A000... Ok! Reading 0x19B000... Ok! Reading 0x19C000... Ok! Reading 0x19D000... Ok! Reading 0x19E000... Ok! Reading 0x19F000... Ok! Reading 0x1A0000... Ok! Reading 0x1A1000... Ok! Reading 0x1A2000... Ok! Reading 0x1A3000... Ok! Reading 0x1A4000... Ok! Reading 0x1A5000... Ok! Reading 0x1A6000... Ok! Reading 0x1A7000... Ok! Reading 0x1A8000... Ok! Reading 0x1A9000... Ok! Reading 0x1AA000... Ok! Reading 0x1AB000... Ok! Reading 0x1AC000... Ok! Reading 0x1AD000... Ok! Reading 0x1AE000... Ok! Reading 0x1AF000... Ok! Reading 0x1B0000... Ok! Reading 0x1B1000... Ok! Reading 0x1B2000... Ok! Reading 0x1B3000... Ok! Reading 0x1B4000... Ok! Reading 0x1B5000... Ok! Reading 0x1B6000... Ok! Reading 0x1B7000... Ok! Reading 0x1B8000... Ok! Reading 0x1B9000... Ok! Reading 0x1BA000... Ok! Reading 0x1BB000... Ok! Reading 0x1BC000... Ok! Reading 0x1BD000... Ok! Reading 0x1BE000... Ok! Reading 0x1BF000... Ok! Reading 0x1C0000... Ok! Reading 0x1C1000... Ok! Reading 0x1C2000... Ok! Reading 0x1C3000... Ok! Reading 0x1C4000... Ok! Reading 0x1C5000... Ok! Reading 0x1C6000... Ok! Reading 0x1C7000... Ok! Reading 0x1C8000... Ok! Reading 0x1C9000... Ok! Reading 0x1CA000... Ok! Reading 0x1CB000... Ok! Reading 0x1CC000... Ok! Reading 0x1CD000... Ok! Reading 0x1CE000... Ok! Reading 0x1CF000... Ok! Reading 0x1D0000... Ok! Reading 0x1D1000... Ok! Reading 0x1D2000... Ok! Reading 0x1D3000... Ok! Reading 0x1D4000... Ok! Reading 0x1D5000... Ok! Reading 0x1D6000... Ok! Reading 0x1D7000... Ok! Reading 0x1D8000... Ok! Reading 0x1D9000... Ok! Reading 0x1DA000... Ok! Reading 0x1DB000... Ok! Reading 0x1DC000... Ok! Reading 0x1DD000... Ok! Reading 0x1DE000... Ok! Reading 0x1DF000... Ok! Reading 0x1E0000... Ok! Reading 0x1E1000... Ok! Reading 0x1E2000... Ok! Reading 0x1E3000... Ok! Reading 0x1E4000... Ok! Reading 0x1E5000... Ok! Reading 0x1E6000... Ok! Reading 0x1E7000... Ok! Reading 0x1E8000... Ok! Reading 0x1E9000... Ok! Reading 0x1EA000... Ok! Reading 0x1EB000... Ok! Reading 0x1EC000... Ok! Reading 0x1ED000... Ok! Reading 0x1EE000... Ok! Reading 0x1EF000... Ok! Reading 0x1F0000... Ok! Reading 0x1F1000... Ok! Reading 0x1F2000... Ok! Reading 0x1F3000... Ok! Reading 0x1F4000... Ok! Reading 0x1F5000... Ok! Reading 0x1F6000... Ok! Reading 0x1F7000... Ok! Reading 0x1F8000... Ok! Reading 0x1F9000... Ok! Reading 0x1FA000... Ok! Reading 0x1FB000... Ok! Reading 0x1FC000... Ok! Reading 0x1FD000... Ok! Reading 0x1FE000... Ok! Reading 0x1FF000... Ok! 
    Basic read operation finished, but now it's time to verify...
    Starting CRC check for 512 sectors, starting at offset 00
    CRC matches 0x8696BBFD!
    All read!
    Loaded total 0x200000 bytes 
    Wrote 2097152 to readResult_BK7231T_QIO_2023-11-12-10-14-19.bin
    Backup 2MB created, now will attempt to extract OBK config.
    It's not an OBK config, header is bad
    OBK config not found.
    Backup 2MB created, now will attempt to extract Tuya config.
    Tuya config extractor - magic is at 2023424 
    Saving debug Tuya decryption data to lastRawDecryptedStrings.bin
    Malformed key? 
    Tuya keys extraction has found 58 keys
    Tuya config extracted and shown.
    MAC seems to be 1C:90:FF:.......


    {
    	"Jsonver":"1.1.0",
    	"brightmin":"5",
    	"gmwb":"75",
    	"title20":"1",
    	"gmwg":"70",
    	"wfcfg":"spcl",
    	"colormin":"10",
    	"pmemory":"1",
    	"gmkb":"60",
    	"cmod":"rgbcw",
    	"nightled":"0",
    	"cwtype":"0",
    	"rst)#Bgw_wsmbr":"100",
    	"colormax":"100",
    	"c_pin":"8",
    	"notdisturb":"0",
    	"module":"wb3s",
    	"b_pin":"26",
    	"b_lv":"1",
    	"cwmaxp":"100",
    	"dmod":"0",
    	"brightmax":"100",
    	"wfct":"10",
    	"pwmhz":"1000",
    	"r_pin":"9",
    	"defbright":"100",
    	"rstnum":"3",
    	"rstcor":"c",
    	"r_lv":"1",
    	"deftemp":"70",
    	"c_lv":"1",
    	"mutex":"1",
    	"irfunc":"0",
    	"g_lv":"1",
    	"wt":"20",
    	"onofftime":"800",
    	"prodagain":"0",
    	"remdmode":"0",
    	"cagt":"20",
    	"g_pin":"24",
    	"w_lv":"1",
    	"colorpfun":"1",
    	"gmwr":"100",
    	"rgbt":"10",
    	"colormaxp":"100",
    	"gmkg":"60",
    	"onoffmode":"0",
    	"w_pin":"6",
    	"rsttemp":"70",
    	"category":"0505",
    	"gmkr":"80",
    	"defcolor":"c",
    	"crc":"107",
    	"ap_passwd":"null",
    	"country_code":"null",
    	"bt_mac":"null",
    	"bt_hid":"null",
    	"prod_test":"false "
    }


    Device configuration, as extracted from Tuya: 
    - LED Cool (Channel 4) on P8
    - LED Blue (Channel 3) on P26
    - TODOpwmhz
    - LED Red (Channel 1) on P9
    - LED Green (Channel 2) on P24
    - LED Warm (Channel 5) on P6
    Device seems to be using wb3s module, which is using BK7231T.
    And the Tuya section starts, as usual, at 2023424


    how does that look to you?
    and what do I do now :) meaning ... what firmware I select?
    currently I have it all configured as:
    Screen of BK7231 Easy UART Flasher showing Reading success! message.
  • #51 20856618
    p.kaczmarek2
    Moderator Smart Home
    Good job, now please post here 2MB backup (so futher devices maybe can be flashed via OTA) and flash OBK. The default one. Flasher takes care of everything.
    Helpful post? Buy me a coffee.
  • #52 20856635
    specialdude
    Level 9  
    I tried to again to READ only backup, and got this:
    
    Starting read!
    Now is: Monday, December 11, 2023 10:36:13 AM.
    Flasher mode: BK7231N
    Going to open port: COM4.
    Serial port open!
    Getting bus... (now, please do reboot by CEN or by power off/on)
    Getting bus failed, will try again - 0/100!
    Getting bus success!
    Going to set baud rate setting (921600)!
    Will try to read device flash MID (for unprotect N):
    failed with serial.BytesToRead 0 (expected 15)
    The beginning of buffer in UART contains  data.
    Failed to read device MID!
    Going to start reading at offset 0x00...
    Reading 0x00... CheckRespond_FlashRead4K: ERROR
    Failed! There was no result to save.


    something to worry about?

    Added after 2 [minutes]:

    SORRY NEVERMIND, BEING DUMB HERE FOR A MOMENT ... I SOMEHOW ACCIDENTALLY SELECTED DIFFERENT CHIP TYPE IN THE FLASHER APP.
    LEAVING THIS IN THE THREAD AS FOR SOMEONE ELSE TO LEARN FROM MY MISTAKE :) GOSH!
  • #55 20856646
    specialdude
    Level 9  
    and just need to ask again... I should be using the one that has QIO in the name?
    Screenshot showing the selection of UART port, chip type, and firmware in a program interface.

    and follow up question maybe... what is the _UA_ one for?
  • #56 20856759
    p.kaczmarek2
    Moderator Smart Home
    Those are internal names, it should not matter for you, the Easy Gui Flasher takes care about everything. If you want to know it for yourself, UA is UART/UserArea flash, only OBK, and QIO is full with bootloader. It does not matter in your case, flash the one with largest version number (latest firmware).

    But really, in your case, both will work, you have just a simple PWM lamp, OBK supports that kind of devices for a year or so arleady.

    Have you seen our automatic GPIO configuration tutorial? Do you know what to do after flashing the firmware?
    Helpful post? Buy me a coffee.
  • #57 20856768
    specialdude
    Level 9  
    OK I did the ... _UA_1.17.335.
    Write success!

    "Have you seen our automatic GPIO configuration tutorial? Do you know what to do after flashing the firmware?"
    No clue :) where is the link :P

    PS: so close but so far :P haha but I am getting excited.

    Added after 1 [hours] 7 [minutes]:

    I did a search on a site here and found:

    Step 2: Once OBK is flashed, do the OBK config read
    Click "Read only OBK config" to read the OBK config from device flash to the application memory via UART:

    Do the CEN reset or power cycle if required. If you want to have automatic restart while using BK7231GUIFlashTool flash tool, please enable flag 31 ("enable UART command line")

    Step 3: Modify OBK config
    Click "Change OBK settings" and change settings to suit your needs:

    Here you can enter your WiFi data, IP settings, MQTT settings, flags, and even a short startup command. More options will be added soon.

    Step 4: Save back OBK config
    Now, press "Write only OBK config" and do power cycle if needed (if UART command line is enabled, it will not be needed):


    I did that, meaning I entered my WIFI SSID and pass and wrote the OBK config.
    I suspect, that was it and I should be able to see how it shows on a network and if home assistant can discover.... please confirm...


    Going to open port: COM4.
    Serial port open!
    Getting bus... (now, please do reboot by CEN or by power off/on)
    Getting bus failed, will try again - 0/100!
    Getting bus success!
    Going to set baud rate setting (921600)!
    Preparing to write data file to chip - resetting bus and baud...
    Getting bus... (now, please do reboot by CEN or by power off/on)
    Getting bus success!
    Going to set baud rate setting (921600)!
    Going to do erase, start 1970176, sec count 1!
    Erasing sector 1970176... ok! 
    All selected sectors erased!
    
    Now will also write OBK config...
    Long name from CFG: OpenBK7231T_FFxxxxxxx
    Short name from CFG: obkFFxxxxxxx
    Web Root from CFG: https://openbekeniot.github.io/webapp/
    Writing config sector 0x1E1000...Writing file data to chip successs.
    
  • #58 20856949
    p.kaczmarek2
    Moderator Smart Home
    You can as well just configure it through access point, like Tasmota....

    So, you've entered your SSID and Pass already?

    Then you need to reboot it again (power off/on) and check if it appears on your router's DHCP clients list.

    You should get OBK's new IP there. Try visiting this IP in your browser.
    Helpful post? Buy me a coffee.
  • #59 20857007
    specialdude
    Level 9  
    holly molly! I did not expect for this to be already reachable meaning ... connected/powered on thru my UART to USB device.
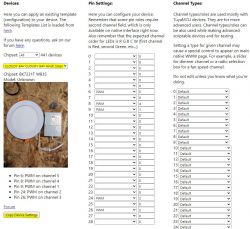
    I got to the page and went to this here:
    Configuration of CLOUDY BAY 6-inch Smart device with pin and channel settings.

    I found the pin configuration in a list and applied.... just need to save ... but after Saving .... I guess I can disconnect it all and connect to original power source and configure it more if needed?
  • #60 20857015
    p.kaczmarek2
    Moderator Smart Home
    Hm yes, I think it should be safe to disconnect flashing wires now.

    Just remember, never connect mains before disconnecting flashing wires.
    Helpful post? Buy me a coffee.

Topic summary

The discussion revolves around the teardown and flashing of Cloudy Bay 6-inch Smart Wifi LED Recessed Lights (model WB3S). Users share their experiences with disassembling the lights, flashing the firmware using a DORHEA ESP8266 Code Burner, and integrating the lights with Home Assistant. Key challenges include ensuring proper connections for flashing, troubleshooting WiFi connectivity issues, and the importance of using the correct baud rate and wiring configurations. Users also discuss the significance of avoiding 802.11b support in WiFi settings to enhance connectivity. Successful flashing and configuration steps are shared, along with recommendations for tools and techniques to simplify the process.
Summary generated by the language model.
ADVERTISEMENT