 .
.
Here I will show step by step how an advanced energy meter/thermostat with LCD screen can be converted so that it can operate 100% locally, without the cloud and without the manufacturer's servers. I'll be converting the S1TW-FR discussed earlier here, to do this I'll upload OpenBeken to the WiFi module and configure it accordingly to communicate with the TuyaMCU on board.
It is worth reading the previous section here, where I showed pairing this meter with Tuya:
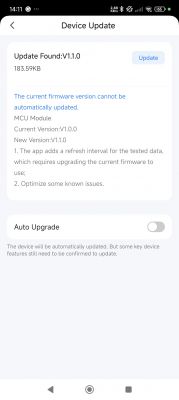
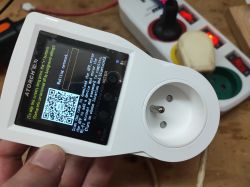
Energy meter/thermostat with LCD - S1TW-FR - first impression, Tuya application .
By the way, let me once again remind you of the collective topic about TuyaMCU:
TuyaMCU flashing, installation and configuration guide - configure dpID for Home Assistant .
This topic assumes the reader's knowledge of TuyaMCU.
Plan of action
To free this device from the cloud the following steps must be taken:
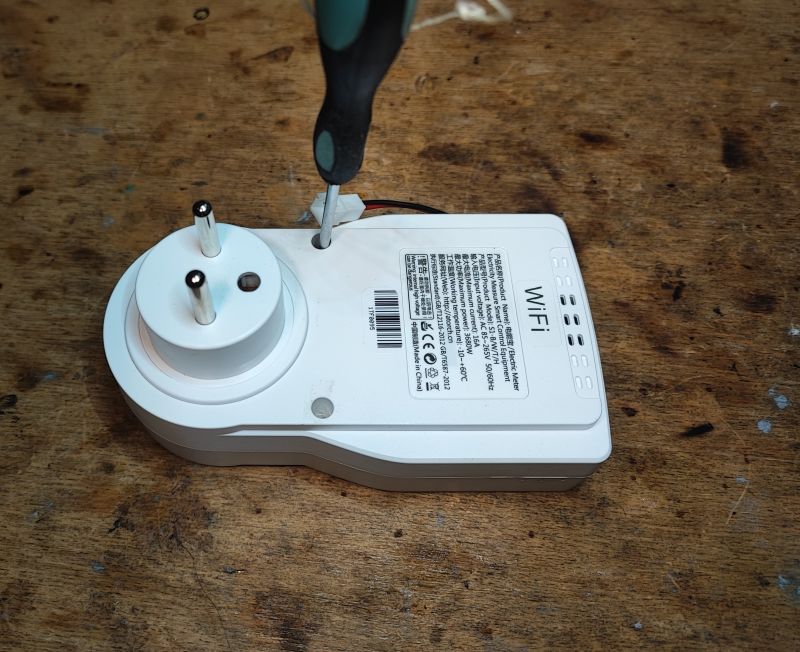
1. disassemble the device
2. intercept the UART communication (TuyaMCU) separately for each operation in the mobile app. This step can be replaced when using Tuya API .
3. soldering the WiFi module to upload OpenBeken via UART
4. configuration of OpenBeken based on the acquired TuyaMCU dpID data
I will try to describe each of the steps here.
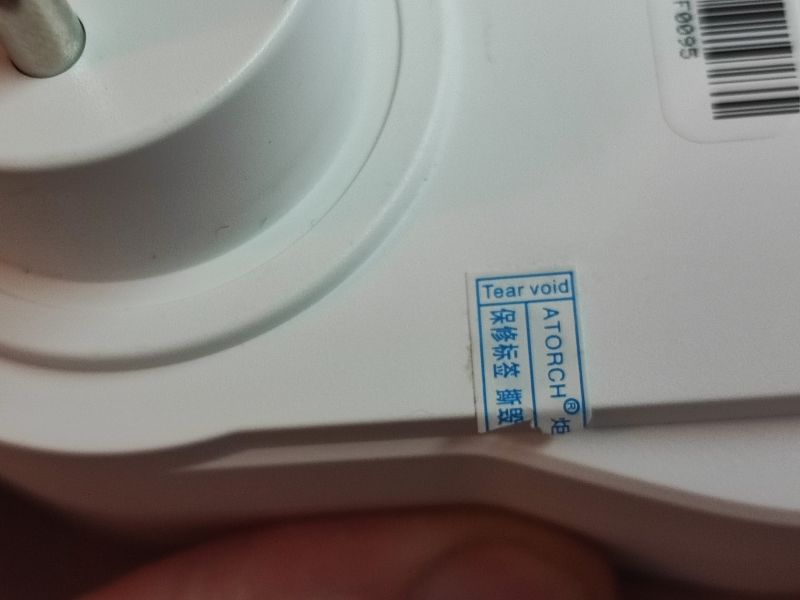
Interior of S1TW-FR .
We remove the seal and look inside:
 .
.
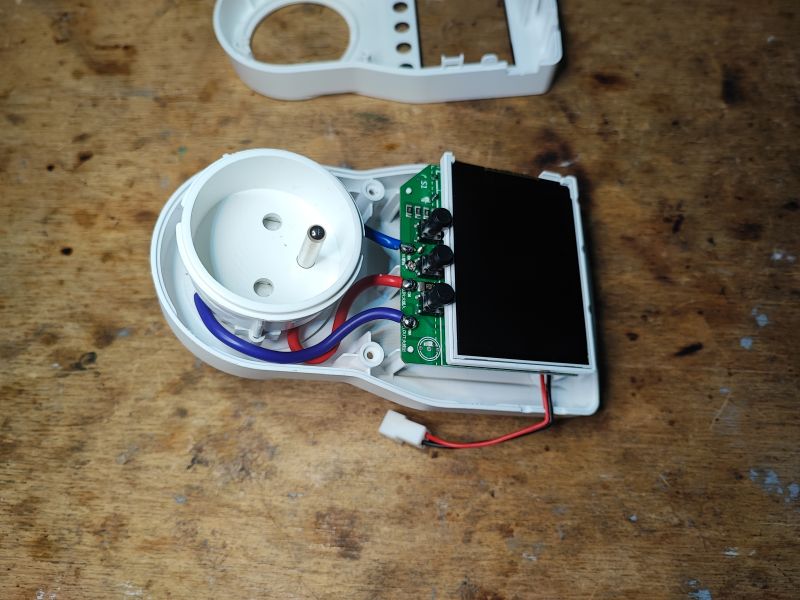
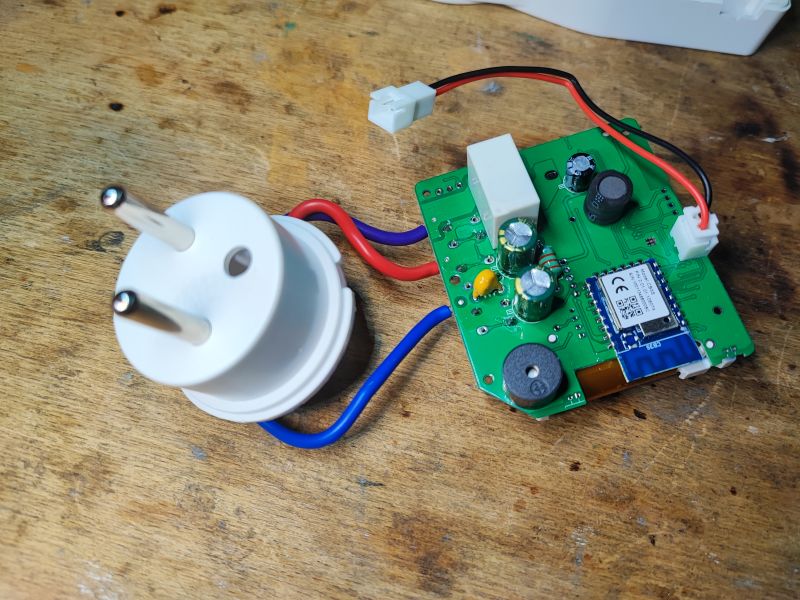
We remove the housing:
 .
.
 .
.
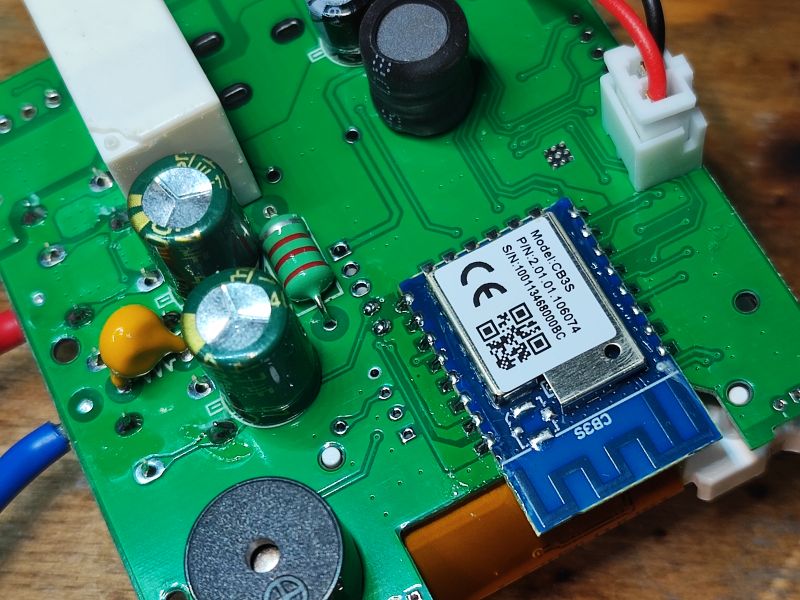
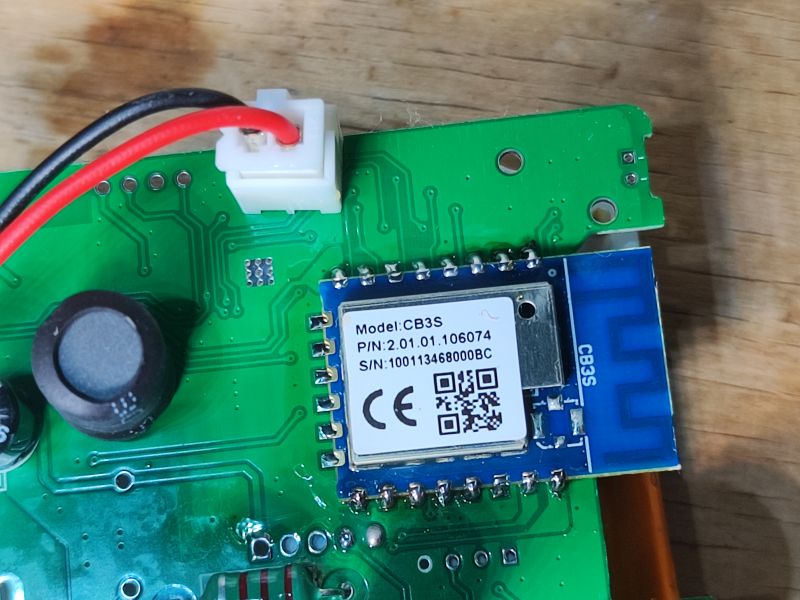
The whole is based on the CB3S module (BK7231N); you can upload OpenBeken :
 .
.
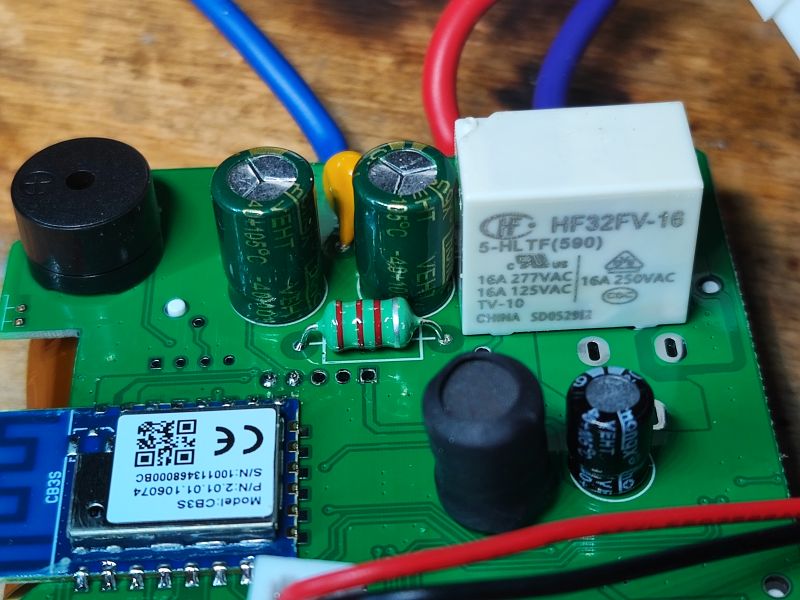
But first, let's take a look at the interior. The relay is an HF32FV-16 for 16A 250VAC:
 .
.
There is more going on on the other side of the board. That's because this device is based on the TuyaMCU, so here we have a WiFi module separately, and an additional microcontroller separately:
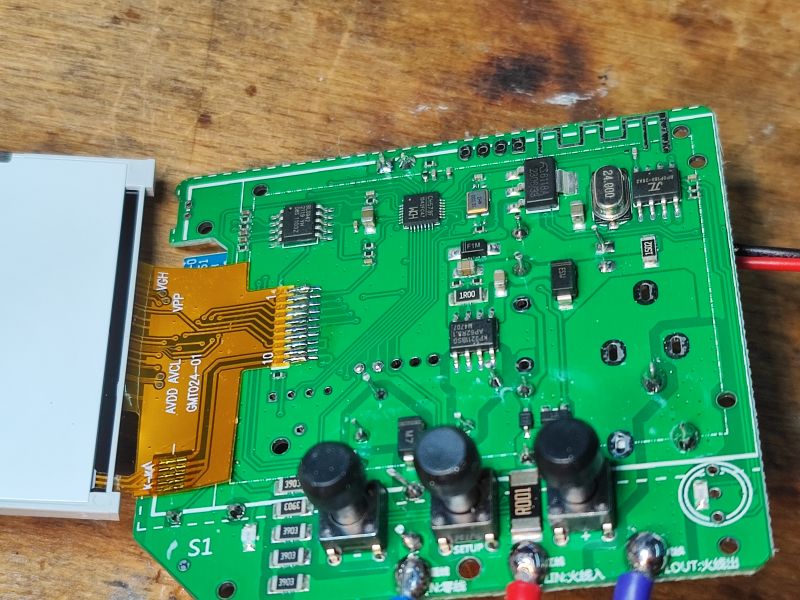 .
.
BL0942 here is responsible for measuring current, voltage and power, it reports the results to the microcontroller right next to it:
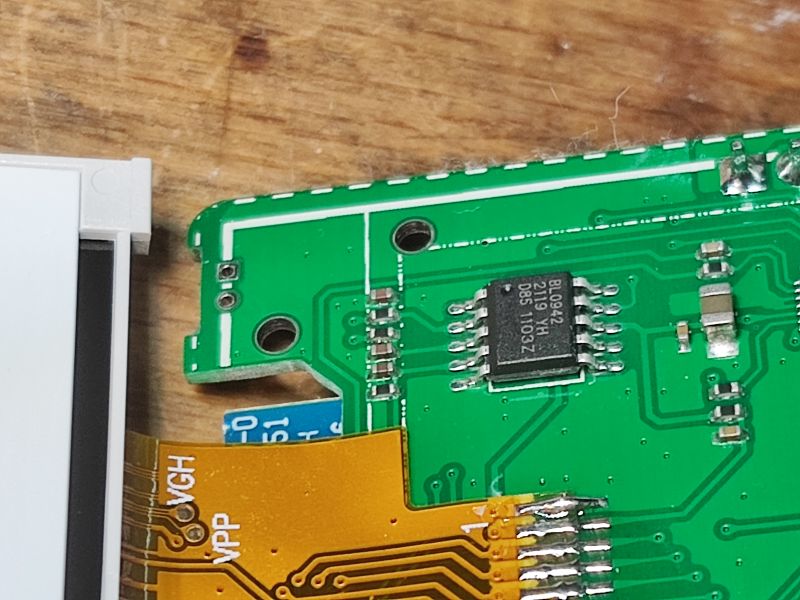 .
.
This MCU next to it is the CH573F (32-bit RISC-V):
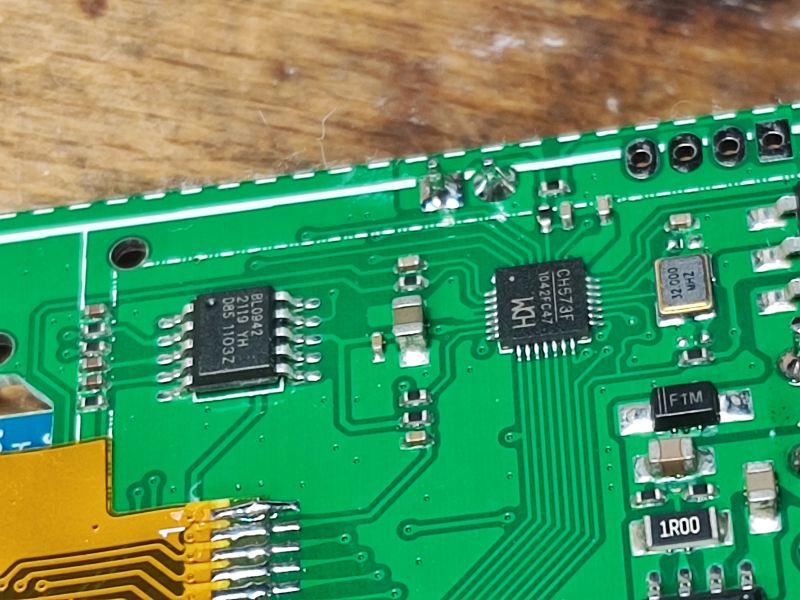 .
.
It is powered by a 3.3V LDO:
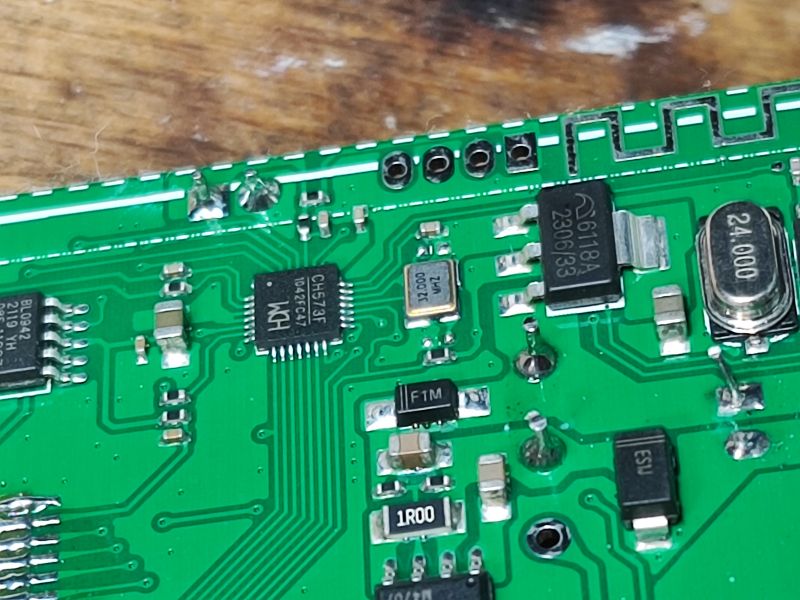 .
.
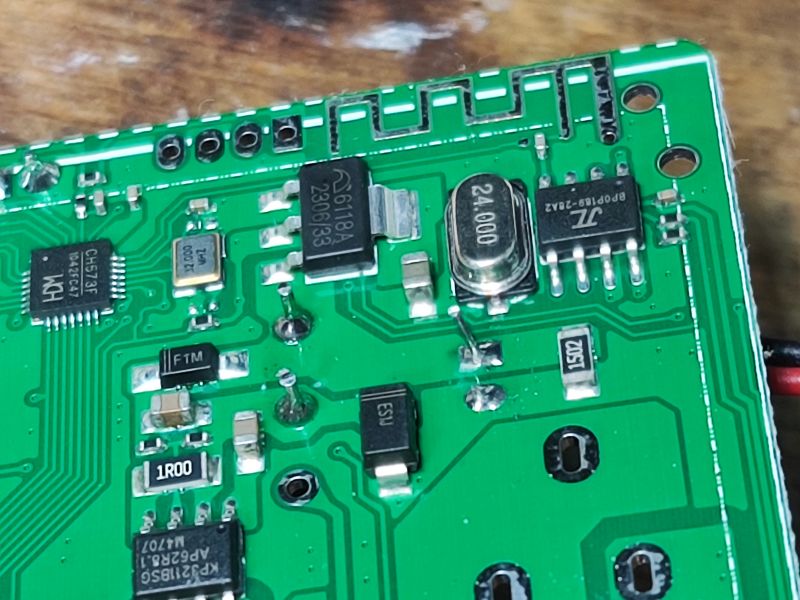
I was curious about the BP0P189 chip, I think it's something from Bluetooth. I wonder why, since the BK7231 already has BT. I associate the JL logo with other similar chips.
 .
.
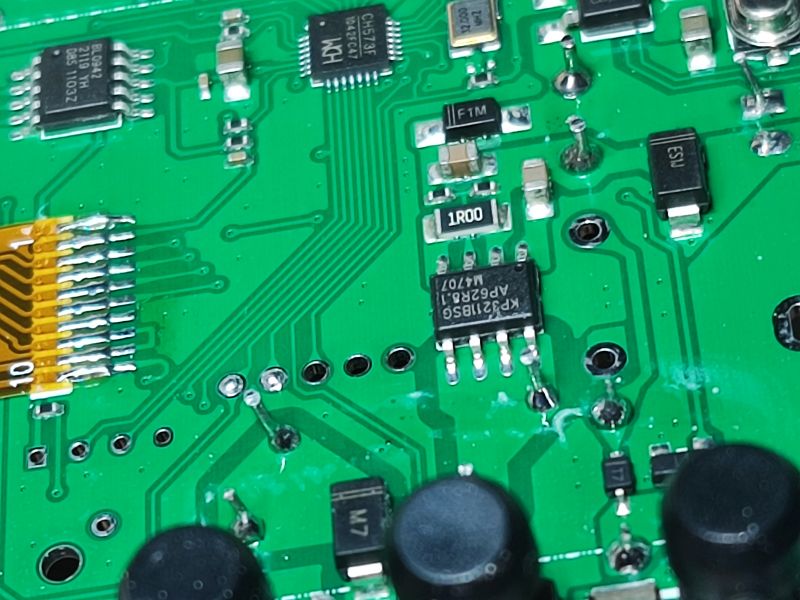
There remains the question of power supply. These are provided by the KP3211BSG.
 .
.
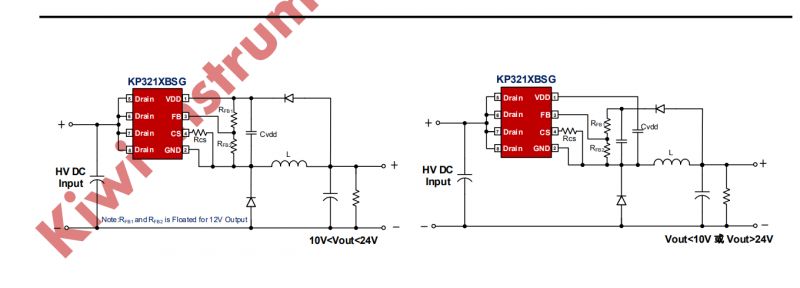
This is a non-isolated inverter controller, there is no flyback power supply:
 .
.
Communication intercept .
In accordance with the topic on TuyaMCU I have intercepted communication on the RX/TX lines:
TuyaMCU protocol - communication between microcontroller and WiFi module .
I used my analyser to capture:
. TuyaMCU analyser - UART packet decoder for Tuya devices - dpID detector .
Due to the lack of galvanic isolation with this device, the capture should preferably be done via suitable opto-isolators on both UART lines!!! .
Alternatively, a completely disconnected (battery-powered) device can be used.
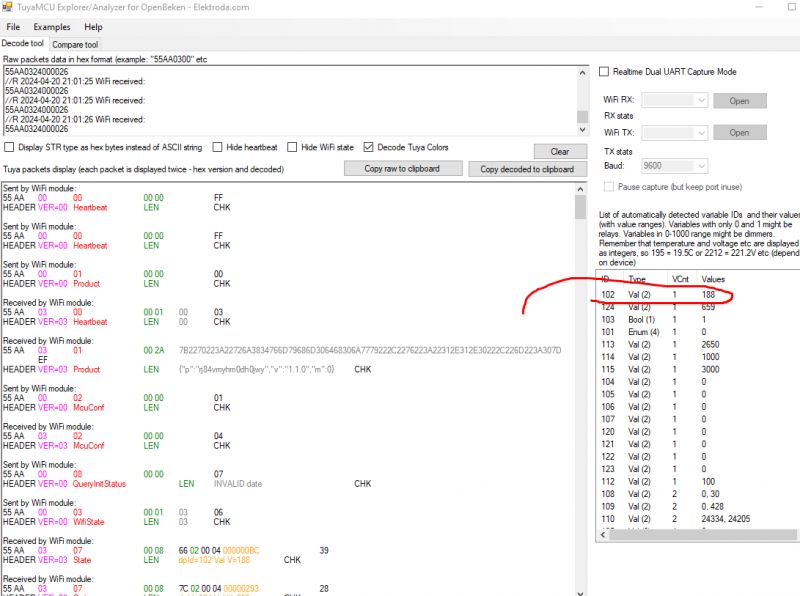
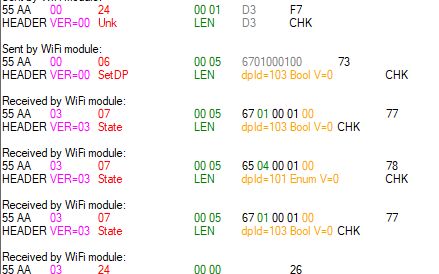
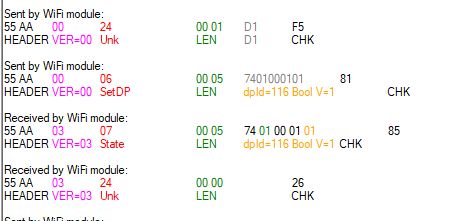
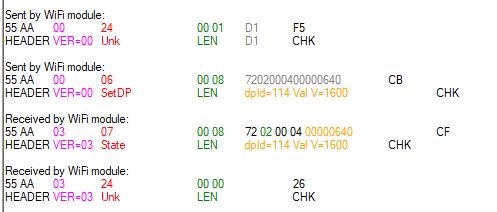
Here is the captured data, each operation separately. The data presented can be pasted into my analyser to see the dpID of the variables and their types and values. Feel free to experiment on your own. The data so defined will then be used to write the OBK configuration for this device.
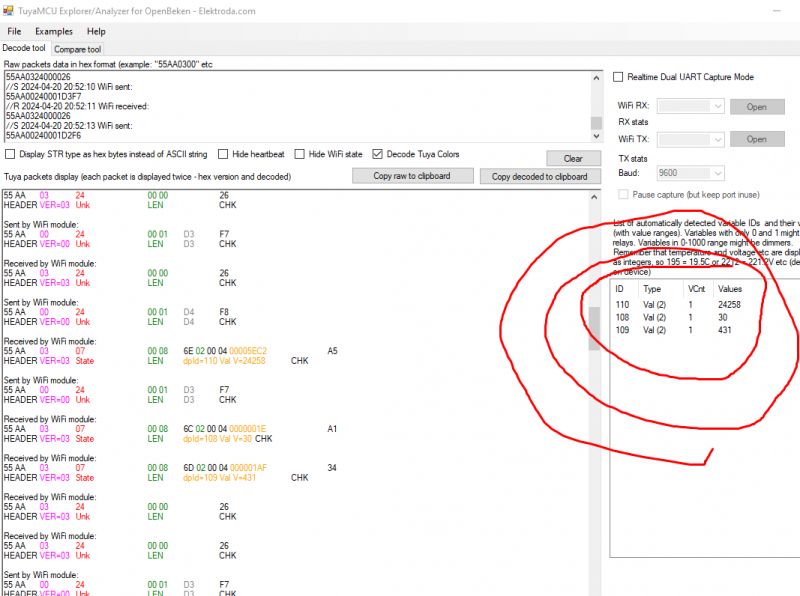
Fragment with measurements (dpID 110, 108, 109): .
//S WiFi sent:
55AA00240001D3F7
//S WiFi sent:
55AA00240001D3F7
//S WiFi sent:
55AA00240001D2F6
//S WiFi sent:
55AA00240001D4F8
//S WiFi sent:
55AA00000000FF
//R WiFi received:
55AA030000010104
//S WiFi sent:
55AA00240001D4F8
//S WiFi sent:
55AA00240001D3F7
//S WiFi sent:
55AA00240001D4F8
//S WiFi sent:
55AA00240001D4F8
//S WiFi sent:
55AA00240001D3F7
//S WiFi sent:
55AA00240001D2F6
//S WiFi sent:
55AA00240001D2F6
//S WiFi sent:
55AA00240001D1F5
//S WiFi sent:
55AA00240001D3F7
//S WiFi sent:
55AA00240001D4F8
//R WiFi received:
55AA030700086E02000400005EC2A5
//S WiFi sent:
55AA00240001D3F7
//R WiFi received:
55AA030700086C0200040000001EA1
//R WiFi received:
55AA030700086D020004000001AF34
//S WiFi sent:
55AA00240001D3F7
//S WiFi sent:
55AA00240001D6FA
//S WiFi sent:
55AA00240001D6FA
//S WiFi sent:
55AA00240001D5F9
//S WiFi sent:
55AA00000000FF
//R WiFi received:
55AA030000010104
//S WiFi sent:
55AA00240001D4F8
//S WiFi sent:
55AA00240001D3F7
//S WiFi sent:
55AA00240001D3F7
//S WiFi sent:
55AA00240001D4F8
//S WiFi sent:
55AA00240001D4F8
//S WiFi sent:
55AA00240001D3F7
//S WiFi sent:
55AA00240001D3F7
//S WiFi sent:
55AA00240001D3F7
//S WiFi sent:
55AA00240001D3F7
//S WiFi sent:
55AA00240001D3F7
//S WiFi sent:
55AA00240001D3F7
//S WiFi sent:
55AA00240001D2F6
//S WiFi sent:
55AA00240001CFF3
//S WiFi sent:
55AA00240001D3F7
//S WiFi sent:
55AA00240001D2F6
//R WiFi received:
55AA030000010104
//S WiFi sent:
55AA00000000FF
//S WiFi sent:
55AA00240001D3F7
//S WiFi sent:
55AA00240001D4F8
//S WiFi sent:
55AA00240001D4F8
//S WiFi sent:
55AA00240001D4F8
//S WiFi sent:
55AA00240001D4F8
//S WiFi sent:
55AA00240001D4F8
//S WiFi sent:
55AA00240001D4F8
//S WiFi sent:
55AA00240001D4F8
//S WiFi sent:
55AA00240001D3F7
//S WiFi sent:
55AA00240001D4F8
//S WiFi sent:
55AA00240001D3F7
//S WiFi sent:
55AA00240001D2F6
 .
.
Temperature 18.8°C and other measurements :
//S WiFi sent:
55AA00000000FF
//S WiFi sent:
55AA00000000FF
//S WiFi sent:
55AA0001000000
//R WiFi received:
55AA030000010003
//R WiFi received:
55AA0301002A7B2270223A22726A3834766D79686D306468306A7779222C2276223A22312E312E30222C226D223A307DEF
//S WiFi sent:
55AA0002000001
//R WiFi received:
55AA0302000004
//S WiFi sent:
55AA0008000007
//S WiFi sent:
55AA000300010306
//R WiFi received:
55AA0307000866020004000000BC39
//R WiFi received:
55AA030700087C0200040000029328
//R WiFi received:
55AA03070005670100010178
//R WiFi received:
55AA03070005650400010078
//R WiFi received:
55AA030700087102000400000A5AEC
//R WiFi received:
55AA0307000872020004000003E874
//R WiFi received:
55AA030700087302000400000BB84D
//R WiFi received:
55AA0307000868020004000000007F
//R WiFi received:
55AA03070008690200040000000080
//S WiFi sent:
55AA00200002010022
//R WiFi received:
55AA030700086A0200040000000081
//R WiFi received:
55AA030700086B0200040000000082
//R WiFi received:
55AA0307000878020004000000008F
//S WiFi sent:
55AA000300010407
//R WiFi received:
55AA03070008790200040000000090
//R WiFi received:
55AA030700087A0200040000000091
//R WiFi received:
55AA030700087B0200040000000092
//R WiFi received:
55AA030700087002000400000064EB
//S WiFi sent:
55AA00000000FF
//R WiFi received:
55AA030700086C0200040000000083
//R WiFi received:
55AA030700086D0200040000000084
//R WiFi received:
55AA030700086E02000400005F0EF2
//R WiFi received:
55AA030700087D0200040000000094
//R WiFi received:
55AA030700086F0200040000000086
//R WiFi received:
55AA03070005740100010084
//R WiFi received:
55AA03070005760400010089
//R WiFi received:
55AA0307000875020004000000008C
//R WiFi received:
55AA0307000877020004000000008E
//R WiFi received:
55AA030700057E010001008E
//R WiFi received:
55AA03070008800200040000003CD3
//R WiFi received:
55AA0303000005
//R WiFi received:
55AA0320002806772E74656D700A772E68756D696469747906772E706D323505772E61716908772E646174652E3145
//R WiFi received:
55AA0303000005
//R WiFi received:
55AA030000010104
//S WiFi sent:
55AA002100400108772E74656D702E300004000000040C772E68756D69646974792E3000040000005108772E706D32352E3000040000000707772E6171692E3000040000001DBB
//R WiFi received:
55AA0021000020
//R WiFi received:
55AA031C00001E
//S WiFi sent:
55AA001C00080118041415000B067A
//R WiFi received:
//S WiFi sent:
55AA00240001D3F7
//R WiFi received:
//S WiFi sent:
55AA00240001D4F8
//R WiFi received:
//S WiFi sent:
55AA00240001D3F7
//R WiFi received:
//S WiFi sent:
55AA00240001D1F5
//R WiFi received:
//S WiFi sent:
55AA00240001D4F8
//R WiFi received:
//S WiFi sent:
55AA00240001D2F6
//S WiFi sent:
55AA00000000FF
//R WiFi received:
55AA030000010104
//S WiFi sent:
55AA00240001D3F7
//S WiFi sent:
55AA00240001D2F6
//S WiFi sent:
55AA00240001D2F6
//S WiFi sent:
55AA00240001D2F6
//S WiFi sent:
55AA00240001D2F6
//S WiFi sent:
55AA00240001D4F8
//S WiFi sent:
55AA00240001D3F7
//S WiFi sent:
55AA00240001D2F6
//S WiFi sent:
55AA00240001D6FA
//S WiFi sent:
55AA00240001D5F9
//S WiFi sent:
55AA00240001D5F9
//S WiFi sent:
55AA00240001D5F9
//S WiFi sent:
55AA00240001D5F9
//S WiFi sent:
55AA00240001D1F5
//S WiFi sent:
55AA00240001CEF2
//R WiFi received:
55AA030000010104
//S WiFi sent:
55AA00000000FF
//S WiFi sent:
55AA00240001D1F5
//S WiFi sent:
55AA00240001D1F5
//S WiFi sent:
55AA00240001D2F6
//S WiFi sent:
55AA00240001D3F7
//S WiFi sent:
55AA00240001D3F7
//S WiFi sent:
55AA00240001D4F8
//S WiFi sent:
55AA00240001D2F6
//S WiFi sent:
55AA00240001D2F6
//S WiFi sent:
55AA00240001D2F6
//S WiFi sent:
55AA00240001D2F6
//S WiFi sent:
55AA00240001D3F7
//S WiFi sent:
55AA00240001D4F8
//S WiFi sent:
55AA00240001D4F8
//S WiFi sent:
55AA00240001D1F5
//S WiFi sent:
55AA00240001D1F5
//R WiFi received:
55AA030000010104
//S WiFi sent:
55AA00000000FF
//S WiFi sent:
55AA00240001D3F7
//S WiFi sent:
55AA00240001D5F9
//S WiFi sent:
55AA00240001D3F7
//S WiFi sent:
55AA00240001D1F5
//S WiFi sent:
55AA00240001D4F8
//S WiFi sent:
55AA00240001D3F7
//S WiFi sent:
55AA00240001D3F7
//S WiFi sent:
55AA00240001D3F7
//S WiFi sent:
55AA00240001D4F8
//S WiFi sent:
55AA00240001D4F8
//R WiFi received:
55AA0307000866020004000000BC39
//S WiFi sent:
55AA00240001D4F8
//R WiFi received:
55AA030700087C0200040000029328
//S WiFi sent:
55AA00240001D4F8
//R WiFi received:
55AA030700086E02000400005E8D70
//S WiFi sent:
55AA00240001D3F7
//R WiFi received:
55AA030700086C0200040000001EA1
//S WiFi sent:
55AA00240001D6FA
//R WiFi received:
55AA030700086D020004000001AC31
//S WiFi sent:
55AA00240001D2F6
//S WiFi sent:
55AA00000000FF
//S WiFi sent:
55AA00240001D4F8
//S WiFi sent:
55AA00240001D3F7
//S WiFi sent:
55AA00240001D5F9
//S WiFi sent:
55AA00240001D3F7
//R WiFi received:
55AA030000010104
//S WiFi sent:
55AA00240001D4F8
//S WiFi sent:
55AA00240001D4F8
//S WiFi sent:
55AA00240001D0F4
//S WiFi sent:
55AA00240001D3F7
 .
.
Turning on and off several times:
//S WiFi sent:
55AA00240001D3F7
//S WiFi sent:
55AA00060005670100010073
//R WiFi received:
55AA03070005670100010077
//R WiFi received:
55AA03070005650400010078
//R WiFi received:
55AA03070005670100010077
//S WiFi sent:
55AA00240001D3F7
//S WiFi sent:
55AA00060005670100010174
//R WiFi received:
55AA03070005670100010178
//R WiFi received:
55AA03070005650400010078
//R WiFi received:
55AA03070005670100010178
//R WiFi received:
//S WiFi sent:
55AA00240001D3F7
//S WiFi sent:
55AA00060005670100010073
//R WiFi received:
55AA03070005670100010077
//R WiFi received:
55AA03070005650400010078
//R WiFi received:
55AA03070005670100010077
//S WiFi sent:
55AA00240001D2F6
//S WiFi sent:
55AA00060005670100010174
//R WiFi received:
55AA03070005670100010178
//R WiFi received:
55AA03070005650400010078
//R WiFi received:
55AA03070005670100010178
//S WiFi sent:
55AA00240001D3F7
//S WiFi sent:
55AA00240001D4F8
//S WiFi sent:
55AA00240001D6FA
 .
.
Child Lock on and off:
//S WiFi sent:
55AA00240001D1F5
//S WiFi sent:
55AA00060005740100010181
//R WiFi received:
55AA03070005740100010185
//S WiFi sent:
55AA00240001CEF2
//S WiFi sent:
55AA00240001CDF1
//S WiFi sent:
55AA00060005740100010080
//R WiFi received:
55AA03070005740100010084
//S WiFi sent:
55AA00240001CDF1
//S WiFi sent:
55AA00240001D1F5
//S WiFi sent:
55AA00240001D2F6
 .
.
Changed OVP from 265 to 275:
//S WiFi sent:
55AA00240001CFF3
//S WiFi sent:
55AA00240001CBEF
//S WiFi sent:
55AA00240001CCF0
//S WiFi sent:
55AA000600087102000400000ABE4C
//R WiFi received:
55AA030700087102000400000ABE50
//S WiFi sent:
55AA00240001D1F5
//S WiFi sent:
55AA00240001D3F7
//S WiFi sent:
55AA00240001D1F5
//S WiFi sent:
55AA00240001D0F4
//S WiFi sent:
55AA00000000FF
//R WiFi received:
55AA030000010104
//R WiFi received:
//S WiFi sent:
55AA00240001D1F5
 .
.
Changed OCP from 10A to 16A:
//S WiFi sent:
55AA00240001D0F4
//S WiFi sent:
55AA00240001D1F5
//S WiFi sent:
55AA00240001D0F4
//S WiFi sent:
55AA00240001D1F5
//S WiFi sent:
55AA00240001D1F5
//S WiFi sent:
55AA000600087202000400000640CB
//R WiFi received:
55AA030700087202000400000640CF
//S WiFi sent:
55AA00240001D1F5
//S WiFi sent:
55AA00240001D3F7
//S WiFi sent:
55AA00240001D2F6
//S WiFi sent:
55AA00240001D2F6
//S WiFi sent:
55AA00240001D3F7
//S WiFi sent:
55AA00000000FF
//R WiFi received:
55AA030000010104
//S WiFi sent:
55AA00240001D4F8
 .
.
Changing the temperature calibration from 0 to 4.5°C:
//S WiFi sent:
55AA00000000FF
//S WiFi sent:
55AA00000000FF
//S WiFi sent:
55AA0001000000
//R WiFi received:
55AA030000010003
//R WiFi received:
55AA0301002A7B2270223A22726A3834766D79686D306468306A7779222C2276223A22312E312E30222C226D223A307DEF
//S WiFi sent:
55AA0002000001
//R WiFi received:
55AA0302000004
//S WiFi sent:
55AA0008000007
//S WiFi sent:
55AA000300010306
//R WiFi received:
55AA0307000866020004000000BD3A
//R WiFi received:
55AA030700087C020004000002952A
//R WiFi received:
55AA03070005670100010077
//R WiFi received:
55AA0307000565040001027A
//R WiFi received:
55AA030700087102000400000ABE50
//R WiFi received:
55AA030700087202000400000640CF
//R WiFi received:
55AA030700087302000400000BB84D
//R WiFi received:
55AA0307000868020004000000007F
//S WiFi sent:
55AA00200002010022
//R WiFi received:
55AA03070008690200040000000080
//R WiFi received:
55AA030700086A0200040000000081
//R WiFi received:
55AA030700086B0200040000000082
//R WiFi received:
55AA0307000878020004000000008F
//S WiFi sent:
55AA000300010407
//R WiFi received:
55AA03070008790200040000000090
//R WiFi received:
55AA030700087A0200040000000091
//R WiFi received:
55AA030700087B0200040000000092
//S WiFi sent:
55AA00000000FF
//R WiFi received:
55AA030700087002000400000064EB
//R WiFi received:
55AA030700086C0200040000000083
//R WiFi received:
55AA030700086D0200040000000084
//R WiFi received:
55AA030700086E02000400005F2004
//R WiFi received:
55AA030700087D0200040000000094
//R WiFi received:
55AA030700086F0200040000000086
//R WiFi received:
55AA03070005740100010084
//R WiFi received:
55AA03070005760400010089
//R WiFi received:
55AA0307000875020004000000008C
//R WiFi received:
55AA0307000877020004000000008E
//R WiFi received:
55AA030700057E010001008E
//R WiFi received:
55AA03070008800200040000003CD3
//R WiFi received:
55AA0303000005
//R WiFi received:
55AA0320002806772E74656D700A772E68756D696469747906772E706D323505772E61716908772E646174652E3145
//R WiFi received:
55AA0303000005
//R WiFi received:
55AA030000010104
//S WiFi sent:
55AA002100400108772E74656D702E300004000000040C772E68756D69646974792E3000040000005008772E706D32352E3000040000000707772E6171692E3000040000001DBA
//R WiFi received:
55AA0021000020
//R WiFi received:
55AA031C00001E
//S WiFi sent:
55AA001C000801180414151B02068C
//S WiFi sent:
55AA00240001D4F8
//S WiFi sent:
55AA00240001D3F7
//S WiFi sent:
55AA00240001D3F7
//S WiFi sent:
55AA00240001D3F7
//S WiFi sent:
55AA00240001D4F8
//S WiFi sent:
55AA00240001D4F8
//R WiFi received:
55AA030000010104
//S WiFi sent:
55AA00000000FF
//S WiFi sent:
55AA00240001D4F8
//S WiFi sent:
55AA00240001D3F7
//S WiFi sent:
55AA00240001D3F7
//S WiFi sent:
55AA00240001D3F7
//S WiFi sent:
55AA00240001D4F8
//S WiFi sent:
55AA00240001D4F8
//S WiFi sent:
55AA00240001D4F8
//S WiFi sent:
55AA00240001D4F8
//S WiFi sent:
55AA00240001D4F8
//S WiFi sent:
55AA00240001D4F8
//S WiFi sent:
55AA00240001D3F7
//S WiFi sent:
55AA00240001D4F8
//S WiFi sent:
55AA00240001D4F8
//S WiFi sent:
55AA00240001D4F8
//S WiFi sent:
55AA00240001D4F8
//R WiFi received:
55AA030000010104
//S WiFi sent:
55AA00000000FF
//S WiFi sent:
55AA00240001D4F8
//S WiFi sent:
55AA00240001D4F8
//S WiFi sent:
55AA00240001D4F8
//R WiFi received:
//S WiFi sent:
55AA00240001D4F8
//R WiFi received:
//S WiFi sent:
55AA00240001D4F8
//R WiFi received:
//S WiFi sent:
55AA00240001D4F8
//R WiFi received:
//S WiFi sent:
55AA00240001D5F9
//R WiFi received:
//S WiFi sent:
55AA00240001D5F9
//R WiFi received:
//S WiFi sent:
55AA00240001D3F7
//R WiFi received:
//S WiFi sent:
55AA00240001D5F9
//R WiFi received:
//S WiFi sent:
55AA00240001D4F8
//R WiFi received:
//S WiFi sent:
55AA00240001D5F9
//R WiFi received:
//S WiFi sent:
55AA00240001D5F9
//R WiFi received:
//S WiFi sent:
55AA00240001D4F8
//R WiFi received:
//S WiFi sent:
55AA00240001D5F9
//R WiFi received:
55AA030000010104
//S WiFi sent:
55AA00000000FF
//S WiFi sent:
55AA00240001D4F8
//S WiFi sent:
55AA00240001D4F8
//S WiFi sent:
55AA00240001D4F8
//S WiFi sent:
55AA00240001D4F8
//S WiFi sent:
55AA00240001D4F8
//S WiFi sent:
55AA00240001D6FA
//S WiFi sent:
55AA00240001D3F7
//R WiFi received:
//S WiFi sent:
55AA00240001D5F9
//R WiFi received:
//S WiFi sent:
55AA00240001D3F7
//R WiFi received:
//S WiFi sent:
55AA00240001D4F8
//R WiFi received:
55AA0307000866020004000000BD3A
//S WiFi sent:
55AA00240001D3F7
//R WiFi received:
55AA030700087C020004000002952A
//S WiFi sent:
55AA00240001D3F7
//R WiFi received:
55AA030700086E02000400005F5B3F
//S WiFi sent:
55AA00240001D3F7
//R WiFi received:
//S WiFi sent:
55AA00240001D4F8
//R WiFi received:
//S WiFi sent:
55AA00240001D3F7
//R WiFi received:
//S WiFi sent:
55AA00000000FF
//R WiFi received:
//S WiFi sent:
55AA00240001D3F7
//R WiFi received:
//S WiFi sent:
55AA00240001D4F8
//R WiFi received:
55AA030000010104
//S WiFi sent:
55AA00240001D3F7
//R WiFi received:
//S WiFi sent:
55AA00240001D4F8
//R WiFi received:
//S WiFi sent:
55AA00240001D4F8
//R WiFi received:
//S WiFi sent:
55AA00240001D3F7
//R WiFi received:
//S WiFi sent:
55AA00240001D3F7
//R WiFi received:
//S WiFi sent:
55AA00240001D3F7
//R WiFi received:
//S WiFi sent:
55AA00240001D3F7
//R WiFi received:
//S WiFi sent:
55AA00240001D3F7
//R WiFi received:
//S WiFi sent:
55AA00240001D6FA
//R WiFi received:
//S WiFi sent:
55AA00240001D6FA
//R WiFi received:
//S WiFi sent:
55AA00240001D5F9
//R WiFi received:
//S WiFi sent:
55AA00240001D3F7
//R WiFi received:
//S WiFi sent:
55AA00240001D4F8
//R WiFi received:
//S WiFi sent:
55AA00000000FF
//R WiFi received:
//S WiFi sent:
55AA00240001D4F8
//R WiFi received:
//S WiFi sent:
55AA00240001D4F8
//R WiFi received:
55AA030000010104
//S WiFi sent:
55AA00240001D4F8
//R WiFi received:
//S WiFi sent:
55AA00240001D4F8
//R WiFi received:
//S WiFi sent:
55AA00240001D5F9
//R WiFi received:
//S WiFi sent:
55AA00240001D4F8
//R WiFi received:
//S WiFi sent:
55AA00240001D5F9
//R WiFi received:
//S WiFi sent:
55AA00240001D4F8
//R WiFi received:
//S WiFi sent:
55AA00240001D5F9
//R WiFi received:
//S WiFi sent:
55AA00240001D4F8
//R WiFi received:
//S WiFi sent:
55AA00240001D4F8
//R WiFi received:
//S WiFi sent:
55AA00240001D4F8
//R WiFi received:
//S WiFi sent:
55AA00240001D4F8
//R WiFi received:
//S WiFi sent:
55AA00240001D4F8
//R WiFi received:
//S WiFi sent:
55AA00240001D3F7
//R WiFi received:
//S WiFi sent:
55AA00000000FF
//R WiFi received:
//S WiFi sent:
55AA00240001D6FA
//R WiFi received:
//S WiFi sent:
55AA00240001D5F9
//R WiFi received:
55AA030000010104
//S WiFi sent:
55AA00240001D5F9
//R WiFi received:
//S WiFi sent:
55AA00240001CFF3
//R WiFi received:
//S WiFi sent:
55AA00240001D1F5
//R WiFi received:
//S WiFi sent:
55AA00240001D3F7
//R WiFi received:
//S WiFi sent:
55AA00240001D2F6
//R WiFi received:
//S WiFi sent:
55AA00240001D2F6
//R WiFi received:
//S WiFi sent:
55AA00240001D2F6
//R WiFi received:
//S WiFi sent:
55AA00240001D2F6
//R WiFi received:
//S WiFi sent:
55AA00240001D2F6
//R WiFi received:
//S WiFi sent:
55AA00060008750200040000002DB5
//R WiFi received:
//S WiFi sent:
55AA00240001D1F5
//R WiFi received:
//S WiFi sent:
55AA00240001D7FB
//R WiFi received:
55AA03070008770200040000019120
//S WiFi sent:
55AA00240001D6FA
//R WiFi received:
55AA03070008750200040000002DB9
//S WiFi sent:
55AA00240001D7FB
//R WiFi received:
//S WiFi sent:
55AA00000000FF
//R WiFi received:
//S WiFi sent:
55AA00240001D6FA
//R WiFi received:
//S WiFi sent:
55AA00240001D5F9
//R WiFi received:
//R WiFi received:
55AA030000010104
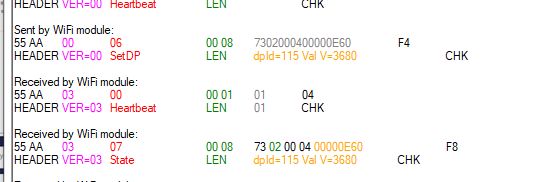
Change OPP from 3000W to 3680W: .
//R WiFi received:
//S WiFi sent:
55AA00240001CCF0
//R WiFi received:
//S WiFi sent:
55AA00240001D2F6
//R WiFi received:
//S WiFi sent:
55AA00240001D2F6
//S WiFi sent:
55AA00000000FF
//S WiFi sent:
55AA000600087302000400000E60F4
//R WiFi received:
55AA030000010104
//R WiFi received:
55AA030700087302000400000E60F8
//R WiFi received:
//S WiFi sent:
55AA00240001D0F4
//R WiFi received:
//S WiFi sent:
55AA00240001D3F7
//R WiFi received:
//S WiFi sent:
55AA00240001D2F6
 .
.
Set cooling start at 21.7°C:
//R WiFi received:
//S WiFi sent:
55AA00240001D1F5
//S WiFi sent:
55AA0006000869020004000000D955
//R WiFi received:
55AA0307000869020004000000D959
//R WiFi received:
55AA0307000565040001027A
//S WiFi sent:
55AA00240001D1F5
//R WiFi received:
55AA03070005670100010178
//R WiFi received:
//R WiFi received:
//S WiFi sent:
55AA00240001CEF2
//R WiFi received:
//S WiFi sent:
55AA00240001CDF1
//R WiFi received:
//S WiFi sent:
55AA00240001D0F4
 .
.
Set cooling stop at 25.6°C:
//S WiFi sent:
55AA000600086B020004000001007F
//R WiFi received:
55AA030700086B0200040000010083
//R WiFi received:
55AA0307000565040001027A
//R WiFi received:
55AA03070005670100010077
//S WiFi sent:
55AA00240001D1F5
//R WiFi received:
//R WiFi received:
//S WiFi sent:
55AA00240001D5F9
//R WiFi received:
//S WiFi sent:
55AA00240001D4F8
//R WiFi received:
//S WiFi sent:
55AA00240001D0F4
//R WiFi received:
//S WiFi sent:
55AA00240001D0F4
 .
.
Changing the cooling mode to heating:
//R WiFi received:
//S WiFi sent:
55AA00240001D2F6
//S WiFi sent:
55AA00000000FF
//R WiFi received:
55AA030000010104
//R WiFi received:
//S WiFi sent:
55AA00240001D3F7
//S WiFi sent:
55AA00060005650400010175
//R WiFi received:
55AA03070005650400010179
//R WiFi received:
55AA03070005650400010179
//R WiFi received:
55AA03070005670100010077
//R WiFi received:
//S WiFi sent:
55AA00240001D4F8
//R WiFi received:
//S WiFi sent:
55AA00240001D5F9
//R WiFi received:
//S WiFi sent:
55AA00240001D4F8

Setting the heating start at 12.3°C:
//R WiFi received:
//S WiFi sent:
55AA00240001D4F8
//S WiFi sent:
55AA00060008680200040000007BF6
//R WiFi received:
55AA03070008680200040000007BFA
//R WiFi received:
55AA03070005650400010179
//R WiFi received:
55AA03070005670100010077
//R WiFi received:
//S WiFi sent:
55AA00240001D5F9
//R WiFi received:
//S WiFi sent:
55AA00240001D6FA
//R WiFi received:
//S WiFi sent:
55AA00240001D6FA
 .
.
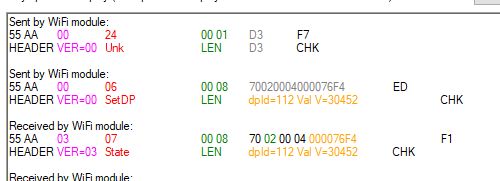
Changed kWh price to 304.52:
//S WiFi sent:
55AA00240001D3F7
//S WiFi sent:
55AA0006000870020004000076F4ED
//R WiFi received:
55AA0307000870020004000076F4F1
//R WiFi received:
//S WiFi sent:
55AA00240001D4F8
//R WiFi received:
//S WiFi sent:
55AA00240001D6FA
//R WiFi received:
//S WiFi sent:
55AA00240001D4F8
 .
.
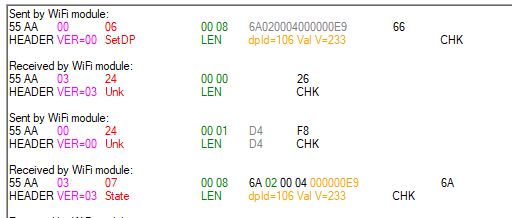
Changing the heating stop to 23.3°C:
//S WiFi sent:
55AA000600086A020004000000E966
//R WiFi received:
//S WiFi sent:
55AA00240001D4F8
//R WiFi received:
55AA030700086A020004000000E96A
//R WiFi received:
55AA03070005650400010179
//R WiFi received:
55AA03070005670100010077
//R WiFi received:
//S WiFi sent:
55AA00240001D4F8
//R WiFi received:
//S WiFi sent:
55AA00240001D6FA
 .
.
With this information now in hand, you can proceed to the next stage.
Changing the firmware .
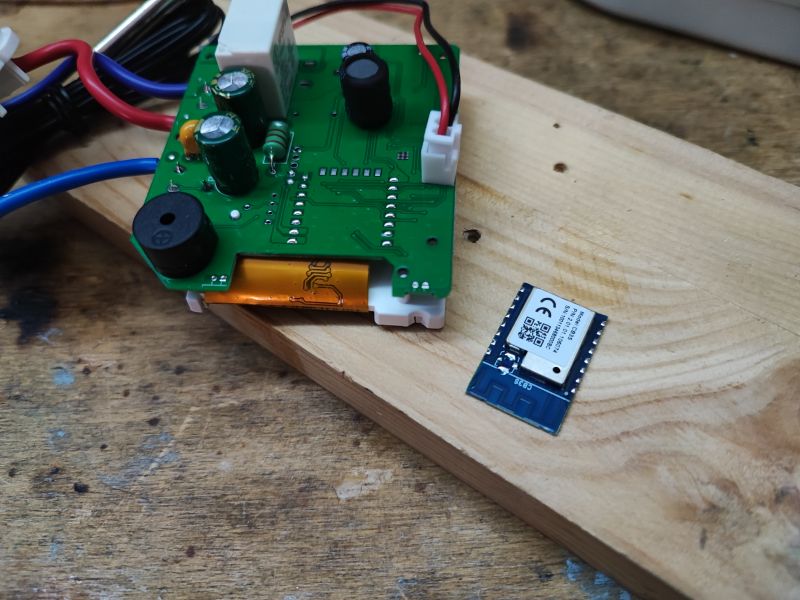
We already have the dpIDs and their roles collected, so we start with just uploading OpenBeken. This requires the WiFi module to be soldered out or at least cutting off its communication with the MCU, as the TuyaMCU uses the same UART port as the programming. I decided to solder out the module myself:
 .
.
Then connect the USB to UART converter, according to my flasher's instructions:
https://github.com/openshwprojects/BK7231GUIFlashTool
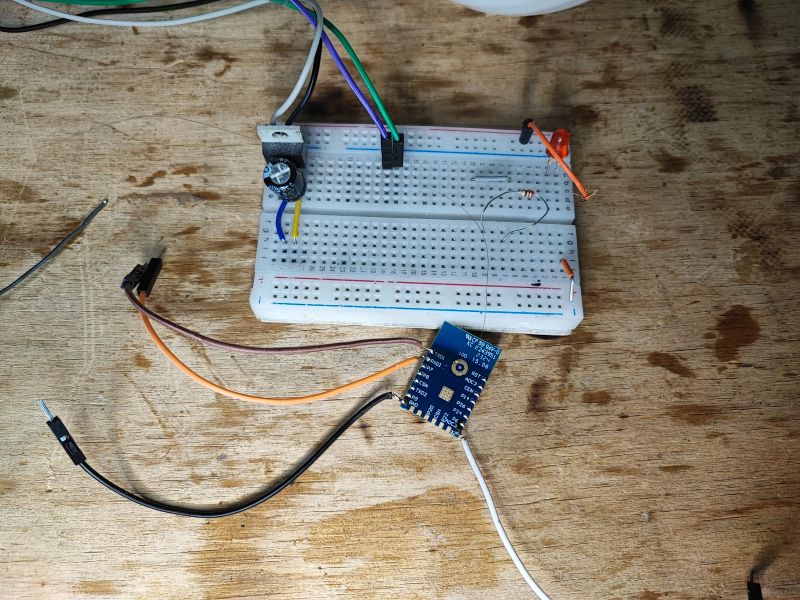
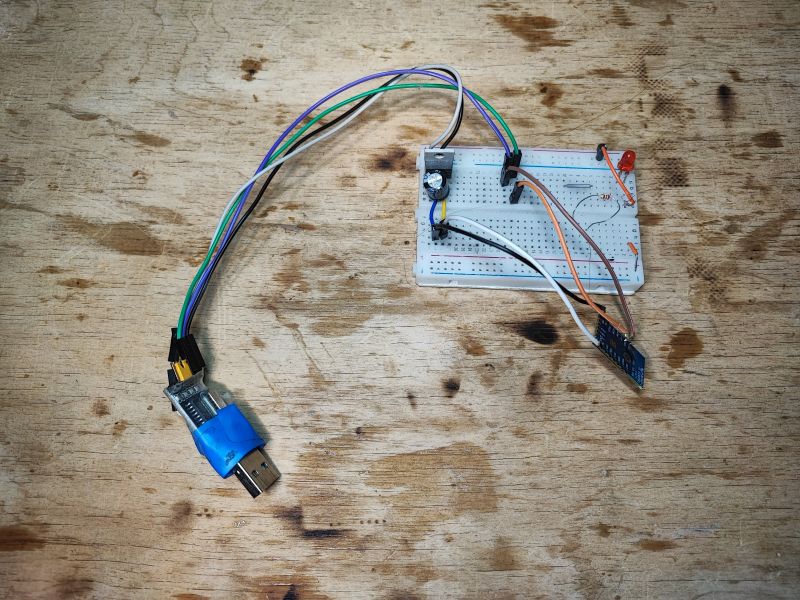 .
.
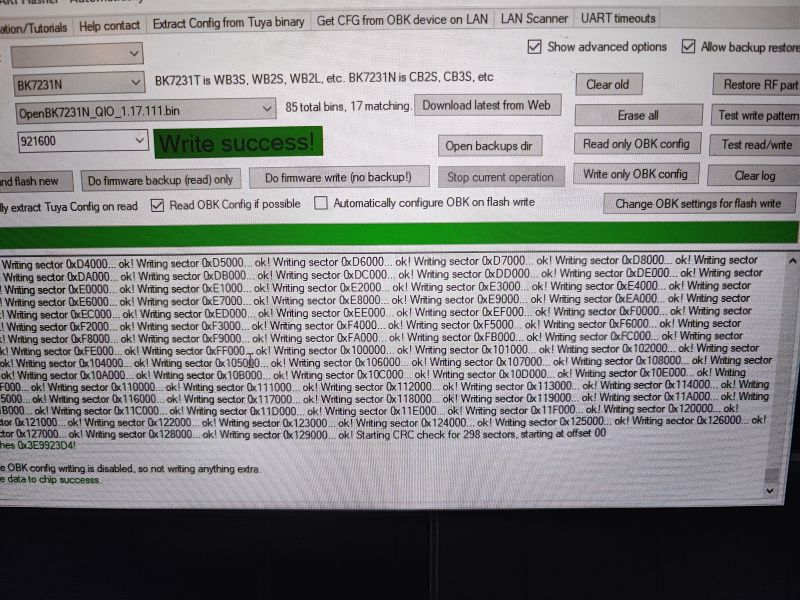 .
.
Here the configuration cannot be automatically loaded.
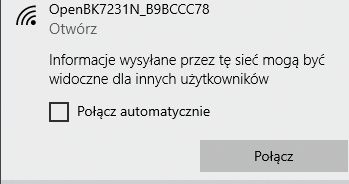
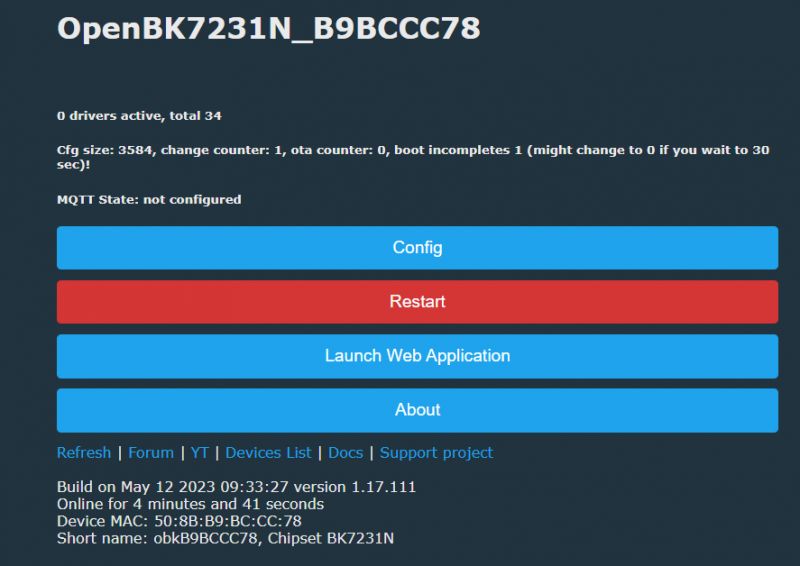
After uploading the OBK we are greeted by the OBK access point and web panel:
 .
.
 .
.
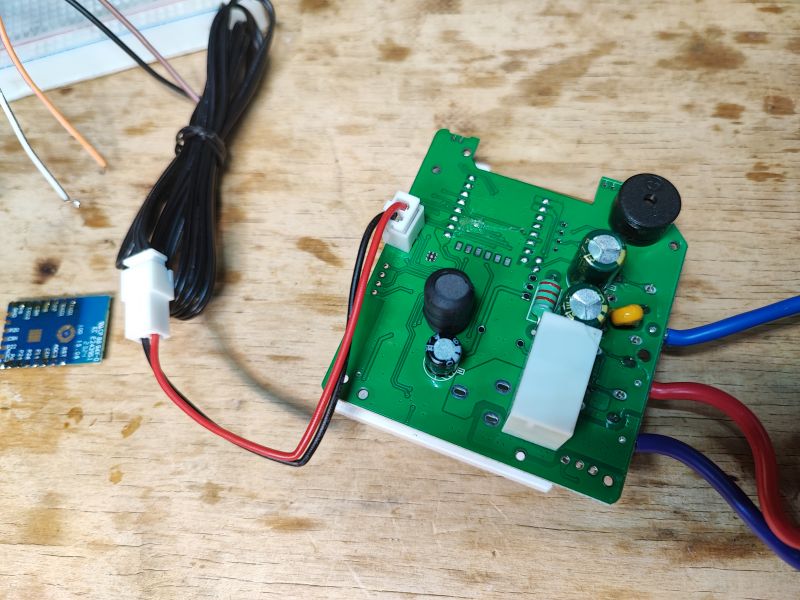
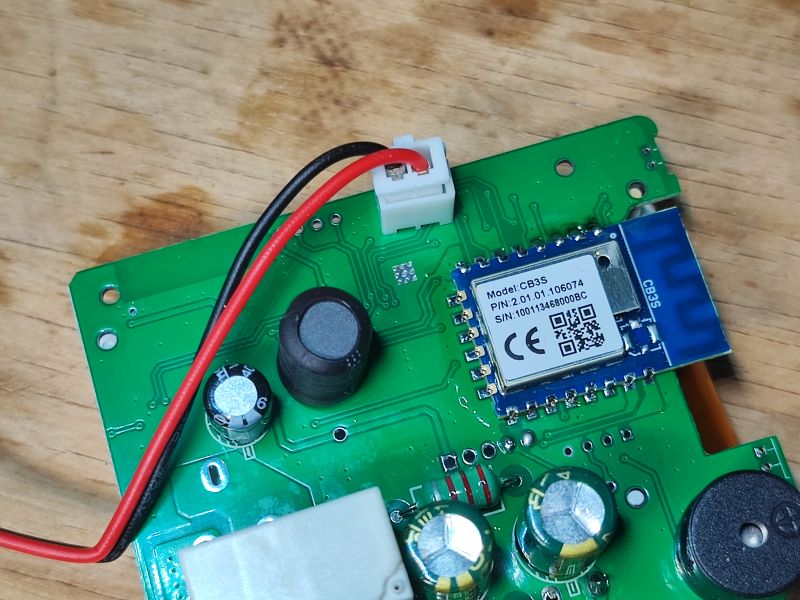
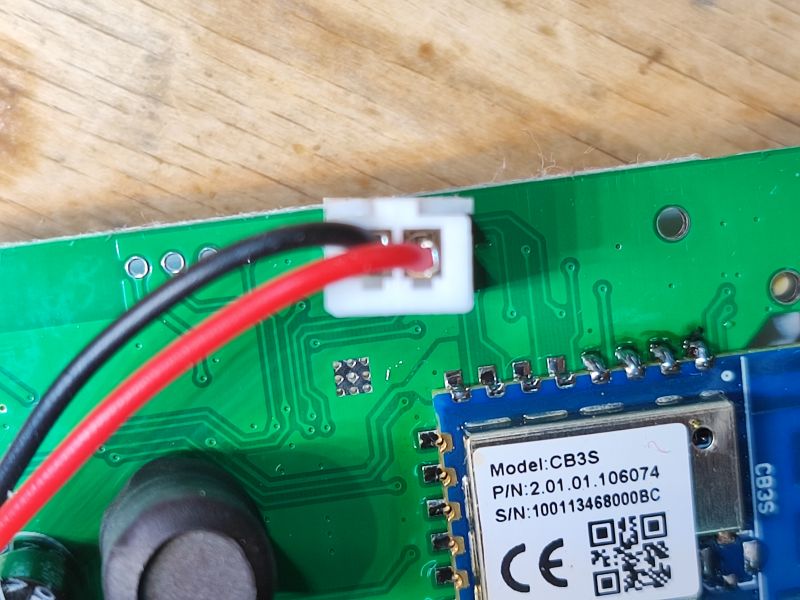
Only then should the module be soldered in place:
 .
.
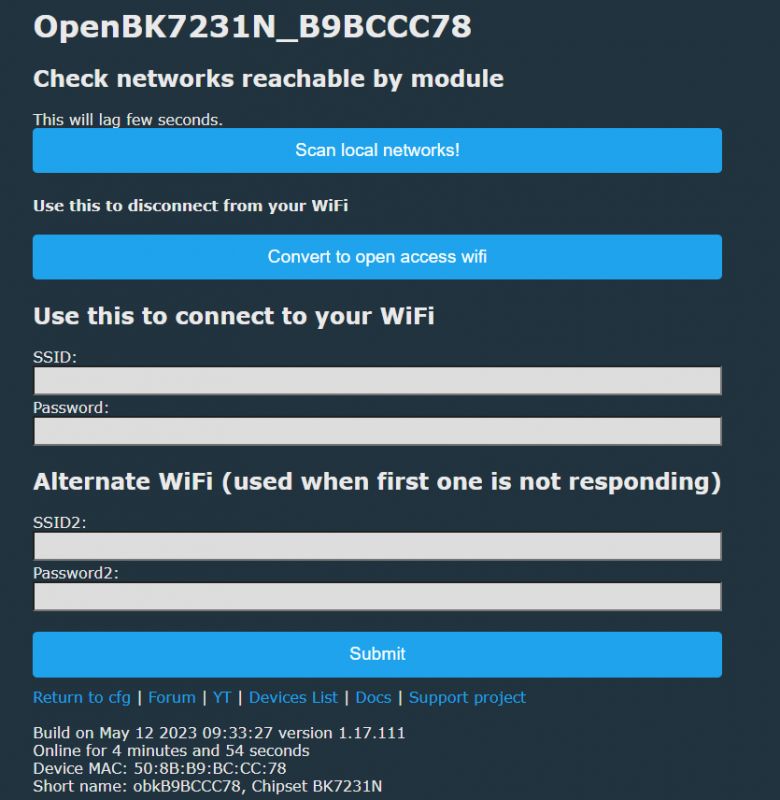
First, of course, we set up our WiFi data:
 .
.
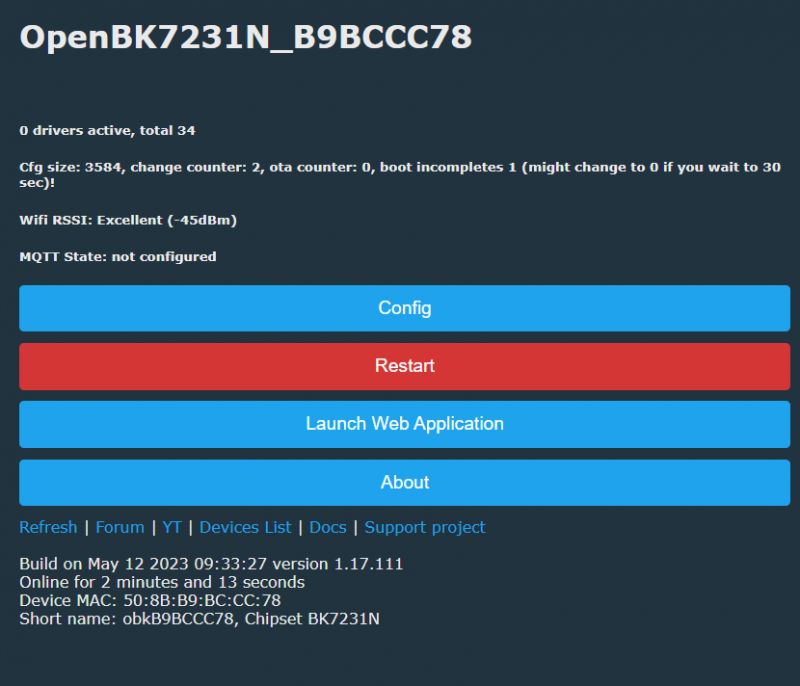
Then only we will configure the TuyaMCU.
 .
.
We configure TuyaMCU in the autoexec.bat file, here is how it is created:
Worthwhile examples are based on:
https://github.com/openshwprojects/OpenBK7231T_App/blob/main/docs/autoexecExamples.md
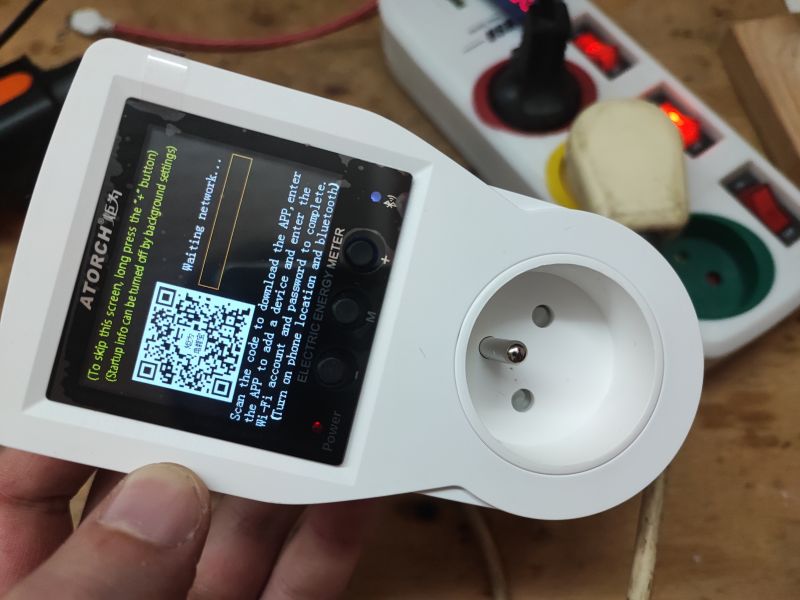
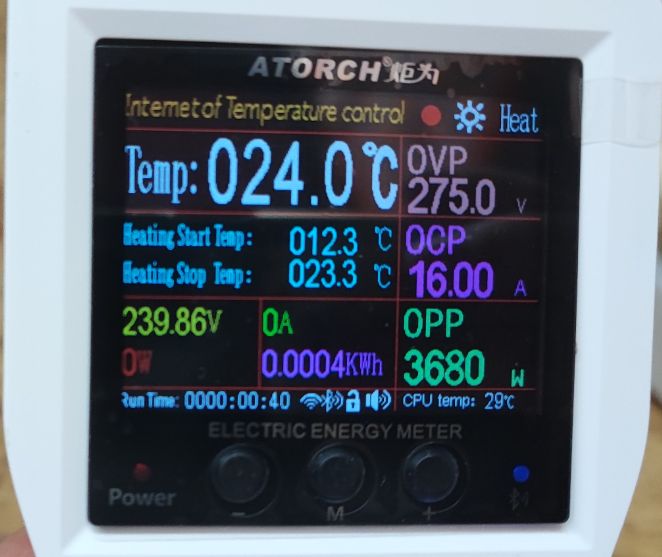
So far, however, the screen is stuck on startup:
 .
.
Let's write the first, minimal autoexec.bat needed for the screen to respond. You need to run the TuyaMCU driver and force WiFi state 0x04 (we simulate connecting to the cloud this way):
startDriver TuyaMCU

tuyaMCU_defWiFiState 4
Result:
 .
.
Now it is time to read the voltage, current and power. Thanks to the UART packet capture performed earlier, we know under which dpID these values are hidden.
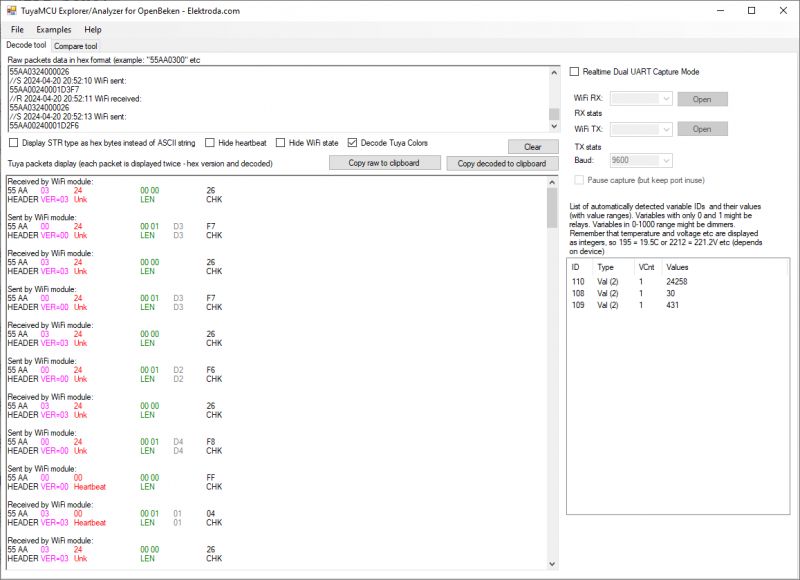 .
.
We enter these into our script and map the dpID to the channels.
startDriver TuyaMCU

tuyaMCU_defWiFiState 4

// channel types
setChannelType 2 Voltage_div100
setChannelType 3 Current_div1000
setChannelType 4 Power_div10

// linkTuyaMCUOutputToChannel dpId verType tgChannel
// voltage
linkTuyaMCUOutputToChannel 110 val 2
// current
linkTuyaMCUOutputToChannel 108 val 3
// power
linkTuyaMCUOutputToChannel 109 val 4


// NOTE: test code only so I can refresh quickly without restarting
tuyaMcu_sendQueryState
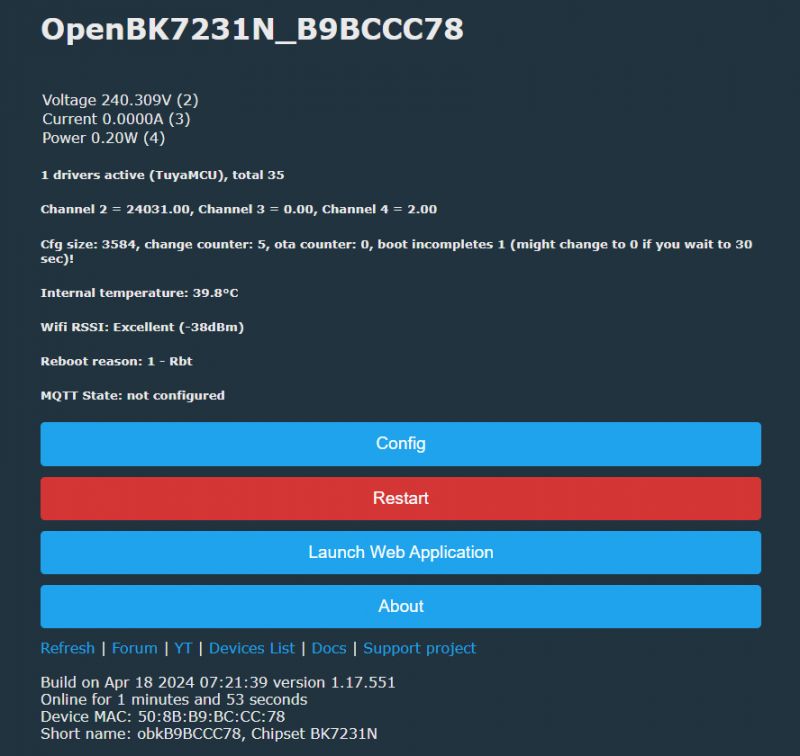
In addition, I added a one-time tuyaMcu_sendQueryState to the script in order to get the measurements faster. This is a prompt call for TuyaMCU to share its state with us.
Here is the result - it looks ok, although I guess the power needs improvement?
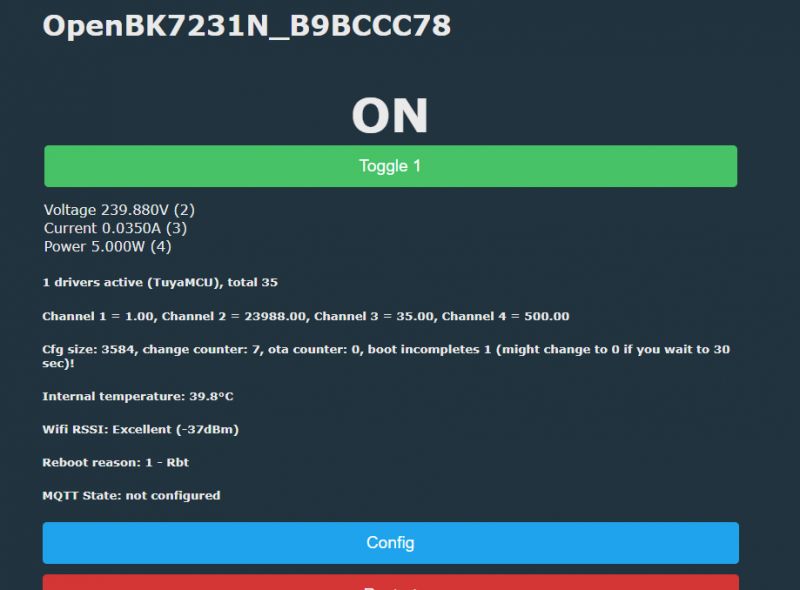
Now it's time to add the relay control. We will define a toggle channel (on/off) for the relay and also map the dpID accordingly. By the way, I corrected the power divider, as I made a mistake in it by one zero.
startDriver TuyaMCU

tuyaMCU_defWiFiState 4

// channel types
setChannelType 1 Toggle
setChannelType 2 Voltage_div100
setChannelType 3 Current_div1000
setChannelType 4 Power_div100

// linkTuyaMCUOutputToChannel dpId verType tgChannel
// toggle
linkTuyaMCUOutputToChannel 103 bool 1
// voltage
linkTuyaMCUOutputToChannel 110 val 2
// current
linkTuyaMCUOutputToChannel 108 val 3
// power
linkTuyaMCUOutputToChannel 109 val 4


// NOTE: test code only so I can refresh quickly without restarting
tuyaMcu_sendQueryState
Here is the result after running the above script:
 .
.
However, we are still missing the current time displayed on the device screen. For this, simply enable NTP on OpenBeken, the rest will take place automatically.
startDriver NTP
Now the time on the TuyaMCU is correct.
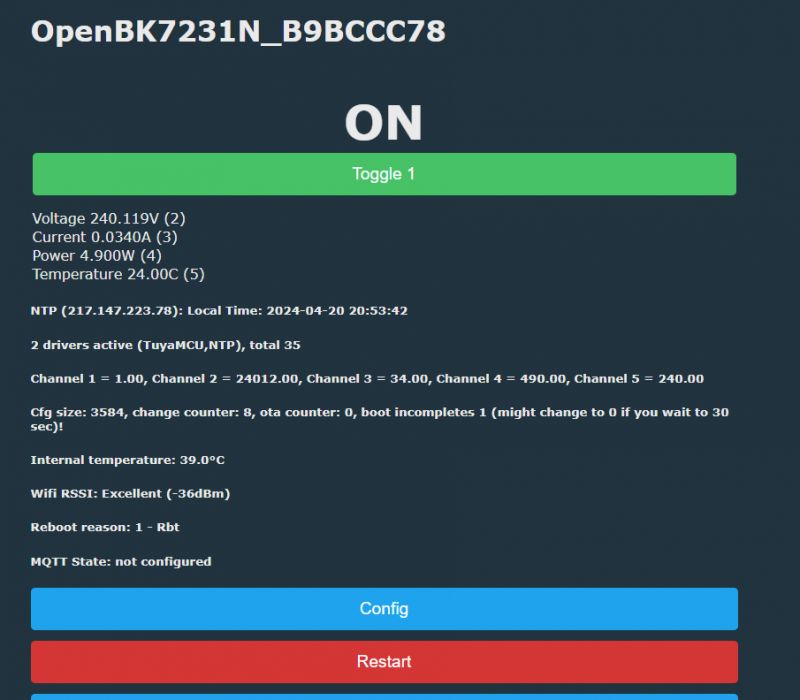
Similarly, we can now read the temperature measurements. We already know the dpIDs for the temperature from our analysis. Here, the temperature value is also sent as an integer after having been previously multiplied by 10.
startDriver TuyaMCU
startDriver NTP

tuyaMCU_defWiFiState 4

// channel types
setChannelType 1 Toggle
setChannelType 2 Voltage_div100
setChannelType 3 Current_div1000
setChannelType 4 Power_div100
setChannelType 5 Temperature_div10

// linkTuyaMCUOutputToChannel dpId verType tgChannel
// toggle
linkTuyaMCUOutputToChannel 103 bool 1
// voltage
linkTuyaMCUOutputToChannel 110 val 2
// current
linkTuyaMCUOutputToChannel 108 val 3
// power
linkTuyaMCUOutputToChannel 109 val 4
// temperature
linkTuyaMCUOutputToChannel 102 val 5


// NOTE: test code only so I can refresh quickly without restarting
tuyaMcu_sendQueryState
Here is the result, the temperature on the OBK panel:
 .
.
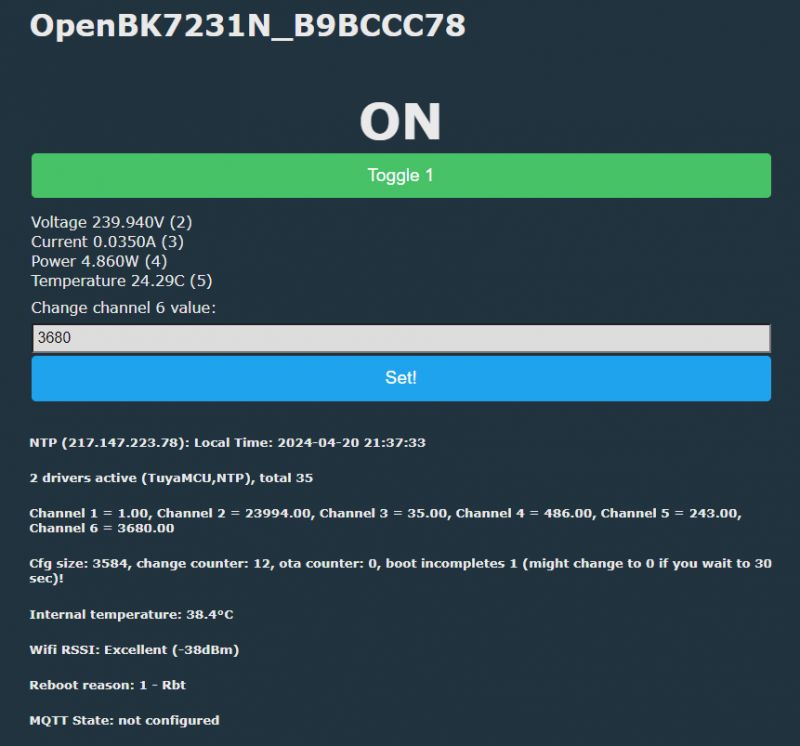
Similarly, we add the other variables. In the case of variables for the configuration, we have a TextField type, where any number can be entered, also as a change of value on the MCU. For example, the OPP Limit can be handled in this way:
startDriver TuyaMCU
startDriver NTP

tuyaMCU_defWiFiState 4

// channel types
setChannelType 1 Toggle
setChannelType 2 Voltage_div100
setChannelType 3 Current_div1000
setChannelType 4 Power_div100
setChannelType 5 Temperature_div10
setChannelType 6 TextField
setChannelType 6 OPP


// linkTuyaMCUOutputToChannel dpId verType tgChannel
// toggle
linkTuyaMCUOutputToChannel 103 bool 1
// voltage
linkTuyaMCUOutputToChannel 110 val 2
// current
linkTuyaMCUOutputToChannel 108 val 3
// power
linkTuyaMCUOutputToChannel 109 val 4
// temperature
linkTuyaMCUOutputToChannel 102 val 5
// OPP max power (limit)
linkTuyaMCUOutputToChannel 115 val 6


// NOTE: test code only so I can refresh quickly without restarting
tuyaMcu_sendQueryState
In this case the communication works both ways, we can also enter a different value here ourselves and change the maximum power value.
 .
.
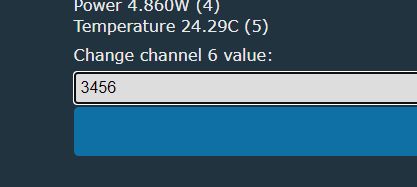
Once entered, the device responds correctly:
 .
.
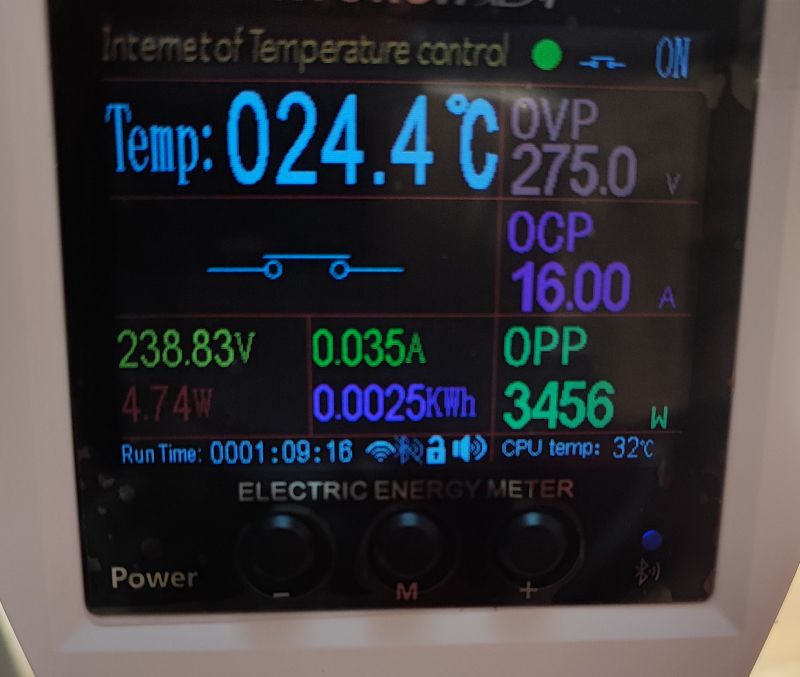
The new value is on the display:
 .
.
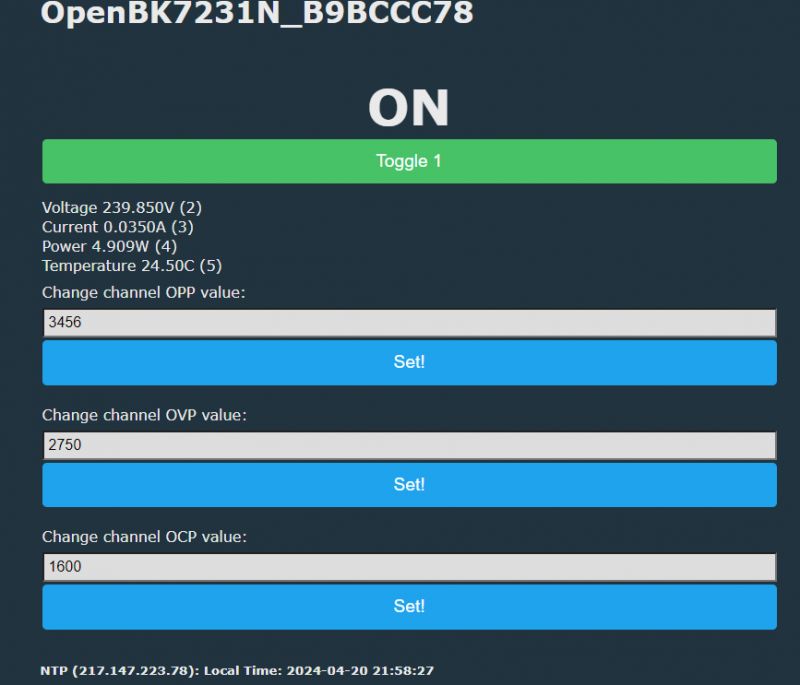
An analogy can be made for OVP and OCP:
startDriver TuyaMCU
startDriver NTP

tuyaMCU_defWiFiState 4

// channel types
setChannelType 1 Toggle
setChannelType 2 Voltage_div100
setChannelType 3 Current_div1000
setChannelType 4 Power_div100
setChannelType 5 Temperature_div10
setChannelType 6 TextField
setChannelLabel 6 OPP
setChannelType 7 TextField
setChannelLabel 7 OVP
setChannelType 8 TextField
setChannelLabel  8 OCP


// linkTuyaMCUOutputToChannel dpId verType tgChannel
// toggle
linkTuyaMCUOutputToChannel 103 bool 1
// voltage
linkTuyaMCUOutputToChannel 110 val 2
// current
linkTuyaMCUOutputToChannel 108 val 3
// power
linkTuyaMCUOutputToChannel 109 val 4
// temperature
linkTuyaMCUOutputToChannel 102 val 5
// OPP max power (limit)
linkTuyaMCUOutputToChannel 115 val 6
// OVP
linkTuyaMCUOutputToChannel 113 val 7
// OCP
linkTuyaMCUOutputToChannel 114 val 8


// NOTE: test code only so I can refresh quickly without restarting
tuyaMcu_sendQueryState
Here are the new text fields:
 .
.
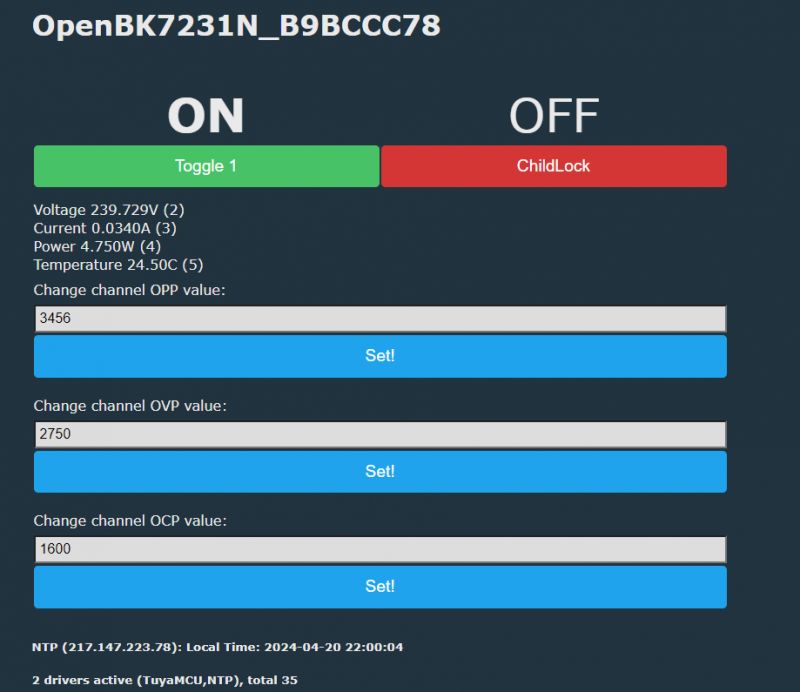
The child lock function, which is to protect the panel from the child, is in turn specified by a boolean type variable, so a toggle is useful here too, just like for the relay:
startDriver TuyaMCU
startDriver NTP

tuyaMCU_defWiFiState 4

// channel types
setChannelType 1 Toggle
setChannelType 2 Voltage_div100
setChannelType 3 Current_div1000
setChannelType 4 Power_div100
setChannelType 5 Temperature_div10
setChannelType 6 TextField
setChannelLabel 6 OPP
setChannelType 7 TextField
setChannelLabel 7 OVP
setChannelType 8 TextField
setChannelLabel  8 OCP
setChannelType 9 Toggle
setChannelLabel 9 ChildLock


// linkTuyaMCUOutputToChannel dpId verType tgChannel
// toggle
linkTuyaMCUOutputToChannel 103 bool 1
// voltage
linkTuyaMCUOutputToChannel 110 val 2
// current
linkTuyaMCUOutputToChannel 108 val 3
// power
linkTuyaMCUOutputToChannel 109 val 4
// temperature
linkTuyaMCUOutputToChannel 102 val 5
// OPP max power (limit)
linkTuyaMCUOutputToChannel 115 val 6
// OVP
linkTuyaMCUOutputToChannel 113 val 7
// OCP
linkTuyaMCUOutputToChannel 114 val 8
// child lock
linkTuyaMCUOutputToChannel 116 bool 9


// NOTE: test code only so I can refresh quickly without restarting
tuyaMcu_sendQueryState
This allows us to control the child lock function. When changed on the OBK panel, the padlock on the device screen also changes:
 .
.
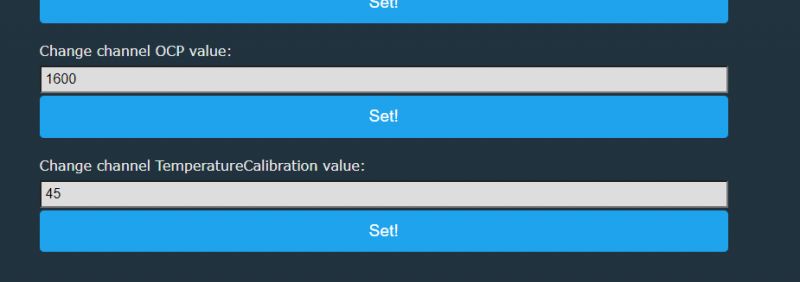
This device offers temperature calibration on the side of the MCU itself. This is also where the text box comes in handy:
startDriver TuyaMCU
startDriver NTP

tuyaMCU_defWiFiState 4

// channel types
setChannelType 1 Toggle
setChannelType 2 Voltage_div100
setChannelType 3 Current_div1000
setChannelType 4 Power_div100
setChannelType 5 Temperature_div10
setChannelType 6 TextField
setChannelLabel 6 OPP
setChannelType 7 TextField
setChannelLabel 7 OVP
setChannelType 8 TextField
setChannelLabel  8 OCP
setChannelType 9 Toggle
setChannelLabel 9 ChildLock
setChannelType 10 TextField
setChannelLabel 10 TemperatureCalibration


// linkTuyaMCUOutputToChannel dpId verType tgChannel
// toggle
linkTuyaMCUOutputToChannel 103 bool 1
// voltage
linkTuyaMCUOutputToChannel 110 val 2
// current
linkTuyaMCUOutputToChannel 108 val 3
// power
linkTuyaMCUOutputToChannel 109 val 4
// temperature
linkTuyaMCUOutputToChannel 102 val 5
// OPP max power (limit)
linkTuyaMCUOutputToChannel 115 val 6
// OVP
linkTuyaMCUOutputToChannel 113 val 7
// OCP
linkTuyaMCUOutputToChannel 114 val 8
// child lock
linkTuyaMCUOutputToChannel 116 bool 9
// temperature calibration
linkTuyaMCUOutputToChannel 117 val 10


// NOTE: test code only so I can refresh quickly without restarting
tuyaMcu_sendQueryState
Result:
 .
.
It is worth remembering that a simple text field does not multiply, so the 45 entered is 4.5°C.
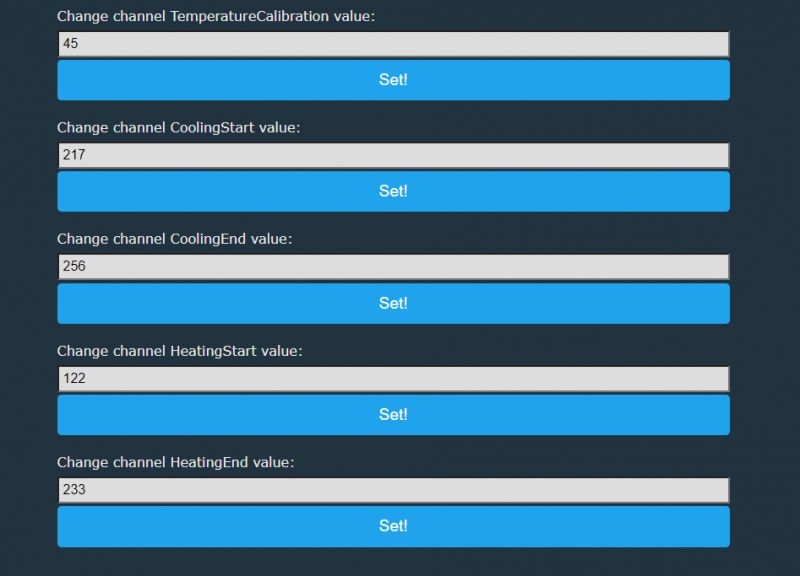
Similarly, you can add fields for thermostat settings, i.e. heating start, heating end, cooling start, cooling end fields.
startDriver TuyaMCU
startDriver NTP

tuyaMCU_defWiFiState 4

// channel types
setChannelType 1 Toggle
setChannelType 2 Voltage_div100
setChannelType 3 Current_div1000
setChannelType 4 Power_div100
setChannelType 5 Temperature_div10
setChannelType 6 TextField
setChannelLabel 6 OPP
setChannelType 7 TextField
setChannelLabel 7 OVP
setChannelType 8 TextField
setChannelLabel  8 OCP
setChannelType 9 Toggle
setChannelLabel 9 ChildLock
setChannelType 10 TextField
setChannelLabel 10 TemperatureCalibration
setChannelType 11 TextField
setChannelLabel 11 CoolingStart
setChannelType 12 TextField
setChannelLabel 12 CoolingEnd
setChannelType 13 TextField
setChannelLabel 13 HeatingStart
setChannelType 14 TextField
setChannelLabel 14 HeatingEnd


// linkTuyaMCUOutputToChannel dpId verType tgChannel
// toggle
linkTuyaMCUOutputToChannel 103 bool 1
// voltage
linkTuyaMCUOutputToChannel 110 val 2
// current
linkTuyaMCUOutputToChannel 108 val 3
// power
linkTuyaMCUOutputToChannel 109 val 4
// temperature
linkTuyaMCUOutputToChannel 102 val 5
// OPP max power (limit)
linkTuyaMCUOutputToChannel 115 val 6
// OVP
linkTuyaMCUOutputToChannel 113 val 7
// OCP
linkTuyaMCUOutputToChannel 114 val 8
// child lock
linkTuyaMCUOutputToChannel 116 bool 9
// temperature calibration
linkTuyaMCUOutputToChannel 117 val 10
// CoolingStart
linkTuyaMCUOutputToChannel 105 val 11
// CoolingEnd
linkTuyaMCUOutputToChannel 107 val 12
// HeatingStart
linkTuyaMCUOutputToChannel 104 val 13
// HeatingEnd
linkTuyaMCUOutputToChannel 106 val 14


// NOTE: test code only so I can refresh quickly without restarting
tuyaMcu_sendQueryState
Additional fields on the web panel.
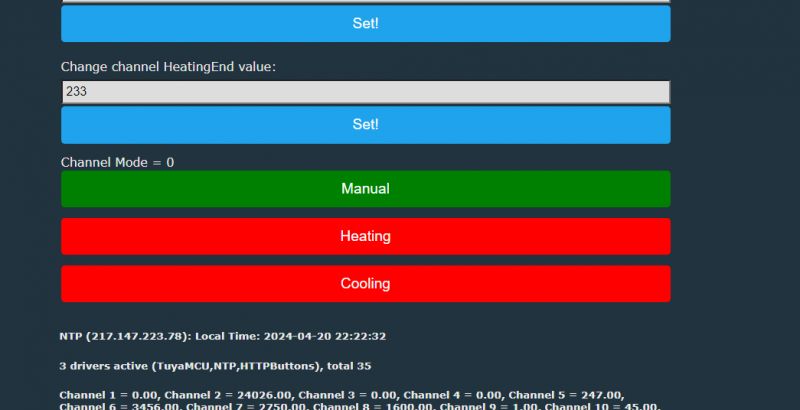
The choice of operating mode (normal, heating, cooling) is determined for us by a variable of type enum. You will have to do a bit of fiddling to display it. Of course, it could be displayed as a number, but what for? Better to add separate buttons with nice captions. To do this, we'll use the HTTPButtons driver and add a listen for changes to the channel selected for that mode (addChangeHandler) so that we can manipulate the button colours accordingly and show them which mode is on:
startDriver TuyaMCU
startDriver NTP

tuyaMCU_defWiFiState 4

// channel types
setChannelType 1 Toggle
setChannelType 2 Voltage_div100
setChannelType 3 Current_div1000
setChannelType 4 Power_div100
setChannelType 5 Temperature_div10
setChannelType 6 TextField
setChannelLabel 6 OPP
setChannelType 7 TextField
setChannelLabel 7 OVP
setChannelType 8 TextField
setChannelLabel  8 OCP
setChannelType 9 Toggle
setChannelLabel 9 ChildLock
setChannelType 10 TextField
setChannelLabel 10 TemperatureCalibration
setChannelType 11 TextField
setChannelLabel 11 CoolingStart
setChannelType 12 TextField
setChannelLabel 12 CoolingEnd
setChannelType 13 TextField
setChannelLabel 13 HeatingStart
setChannelType 14 TextField
setChannelLabel 14 HeatingEnd


setChannelType 15 ReadOnly
setChannelLabel 15 Mode

// linkTuyaMCUOutputToChannel dpId verType tgChannel
// toggle
linkTuyaMCUOutputToChannel 103 bool 1
// voltage
linkTuyaMCUOutputToChannel 110 val 2
// current
linkTuyaMCUOutputToChannel 108 val 3
// power
linkTuyaMCUOutputToChannel 109 val 4
// temperature
linkTuyaMCUOutputToChannel 102 val 5
// OPP max power (limit)
linkTuyaMCUOutputToChannel 115 val 6
// OVP
linkTuyaMCUOutputToChannel 113 val 7
// OCP
linkTuyaMCUOutputToChannel 114 val 8
// child lock
linkTuyaMCUOutputToChannel 116 bool 9
// temperature calibration
linkTuyaMCUOutputToChannel 117 val 10
// CoolingStart
linkTuyaMCUOutputToChannel 105 val 11
// CoolingEnd
linkTuyaMCUOutputToChannel 107 val 12
// HeatingStart
linkTuyaMCUOutputToChannel 104 val 13
// HeatingEnd
linkTuyaMCUOutputToChannel 106 val 14
// mode
/// 0 is manual
// 1 is heating
// 2 is cooling
linkTuyaMCUOutputToChannel 101 val 15

startDriver HTTPButtons
setButtonEnabled 0 1
setButtonEnabled 1 1
setButtonEnabled 2 1
setButtonLabel 0 Manual
setButtonLabel 1 Heating
setButtonLabel 2 Cooling
setButtonCommand 0 "setChannel 15 0"
setButtonCommand 1 "setChannel 15 1"
setButtonCommand 2 "setChannel 15 2"
alias clear_buttons backlog setButtonColor 0 red;setButtonColor 1 red;setButtonColor 2 red
clear_buttons

addChangeHandler Channel15 == 0 backlog clear_buttons ; setButtonColor 0 green
addChangeHandler Channel15 == 1 backlog clear_buttons ; setButtonColor 1 green
addChangeHandler Channel15 == 2 backlog clear_buttons ; setButtonColor 2 green

// NOTE: test code only so I can refresh quickly without restarting
tuyaMcu_sendQueryState
Here is the result on the OBK panel:
 .
.
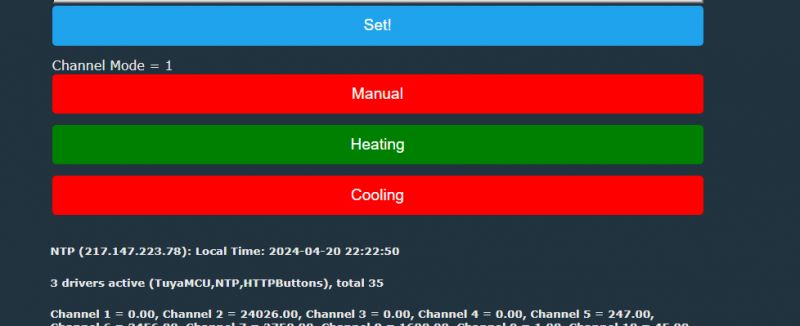
The buttons are visually appealing and responsive:
 .
.
Interestingly, when I set, for example, Heating, and then change the relay status at the very top of the OBK page, the unit itself returns to Manual. Everything works!
Summary .
That's it for now. I think I've managed to get the vast majority of the functionality of this device working, even the mode selection and thermostat works, all without the cloud. The device configured in this way can also be connected to Home Assistant, with this particular version the automatic Discovery at the moment not yet discovering the buttons with HTTPButtons, but this should be corrected soon. Feel free to comment, and if anyone has a similar device and wants to convert it to work locally, I'm happy to help.
Support materials:
https://github.com/openshwprojects/OpenBK7231T_App
https://github.com/openshwprojects/BK7231GUIFlashTool
https://github.com/openshwprojects/OpenBK7231T_App/blob/main/docs/autoexecExamples.md
Cool? Ranking DIY Helpful post? Buy me a coffee.


